

Hydrogen Peroxide Grout Cleaning: Is your grout looking less than stellar? Are you tired of dingy, stained lines ruining the look of your beautiful tile? I know I have been there! Before you resign yourself to hours of back-breaking scrubbing or expensive professional cleaning, let me let you in on a little secret: hydrogen peroxide.
For generations, homeowners have sought effective and affordable ways to maintain their homes. While the specific methods have evolved, the desire for sparkling clean surfaces has remained constant. From using natural ingredients like vinegar and baking soda to harnessing the power of modern solutions like hydrogen peroxide, the quest for a pristine home is a timeless pursuit.
But why hydrogen peroxide grout cleaning? Well, grout is notoriously porous, making it a magnet for dirt, grime, and mildew. Traditional cleaners often fall short, leaving you with frustratingly persistent stains. This DIY trick offers a powerful, yet gentle, alternative. It’s a fantastic way to brighten your grout, kill mold and bacteria, and restore your tile to its former glory – all without harsh chemicals or breaking the bank. I’m going to show you exactly how to use this common household item to achieve professional-looking results. Get ready to say goodbye to dingy grout and hello to a sparkling clean home!
DIY Grout Cleaning with Hydrogen Peroxide: A Sparkling Solution!
Hey there, fellow DIY enthusiasts! Are you tired of staring at dingy, stained grout lines that seem impossible to clean? I know the feeling! I’ve battled grimy grout for years, trying countless cleaners with disappointing results. But guess what? I’ve discovered a simple, effective, and surprisingly affordable solution: hydrogen peroxide!
That’s right, the same stuff you use to disinfect cuts can work wonders on your grout. It’s a natural bleaching agent, meaning it can lift stains and brighten your grout without harsh chemicals. Plus, it’s readily available at most drugstores and supermarkets.
In this article, I’m going to walk you through my tried-and-true method for cleaning grout with hydrogen peroxide. Get ready to say goodbye to those stubborn stains and hello to sparkling clean grout!
What You’ll Need
Before we dive in, let’s gather our supplies. This is a pretty straightforward project, so you won’t need a ton of fancy equipment.
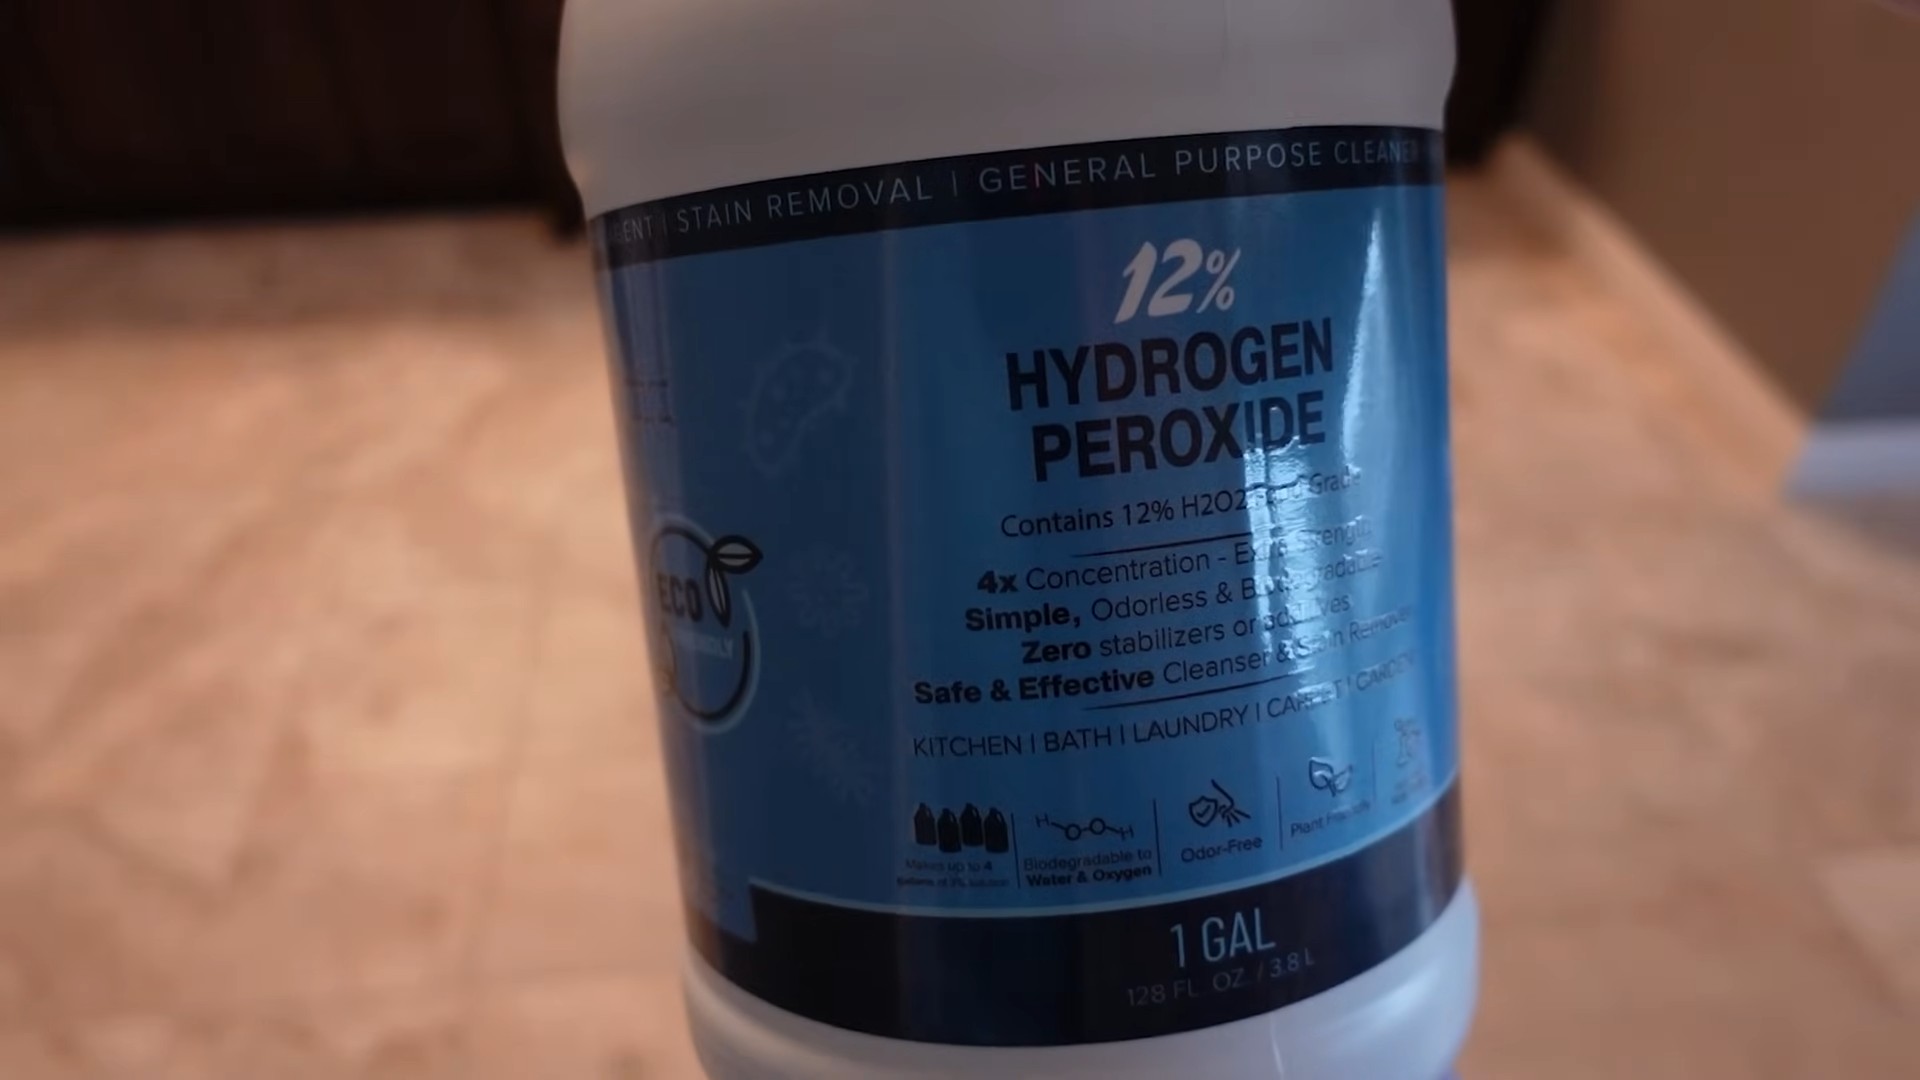
* **Hydrogen Peroxide (3% solution):** This is the standard concentration you’ll find in most stores. Don’t use anything stronger without diluting it properly, as it could damage your grout or tiles.
* **Spray Bottle:** A clean spray bottle is essential for applying the hydrogen peroxide evenly.
* **Old Toothbrush or Grout Brush:** An old toothbrush works great for scrubbing grout lines, but a specialized grout brush will make the job even easier.
* **Clean Cloth or Sponge:** For wiping away the hydrogen peroxide and any loosened dirt.
* **Warm Water:** For rinsing.
* **Optional: Baking Soda:** For extra stubborn stains, baking soda can be combined with hydrogen peroxide to create a powerful cleaning paste.
* **Optional: Gloves:** While hydrogen peroxide is generally safe, wearing gloves will protect your hands from potential irritation, especially if you have sensitive skin.
* **Optional: Eye Protection:** Although unlikely, splashes can happen. Eye protection is always a good idea when working with cleaning solutions.
Preparing for the Grout Cleaning Process
Before you start spraying and scrubbing, it’s important to prep the area. This will help the hydrogen peroxide work more effectively and prevent any accidental damage.
1. **Ventilate the Area:** Open windows and doors to ensure good ventilation. While hydrogen peroxide is relatively safe, it’s always best to work in a well-ventilated space.
2. **Remove Loose Debris:** Sweep or vacuum the area to remove any loose dirt, dust, or debris. This will prevent you from just pushing the dirt around while you’re scrubbing.
3. **Test in an Inconspicuous Area:** Before applying hydrogen peroxide to the entire area, test it on a small, hidden section of grout to make sure it doesn’t discolor or damage your tiles. Apply a small amount of hydrogen peroxide, let it sit for a few minutes, and then wipe it away. If everything looks good, you can proceed with the rest of the project.
Cleaning Grout with Hydrogen Peroxide: Step-by-Step
Now for the fun part! Follow these steps to clean your grout with hydrogen peroxide and achieve sparkling results.
1. **Fill the Spray Bottle:** Pour the 3% hydrogen peroxide into your clean spray bottle.
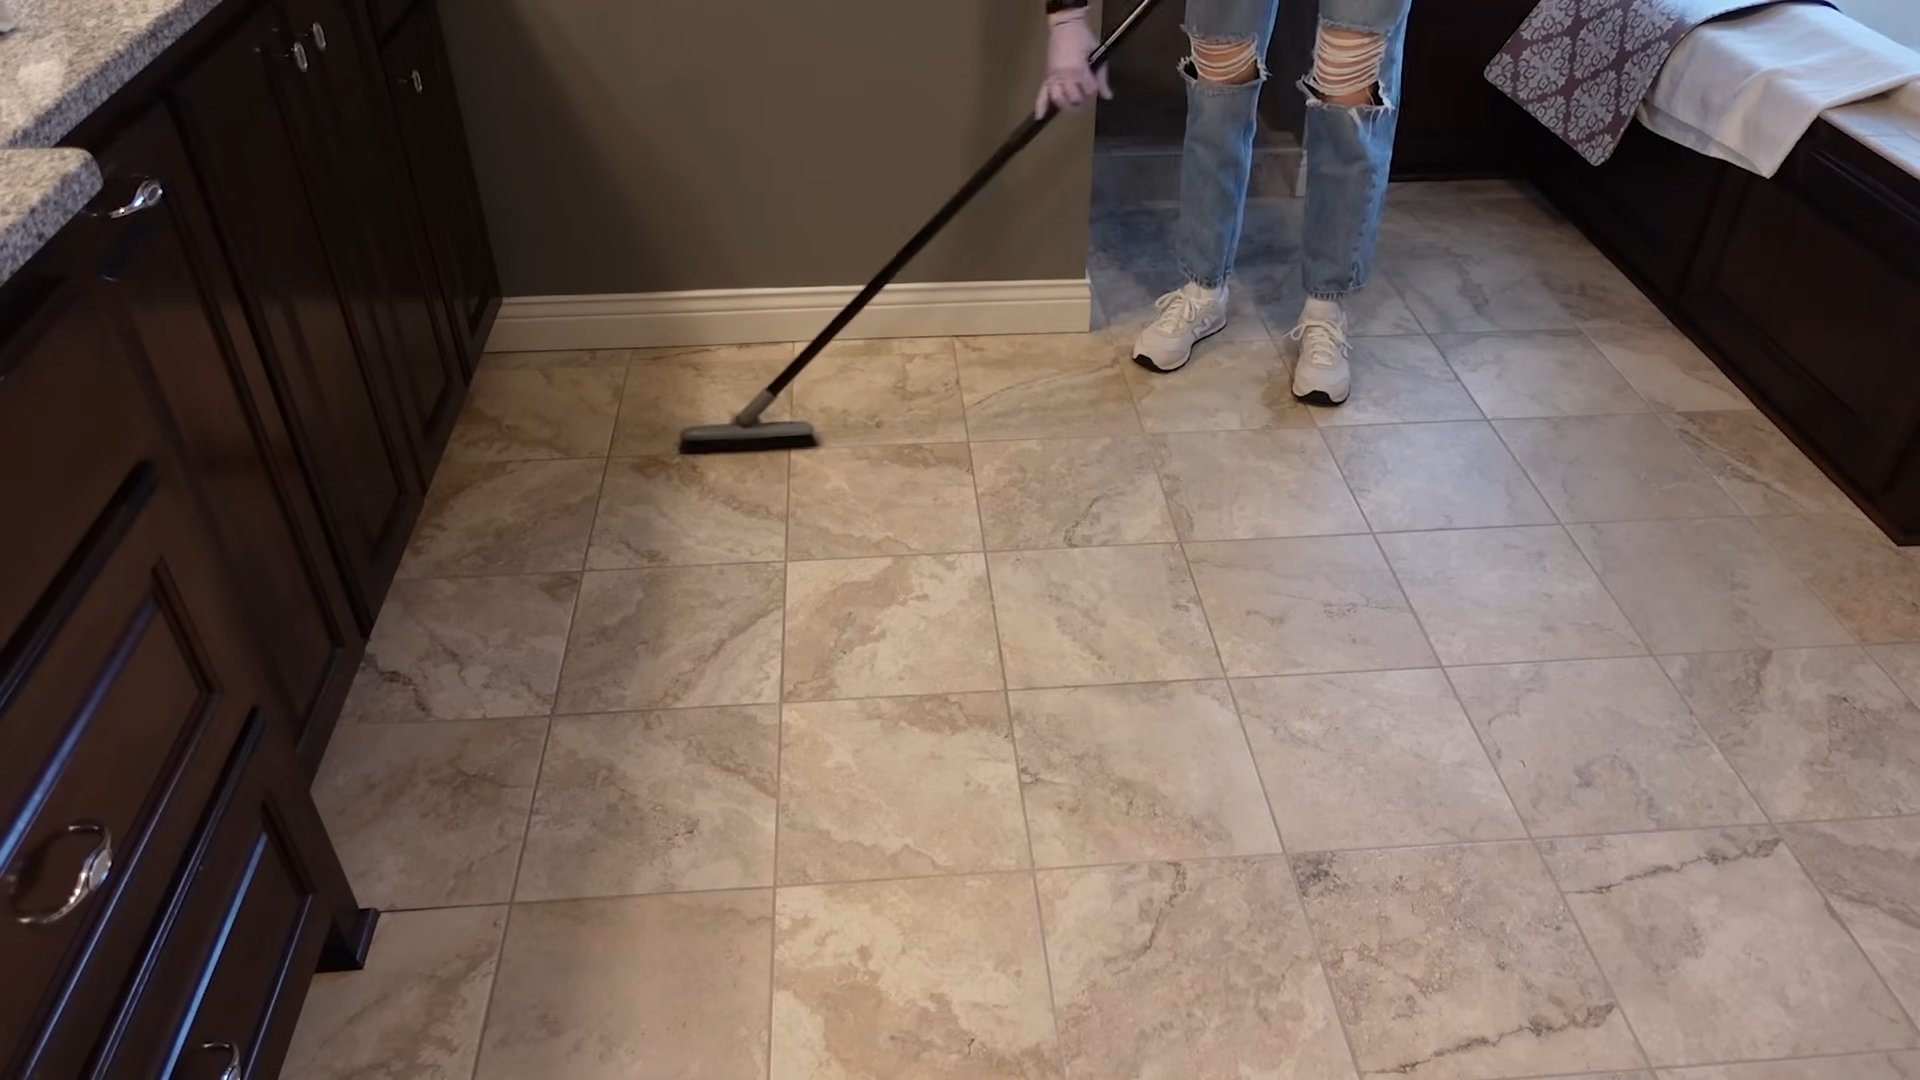
2. **Spray the Grout Lines:** Generously spray the hydrogen peroxide directly onto the grout lines. Make sure to saturate the grout, but avoid spraying excessively onto the tiles themselves.
3. **Let it Sit:** Allow the hydrogen peroxide to sit on the grout for at least 10-15 minutes. This gives it time to penetrate the stains and break down the dirt and grime. For heavily stained grout, you can let it sit for up to 30 minutes.
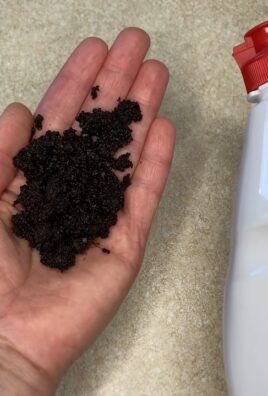
4. **Scrub the Grout:** Using your old toothbrush or grout brush, scrub the grout lines in a back-and-forth motion. Apply firm pressure, but be careful not to damage the grout or tiles. You’ll likely see the dirt and grime start to loosen and lift.
5. **Wipe Away the Residue:** After scrubbing, use a clean cloth or sponge to wipe away the hydrogen peroxide and any loosened dirt. Rinse the cloth or sponge frequently with warm water.
6. **Rinse Thoroughly:** Once you’ve wiped away all the residue, rinse the area thoroughly with warm water. This will remove any remaining hydrogen peroxide and prevent it from leaving a sticky residue.
7. **Dry the Area:** Use a clean towel to dry the area completely. This will help prevent water spots and mildew growth.
8. **Repeat if Necessary:** For stubborn stains, you may need to repeat the process. Don’t be discouraged if the grout doesn’t look perfect after the first try. Sometimes it takes a few applications to achieve the desired results.
Tackling Stubborn Stains with a Baking Soda Paste
Sometimes, hydrogen peroxide alone isn’t enough to tackle those really tough stains. That’s where baking soda comes in! Baking soda is a mild abrasive that can help scrub away stubborn dirt and grime.
1. **Make a Paste:** In a small bowl, mix together baking soda and hydrogen peroxide to form a thick paste. The consistency should be similar to toothpaste.
2. **Apply the Paste:** Apply the paste directly to the stained grout lines.
3. **Let it Sit:** Allow the paste to sit on the grout for at least 5-10 minutes. For heavily stained grout, you can let it sit for up to 30 minutes.
4. **Scrub the Grout:** Using your old toothbrush or grout brush, scrub the grout lines in a back-and-forth motion. The baking soda will provide extra scrubbing power to help remove the stains.
5. **Wipe Away the Residue:** Use a clean cloth or sponge to wipe away the paste and any loosened dirt. Rinse the cloth or sponge frequently with warm water.
6. **Rinse Thoroughly:** Rinse the area thoroughly with warm water to remove any remaining baking soda and hydrogen peroxide.
7. **Dry the Area:** Use a clean towel to dry the area completely.
8. **Repeat if Necessary:** If the stains are still visible, repeat the process.
Tips for Maintaining Clean Grout
Once you’ve achieved sparkling clean grout, you’ll want to keep it that way! Here are a few tips for maintaining clean grout and preventing future stains:
* **Wipe Up Spills Immediately:** The sooner you wipe up spills, the less likely they are to stain your grout.
* **Regular Cleaning:** Clean your grout regularly, even if it doesn’t look dirty. A quick wipe-down with a damp cloth or sponge can help prevent dirt and grime from building up.
* **Use a Grout Sealer:** Applying a grout sealer can help protect your grout from stains and make it easier to clean. Follow the manufacturer’s instructions for application.
* **Avoid Harsh Chemicals:** Harsh chemicals can damage your grout and tiles. Stick to gentle cleaning solutions like hydrogen peroxide or baking soda.
* **Ventilate the Area:** Make sure to ventilate the area after cleaning to prevent mildew growth.
Safety Precautions
While hydrogen peroxide is generally safe, it’s important to take a few safety precautions:
* **Avoid Contact with Eyes:** Hydrogen peroxide can irritate your eyes. If it gets in your eyes, rinse them immediately with plenty of water.
* **Wear Gloves:** Wearing gloves will protect your hands from potential irritation.
* **Don’t Mix with Other Cleaners:** Never mix hydrogen peroxide with other cleaners, especially bleach. This can create dangerous fumes.
* **Keep Out of Reach of Children and Pets:** Store hydrogen peroxide in a safe place where children and pets cannot access it.
Troubleshooting
* **Grout Still Looks Dirty:** If your grout still looks dirty after cleaning, try repeating the process or using the baking soda paste. You may also need to use a stronger grout brush or apply more pressure while scrubbing.
* **Grout is Discolored:** If your grout is discolored after cleaning, it may be due to the type of grout you have or the type of stain. In some cases, discoloration may be permanent.
* **Tiles are Damaged:** If your tiles are damaged after cleaning, it may be due to using a harsh cleaning solution or scrubbing too aggressively. Be careful when cleaning delicate tiles.
I hope this guide has been helpful! Cleaning grout with hydrogen peroxide is a simple and effective way to achieve sparkling results. With a little elbow grease and the right supplies, you can say goodbye to those stubborn stains and hello to a cleaner, brighter home. Happy cleaning!
Conclusion
So, there you have it! This simple yet incredibly effective DIY trick using hydrogen peroxide for grout cleaning is a game-changer for anyone battling dingy, stained grout. We’ve walked you through the process, highlighting its ease, affordability, and impressive results. But why is this method a must-try?
Firstly, it’s a fantastic alternative to harsh chemical cleaners. Many commercial grout cleaners contain strong chemicals that can be harmful to your health and the environment. Hydrogen peroxide, on the other hand, is a relatively safe and readily available household item that breaks down into water and oxygen. This makes it a much more eco-friendly and health-conscious choice for tackling stubborn grout stains.
Secondly, the effectiveness of hydrogen peroxide is undeniable. Its oxidizing properties lift dirt, grime, and even mold from porous grout surfaces, restoring them to their former glory. You’ll be amazed at the difference a little bit of bubbling action can make!
Beyond the basic method, there are several variations you can explore to customize this DIY trick to your specific needs. For instance, if you’re dealing with particularly stubborn stains, consider creating a paste by mixing hydrogen peroxide with baking soda. This creates a slightly abrasive cleaner that can help scrub away tough grime. Alternatively, for colored grout, test the hydrogen peroxide in an inconspicuous area first to ensure it doesn’t affect the color. You can also add a few drops of your favorite essential oil, like lemon or tea tree, to the hydrogen peroxide solution for a fresh, clean scent.
This hydrogen peroxide grout cleaning method is not just about cleaning; it’s about reclaiming the beauty of your tiled surfaces and creating a healthier home environment.
We understand that trying a new cleaning method can be daunting, but we urge you to give this DIY trick a try. The results speak for themselves, and we’re confident you’ll be thrilled with the outcome. Don’t let stained grout detract from the overall appearance of your home any longer.
But the real magic happens when you share your experiences! We encourage you to try this hydrogen peroxide grout cleaning method and then come back and tell us all about it. Did you use a variation? Did you find it particularly effective on a specific type of stain? Your insights can help other readers achieve sparkling clean grout and a brighter, more beautiful home. Share your before-and-after photos, your tips, and your questions in the comments section below. Let’s create a community of grout-cleaning enthusiasts!
So, grab your hydrogen peroxide, gather your supplies, and get ready to transform your grout. You won’t regret it!
Frequently Asked Questions (FAQ)
What concentration of hydrogen peroxide should I use for grout cleaning?
The standard 3% hydrogen peroxide solution, commonly found in drugstores and supermarkets, is generally sufficient for grout cleaning. This concentration is effective at lifting dirt and grime without being overly harsh on the grout itself. Higher concentrations, such as 6% or higher, are available but should be used with caution, as they can potentially damage or discolor certain types of grout. Always test in an inconspicuous area first if using a higher concentration. For most household grout cleaning needs, 3% hydrogen peroxide is the ideal choice.
Can I use hydrogen peroxide on all types of grout?
While hydrogen peroxide is generally safe for most types of grout, it’s always a good idea to test it in an inconspicuous area first, especially if you have colored grout. Some colored grouts may be susceptible to fading or discoloration when exposed to hydrogen peroxide. If you notice any adverse effects after testing, discontinue use. For epoxy grout, hydrogen peroxide is generally safe and effective. However, always consult the manufacturer’s recommendations for your specific type of grout to ensure compatibility.
How long should I let the hydrogen peroxide sit on the grout before scrubbing?
Allowing the hydrogen peroxide to sit on the grout for an adequate amount of time is crucial for optimal results. We recommend letting it sit for at least 10-15 minutes. This allows the hydrogen peroxide to penetrate the grout and break down the dirt and grime. For particularly stubborn stains, you can let it sit for up to 30 minutes. Just be sure to keep an eye on it and prevent it from drying out completely. If it starts to dry, you can lightly mist it with more hydrogen peroxide.
What type of brush is best for scrubbing grout after applying hydrogen peroxide?
A stiff-bristled brush is the best choice for scrubbing grout after applying hydrogen peroxide. An old toothbrush works well for small areas and tight corners. For larger areas, a grout brush with a long handle can save you time and effort. Avoid using metal brushes, as they can scratch or damage the grout. When scrubbing, use firm, even pressure to lift the dirt and grime. Rinse the brush frequently to remove any buildup.
How often should I clean my grout with hydrogen peroxide?
The frequency of grout cleaning depends on several factors, including the amount of foot traffic, the type of grout, and the level of dirt and grime buildup. As a general rule, cleaning your grout with hydrogen peroxide every 1-3 months is a good starting point. However, if you notice stains or discoloration appearing more frequently, you may need to clean it more often. Regular cleaning will help prevent the buildup of dirt and grime and keep your grout looking its best.
Is it safe to mix hydrogen peroxide with other cleaning products for grout cleaning?
It is generally not recommended to mix hydrogen peroxide with other cleaning products, especially those containing ammonia or vinegar. Mixing hydrogen peroxide with ammonia can create toxic fumes that are harmful to your health. Mixing it with vinegar can create peracetic acid, which can be irritating to the skin, eyes, and respiratory system. It’s best to use hydrogen peroxide on its own for grout cleaning to avoid any potential hazards.
How do I prevent grout from getting dirty in the first place?
Preventing grout from getting dirty in the first place is the best way to minimize the need for frequent cleaning. Here are a few tips:
* Seal your grout: Applying a grout sealer creates a protective barrier that prevents dirt and grime from penetrating the grout. Reapply the sealer every 6-12 months, or as recommended by the manufacturer.
* Wipe up spills immediately: Promptly wiping up spills prevents them from soaking into the grout and causing stains.
* Use doormats and rugs: Placing doormats and rugs at entrances helps trap dirt and debris before they can be tracked onto your tiled surfaces.
* Ventilate your bathroom: Proper ventilation in your bathroom helps prevent the growth of mold and mildew in the grout.
* Regularly sweep or vacuum: Regularly sweeping or vacuuming your tiled floors removes loose dirt and debris that can contribute to grout staining.
What if the hydrogen peroxide doesn’t remove all the stains?
If hydrogen peroxide alone doesn’t remove all the stains, you can try a few alternative methods. As mentioned earlier, creating a paste of hydrogen peroxide and baking soda can provide a more abrasive cleaning action. You can also try using a commercial grout cleaner specifically designed for stubborn stains. Always follow the manufacturer’s instructions carefully and test in an inconspicuous area first. For extremely stubborn stains, you may need to consider professional grout cleaning services.


Leave a Comment