

Bag Method Gourds at Home: Ever dreamt of a bountiful gourd harvest, bursting with vibrant colors and unique shapes, right in your own backyard? I know I have! But sometimes, getting those gourds to thrive can feel like a real challenge, especially when facing unpredictable weather or pesky pests. That’s where the magic of the bag method comes in!
Growing gourds has a rich history, dating back thousands of years. Ancient civilizations across the globe, from Asia to the Americas, cultivated gourds not just for food, but also for crafting tools, containers, and even musical instruments. Think of the iconic maracas – gourds played a vital role in shaping cultures and traditions. Today, we continue to appreciate gourds for their ornamental beauty and practical uses.
But let’s face it, achieving that picture-perfect gourd patch isn’t always easy. Rotting gourds due to ground contact, insect infestations, and inconsistent moisture levels can quickly dash your gardening dreams. That’s why I’m so excited to share this simple yet incredibly effective DIY trick: the bag method. This technique elevates your gourds, literally and figuratively, protecting them from soil-borne diseases and creating a more favorable environment for healthy growth. With the bag method gourds at home become easier to grow, healthier, and more beautiful. I’m confident that this method will help you achieve the gourd harvest you’ve always wanted!

DIY: Grow Gorgeous Gourds Using the Bag Method!
Hey there, fellow gardening enthusiasts! I’m so excited to share one of my favorite gardening hacks with you: growing gourds using the bag method. It’s a fantastic way to get a head start on the growing season, protect your delicate seedlings from pests and harsh weather, and ultimately, cultivate some truly impressive gourds. Trust me, once you try this, you’ll be hooked!
Why the Bag Method?
Before we dive into the nitty-gritty, let’s talk about why this method is so awesome.
* Early Start: You can start your gourd seeds indoors weeks before the last frost, giving them a significant head start.
* Protection: The bags act as mini-greenhouses, shielding your seedlings from frost, wind, and hungry critters.
* Controlled Environment: You have more control over moisture and temperature, creating the perfect conditions for germination and early growth.
* Easy Transplanting: The bag method minimizes root disturbance during transplanting, leading to healthier, stronger plants.
* Space Saving: If you’re short on space, this method allows you to start a large number of gourds in a relatively small area.
What You’ll Need
Alright, let’s gather our supplies. Here’s what you’ll need to embark on this gourd-growing adventure:
* Gourd Seeds: Choose your favorite gourd varieties! I personally love growing birdhouse gourds and dipper gourds, but the possibilities are endless. Make sure you get your seeds from a reputable source to ensure good germination rates.
* Clear Plastic Bags: Gallon-sized zip-top bags work perfectly. You’ll need one bag per seed.
* Paper Towels: These will provide a moist environment for germination.
* Spray Bottle: Filled with clean water.
* Seed Starting Mix: A lightweight, well-draining mix is essential for healthy seedling growth.
* Small Pots or Containers: For transplanting the sprouted seeds.
* Labels and a Permanent Marker: To keep track of your gourd varieties.
* Warm Location: A sunny windowsill or a heat mat will help speed up germination.
* Optional: Rooting Hormone: This can help encourage root development, but it’s not strictly necessary.
Germinating Your Gourd Seeds: The Bag Method in Action
This is where the magic happens! Follow these steps carefully to ensure successful germination.
1. Prepare the Paper Towels: Take a paper towel and fold it in half, then in half again. You want a small, absorbent pad.
2. Moisten the Paper Towel: Thoroughly dampen the paper towel with water from your spray bottle. It should be moist but not dripping wet. You want it to feel like a wrung-out sponge.
3. Place the Seeds: Carefully place one or two gourd seeds onto the moistened paper towel. Give them a little space between them.
4. Fold and Seal: Fold the paper towel over the seeds to enclose them. Then, gently place the paper towel with the seeds inside a clear plastic bag. Seal the bag, leaving a small opening for air circulation.
5. Label the Bag: Use a permanent marker to label the bag with the gourd variety and the date you started the germination process. This will help you keep track of everything.
6. Find a Warm Spot: Place the bag in a warm location, such as a sunny windowsill or on a heat mat. The ideal temperature for gourd seed germination is between 70-80°F (21-27°C).
7. Monitor Moisture Levels: Check the bags daily to ensure the paper towels remain moist. If they start to dry out, lightly spray them with water.
8. Be Patient: Gourd seeds can take anywhere from 5 to 14 days to germinate, depending on the variety and temperature. Keep an eye out for tiny roots emerging from the seeds.
Transplanting Your Sprouted Seeds
Once your gourd seeds have sprouted and have a small root (about ½ inch long), it’s time to transplant them into pots.
1. Prepare Your Pots: Fill your small pots or containers with seed starting mix. Gently water the mix to moisten it.
2. Carefully Remove the Seedlings: Open the plastic bag and carefully unfold the paper towel. Gently remove the sprouted seed from the paper towel, being careful not to damage the delicate roots. If the roots are stuck to the paper towel, you can gently tear the paper towel around the root to minimize disturbance.
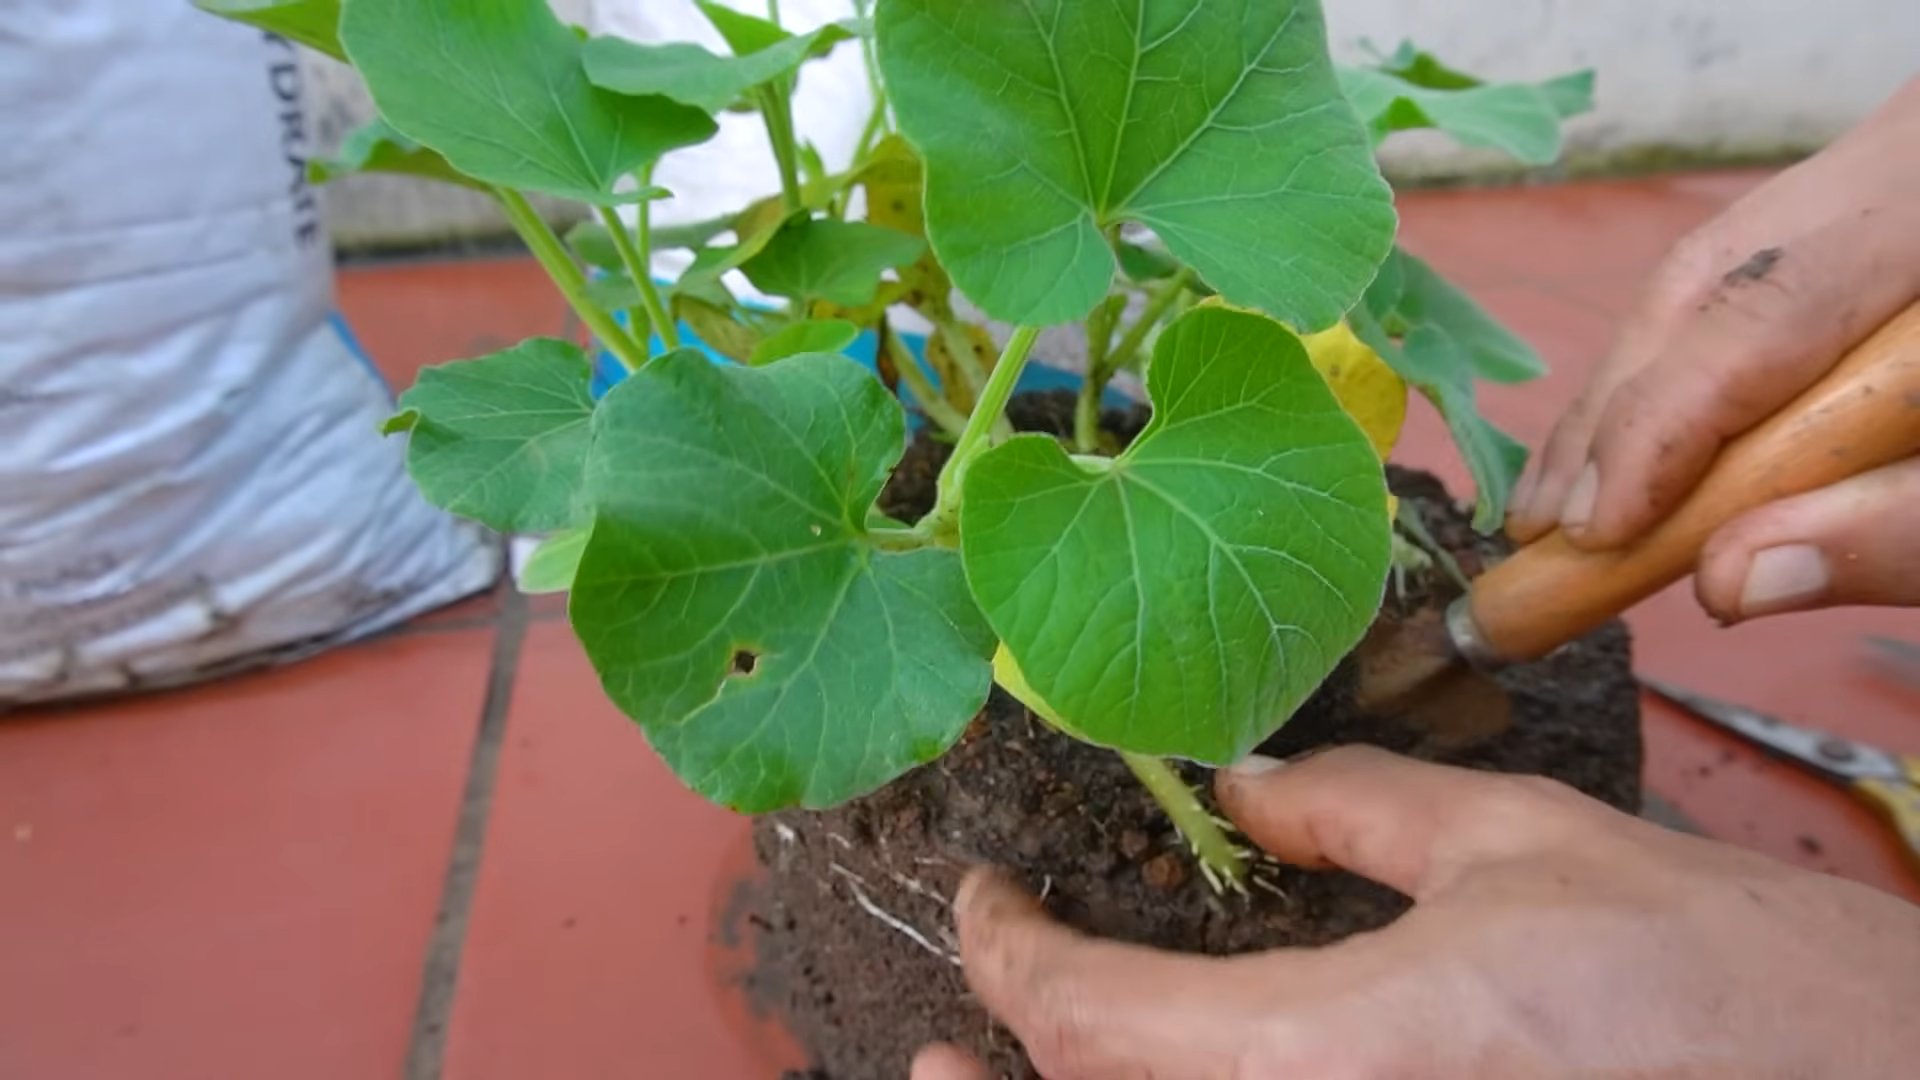
3. Plant the Seedlings: Make a small hole in the center of the soil in each pot. Carefully place the seedling into the hole, ensuring that the roots are pointing downwards. Cover the roots with soil, gently patting it down.
4. Water Gently: Water the newly transplanted seedlings gently to settle the soil.
5. Provide Light: Place the pots in a sunny location or under grow lights. Gourd seedlings need plenty of light to thrive.
6. Monitor and Water: Keep the soil consistently moist, but not waterlogged. Check the soil moisture daily and water when the top inch feels dry.
Hardening Off Your Seedlings
Before transplanting your gourd seedlings outdoors, it’s crucial to harden them off. This process gradually acclimates them to the outdoor environment, reducing the risk of shock.
1. Start Slowly: Begin by placing your seedlings outdoors in a sheltered location for just an hour or two each day. Choose a day with mild weather and no strong winds.
2. Gradually Increase Exposure: Over the next week or two, gradually increase the amount of time your seedlings spend outdoors each day. Also, gradually expose them to more sunlight and wind.
3. Monitor for Stress: Keep a close eye on your seedlings for signs of stress, such as wilting or leaf burn. If you notice any stress, bring them back indoors or provide shade.
4. Ready to Transplant: Once your seedlings have been hardened off for a week or two and the danger of frost has passed, they’re ready to be transplanted into your garden.
Transplanting to the Garden
Now for the final step: getting those gourds into their permanent home!
1. Choose a Sunny Location: Gourds need at least 6-8 hours of sunlight per day. Choose a location in your garden that receives plenty of sunshine.
2. Prepare the Soil: Gourds prefer well-drained soil that is rich in organic matter. Amend your soil with compost or well-rotted manure before planting.
3. Space Your Plants: Give your gourd plants plenty of space to grow. Depending on the variety, you’ll need to space them 2-4 feet apart.
4. Dig the Holes: Dig holes that are slightly larger than the pots your seedlings are in.
5. Gently Remove the Seedlings: Carefully remove the seedlings from their pots, being careful not to damage the roots.
6. Plant the Seedlings: Place the seedlings into the holes and backfill with soil. Gently pat the soil down around the base of the plants.
7. Water Thoroughly: Water the newly transplanted seedlings thoroughly to settle the soil.
8. Mulch: Apply a layer of mulch around the base of the plants to help retain moisture and suppress weeds.
9. Provide Support: Many gourd varieties are vining and will need support to climb. Provide a trellis, fence, or other support structure for your gourds to grow on.
Caring for Your Gourd Plants
Once your gourd plants are in the ground, here are a few tips to keep them happy and healthy:
* Water Regularly: Water your gourd plants regularly, especially during dry spells. Aim to keep the soil consistently moist, but not waterlogged.
* Fertilize: Fertilize your gourd plants every few weeks with a balanced fertilizer.
* Pest Control: Keep an eye out for pests, such as squash bugs and vine borers. Take action to control pests as soon as you notice them.
* Pruning: Prune your gourd plants to encourage air circulation and prevent disease. Remove any dead or diseased leaves.
* Pollination: Gourds require pollination to produce fruit. If you’re not seeing any gourds developing, you may need to hand-pollinate the flowers.
Harvesting and Curing Your Gourds
Harvesting and curing are crucial for preserving your gourds and preventing them from rotting.
1. Harvest When Mature: Harvest your gourds when they are fully mature and the stems have dried and turned brown. The skin should be hard and tough.
2. Cut Carefully: Use a sharp knife or pruning shears to cut the gourds from the vine, leaving a few inches of stem attached.
3. Wash and Dry: Wash the gourds with soapy water to remove
Conclusion
So, there you have it! The bag method for growing gourds at home isn’t just a gardening hack; it’s a game-changer. It’s a simple, effective, and surprisingly rewarding way to cultivate these fascinating fruits, even if you’re short on space or experience. We’ve walked you through the process, highlighting the benefits of this technique, from improved germination rates and enhanced moisture control to protection from pests and diseases.
Why is this a must-try? Because it empowers you to take control of your gourd-growing journey. No more relying solely on the whims of nature or battling unpredictable weather patterns. The bag method provides a controlled environment, giving your gourds the best possible start in life. It’s also incredibly satisfying to witness the transformation from tiny seed to thriving seedling, all within the confines of a simple plastic bag.
But the beauty of this method lies in its adaptability. Feel free to experiment with different types of gourds. From the classic birdhouse gourd to the decorative bottle gourd, the possibilities are endless. You can also adjust the size of the bag to accommodate larger varieties or multiple seedlings. Consider adding a small amount of slow-release fertilizer to the soil mix for an extra boost of nutrients. And don’t be afraid to get creative with your support system as the gourds grow larger. Trellises, stakes, or even repurposed materials can all be used to provide the necessary support.
Beyond the practical benefits, growing gourds is a deeply enriching experience. It connects you to the natural world, fosters a sense of accomplishment, and provides you with unique and beautiful creations to decorate your home or share with friends and family. Imagine the joy of crafting your own birdhouses, bowls, or ornaments from gourds you’ve nurtured from seed to harvest.
We wholeheartedly encourage you to give the bag method for growing gourds at home a try. It’s a fun, educational, and ultimately rewarding project that will bring a touch of nature and creativity into your life. Don’t be intimidated by the process; it’s much simpler than it seems. Just follow the steps outlined in this guide, and you’ll be well on your way to a bountiful gourd harvest.
And most importantly, we want to hear about your experience! Share your photos, tips, and stories with us in the comments section below. Let us know what worked well for you, what challenges you encountered, and any variations you tried. Your feedback will not only help us improve this guide but also inspire other gardeners to embark on their own gourd-growing adventures. So, grab your seeds, soil, and bags, and let’s get growing!
Frequently Asked Questions (FAQ)
What type of bag is best for the bag method?
The ideal bag is a clear plastic bag, such as a zip-top freezer bag or a grocery bag. The clarity allows you to monitor the seedling’s progress without opening the bag. The size should be large enough to accommodate the seedling’s initial growth, typically a gallon-sized bag works well. Ensure the bag is clean to prevent the introduction of diseases. Avoid bags with holes, as they will compromise the humidity control. You can also use biodegradable bags, but be aware they may break down faster and require more frequent replacement.
How often should I water the seedlings in the bag?
Initially, you should thoroughly moisten the soil mix before sealing the bag. The bag method creates a humid environment, so the soil will retain moisture for a considerable time. Generally, you shouldn’t need to water again until you see condensation significantly decrease or the soil appears dry. This could be several weeks, depending on the ambient temperature and humidity. When you do water, use a spray bottle to lightly mist the soil, avoiding overwatering. Overwatering can lead to fungal diseases.
What kind of soil should I use for growing gourds in bags?
A well-draining potting mix is crucial. A mix of peat moss, perlite, and vermiculite is a good starting point. You can also add compost for extra nutrients. Avoid using garden soil, as it can be too heavy and may contain pests or diseases. The ideal pH for gourds is between 6.0 and 6.5. You can test the pH of your soil mix using a soil testing kit.
How much light do the seedlings need while in the bag?
Seedlings need bright, indirect light. Avoid placing the bag in direct sunlight, as this can overheat the seedlings and damage them. A location near a sunny window is ideal. If you don’t have access to natural light, you can use a grow light. Position the grow light a few inches above the bag and provide 12-16 hours of light per day.
When should I transplant the seedlings from the bag to a larger container or the garden?
Transplant the seedlings when they have developed several sets of true leaves and are large enough to handle without damaging them. This is typically when they are a few inches tall. Before transplanting, harden off the seedlings by gradually exposing them to outdoor conditions for a week or two. Start by placing them in a sheltered location for a few hours each day, gradually increasing the amount of time they spend outdoors. This will help them acclimate to the temperature and humidity changes.
What are some common problems I might encounter when using the bag method, and how can I fix them?
One common problem is fungal diseases, which can be caused by overwatering or poor ventilation. To prevent fungal diseases, avoid overwatering, ensure the bag is not overcrowded, and provide adequate ventilation by opening the bag for a few hours each day. If you see signs of fungal disease, such as white or gray mold, remove the affected seedlings and treat the remaining seedlings with a fungicide. Another problem is pests, such as aphids or spider mites. Inspect the seedlings regularly for pests and treat them with an insecticidal soap or neem oil if necessary.
Can I use this method for other types of plants besides gourds?
Yes, the bag method can be used for a variety of plants, including vegetables, herbs, and flowers. It’s particularly useful for plants that require high humidity for germination, such as tomatoes, peppers, and eggplants. However, you may need to adjust the size of the bag and the type of soil mix depending on the specific needs of the plant.
How do I prevent the bag from collapsing on the seedlings?
To prevent the bag from collapsing, you can insert a few small sticks or straws into the soil to provide support. You can also partially inflate the bag before sealing it to create a cushion of air. Another option is to use a rigid container inside the bag to provide structural support.
What do I do if condensation builds up excessively inside the bag?
Excessive condensation can lead to fungal diseases. If you notice a lot of condensation, open the bag for a few hours each day to allow the moisture to evaporate. You can also use a paper towel to gently wipe down the inside of the bag. Ensure the bag is not in a location with high humidity.
How long does it take for gourds to germinate using the bag method?
Germination time varies depending on the type of gourd and the temperature. Generally, gourds will germinate within 7-14 days using the bag method. Soaking the seeds in water for 24 hours before planting can help speed up the germination process. Maintaining a consistent temperature of around 70-80°F (21-27°C) will also promote germination.
Leave a Comment