

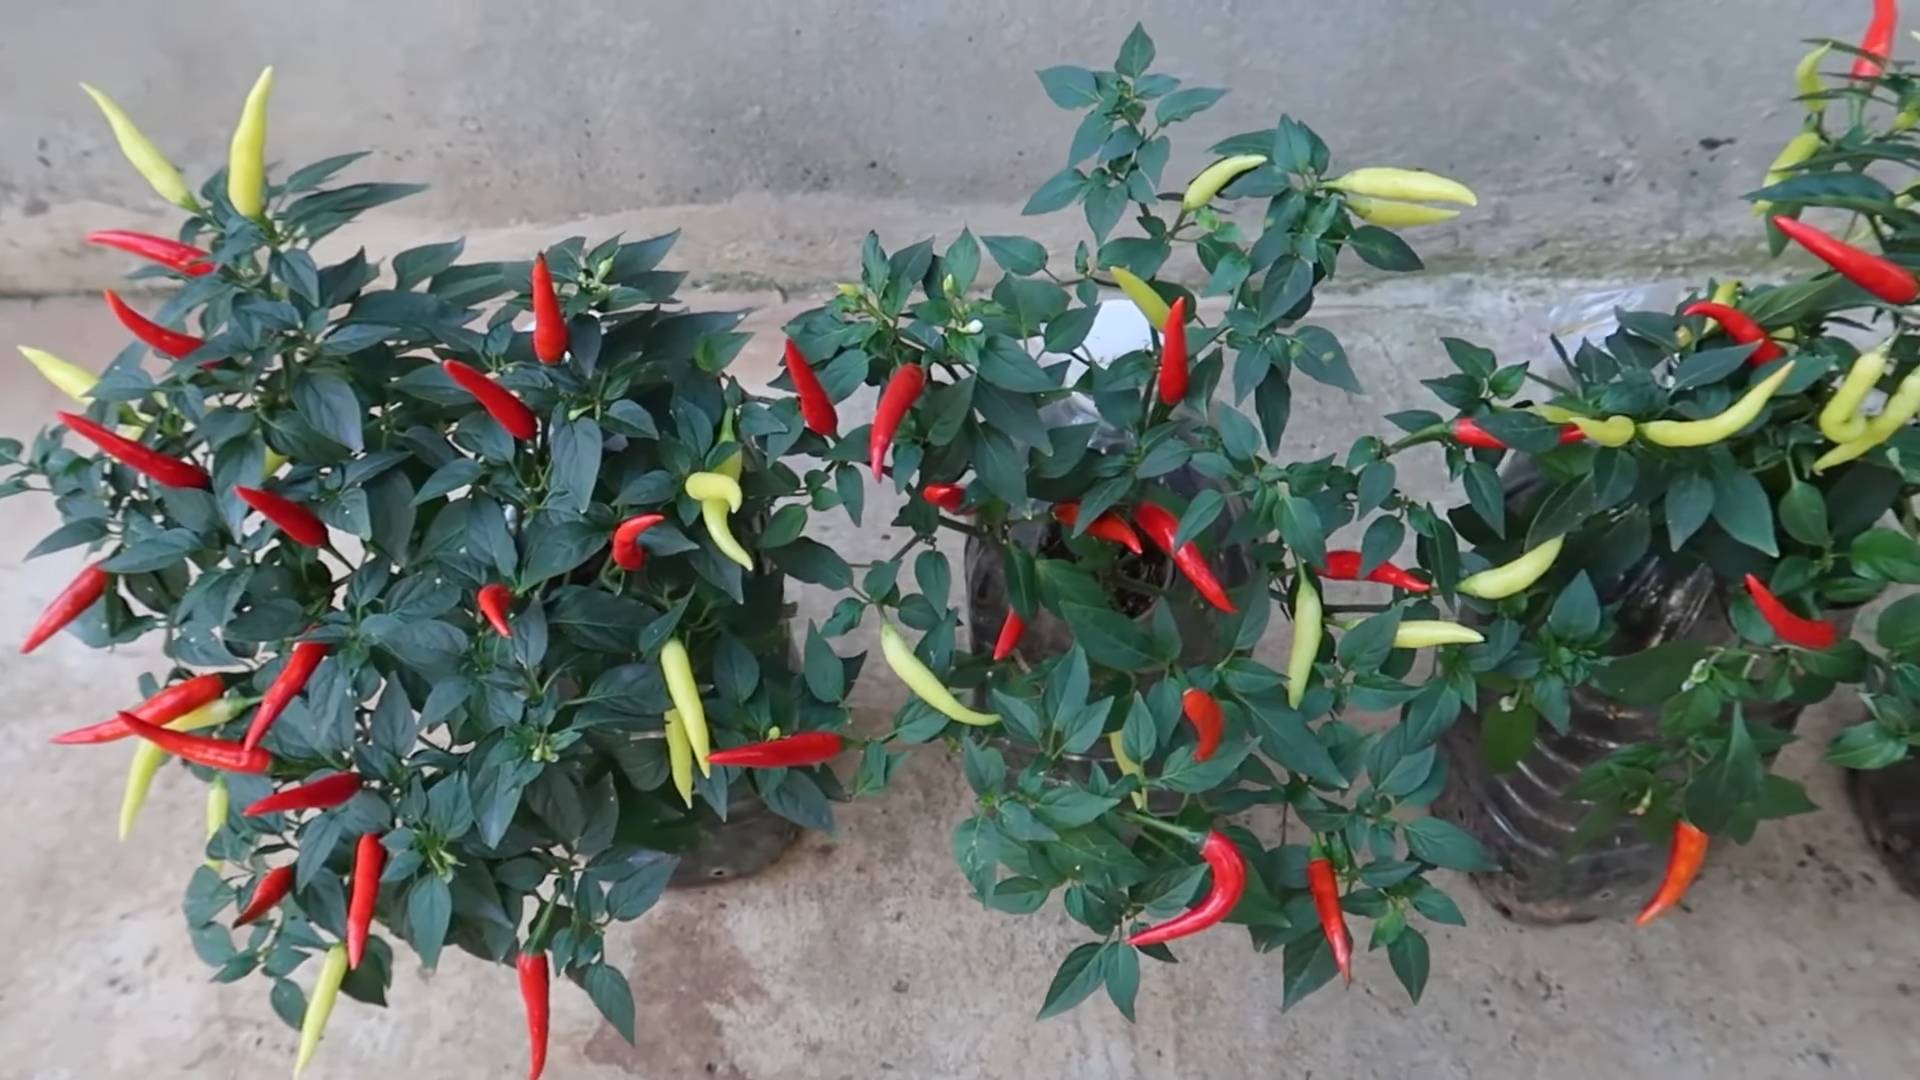
Bottle Grown Chili Peppers: Imagine harvesting fiery chili peppers right from your windowsill, even if you don’t have a sprawling garden! Sounds too good to be true? Well, get ready to be amazed because this DIY guide will show you how to cultivate your own thriving chili pepper plants using recycled bottles.
The practice of container gardening, a close relative to our bottle-based chili adventure, has roots stretching back centuries. From the Hanging Gardens of Babylon to the ornate orangeries of Renaissance Europe, people have always found creative ways to bring nature indoors and maximize limited spaces. Now, we’re taking that ingenuity a step further with a sustainable and space-saving twist.
Why should you try this DIY trick? Let’s face it, not everyone has access to a large garden. Apartment dwellers, urban residents, and those with limited mobility often miss out on the joy of growing their own food. But with this simple and effective method, anyone can enjoy the satisfaction of nurturing a plant from seed to harvest. Plus, growing your own bottle grown chili peppers means you’ll always have fresh, organic spice on hand to add a kick to your favorite dishes. I’m excited to share this easy and rewarding project with you, so let’s get started!
DIY Bottle Grown Chili Peppers: From Seed to Spice Rack!
Hey there, fellow chili enthusiasts! Ever dreamt of having a constant supply of fresh, fiery peppers right at your fingertips? Well, I’m here to tell you it’s totally achievable, even if you don’t have a sprawling garden. We’re going to dive into the wonderful world of bottle-grown chili peppers! This method is perfect for small spaces, apartment dwellers, or anyone who just wants a fun and rewarding DIY project. Get ready to add some spice to your life!
What You’ll Need: The Chili Pepper Arsenal
Before we get our hands dirty, let’s gather our supplies. This is crucial for a smooth and successful chili-growing adventure.
* Chili Pepper Seeds: This is the most important part! Choose varieties that you love to eat and that are known to thrive in containers. Some great options include Jalapeños, Thai peppers, Serrano peppers, or even some of the smaller ornamental varieties. I personally love growing Jalapeños because they’re so versatile.
* Plastic Bottles: We’ll need some sturdy plastic bottles. Two-liter soda bottles or larger water bottles work perfectly. Make sure they’re clean and free of any residue.
* Potting Mix: Don’t skimp on the potting mix! Use a high-quality, well-draining mix specifically formulated for containers. Avoid using garden soil, as it can compact and hinder drainage.
* Seed Starting Tray (Optional): If you want a head start, you can use a seed starting tray to germinate your seeds before transplanting them into the bottles.
* Spray Bottle: For misting the seedlings and keeping the soil moist.
* Scissors or Utility Knife: For cutting the plastic bottles. Be careful!
* Drill or Nail: For creating drainage holes in the bottles.
* Water: Essential for watering your chili plants.
* Fertilizer: A balanced liquid fertilizer to feed your plants once they start growing.
* Small Pebbles or Gravel: To improve drainage at the bottom of the bottles.
* Gloves (Optional): To keep your hands clean.
Phase 1: Seed Starting – The Germination Game
This is where the magic begins! Getting your seeds to sprout is the first step towards a bountiful chili harvest.
1. Prepare Your Seed Starting Tray (If Using): Fill the seed starting tray with your chosen potting mix. Gently press down on the soil to create a firm surface.
2. Sow the Seeds: Place 2-3 chili pepper seeds in each cell of the seed starting tray, or directly into your small starter pots if you’re skipping the tray. Cover the seeds with a thin layer of potting mix (about ¼ inch).
3. Water Gently: Use a spray bottle to mist the soil thoroughly. You want it to be moist but not soggy.
4. Create a Humid Environment: Cover the seed starting tray with a clear plastic lid or plastic wrap to create a humid environment. This will help the seeds germinate.
5. Provide Warmth: Place the seed starting tray in a warm location, ideally between 70-80°F (21-27°C). A heat mat can be helpful if your home is cooler.
6. Monitor and Water: Check the soil moisture daily and mist as needed to keep it consistently moist.
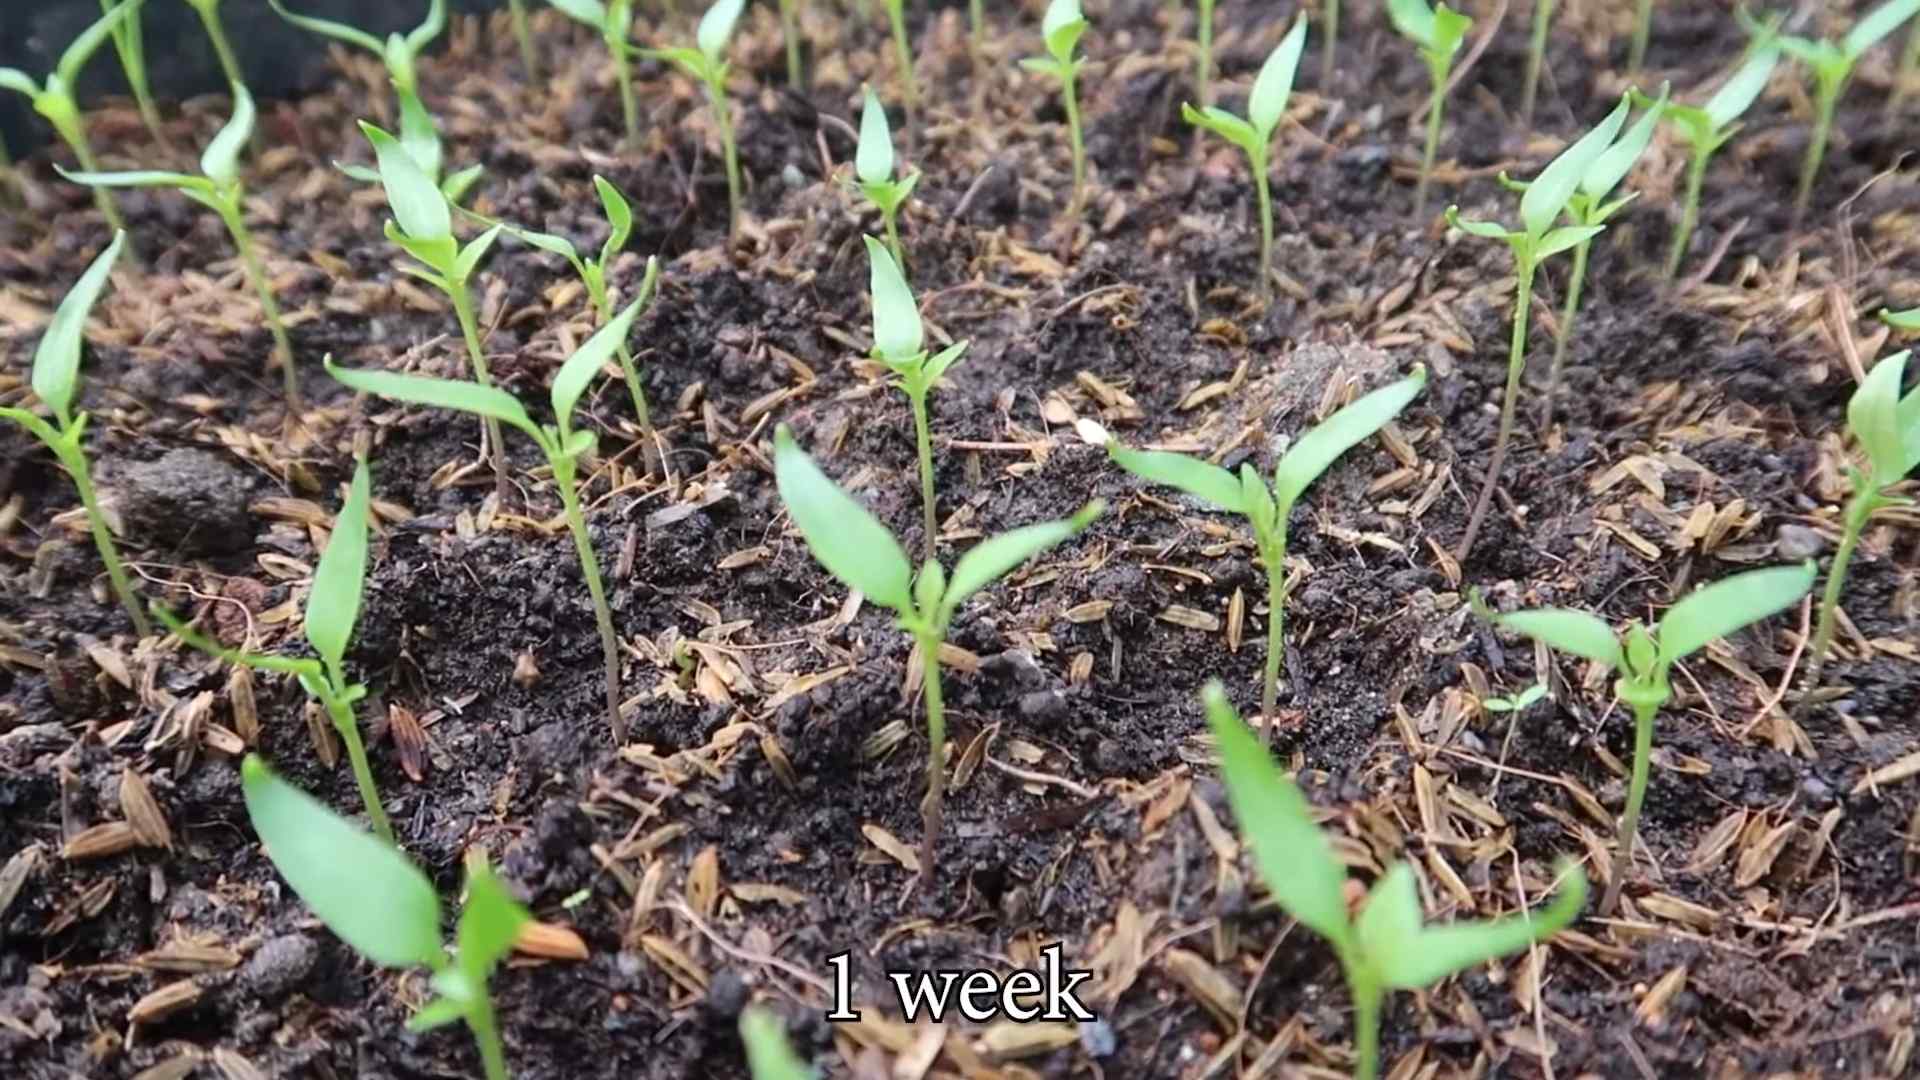
7. Wait Patiently: Germination can take anywhere from 7-21 days, depending on the variety of chili pepper and the environmental conditions.
8. Remove the Cover: Once the seedlings emerge, remove the plastic lid or wrap to allow for better air circulation.
9. Provide Light: Place the seedlings under a grow light or in a sunny windowsill. They need at least 6-8 hours of light per day.
Phase 2: Bottle Preparation – Creating the Perfect Pepper Home
Now, let’s transform those plastic bottles into cozy homes for our chili plants.
1. Clean the Bottles: Thoroughly wash the plastic bottles with soap and water to remove any residue. Rinse them well.
2. Cut the Bottles: Carefully cut the top third of the bottle off. You can discard the top portion or save it to use as a mini-greenhouse later.
3. Create Drainage Holes: Use a drill or nail to create several drainage holes in the bottom of the bottle. This is crucial to prevent waterlogging, which can kill your chili plants. I usually make about 5-6 holes.
4. Add Drainage Layer: Place a layer of small pebbles or gravel at the bottom of the bottle. This will further improve drainage and prevent the potting mix from clogging the drainage holes.
Phase 3: Transplanting – Moving to the Bottle Mansion
It’s time to move our seedlings into their new bottle homes!
1. Fill the Bottles with Potting Mix: Fill the prepared bottles with your chosen potting mix, leaving about an inch of space at the top.
2. Gently Remove the Seedlings: Carefully remove the seedlings from the seed starting tray or starter pots. Be gentle to avoid damaging the roots. If the roots are tightly bound, gently loosen them with your fingers.
3. Create a Hole: Make a small hole in the center of the potting mix in each bottle.
4. Transplant the Seedlings: Place the seedlings into the holes and gently cover the roots with potting mix.
5. Water Thoroughly: Water the transplanted seedlings thoroughly to help settle the soil.
6. Provide Support (Optional): If your seedlings are tall and leggy, you can insert a small stake or chopstick into the soil to provide support.
Phase 4: Ongoing Care – Nurturing Your Chili Plants
This is where the real commitment comes in! Consistent care is key to a thriving chili pepper plant.
1. Watering: Water your chili plants regularly, keeping the soil consistently moist but not soggy. Check the soil moisture by sticking your finger into the soil. If the top inch feels dry, it’s time to water. Avoid overwatering, as this can lead to root rot.
2. Fertilizing: Feed your chili plants with a balanced liquid fertilizer every 2-3 weeks. Follow the instructions on the fertilizer label. I like to use a fertilizer that’s specifically formulated for tomatoes and peppers, as it provides the nutrients they need to produce abundant fruit.
3. Sunlight: Chili peppers need at least 6-8 hours of sunlight per day. Place your bottle-grown chili plants in a sunny location, such as a windowsill or balcony. If you don’t have enough natural sunlight, you can supplement with a grow light.
4. Temperature: Chili peppers thrive in warm temperatures, ideally between 70-85°F (21-29°C). Protect your plants from frost and extreme temperatures.
5. Pruning (Optional): Pruning can help to encourage bushier growth and more fruit production. You can prune your chili plants by pinching off the tips of the branches.
6. Pest Control: Keep an eye out for pests, such as aphids, spider mites, and whiteflies. If you notice any pests, you can treat them with insecticidal soap or neem oil. I prefer to use organic pest control methods whenever possible.
7. Pollination: Chili peppers are self-pollinating, but you can help them along by gently shaking the plants or using a small brush to transfer pollen from one flower to another. This is especially important if you’re growing your chili peppers indoors, where there are fewer pollinators.
Phase 5: Harvesting – The Spicy Reward!
The moment you’ve been waiting for! Harvesting your own homegrown chili peppers is incredibly satisfying.
1. Harvest When Ripe: Harvest your chili peppers when they have reached their mature color and size. The color will vary depending on the variety of chili pepper.
2. Use Scissors or Pruning Shears: Use scissors or pruning shears to cut the chili peppers from the plant. Be careful not to damage the plant.
3. Enjoy Your Harvest: Use your fresh chili peppers in your favorite recipes, or dry them for later use. You can also freeze chili peppers for long-term storage.
Important Considerations:
* Choosing the Right Chili Pepper Variety: Consider your climate and growing conditions when choosing a chili pepper variety. Some varieties are more tolerant of heat or cold than others.
* Bottle Size: The size of the bottle will affect the size of the plant. Larger bottles will allow for larger plants and more fruit production.
* Drainage: Proper drainage is essential for healthy chili pepper plants. Make sure your bottles have adequate drainage holes.
* Fertilizer: Chili peppers are heavy feeders and need regular fertilization. Use a balanced liquid fertilizer to provide them with the nutrients they need.
* Pest Control: Be vigilant about pest control. Check your plants regularly for pests and treat
Conclusion
So, there you have it! Growing chili peppers in bottles isn’t just a quirky gardening experiment; it’s a surprisingly effective and space-saving method that can bring a fiery touch to even the smallest of living spaces. We’ve walked you through the process, from selecting the right bottle and preparing the soil to nurturing your seedlings and harvesting your spicy bounty.
Why is this DIY trick a must-try? Because it democratizes gardening. It removes the barriers of large yards and expensive equipment, allowing anyone, regardless of their living situation, to experience the joy of growing their own food. Imagine the satisfaction of adding freshly grown, intensely flavorful chili peppers to your favorite dishes, knowing you nurtured them from tiny seeds within a recycled bottle. It’s sustainable, it’s rewarding, and it’s undeniably cool.
But the beauty of this method lies in its adaptability. Feel free to experiment with different varieties of chili peppers. Perhaps you’re a fan of the scorching heat of habaneros, or maybe you prefer the milder kick of jalapeños. The choice is yours! You can also play around with the type of bottle you use. While we’ve focused on plastic bottles for their durability and ease of access, you could also try glass bottles for a more aesthetically pleasing look, just be extra careful when handling them.
Consider adding companion plants to your bottle garden. Herbs like basil or oregano can thrive alongside your chili peppers, attracting beneficial insects and adding another layer of flavor to your culinary creations. You could even create a tiered bottle garden, stacking multiple bottles to maximize your vertical growing space.
Don’t be afraid to get creative with your bottle design. Paint them, decorate them with twine, or even turn them into miniature works of art. This is your chance to express your personality and add a unique touch to your home or garden.
The key to success with this method is consistent care. Remember to water your chili peppers regularly, especially during hot weather. Provide them with plenty of sunlight, and fertilize them every few weeks to ensure they have the nutrients they need to thrive. Keep an eye out for pests and diseases, and take action promptly if you notice any problems.
Growing bottle grown chili peppers is more than just a gardening project; it’s an opportunity to connect with nature, learn new skills, and enjoy the fruits (or rather, the peppers) of your labor. It’s a sustainable way to add fresh, flavorful ingredients to your meals and a conversation starter that’s sure to impress your friends and family.
So, what are you waiting for? Gather your bottles, grab some seeds, and get ready to embark on a spicy adventure. We’re confident that you’ll be amazed by the results. And once you’ve harvested your first batch of bottle-grown chili peppers, we encourage you to share your experience with us. Post photos of your bottle gardens on social media, tag us in your posts, and let us know what you’ve learned along the way. We can’t wait to see your creations!
Frequently Asked Questions (FAQ)
What type of chili peppers are best suited for bottle growing?
Almost any variety of chili pepper can be grown in a bottle, but smaller varieties tend to be more successful due to the limited space. Jalapeños, serranos, Thai chilies, and even smaller habanero varieties are all excellent choices. Consider the size of the mature plant when making your selection. Dwarf or compact varieties are generally better suited for bottle growing. Also, think about your personal preference for heat level. If you prefer a milder flavor, opt for jalapeños or poblano peppers. If you’re a fan of intense heat, try growing Scotch bonnets or ghost peppers, but be prepared for a fiery experience!
What size bottle is ideal for growing chili peppers?
A 2-liter plastic bottle is a good starting point, but larger bottles (3-5 liters) will provide more room for the roots to grow and can support larger plants. The key is to ensure the bottle is sturdy enough to support the weight of the soil and the plant. You can also use glass bottles, but be extra careful when handling them to avoid breakage. Make sure the bottle has a wide enough opening to easily plant the seedlings and water the plants.
What type of soil should I use for growing chili peppers in bottles?
A well-draining potting mix is essential for growing chili peppers in bottles. Avoid using garden soil, as it can become compacted and prevent proper drainage. A good potting mix will contain a blend of peat moss, perlite, and vermiculite, which will provide the necessary nutrients and aeration for healthy root growth. You can also add compost to the potting mix to further enrich the soil and provide additional nutrients.
How often should I water my bottle-grown chili peppers?
Water your chili peppers regularly, especially during hot weather. The frequency of watering will depend on the size of the bottle, the type of soil, and the weather conditions. Check the soil moisture level regularly by sticking your finger into the soil. If the top inch of soil feels dry, it’s time to water. Avoid overwatering, as this can lead to root rot. When watering, water deeply until the water drains out of the drainage holes at the bottom of the bottle.
How much sunlight do bottle-grown chili peppers need?
Chili peppers need at least 6-8 hours of direct sunlight per day to thrive. Place your bottle garden in a sunny location, such as a south-facing window or a balcony. If you don’t have access to enough natural sunlight, you can supplement with grow lights.
Do I need to fertilize my bottle-grown chili peppers?
Yes, chili peppers are heavy feeders and will benefit from regular fertilization. Use a balanced fertilizer that is specifically formulated for vegetables. Fertilize every few weeks, following the instructions on the fertilizer package. You can also use organic fertilizers, such as compost tea or fish emulsion.
How do I protect my bottle-grown chili peppers from pests and diseases?
Inspect your plants regularly for signs of pests and diseases. Common pests that affect chili peppers include aphids, spider mites, and whiteflies. You can control these pests with insecticidal soap or neem oil. Diseases that can affect chili peppers include powdery mildew and blossom end rot. Prevent these diseases by providing good air circulation and avoiding overwatering.
How long does it take for chili peppers to mature in bottles?
The time it takes for chili peppers to mature will depend on the variety of pepper and the growing conditions. Generally, it takes about 60-90 days from transplanting the seedlings to harvesting the peppers.
Can I grow chili peppers indoors in bottles?
Yes, you can grow chili peppers indoors in bottles, but you will need to provide them with enough light. Place your bottle garden near a sunny window or supplement with grow lights.
What are some creative ways to decorate my bottle garden?
There are endless possibilities for decorating your bottle garden. You can paint the bottles, decorate them with twine, or even turn them into miniature works of art. You can also add decorative stones or pebbles to the top of the soil. Get creative and express your personality!
Can I reuse the bottles for growing chili peppers again?
Yes, you can reuse the bottles for growing chili peppers again. Just make sure to clean them thoroughly before replanting. Remove any old soil and wash the bottles with soap and water. You can also disinfect the bottles with a bleach solution to kill any remaining bacteria or fungi.
What if my chili pepper plant becomes too big for the bottle?
If your chili pepper plant becomes too big for the bottle, you can transplant it into a larger container. Choose a pot that is at least twice the size of the bottle. Gently remove the plant from the bottle and transplant it into the new pot, being careful not to damage the roots.
How do I know when my chili peppers are ready to harvest?
Chili peppers are typically ready to harvest when they have reached their mature color and size. The color will vary depending on the variety of pepper. The peppers should also feel firm to the touch. Use scissors or pruning shears to cut the peppers from the plant, leaving a small stem attached.
Can I grow other vegetables in bottles besides chili peppers?
Yes, you can grow other vegetables in bottles besides chili peppers. Herbs, lettuce, spinach, and strawberries are all good choices for bottle growing. Choose varieties that are compact and well-suited for container gardening.
Is growing bottle grown chili peppers environmentally friendly?
Yes, growing bottle grown chili peppers is an environmentally friendly practice. It reuses plastic bottles, reducing waste. It also allows you to grow your own food, reducing your reliance on commercially grown produce, which often involves transportation and packaging that contribute to carbon emissions. Furthermore, it encourages sustainable gardening practices, such as using organic fertilizers and avoiding pesticides.
Leave a Comment