

Grow Mushrooms at Home: Imagine stepping into your kitchen, not to grab ingredients from the fridge, but to harvest fresh, flavorful mushrooms you cultivated yourself! Sounds like something out of a fairytale, right? Well, it’s more attainable than you think! For centuries, mushroom cultivation has been practiced across various cultures, from ancient China, where they were revered for their medicinal properties, to European monasteries, where monks perfected indoor growing techniques.
Today, you don’t need to be a seasoned mycologist or a cloistered monk to enjoy the delights of homegrown fungi. This DIY guide is your passport to the fascinating world of mushroom cultivation, offering simple, effective tricks and hacks to grow mushrooms at home, even if you have limited space or experience.
Why should you embark on this fungal adventure? Because store-bought mushrooms, while convenient, often lack the freshness and unique flavors of homegrown varieties. Plus, cultivating your own mushrooms is a sustainable and rewarding way to add nutritious and delicious ingredients to your meals. I’m excited to share these easy-to-follow steps that will transform your kitchen into a mini mushroom farm!
Grow Your Own Gourmet Mushrooms at Home: A Beginner’s Guide
Hey there, fellow fungi fanatics! Ever dreamt of harvesting your own delicious mushrooms right in your kitchen? Well, dream no more! Growing mushrooms at home is surprisingly achievable, even for beginners. I’m going to walk you through a simple and effective method using readily available materials. Get ready to embark on a fascinating journey into the world of mycology!
Choosing Your Mushroom Variety
Before we dive in, let’s talk about which mushrooms are easiest to grow at home. While you can technically cultivate many varieties, some are much more beginner-friendly. I highly recommend starting with oyster mushrooms (Pleurotus ostreatus) or shiitake mushrooms (Lentinula edodes).
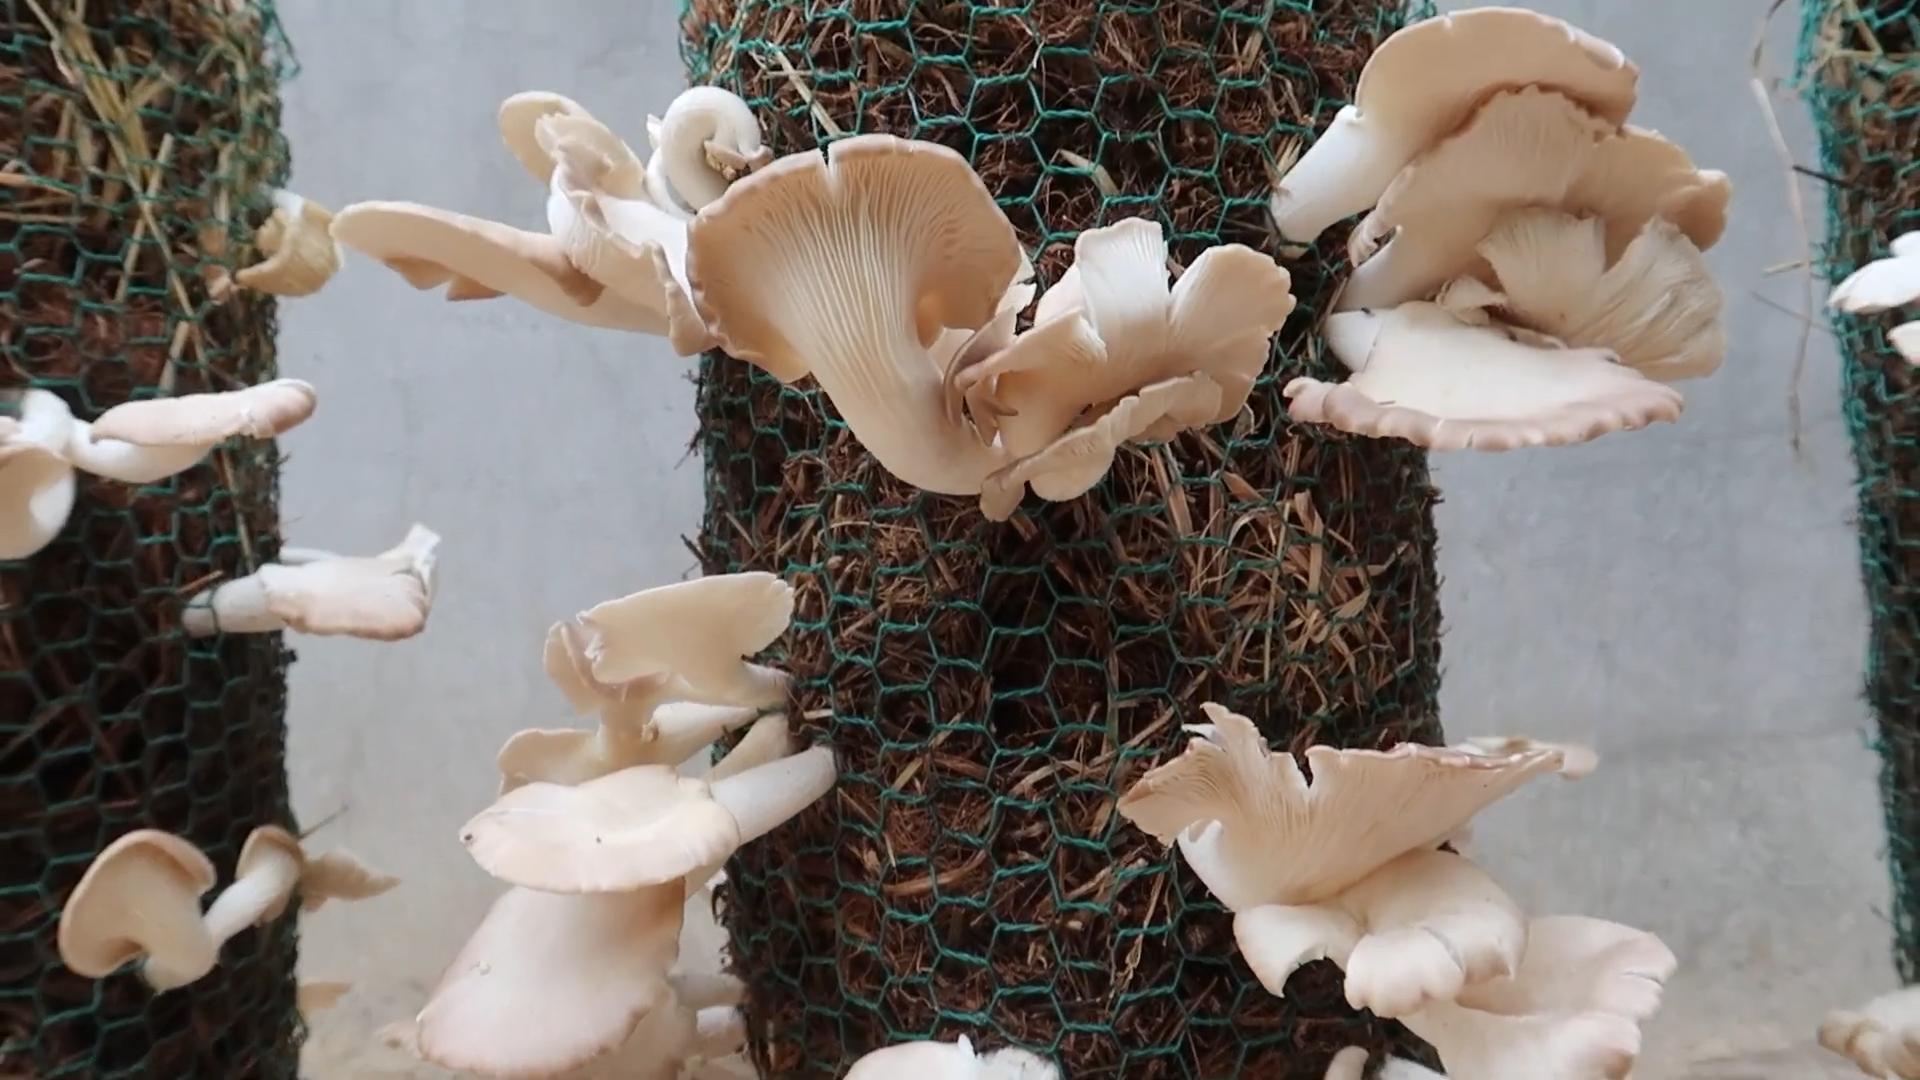
* Oyster Mushrooms: These are incredibly versatile, fast-growing, and relatively forgiving. They thrive on a variety of substrates, making them perfect for beginners. Plus, they come in a range of colors, from pearly white to blue and pink!
* Shiitake Mushrooms: While slightly more demanding than oyster mushrooms, shiitakes are still manageable for home cultivation. They have a rich, savory flavor and are a popular choice in Asian cuisine. They typically require a hardwood substrate.
For this guide, I’ll focus on growing oyster mushrooms using the straw pasteurization method, as it’s the most accessible and cost-effective for beginners.
Materials You’ll Need
Okay, let’s gather our supplies. You’ll need:
* Oyster Mushroom Spawn: This is essentially mushroom “seeds.” You can purchase it online from reputable mushroom suppliers. Make sure to choose a strain that’s suitable for your climate.
* Straw: Wheat straw is ideal, but other types of straw can also work. Avoid straw that’s moldy or treated with chemicals.
* Large Pot or Container: Big enough to submerge your straw in water. A large stockpot or even a clean plastic bin will do.
* Propane Burner or Stove: To heat the water for pasteurization.
* Thermometer: To monitor the water temperature. An instant-read thermometer is perfect.
* Large Plastic Bags: These will be your growing bags. Heavy-duty garbage bags work well, but make sure they’re clean and free of any chemicals.
* Drill or Knife: To create ventilation holes in the growing bags.
* Spray Bottle: Filled with clean water for misting.
* Bleach: For sanitizing surfaces.
* Gloves: To maintain cleanliness.
* Face Mask: To avoid inhaling dust or spores.
Preparing the Straw Substrate
The key to successful mushroom cultivation is a properly prepared substrate. Straw needs to be pasteurized to kill off competing organisms that could hinder mushroom growth. Don’t worry, it’s not as complicated as it sounds!
Step 1: Chop the Straw
First, chop the straw into smaller pieces, about 2-4 inches long. This will make it easier to pack into the growing bags and will increase the surface area for the mushroom mycelium to colonize. I usually use garden shears or a lawnmower (carefully!) to chop the straw.
Step 2: Pasteurize the Straw
This is the most crucial step. Pasteurization eliminates harmful bacteria and fungi that could compete with your oyster mushrooms.
1. Fill your large pot or container with water.
2. Heat the water to 160-180°F (71-82°C). Use your thermometer to monitor the temperature. Maintaining this temperature range is crucial for effective pasteurization.
3. Submerge the chopped straw in the hot water. You might need to weigh it down with a brick or rock to keep it submerged.
4. Maintain the water temperature between 160-180°F (71-82°C) for 60-90 minutes. This ensures that the straw is properly pasteurized. I usually set a timer and check the temperature every 15 minutes.
5. After pasteurization, carefully drain the hot water from the straw. Be careful, as the straw will be very hot! I usually use a colander or a large strainer to drain the water.
Step 3: Cool and Drain the Straw
Allow the pasteurized straw to cool down to room temperature. This is important because hot straw can kill the mushroom spawn. As the straw cools, it will also continue to drain excess water. You want the straw to be moist but not soaking wet. A good test is to squeeze a handful of straw – it should feel damp, but only a few drops of water should come out.
Inoculating the Straw with Mushroom Spawn
Now comes the fun part – introducing the mushroom spawn to the straw!
Step 1: Sanitize Your Work Area
Before you start, thoroughly clean and sanitize your work area. Wipe down all surfaces with a bleach solution (1 part bleach to 10 parts water). This will help prevent contamination. I also recommend wearing gloves and a face mask during this process.
Step 2: Layer the Straw and Spawn
1. Take one of your large plastic bags and place a layer of pasteurized straw at the bottom, about 4-6 inches thick.
2. Sprinkle a generous amount of oyster mushroom spawn over the straw. Aim for about 5-10% spawn by weight of the straw.
3. Add another layer of straw, followed by more spawn.
4. Continue layering straw and spawn until the bag is almost full, leaving a few inches of space at the top.
5. Tie the bag tightly with string or a zip tie.
Step 3: Create Ventilation Holes
Mushrooms need oxygen to grow, so you’ll need to create ventilation holes in the bag. Use a drill or knife to make small holes (about 1/4 inch in diameter) every 4-6 inches around the bag. These holes will allow air to circulate and prevent the buildup of carbon dioxide.
Incubation: Letting the Mycelium Colonize
This is the waiting game. During incubation, the mushroom mycelium (the vegetative part of the fungus) will spread throughout the straw, colonizing it and preparing it for fruiting.
Step 1: Find a Suitable Incubation Spot
Place the inoculated bags in a dark, warm, and humid location. A basement, closet, or spare room works well. The ideal temperature for oyster mushroom incubation is between 65-75°F (18-24°C).
Step 2: Monitor the Bags
Check the bags regularly for signs of contamination. Look for mold, discoloration, or unusual odors. If you see any signs of contamination, remove the affected bag immediately to prevent it from spreading to other bags.
Step 3: Wait for Colonization
It will take approximately 2-3 weeks for the mycelium to fully colonize the straw. You’ll know the colonization is complete when the straw is covered in a white, cottony growth. This is the mycelium!
Fruiting: Harvesting Your Mushrooms
Once the straw is fully colonized, it’s time to trigger fruiting – the formation of mushrooms.
Step 1: Expose to Light and Fresh Air
Move the bags to a location with indirect light and good air circulation. A well-lit room or a shaded outdoor area is ideal. Avoid direct sunlight, as it can dry out the mushrooms.
Step 2: Increase Humidity
Mushrooms need high humidity to fruit properly. Mist the bags with water several times a day to keep them moist. You can also place a humidifier nearby to increase the overall humidity in the area. I often use a humidity dome or a plastic tent to create a humid microclimate around the bags.
Step 3: Watch for Pinning
After a few days, you should start to see small mushroom “pins” forming on the surface of the straw. These are the baby mushrooms!
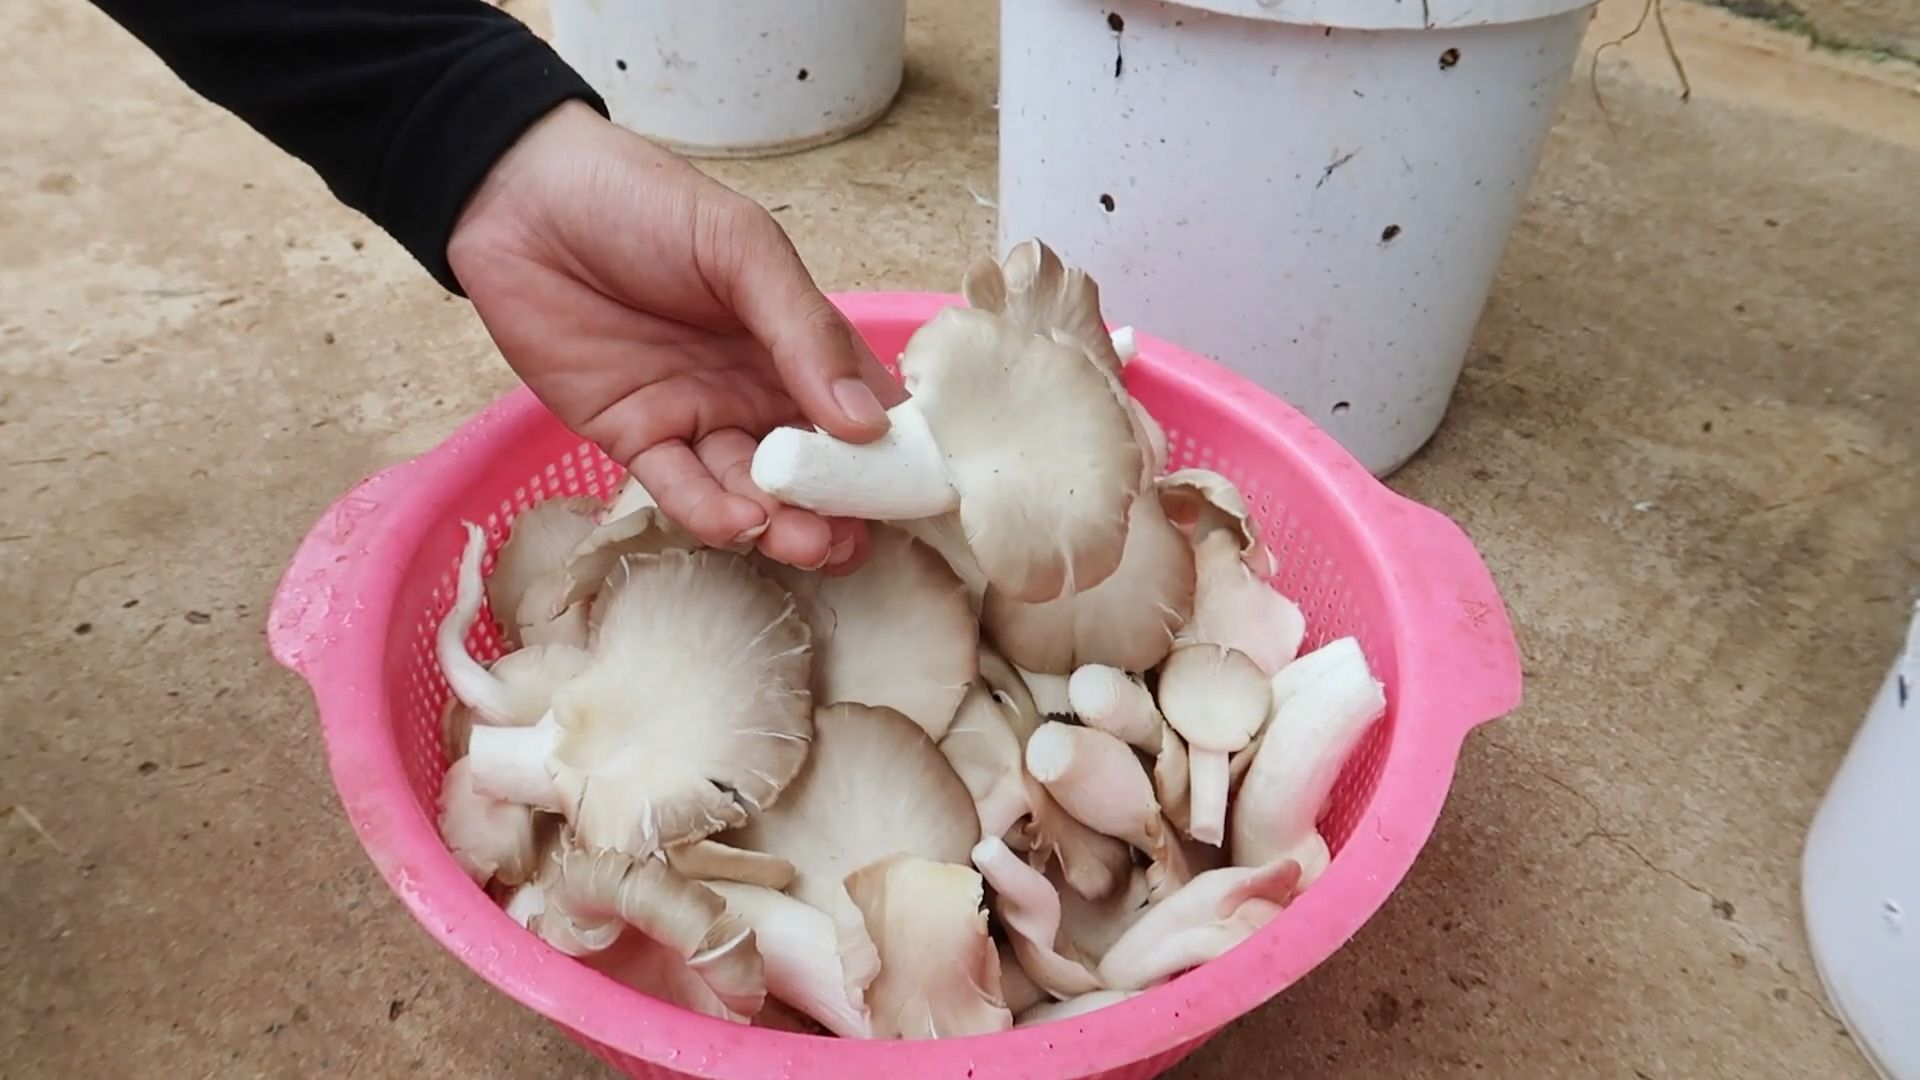
Step 4: Harvest Your Mushrooms
The mushrooms will grow rapidly over the next few days. Harvest them when the caps are fully developed but before they start to release spores. To harvest, simply twist or cut the mushrooms off the straw.
Post-Harvest Care and Subsequent Flushes
After harvesting your first flush of mushrooms, don’t throw away the straw! You can often get several more flushes of mushrooms from the same bag.
Step 1: Rehydrate the Substrate
After harvesting, the straw will be depleted of moisture. Rehydrate it by soaking the bag in water for 12-24 hours.
Step 2: Repeat Fruiting Conditions
After rehydrating, return the bag to the fruiting conditions (light, fresh air, and high humidity).
Step 3: Expect Subsequent Flushes
You can usually get 2-3 more flushes of mushrooms from the same bag. Each flush may be smaller than the previous one.
Troubleshooting
Even with the best preparation, you might encounter some challenges along the way. Here are a few common problems and how to address them:
* Contamination: If you see
Conclusion
So, there you have it! Cultivating your own mushrooms at home is not only surprisingly simple, but also incredibly rewarding. Forget those expensive, pre-packaged mushrooms from the grocery store – with a little patience and this straightforward method, you can enjoy a constant supply of fresh, flavorful fungi right from your own kitchen.
This DIY approach to growing mushrooms offers a multitude of benefits. First and foremost, you gain complete control over the growing environment, ensuring that your mushrooms are free from harmful pesticides and chemicals. You know exactly what goes into their cultivation, resulting in a healthier and more sustainable food source. Secondly, the taste of homegrown mushrooms is simply unparalleled. The freshness and vibrancy of flavor are a world apart from store-bought varieties that have often traveled long distances and lost their peak quality.
But perhaps the most compelling reason to embrace this DIY trick is the sheer satisfaction of nurturing life from scratch. Watching those tiny pins emerge and develop into fully formed mushrooms is an experience that connects you to the natural world in a profound way. It’s a fascinating project for individuals, families, and anyone interested in sustainable living.
Don’t be afraid to experiment! While we’ve outlined a basic method, there’s plenty of room for customization. Try different types of substrate, such as coffee grounds or straw, to see how they affect the growth and flavor of your mushrooms. Explore different mushroom varieties, from the classic oyster mushroom to the more exotic shiitake or lion’s mane. Each variety offers a unique flavor profile and growing experience. You can even adjust the humidity and temperature to optimize the growing conditions for your chosen mushroom type.
Consider adding a small fan to your growing area to improve air circulation and prevent mold growth. A simple humidity tent made from a plastic bag can help maintain the ideal moisture levels. And remember, patience is key! Mushroom cultivation takes time, so don’t get discouraged if you don’t see results immediately.
Growing mushrooms at home is an adventure, a learning experience, and a delicious way to enhance your culinary creations. We wholeheartedly encourage you to give it a try. Once you’ve harvested your first batch of homegrown mushrooms, we’re confident you’ll be hooked!
We’d love to hear about your experiences! Share your photos, tips, and questions in the comments below. Let’s build a community of home mushroom growers and learn from each other. Happy growing!
Frequently Asked Questions (FAQ)
What kind of mushrooms are easiest to grow at home for beginners?
Oyster mushrooms are generally considered the easiest type of mushroom to grow at home, especially for beginners. They are relatively forgiving of environmental fluctuations and can thrive on a variety of substrates, including straw, coffee grounds, and even cardboard. They also have a relatively fast growth cycle, so you’ll see results sooner than with some other varieties. Shiitake mushrooms are another popular choice, but they require a bit more patience and attention to detail. Lion’s mane mushrooms are gaining popularity, but they can be slightly more challenging to cultivate. Start with oyster mushrooms and then branch out to other varieties as you gain experience.
What is the best substrate to use for growing mushrooms at home?
The best substrate depends on the type of mushroom you’re growing. Oyster mushrooms, as mentioned above, are very versatile and can grow on a wide range of substrates. Straw is a common and readily available option. Coffee grounds are another excellent choice, as they are rich in nutrients and often readily available. Hardwood sawdust is a good option for shiitake mushrooms. Make sure to properly pasteurize or sterilize your substrate before inoculation to kill off any competing organisms. Pasteurization involves heating the substrate to a temperature that kills harmful bacteria and fungi without destroying beneficial microbes. Sterilization involves heating the substrate to a higher temperature to kill all microorganisms.
How long does it take to grow mushrooms at home?
The time it takes to grow mushrooms at home varies depending on the mushroom variety, the substrate used, and the environmental conditions. Oyster mushrooms typically fruit within 1-2 weeks after the substrate is fully colonized by the mycelium. Shiitake mushrooms can take several months to fruit. Lion’s mane mushrooms typically fruit within 2-3 weeks. The colonization phase, where the mycelium spreads throughout the substrate, can take anywhere from a few days to several weeks. Be patient and monitor your growing environment closely.
What are the ideal temperature and humidity conditions for growing mushrooms?
The ideal temperature and humidity conditions also vary depending on the mushroom variety. Oyster mushrooms generally prefer temperatures between 60-75°F (15-24°C) and high humidity levels (80-90%). Shiitake mushrooms prefer cooler temperatures, around 50-60°F (10-15°C), and high humidity. Lion’s mane mushrooms prefer temperatures between 65-75°F (18-24°C) and high humidity. You can use a humidifier or a spray bottle to maintain the desired humidity levels. A simple humidity tent made from a plastic bag can also be effective.
How do I prevent contamination when growing mushrooms at home?
Contamination is a common problem when growing mushrooms at home, but there are several steps you can take to minimize the risk. First, always work in a clean environment. Sanitize your work surfaces and tools with isopropyl alcohol. Second, use sterile or pasteurized substrate. This will kill off any competing organisms that could inhibit mushroom growth. Third, maintain proper ventilation to prevent the buildup of moisture, which can encourage mold growth. Fourth, monitor your growing environment closely and remove any contaminated areas immediately. Fifth, avoid overwatering, as this can create a breeding ground for bacteria and fungi.
How do I know when my mushrooms are ready to harvest?
The signs of maturity vary depending on the mushroom variety. Oyster mushrooms are typically ready to harvest when the caps are fully formed and the edges are still slightly curled inward. Shiitake mushrooms are ready to harvest when the caps have flattened out and the gills are visible. Lion’s mane mushrooms are ready to harvest when the spines are fully developed and have a slightly yellowish tint. Harvest your mushrooms by gently twisting them off the substrate or cutting them off with a clean knife.
Can I grow mushrooms indoors without any special equipment?
Yes, you can grow mushrooms indoors without any special equipment, although some basic supplies will be helpful. You’ll need a container to grow your mushrooms in, such as a plastic tub or a bucket. You’ll also need a substrate, such as straw, coffee grounds, or sawdust. You’ll need mushroom spawn, which you can purchase online or from a local supplier. A spray bottle or humidifier can help maintain the desired humidity levels. A thermometer can help you monitor the temperature. A small fan can improve air circulation.
What do I do after I harvest my mushrooms?
After you harvest your mushrooms, you can store them in the refrigerator for up to a week. Wrap them in a paper towel to absorb excess moisture. You can also dry your mushrooms for longer-term storage. To dry mushrooms, slice them thinly and place them in a dehydrator or oven at a low temperature. You can also string them up and hang them to dry in a well-ventilated area. Dried mushrooms can be stored in an airtight container for several months.
Is it safe to eat homegrown mushrooms?
Yes, it is generally safe to eat homegrown mushrooms, as long as you have properly identified the species and followed safe growing practices. Only consume mushrooms that you are 100% certain are edible. If you are unsure about the identity of a mushroom, do not eat it. Always cook your mushrooms thoroughly before eating them. Some mushrooms contain toxins that are destroyed by heat.
Can I reuse the substrate after harvesting mushrooms?
Yes, you can often reuse the substrate after harvesting mushrooms, although the yield may be lower on subsequent flushes. After harvesting, remove any remaining mushroom stems and debris from the substrate. You can then rehydrate the substrate by soaking it in water for a few hours. After rehydrating, place the substrate back in its growing container and wait for new mushrooms to emerge. You can also compost the spent substrate and use it to enrich your garden soil.
Leave a Comment