

Grow Ginger at Home with these simple, yet effective DIY tricks! Have you ever dreamt of snipping fresh ginger straight from your own garden for your favorite stir-fry or soothing cup of tea? Well, dream no more! This guide is packed with easy-to-follow instructions that will transform your kitchen into a mini-ginger farm.
Ginger, with its fiery zest and incredible health benefits, has been cherished for centuries. Originating in South Asia, it has been used in traditional medicine and culinary practices across cultures. From ancient Chinese remedies to Indian curries, ginger’s versatility is undeniable. But did you know that you don’t need a sprawling farm to enjoy this amazing spice?
In today’s world, where fresh produce prices are soaring and concerns about pesticides are growing, learning to grow ginger at home is more relevant than ever. Imagine the satisfaction of harvesting your own organic ginger, knowing exactly where it came from and how it was grown. Plus, it’s a fantastic way to reduce your carbon footprint and connect with nature, even if you only have a small balcony or windowsill. So, let’s dive in and unlock the secrets to cultivating your own ginger bounty!
Ingwer zu Hause anbauen: Ein umfassender DIY-Leitfaden
Hallo liebe Gartenfreunde! Habt ihr euch jemals gefragt, wie ihr diesen würzigen, gesunden Ingwer, den ihr so liebt, einfach selbst anbauen könnt? Ich zeige euch, wie es geht! Es ist einfacher, als ihr denkt, und es macht unglaublich viel Spaß, zu sehen, wie eure eigenen Ingwerpflanzen wachsen. Lasst uns gemeinsam in dieses spannende Projekt eintauchen!
Was ihr für den Ingweranbau benötigt
Bevor wir loslegen, hier eine Liste der Dinge, die ihr braucht. Keine Sorge, die meisten davon habt ihr wahrscheinlich schon zu Hause!
* Ein Stück Ingwerwurzel (Rhizom): Achtet darauf, dass es prall und gesund aussieht, mit kleinen “Augen” (Wachstumsknoten). Bio-Ingwer ist oft die bessere Wahl, da er weniger wahrscheinlich mit Wachstumsinhibitoren behandelt wurde.
* Ein Pflanzgefäß: Wählt einen Topf, der mindestens 30 cm breit und 20 cm tief ist. Ingwerwurzeln wachsen horizontal, also ist Breite wichtiger als Tiefe.
* Hochwertige Blumenerde: Eine gut durchlässige Mischung ist entscheidend. Ich empfehle eine Mischung aus Blumenerde, Kompost und Perlit oder Vermiculit.
* Wasser: Klares, sauberes Wasser zum Gießen.
* Ein sonniger Standort: Ingwer liebt Wärme und Licht, aber direkte, pralle Mittagssonne kann schädlich sein. Ein Standort mit Morgen- oder Nachmittagssonne ist ideal.
* Sprühflasche (optional): Zum Befeuchten der Erde und der Pflanze.
* Geduld: Ingwer braucht Zeit zum Wachsen, also seid nicht entmutigt, wenn ihr nicht sofort Ergebnisse seht!
Die Vorbereitung des Ingwers
Dieser Schritt ist wichtig, um sicherzustellen, dass euer Ingwer gut anwächst.
1. Ingwerwurzel auswählen: Sucht im Supermarkt nach einem Stück Ingwer, das prall und gesund aussieht. Es sollte mehrere “Augen” oder Wachstumsknoten haben. Diese kleinen Knubbel sind die Stellen, aus denen die neuen Triebe wachsen werden. Wenn ihr Bio-Ingwer findet, ist das super, da dieser weniger wahrscheinlich mit Wachstumsinhibitoren behandelt wurde.
2. Ingwerwurzel vorbereiten: Wenn euer Ingwer ein großes Stück ist, könnt ihr ihn in kleinere Stücke schneiden, wobei jedes Stück mindestens einen Wachstumsknoten haben sollte. Lasst die Schnittflächen ein paar Tage an der Luft trocknen. Das hilft, Fäulnis zu verhindern. Ich lasse sie meistens 2-3 Tage liegen, bis die Schnittflächen leicht verheilt sind.
3. Einweichen (optional): Um den Keimprozess zu beschleunigen, könnt ihr die Ingwerstücke über Nacht in lauwarmem Wasser einweichen. Das hilft, die Wurzeln zu hydratisieren und das Wachstum anzuregen. Ich mache das nicht immer, aber es kann definitiv helfen, wenn ihr ungeduldig seid!
Das Einpflanzen des Ingwers
Jetzt kommt der spaßige Teil!
1. Topf vorbereiten: Füllt euren Topf mit der vorbereiteten Blumenerde. Lasst etwa 2-3 cm Platz bis zum Rand des Topfes. Die Erde sollte locker und gut durchlässig sein.
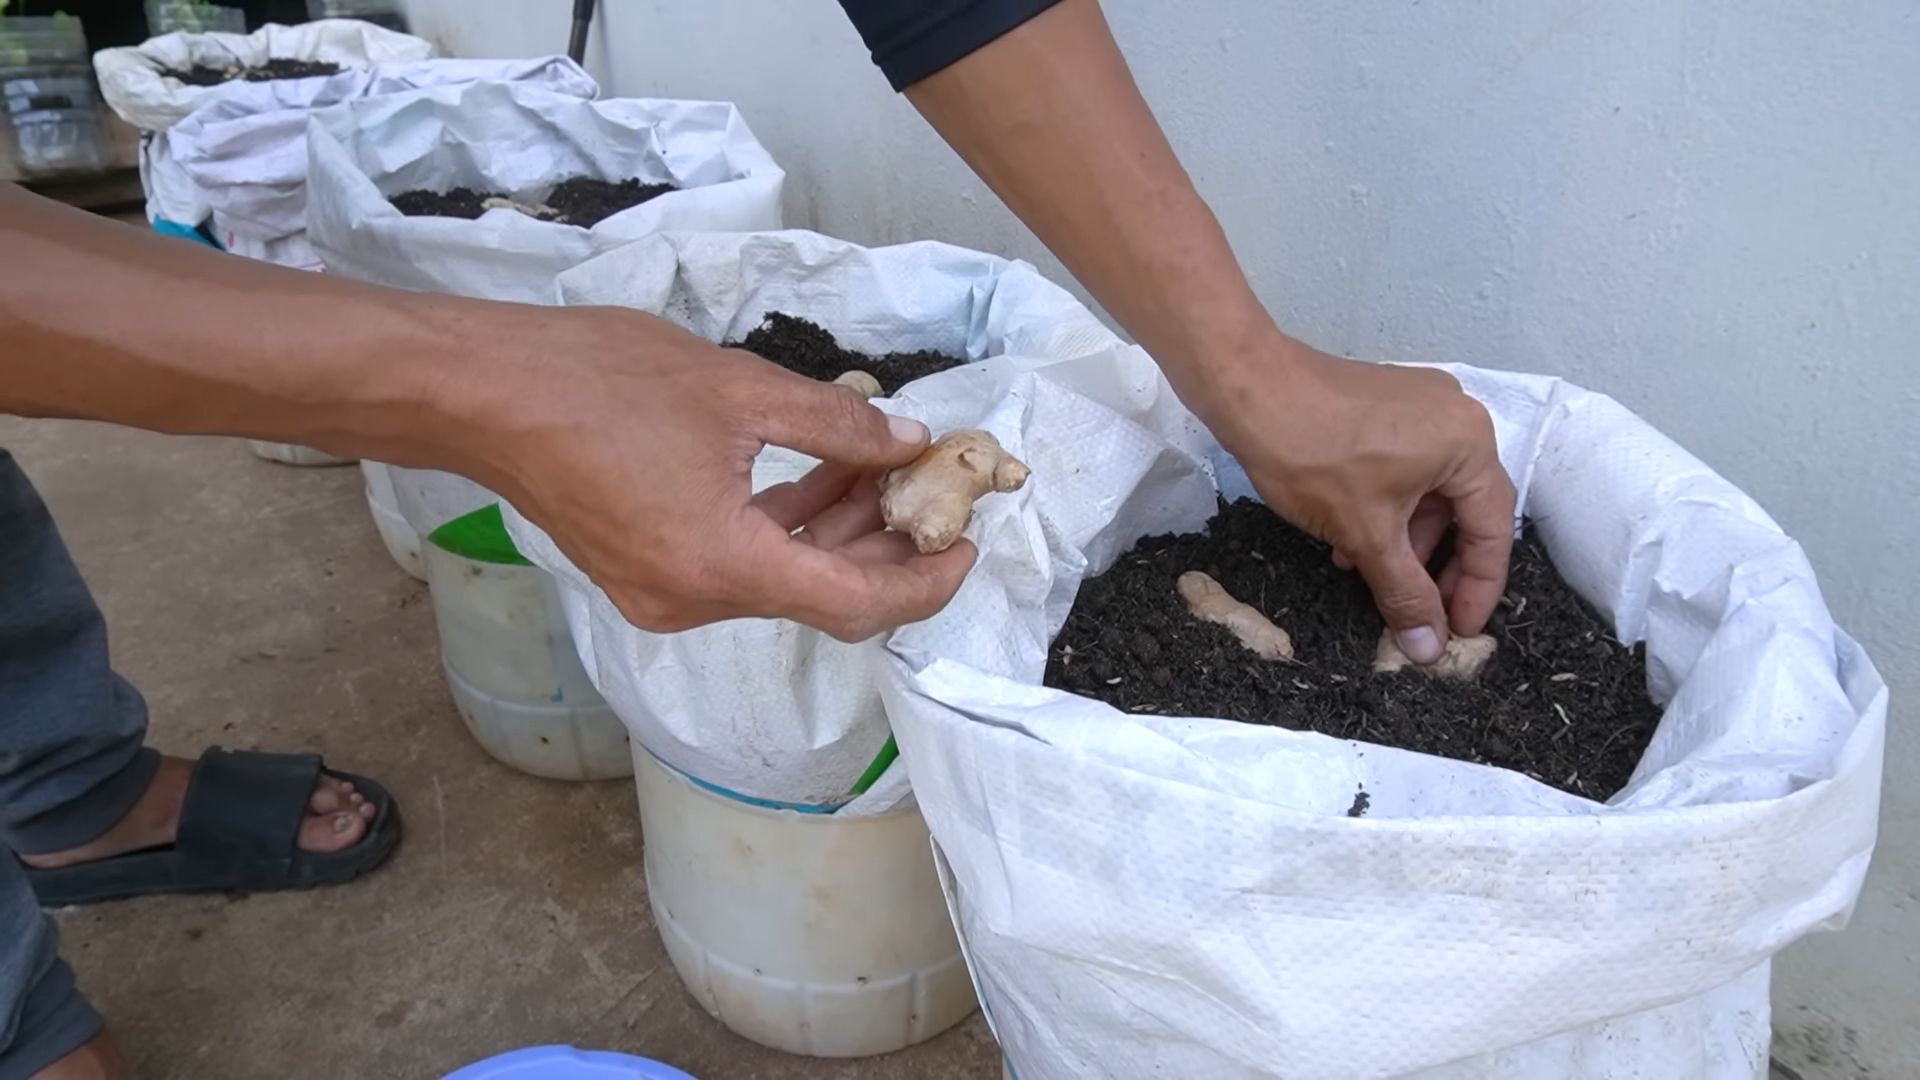
2. Ingwer einpflanzen: Legt die Ingwerstücke mit den Wachstumsknoten nach oben auf die Erde. Drückt sie leicht an.
3. Mit Erde bedecken: Bedeckt die Ingwerstücke mit etwa 2-5 cm Erde. Drückt die Erde leicht an.
4. Gießen: Gießt die Erde gründlich, bis sie feucht, aber nicht durchnässt ist. Lasst das überschüssige Wasser ablaufen.
Die Pflege des Ingwers
Die richtige Pflege ist entscheidend für ein gesundes Wachstum.
1. Standort: Stellt den Topf an einen warmen, hellen Ort, aber vermeidet direkte, pralle Mittagssonne. Ein Standort mit Morgen- oder Nachmittagssonne ist ideal. Ingwer liebt Wärme, also achtet darauf, dass die Temperatur nicht unter 20°C fällt.
2. Gießen: Haltet die Erde feucht, aber nicht durchnässt. Gießt, wenn sich die oberste Schicht der Erde trocken anfühlt. Vermeidet Staunässe, da dies zu Fäulnis führen kann. Ich überprüfe die Erde normalerweise alle paar Tage und gieße, wenn nötig.
3. Luftfeuchtigkeit: Ingwer liebt hohe Luftfeuchtigkeit. Ihr könnt die Luftfeuchtigkeit erhöhen, indem ihr die Pflanze regelmäßig mit Wasser besprüht oder den Topf auf eine Schale mit Wasser und Kieselsteinen stellt. Das Wasser verdunstet und erhöht die Luftfeuchtigkeit um die Pflanze herum.
4. Düngen (optional): Während der Wachstumsperiode (Frühling und Sommer) könnt ihr die Pflanze alle paar Wochen mit einem organischen Flüssigdünger düngen. Achtet darauf, den Dünger gemäß den Anweisungen auf der Verpackung zu verdünnen. Ich verwende gerne einen organischen Gemüsedünger.
5. Beobachtung: Achtet auf Anzeichen von Schädlingen oder Krankheiten. Blattläuse oder Spinnmilben können gelegentlich auftreten. Wenn ihr Schädlinge entdeckt, könnt ihr sie mit einem milden Insektizid oder einer Mischung aus Wasser und Spülmittel bekämpfen.
Die Ernte des Ingwers
Der Moment, auf den ihr gewartet habt!
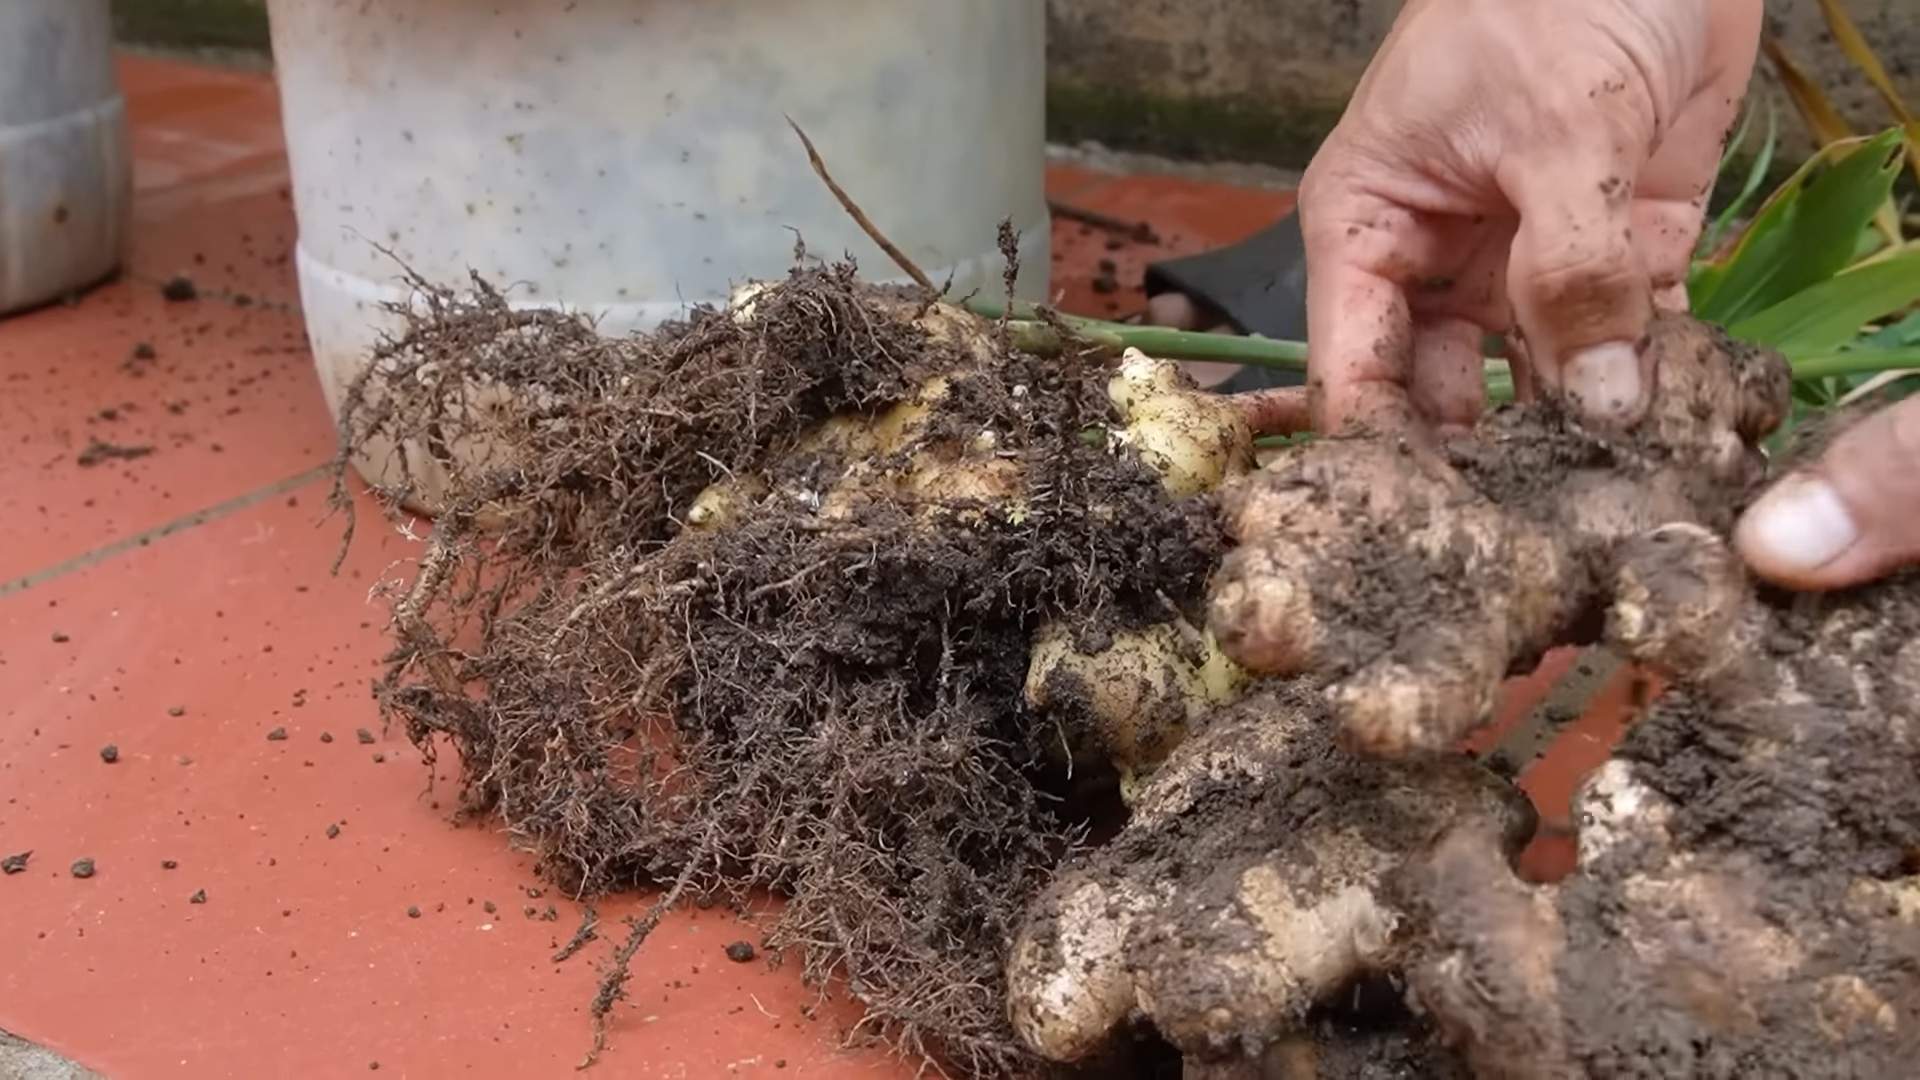
1. Wann ernten: Ingwer kann etwa 8-10 Monate nach dem Einpflanzen geerntet werden. Ihr könnt aber auch schon früher kleine Mengen ernten, indem ihr vorsichtig ein Stück der Wurzel abschneidet. Die Pflanze wird weiterwachsen.
2. Wie ernten: Um den gesamten Ingwer zu ernten, stoppt das Gießen für ein paar Wochen, um die Erde leicht austrocknen zu lassen. Kippt dann den Topf vorsichtig aus und löst die Ingwerwurzeln aus der Erde.
3. Reinigen und lagern: Reinigt die Ingwerwurzeln vorsichtig mit Wasser und lasst sie trocknen. Ihr könnt den Ingwer im Kühlschrank in einem luftdichten Behälter oder im Gefrierschrank lagern.
Zusätzliche Tipps und Tricks
Hier sind noch ein paar zusätzliche Tipps, die euch helfen können, erfolgreich Ingwer anzubauen:
* Wählt den richtigen Topf: Ein Topf mit guter Drainage ist entscheidend, um Staunässe zu vermeiden.
* Verwendet hochwertige Erde: Eine gut durchlässige, nährstoffreiche Erde ist wichtig für ein gesundes Wachstum.
* Seid geduldig: Ingwer braucht Zeit zum Wachsen, also seid nicht entmutigt, wenn ihr nicht sofort Ergebnisse seht.
* Experimentiert: Probiert verschiedene Sorten von Ingwer aus, um herauszufinden, welche am besten in eurer Region wachsen.
* Habt Spaß: Der Anbau von Ingwer sollte Spaß machen! Genießt den Prozess und freut euch über eure eigene Ernte.
Ich hoffe, dieser Leitfaden hat euch geholfen, den Anbau von Ingwer zu Hause zu verstehen. Mit ein wenig Geduld und Sorgfalt könnt ihr eure eigenen frischen Ingwer ernten und eure Gerichte damit verfeinern. Viel Erfolg und viel Spaß beim Gärtnern!
Conclusion
So, there you have it! Growing ginger at home is not only achievable, but it’s also incredibly rewarding. Forget those bland, store-bought rhizomes that have been sitting on shelves for weeks. Imagine the vibrant, zesty flavor of freshly harvested ginger, ready to elevate your culinary creations and soothe your senses. This DIY project is a game-changer for anyone who loves cooking, gardening, or simply appreciates the satisfaction of creating something from scratch.
Why is this a must-try? Because it puts you in control. You control the quality of the ginger, ensuring it’s organic and free from harmful pesticides. You control the freshness, harvesting only what you need when you need it. And you control the flavor, as homegrown ginger often boasts a more intense and nuanced taste than its commercially grown counterparts. Plus, let’s be honest, there’s something deeply satisfying about nurturing a plant from a humble rhizome to a thriving, productive specimen.
But the fun doesn’t stop there! Experiment with different varieties of ginger to discover your favorite flavor profile. Try growing ornamental ginger for its stunning foliage and exotic blooms. Consider using different potting mixes or fertilizers to see how they affect the growth and flavor of your ginger. You can even try growing ginger in different locations, such as a sunny windowsill, a greenhouse, or even outdoors in warmer climates.
Don’t be afraid to get creative and personalize your ginger-growing experience.
We’ve covered the basics of how to grow ginger at home, but the real magic happens when you put these tips into practice. So, grab a ginger rhizome, gather your supplies, and get ready to embark on this exciting horticultural adventure. We are confident that you will enjoy the process and the delicious results.
We encourage you to try this DIY trick and share your experience with us! Post photos of your ginger plants on social media using #HomegrownGinger or leave a comment below to tell us about your successes, challenges, and any tips you’ve discovered along the way. We’re eager to hear your stories and learn from your experiences. Let’s create a community of home ginger growers and inspire others to embrace the joys of homegrown goodness.
Ready to elevate your culinary creations with the unparalleled flavor of homegrown ginger?
Start your ginger-growing journey today!
Frequently Asked Questions (FAQ)
1. What kind of ginger should I use to start growing?
The best type of ginger to use for starting your home garden is fresh, plump ginger rhizomes from a grocery store or nursery. Look for rhizomes that are firm, with visible “eyes” or buds. Organic ginger is preferable, as it’s less likely to have been treated with growth inhibitors. Avoid ginger that is shriveled, moldy, or has soft spots. If you can find ginger specifically labeled as “seed ginger,” that’s even better!
2. How long does it take to grow ginger at home?
Growing ginger takes time and patience. You can expect to harvest young ginger shoots in about 3-4 months. Mature ginger rhizomes, ready for full-fledged culinary use, typically take 8-10 months to develop. The exact timeframe will depend on factors such as the variety of ginger, the growing conditions, and the climate. Remember to be patient and provide your ginger with the care it needs, and you’ll be rewarded with a bountiful harvest.
3. What are the ideal growing conditions for ginger?
Ginger thrives in warm, humid environments with partial shade. The ideal temperature range is between 65°F and 90°F (18°C and 32°C). It needs well-draining soil that is rich in organic matter. Avoid direct sunlight, which can scorch the leaves. Consistent moisture is essential, but avoid overwatering, which can lead to root rot. A location with good air circulation is also beneficial.
4. Can I grow ginger indoors?
Yes, you can absolutely grow ginger indoors! In fact, it’s a great option for those who live in colder climates. Choose a pot that is at least 12 inches deep and wide to allow for root development. Use a well-draining potting mix and place the pot in a location that receives bright, indirect sunlight. Water regularly, keeping the soil consistently moist but not soggy. You may also need to increase the humidity around the plant by misting it regularly or placing it on a pebble tray filled with water.
5. What are some common problems when growing ginger and how can I fix them?
Some common problems include root rot (caused by overwatering), leaf spot (a fungal disease), and pests such as aphids and spider mites. To prevent root rot, ensure your soil is well-draining and avoid overwatering. For leaf spot, improve air circulation and consider using a fungicide if the problem is severe. To control pests, try spraying the plant with insecticidal soap or neem oil. Regularly inspect your ginger plants for any signs of problems and address them promptly to prevent them from escalating.
6. How do I harvest ginger?
You can harvest ginger at any stage, depending on your needs. For young ginger, which has a milder flavor and thinner skin, simply dig up a small portion of the rhizome after about 3-4 months. For mature ginger, wait until the plant is about 8-10 months old. The leaves will start to turn yellow and die back, indicating that the rhizomes are ready for harvest. Gently dig up the entire plant and separate the rhizomes from the roots. Wash the rhizomes thoroughly and store them in a cool, dry place.
7. Can I grow ginger in containers?
Yes, growing ginger in containers is a great option, especially if you live in a cooler climate or have limited space. Choose a container that is at least 12 inches deep and wide to allow for adequate root development. Make sure the container has drainage holes to prevent waterlogging. Use a well-draining potting mix that is rich in organic matter. Place the container in a location that receives partial shade and water regularly, keeping the soil consistently moist.
8. What are some uses for homegrown ginger?
The possibilities are endless! Freshly harvested ginger can be used in a wide variety of culinary applications, from stir-fries and soups to teas and desserts. It can also be used to make ginger ale, ginger beer, and other beverages. In addition to its culinary uses, ginger has numerous medicinal properties and can be used to soothe nausea, reduce inflammation, and boost the immune system. You can also use the leaves and stems of the ginger plant to make teas or add flavor to soups and stews.
9. How do I store ginger after harvesting?
After harvesting, wash the ginger rhizomes thoroughly and allow them to dry completely. You can store them in a cool, dry place, such as a pantry or refrigerator. To prevent them from drying out, wrap them in a paper towel or place them in a plastic bag. Ginger can also be frozen for longer-term storage. Simply peel and chop the ginger into smaller pieces, then freeze them in a single layer on a baking sheet. Once frozen, transfer them to a freezer bag or container. Frozen ginger can be used directly from the freezer in your recipes.
10. Can I regrow ginger from the rhizomes I harvest?
Absolutely! In fact, that’s the best way to propagate ginger. After harvesting, select some healthy, plump rhizomes with visible “eyes” or buds. Allow them to dry for a few days, then plant them in a pot or garden bed, following the same instructions as you would for starting with store-bought ginger. With proper care, these rhizomes will sprout and grow into new ginger plants, providing you with a continuous supply of fresh ginger.
Leave a Comment