

Growing Purple Peppers in Pots: Unlock the secrets to a vibrant, edible garden right on your patio! Have you ever dreamed of adding a splash of color and a burst of flavor to your meals, all sourced from your own backyard (or balcony)? I know I have! This guide is your passport to cultivating beautiful, bountiful purple peppers, even if you’re short on space.
For centuries, peppers have been cherished across cultures, from the ancient civilizations of South America, where they originated, to modern-day kitchens worldwide. But did you know that purple peppers, with their unique anthocyanin pigments, offer not only visual appeal but also potential health benefits? They’re packed with antioxidants!
Many people shy away from gardening, thinking it requires acres of land and years of experience. But that’s simply not true! Growing purple peppers in pots is surprisingly easy and incredibly rewarding. Imagine the satisfaction of harvesting your own colorful peppers, knowing exactly where they came from and how they were grown. Plus, it’s a fantastic way to reduce your carbon footprint and enjoy fresh, healthy produce. This DIY guide will provide you with simple, step-by-step instructions and insider tips to ensure your potted purple peppers thrive. Let’s get started and transform your space into a pepper paradise!
Growing Vibrant Purple Peppers in Pots: A DIY Guide
Hey there, fellow gardening enthusiasts! I’m so excited to share my experience with growing gorgeous purple peppers in pots. It’s easier than you might think, and the vibrant color they add to your garden (and your plate!) is totally worth it. This guide will walk you through every step, from choosing the right seeds to harvesting your beautiful bounty. Let’s get started!
Choosing Your Purple Pepper Variety
First things first, you need to decide which purple pepper variety you want to grow. There are a few popular options, each with its own unique characteristics:
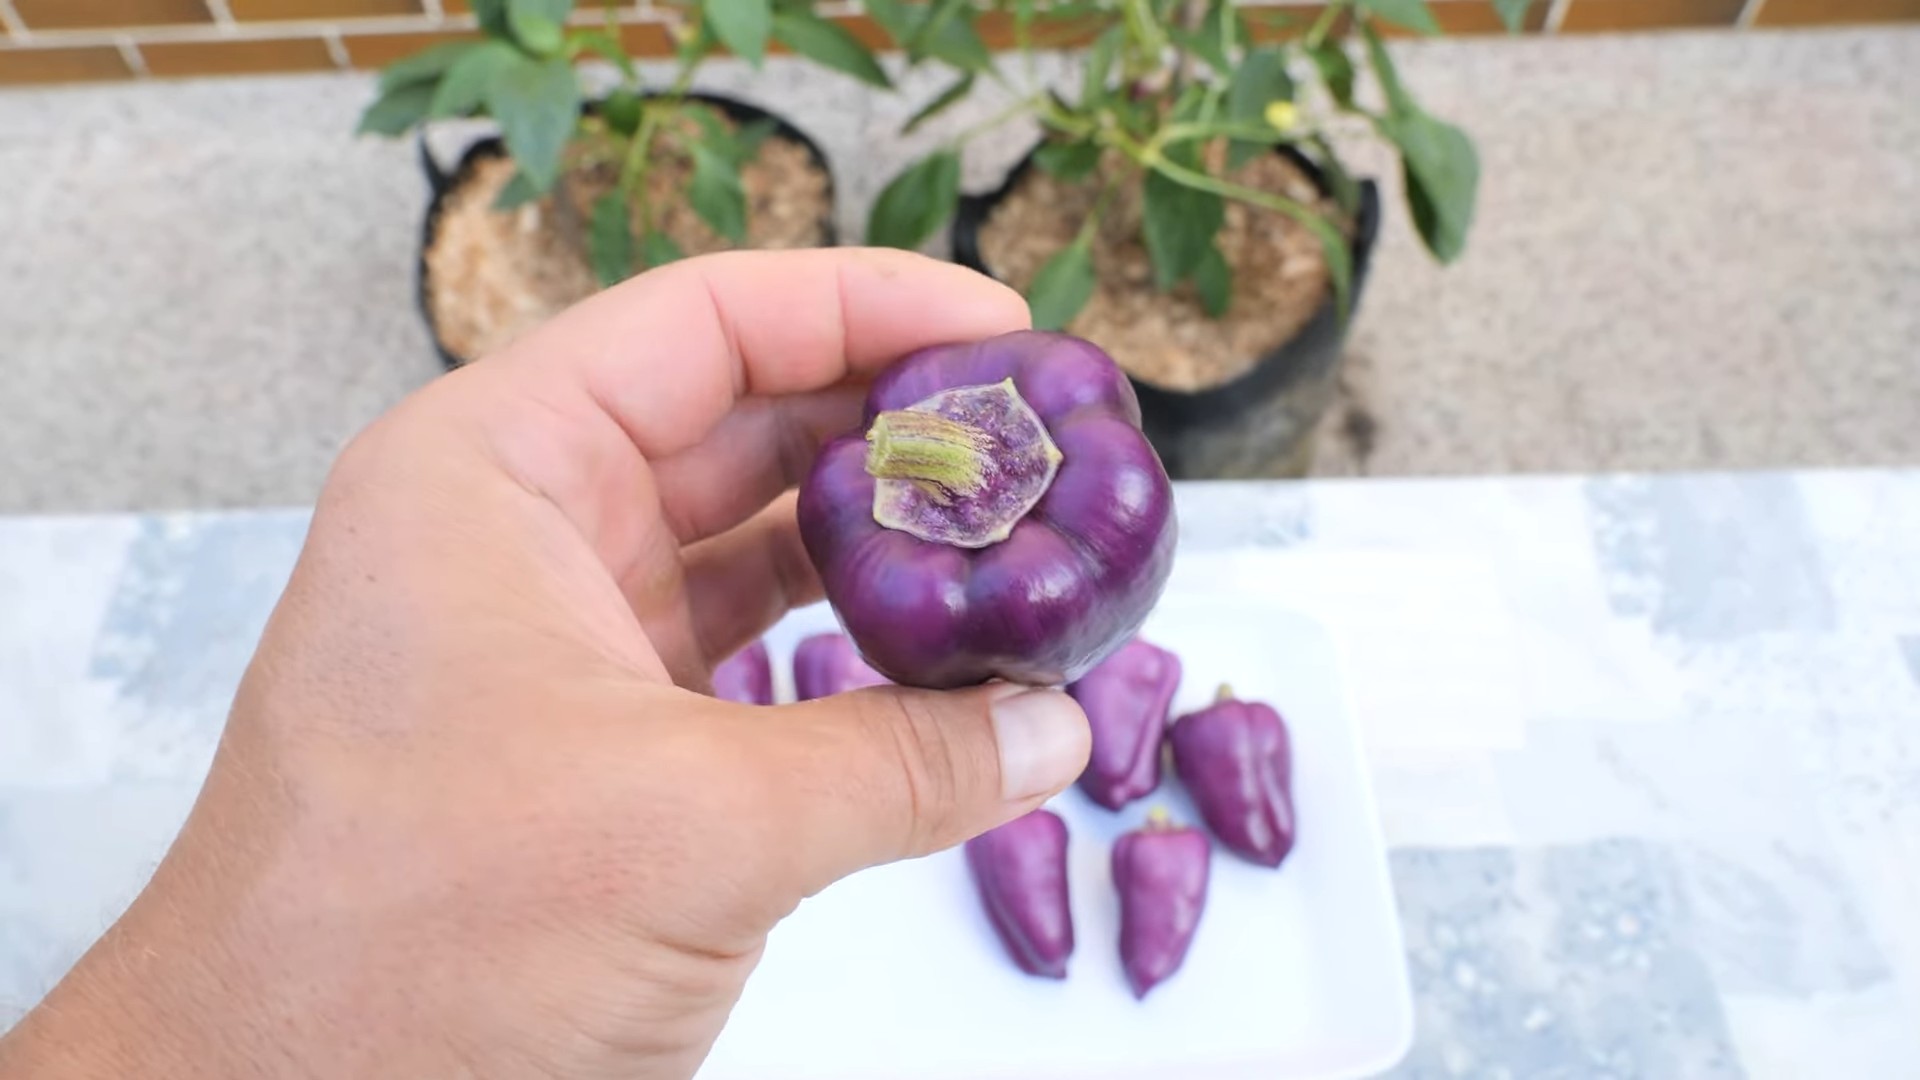
* Purple Beauty: This is a classic choice, known for its bell-shaped peppers that start green and mature to a deep, glossy purple. They’re relatively mild in flavor and perfect for salads or stuffing.
* Purple Marconi: These are long, slender peppers that also transition from green to purple. They have a slightly sweeter taste than Purple Beauty and are great for grilling or roasting.
* Sweet Purple: As the name suggests, these peppers are known for their sweetness. They are smaller than the other two and turn a vibrant purple when ripe.
* Black Pearl: These are ornamental peppers that start black and mature to a deep red. They are very hot and spicy, so be careful!
I personally love growing Purple Beauty because they are so versatile, but feel free to experiment and find your favorite!
Gathering Your Supplies
Before you start planting, make sure you have everything you need. Here’s a checklist:
* Purple pepper seeds: Choose a reputable seed supplier for the best germination rates.
* Pots: Select pots that are at least 12 inches in diameter and depth. This gives the pepper plants enough room to grow. I prefer using fabric pots because they allow for better drainage and aeration.
* Potting mix: Use a high-quality potting mix that is well-draining and contains plenty of nutrients. Avoid using garden soil, as it can compact in pots and hinder root growth.
* Seed starting tray (optional): If you’re starting your seeds indoors, you’ll need a seed starting tray with a humidity dome.
* Grow lights (optional): If you’re starting your seeds indoors, grow lights will help ensure strong, healthy seedlings.
* Watering can or hose: You’ll need a way to water your plants regularly.
* Fertilizer: Choose a fertilizer that is specifically formulated for peppers or tomatoes.
* Stakes or cages: As your pepper plants grow, they may need support to prevent them from falling over.
* Gardening gloves: Protect your hands from dirt and potential irritants.
Starting Your Seeds (Indoors or Outdoors)
You have two options for starting your purple pepper seeds: indoors or outdoors. Starting indoors gives you a head start on the growing season, especially if you live in a cooler climate.
Starting Seeds Indoors
1. Prepare your seed starting tray: Fill the cells of your seed starting tray with potting mix. Moisten the soil gently.
2. Sow the seeds: Plant 2-3 seeds per cell, about 1/4 inch deep.
3. Cover the tray: Place the humidity dome over the tray to create a warm, moist environment.
4. Provide light: Place the tray under grow lights or in a sunny window. If using grow lights, keep them on for 14-16 hours per day.
5. Keep the soil moist: Water the soil regularly to keep it moist but not soggy.
6. Wait for germination: The seeds should germinate in 7-14 days.
7. Thin the seedlings: Once the seedlings have their first true leaves (the second set of leaves), thin them to one plant per cell. Choose the strongest seedling and snip off the others at the soil line.
8. Harden off the seedlings: Before transplanting the seedlings outdoors, you need to harden them off. This means gradually exposing them to outdoor conditions over a period of 1-2 weeks. Start by placing the seedlings in a sheltered spot outdoors for a few hours each day, gradually increasing the amount of time they spend outside.
Starting Seeds Outdoors
1. Choose a sunny location: Select a spot in your garden that receives at least 6-8 hours of sunlight per day.
2. Prepare the soil: Amend the soil with compost or other organic matter to improve drainage and fertility.
3. Sow the seeds: Plant the seeds directly into the soil, about 1/4 inch deep. Space the seeds about 18 inches apart.
4. Water the soil: Water the soil gently to keep it moist but not soggy.
5. Protect the seedlings: If you live in an area with cool temperatures or pests, you may need to protect the seedlings with row covers or netting.
6. Thin the seedlings: Once the seedlings have their first true leaves, thin them to one plant per 18 inches.
Transplanting Your Seedlings
Once your seedlings are about 6-8 inches tall and the weather is warm enough (soil temperature above 60°F), it’s time to transplant them into their permanent pots.
1. Prepare the pots: Fill the pots with potting mix, leaving about an inch of space at the top.
2. Dig a hole: Dig a hole in the center of each pot that is large enough to accommodate the root ball of the seedling.
3. Remove the seedling: Gently remove the seedling from its cell or the ground, being careful not to damage the roots.
4. Place the seedling in the hole: Place the seedling in the hole and backfill with potting mix.
5. Water the plant: Water the plant thoroughly to help it settle in.
6. Add support: Insert a stake or cage into the pot to provide support for the plant as it grows.
Caring for Your Purple Pepper Plants
Now that your purple pepper plants are in their pots, it’s important to provide them with the care they need to thrive.
* Watering: Water your pepper plants regularly, especially during hot, dry weather. Aim to keep the soil consistently moist but not soggy. Check the soil moisture by sticking your finger into the soil about an inch deep. If it feels dry, it’s time to water.
* Fertilizing: Feed your pepper plants every 2-3 weeks with a fertilizer that is specifically formulated for peppers or tomatoes. Follow the instructions on the fertilizer label. I like to use a balanced fertilizer early in the season and then switch to a fertilizer with higher phosphorus and potassium levels as the plants start to flower and fruit.
* Sunlight: Purple peppers need at least 6-8 hours of sunlight per day. Place your pots in a sunny location where they will receive plenty of light.
* Pruning: Pruning your pepper plants can help improve air circulation and encourage fruit production. Remove any suckers (small shoots that grow from the base of the plant) and any yellowing or diseased leaves.
* Pest and disease control: Keep an eye out for pests and diseases. Common pests that affect pepper plants include aphids, spider mites, and whiteflies. Common diseases include blossom end rot and fungal infections. Treat any problems promptly with appropriate organic pesticides or fungicides. A strong blast of water from the hose can often dislodge aphids and spider mites. For blossom end rot, ensure consistent watering and consider adding calcium to the soil.
* Mulching: Add a layer of mulch around the base of the plants to help retain moisture, suppress weeds, and regulate soil temperature. Organic mulches like straw or wood chips are a great choice.
Harvesting Your Purple Peppers
The moment you’ve been waiting for! Your purple peppers are ready to harvest when they have reached their mature size and color. This will vary depending on the variety you are growing.
1. Check for ripeness: Look for peppers that are firm, glossy, and have a deep, even color.
2. Harvest carefully: Use a sharp knife or scissors to cut the peppers from the plant, leaving a small stem attached.
3. Enjoy your harvest: Use your purple peppers in your favorite recipes or share them with friends and family.
Troubleshooting Common Problems
Even with the best care, you may encounter some problems while growing purple peppers. Here are a few common issues and how to address them:
* Blossom end rot: This is a condition that causes the bottom of the peppers to rot. It is usually caused by a calcium deficiency or inconsistent watering. To prevent blossom end rot, ensure consistent watering and consider adding calcium to the soil.
* Aphids: These small, sap-sucking insects can weaken your pepper plants. Treat aphids with insecticidal soap or neem oil.
* Spider mites: These tiny pests can cause yellowing and stippling on the leaves.

Conclusion
So, there you have it! Growing purple peppers in pots is not only achievable but also incredibly rewarding. Imagine the vibrant splash of color these beauties will bring to your patio, balcony, or even a sunny windowsill. Beyond their aesthetic appeal, these peppers offer a unique flavor profile that can elevate your culinary creations.
This DIY approach to cultivating your own purple peppers empowers you to control the entire growing process, from selecting the perfect potting mix to ensuring optimal sunlight exposure. You’ll know exactly what goes into your peppers, guaranteeing fresh, organic produce free from harmful chemicals. Plus, there’s an undeniable satisfaction in nurturing a plant from seed to harvest, witnessing the transformation from tiny sprout to a bountiful source of delicious peppers.
But the benefits don’t stop there. Growing your own purple peppers in pots is also a fantastic way to reduce your carbon footprint. By sourcing your produce locally – from your own backyard, no less – you’re minimizing transportation costs and supporting sustainable practices. It’s a small change that can make a big difference.
And speaking of making a difference, consider experimenting with different varieties of purple peppers. From the mild and sweet ‘Purple Beauty’ to the fiery ‘Purple Jalapeño,’ there’s a purple pepper out there to suit every palate. You can also try different potting mixes to see which one yields the best results for your specific growing conditions. Perhaps a mix with added compost for extra nutrients, or one with perlite for improved drainage.
Don’t be afraid to get creative with your container choices, too. While standard terracotta pots are perfectly fine, you could also repurpose old buckets, baskets, or even grow bags. Just make sure your chosen container has adequate drainage holes to prevent waterlogging.
We highly encourage you to embark on this exciting journey of growing purple peppers in pots. It’s a fun, educational, and ultimately delicious experience. And once you’ve harvested your first batch of vibrant purple peppers, don’t hesitate to share your success stories with us! We’d love to see photos of your plants, hear about your favorite recipes, and learn any tips or tricks you’ve discovered along the way. Share your experiences on social media using relevant hashtags and inspire others to join the purple pepper revolution!
Remember, gardening is a learning process, and there will be challenges along the way. But with a little patience, dedication, and the information provided in this guide, you’ll be well on your way to enjoying a bountiful harvest of homegrown purple peppers. So, grab your pots, seeds, and potting mix, and let’s get growing!
Frequently Asked Questions (FAQ)
What is the best time of year to start growing purple peppers in pots?
The ideal time to start growing purple peppers depends on your climate. In general, you should start seeds indoors 6-8 weeks before the last expected frost. This allows the seedlings to develop a strong root system before being transplanted outdoors. If you live in a warmer climate with a longer growing season, you can start seeds directly in pots outdoors after the threat of frost has passed. However, starting indoors is generally recommended for better control over temperature and moisture.
What size pot is needed for growing purple peppers?
A pot that is at least 12 inches in diameter and 12 inches deep is recommended for growing purple peppers. This provides enough space for the roots to grow and develop properly. Larger pots, such as those that are 5 gallons or more, are even better, as they provide more room for the roots and help to retain moisture. Make sure the pot has adequate drainage holes to prevent waterlogging, which can lead to root rot.
How much sunlight do purple peppers need?
Purple peppers need at least 6-8 hours of direct sunlight per day to thrive. Choose a location that receives plenty of sunlight throughout the day. If you are growing peppers indoors, you may need to supplement with grow lights to ensure they receive enough light. Rotate the pots regularly to ensure that all sides of the plant receive equal sunlight exposure.
What type of soil is best for growing purple peppers in pots?
A well-draining potting mix that is rich in organic matter is best for growing purple peppers in pots. Avoid using garden soil, as it can be too heavy and may not drain properly. A good potting mix should contain a blend of peat moss, perlite, and vermiculite. You can also add compost or other organic matter to improve the soil’s fertility and drainage.
How often should I water my purple pepper plants?
Water your purple pepper plants regularly, especially during hot, dry weather. The soil should be kept consistently moist, but not waterlogged. Water deeply whenever the top inch of soil feels dry to the touch. Avoid watering the foliage, as this can promote fungal diseases. Mulching around the base of the plant can help to retain moisture and suppress weeds.
Do purple peppers need fertilizer?
Yes, purple peppers benefit from regular fertilization. Use a balanced fertilizer that is specifically formulated for vegetables. Follow the instructions on the fertilizer label for application rates and frequency. You can also use organic fertilizers, such as compost tea or fish emulsion. Fertilize your pepper plants every 2-3 weeks during the growing season.
How do I prevent pests and diseases from affecting my purple pepper plants?
To prevent pests and diseases, start by choosing disease-resistant varieties of purple peppers. Inspect your plants regularly for signs of pests or diseases. If you find any pests, such as aphids or spider mites, you can treat them with insecticidal soap or neem oil. To prevent fungal diseases, avoid overwatering and ensure good air circulation around the plants. You can also use a fungicide if necessary.
When are purple peppers ready to harvest?
Purple peppers are typically ready to harvest when they have reached their full size and have developed a deep, vibrant purple color. The peppers should also feel firm to the touch. Use a sharp knife or scissors to cut the peppers from the plant, leaving a small stem attached. The time from planting to harvest can vary depending on the variety of pepper and the growing conditions, but it is typically around 60-80 days.
Can I grow purple peppers indoors year-round?
Yes, you can grow purple peppers indoors year-round if you provide them with the right conditions. This includes adequate sunlight (or grow lights), proper watering, fertilization, and pest control. Choose a compact variety of purple pepper that is well-suited for container growing. You may also need to pollinate the flowers by hand to ensure fruit production.
What are some common problems when growing purple peppers and how can I fix them?
Some common problems include blossom end rot (caused by calcium deficiency), leaf drop (caused by overwatering or underwatering), and pest infestations. To prevent blossom end rot, add calcium to the soil or use a calcium-rich fertilizer. Adjust your watering schedule to ensure that the soil is consistently moist, but not waterlogged. Treat pest infestations with appropriate insecticides or organic pest control methods. Regularly inspect your plants and address any problems promptly to ensure a healthy and productive harvest.

Leave a Comment