

Grow Sweet Melons, right in your own backyard! Imagine biting into a juicy, sun-ripened melon, bursting with flavor, knowing you nurtured it from seed to table. Sounds idyllic, doesn’t it? For centuries, cultivating melons has been a cherished tradition, dating back to ancient Egypt and beyond, where they were symbols of prosperity and sweetness. Today, you don’t need to be a pharaoh to enjoy this delicious fruit.
But let’s be honest, growing melons can seem intimidating. They have a reputation for being finicky and demanding. That’s where these DIY tricks and hacks come in! I’m here to demystify the process and show you how to grow sweet melons, even if you’re a beginner gardener with limited space.
This article is packed with simple, effective techniques to boost your melon-growing success. From choosing the right varieties for your climate to maximizing sunlight and preventing common pests, I’ll share my tried-and-true secrets. Why spend a fortune at the grocery store when you can harvest your own delicious, organic melons? Let’s get started and transform your garden into a melon paradise!
Growing Sweet Melons: A DIY Guide to Juicy Success
Hey there, fellow gardening enthusiasts! I’m so excited to share my tried-and-true method for growing incredibly sweet and juicy melons right in your own backyard. Forget those bland, store-bought melons – with a little effort and these tips, you’ll be enjoying homegrown goodness all summer long. This guide is packed with everything I’ve learned over the years, so let’s dive in!
Choosing the Right Melon Variety
Before we even think about planting, selecting the right melon variety is crucial. Not all melons are created equal, and some are better suited for certain climates and growing conditions. Here are a few of my favorites:
* Cantaloupe: A classic choice, cantaloupes are known for their sweet, orange flesh and distinct aroma. Look for varieties like ‘Athena’ or ‘Hales Best Jumbo’ for reliable results.
* Honeydew: These melons have a smooth, pale green rind and sweet, juicy flesh. ‘Honeycrisp’ and ‘Temptation’ are excellent choices.
* Watermelon: Who doesn’t love a refreshing watermelon on a hot day? ‘Sugar Baby’ is a compact variety perfect for smaller gardens, while ‘Crimson Sweet’ is a larger, more traditional option.
* Galia Melon: This is a personal favorite! It has a yellow rind with netting and a pale green, incredibly sweet flesh. It’s a bit less common, but definitely worth seeking out.
Pro Tip: Check your local climate and growing season before choosing a variety. Some melons require a longer growing season than others. Your local nursery can offer great advice!
Preparing Your Garden Bed
Melons are heavy feeders, meaning they need plenty of nutrients to thrive. Proper soil preparation is key to a successful harvest.
* Sunlight: Melons need at least 6-8 hours of direct sunlight per day. Choose a location in your garden that gets plenty of sunshine.
* Soil: Melons prefer well-drained soil that is rich in organic matter. Amend your soil with compost, aged manure, or other organic materials to improve its fertility and drainage.
* pH: The ideal soil pH for melons is between 6.0 and 6.8. You can test your soil pH with a home testing kit or send a sample to your local extension office for analysis.
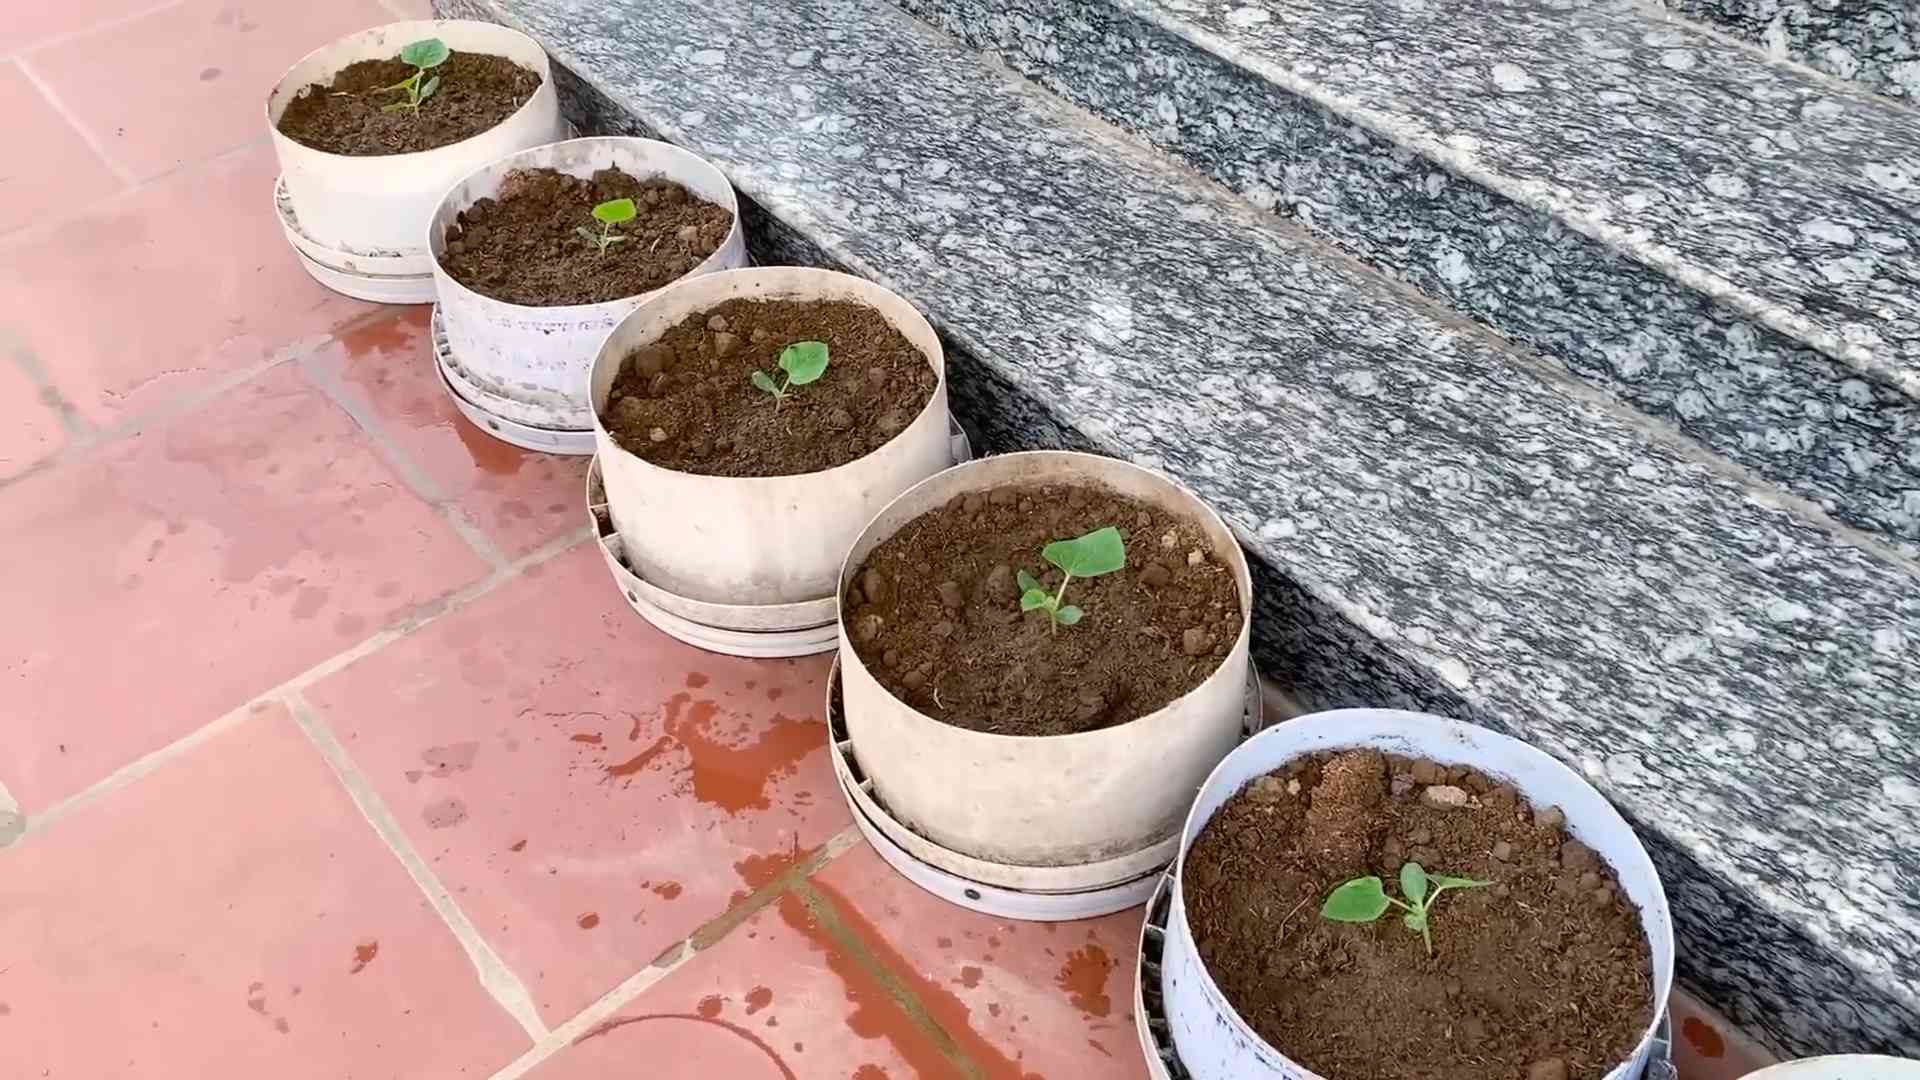
* Raised Beds: I’ve found that growing melons in raised beds can significantly improve drainage and soil temperature, leading to healthier plants and bigger yields.
Step-by-Step Planting Guide
Now for the fun part – planting! You can either start your melon seeds indoors or direct sow them in your garden, depending on your climate and growing season.
1. Starting Seeds Indoors (Optional): If you live in a cooler climate with a shorter growing season, starting your melon seeds indoors 3-4 weeks before the last expected frost is a great idea.
* Use seed-starting trays or small pots filled with seed-starting mix.
* Sow the seeds about ½ inch deep.
* Keep the soil moist but not soggy.
* Provide plenty of light, either with a grow light or a sunny windowsill.
* Harden off the seedlings by gradually exposing them to outdoor conditions for a week before transplanting.
2. Direct Sowing: If your climate is warm and your growing season is long enough, you can direct sow your melon seeds directly into your garden bed.
* Wait until the soil has warmed up to at least 70°F (21°C).
* Sow the seeds about 1 inch deep and 18-24 inches apart.
* Water gently but thoroughly.
3. Transplanting Seedlings: If you started your seeds indoors, carefully transplant the seedlings into your garden bed after the last expected frost.
* Dig a hole slightly larger than the root ball.
* Gently remove the seedling from its container and place it in the hole.
* Backfill with soil and water thoroughly.
* Space the seedlings 18-24 inches apart.
4. Mulching: After planting, apply a layer of mulch around your melon plants. Mulch helps to retain moisture, suppress weeds, and regulate soil temperature. I like to use straw or shredded leaves. Black plastic mulch can also be used to warm the soil, especially beneficial in cooler climates.
5. Watering: Melons need consistent moisture, especially during fruit development. Water deeply and regularly, aiming for about 1-2 inches of water per week. Avoid overhead watering, as this can lead to fungal diseases. Drip irrigation is an excellent option for delivering water directly to the roots.
Caring for Your Melon Plants
Once your melon plants are established, it’s important to provide them with the care they need to thrive.
* Fertilizing: Melons are heavy feeders, so regular fertilization is essential. Use a balanced fertilizer (e.g., 10-10-10) every 2-3 weeks. You can also supplement with compost tea or fish emulsion.
* Pruning: Pruning melon vines can help to improve air circulation and encourage fruit production. Remove any suckers (small shoots that grow from the base of the plant) and any yellowing or diseased leaves.
* Pest Control: Keep an eye out for common melon pests like aphids, squash bugs, and cucumber beetles. Use organic pest control methods like insecticidal soap or neem oil to control these pests. Row covers can also be used to protect young plants from pests.
* Weed Control: Keep your garden bed free of weeds, as they can compete with your melon plants for nutrients and water. Hand-pull weeds regularly or use a hoe to cultivate the soil.
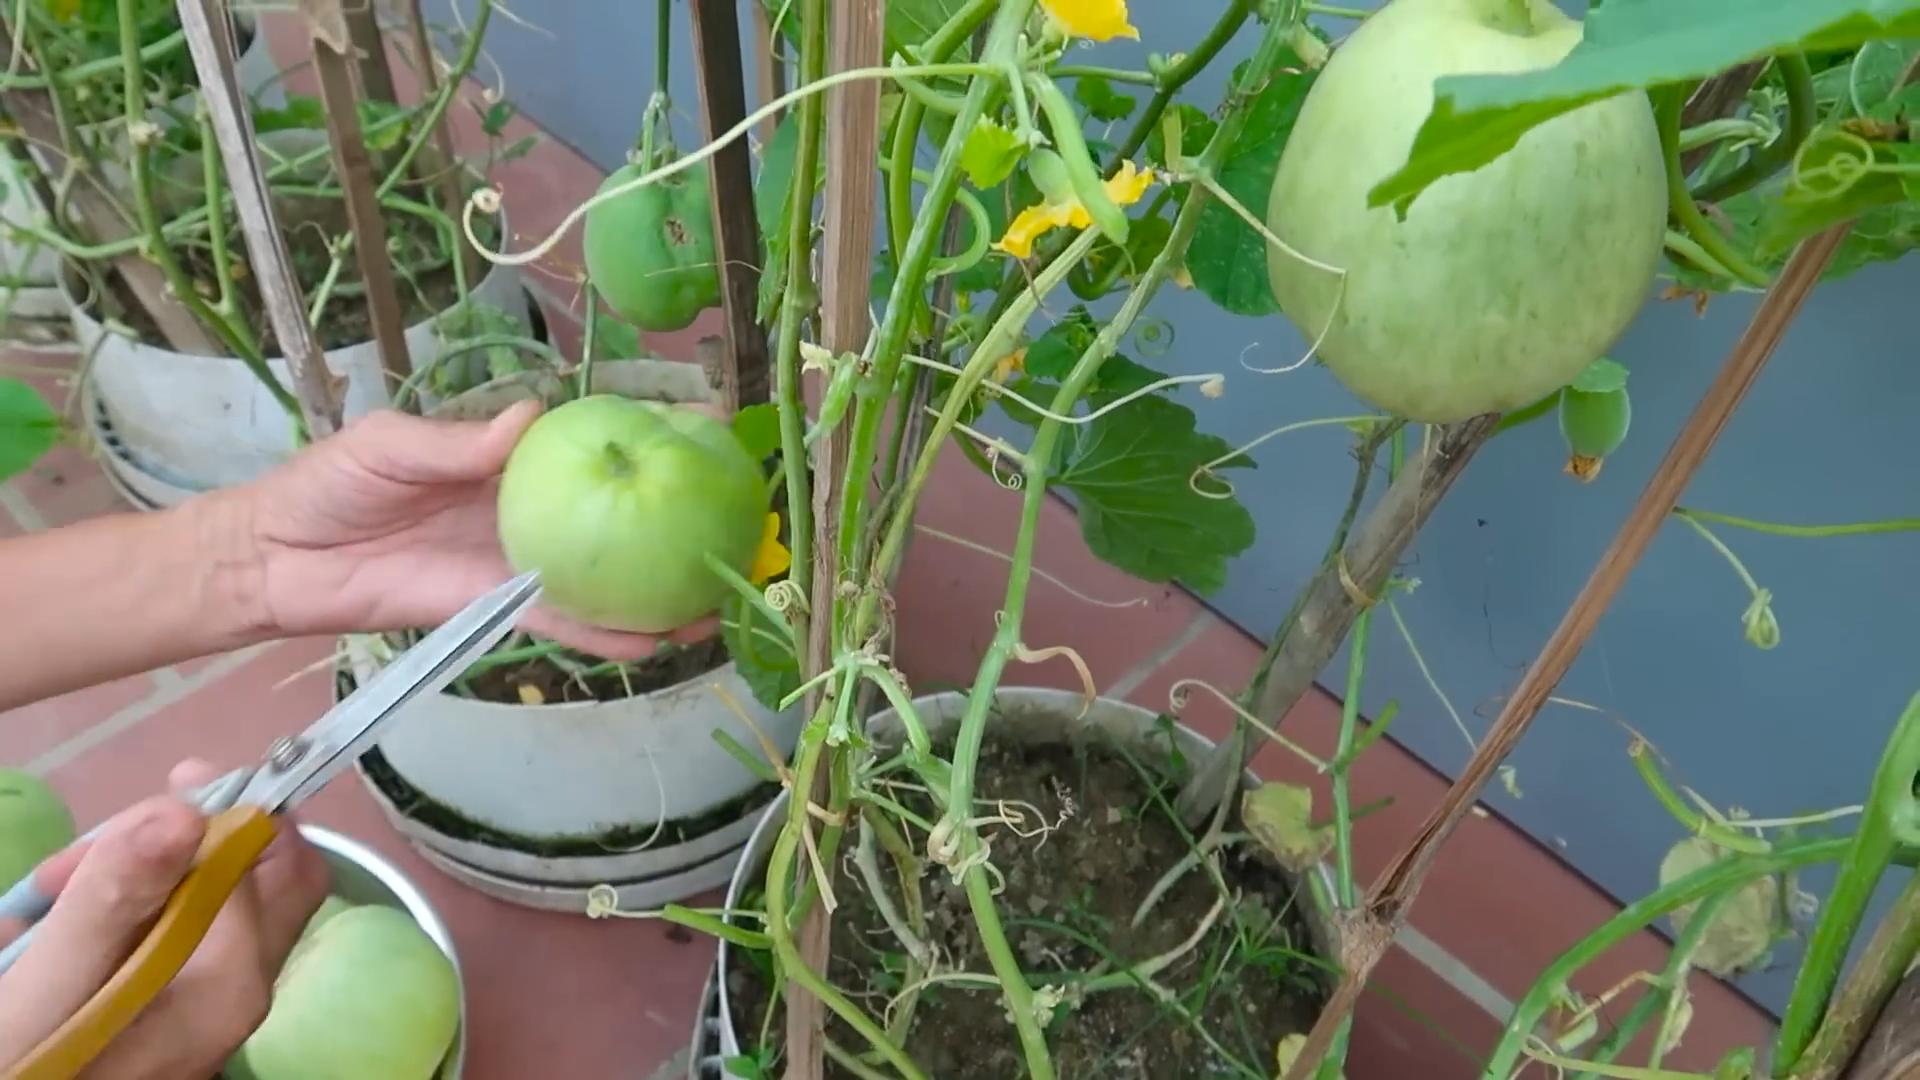
* Supporting the Fruit: As your melons grow larger, you may need to support them to prevent them from rotting on the ground. You can use melon cradles, slings made from pantyhose, or even just place them on a bed of straw. This is especially important for larger varieties like watermelons.
Pollination: Helping Nature Along
Melons rely on pollinators, primarily bees, to produce fruit. If you’re not seeing a lot of bee activity in your garden, you may need to hand-pollinate your melon flowers.
* Identifying Male and Female Flowers: Male flowers have a long, thin stem, while female flowers have a small, immature melon at the base of the flower.
* Hand-Pollinating: In the morning, use a small paintbrush to collect pollen from the male flowers and transfer it to the female flowers. Repeat this process for several days to ensure successful pollination.
Pro Tip: Planting flowers that attract pollinators, such as sunflowers, zinnias, and lavender, can help to increase bee activity in your garden.
Harvesting Your Sweet Melons
Knowing when to harvest your melons is crucial for getting that perfect, sweet flavor. Here are some tips for each type of melon:
* Cantaloupe: Cantaloupes are ready to harvest when the stem begins to slip easily from the fruit. The rind will also turn from green to tan, and the melon will have a sweet aroma.
* Honeydew: Honeydews are ready to harvest when the rind turns from green to creamy yellow and the blossom end is slightly soft.
* Watermelon: Watermelons are a bit trickier to determine. Look for a dull thud when you tap the melon, a yellow spot on the underside where it rested on the ground, and a dried tendril near the stem.
* Galia Melon: Galia melons are ready when the rind turns a golden yellow and the netting becomes more pronounced. They also have a distinct, sweet aroma.
Important Note: Don’t pick your melons too early! They won’t ripen much after being harvested.
Dealing with Common Melon Problems
Even with the best care, you may encounter some problems while growing melons. Here are a few common issues and how to address them:
* Powdery Mildew: This fungal disease causes a white, powdery coating on the leaves. Improve air circulation, avoid overhead watering, and use a fungicide if necessary.
* Fusarium Wilt: This soilborne disease causes wilting and yellowing of the leaves. Plant resistant varieties and practice crop rotation.
* Aphids: These small, sap-sucking insects can weaken your plants. Use insecticidal soap or neem oil to control them.
* Squash Bugs: These pests can cause significant damage to melon plants. Hand-pick them off the plants or use insecticidal soap.
* Cucumber Beetles: These beetles can transmit diseases and damage the leaves and fruit. Use row covers to protect young plants and hand-pick the beetles off the plants.
Enjoying Your Homegrown Melons
Congratulations! You’ve successfully grown your own sweet and juicy melons. Now it’s time to enjoy the fruits (or rather, melons) of your labor.
*
Conclusion
So, there you have it! Growing sweet melons at home, bursting with flavor and sunshine, is absolutely within your reach. This DIY trick, focusing on [specific aspect of the trick, e.g., soil amendment, watering technique, or support system], is a game-changer for anyone who’s ever dreamed of biting into a perfectly ripe, homegrown melon. It addresses the common challenges of melon cultivation – from nutrient deficiencies to pest control – in a simple, effective, and often surprisingly affordable way.
Why is this a must-try? Because it empowers you to take control of your melon-growing journey. You’re not just relying on luck or expensive store-bought solutions. You’re actively creating the ideal environment for your melons to thrive, resulting in a harvest that’s not only delicious but also deeply satisfying. Imagine the pride of serving a melon you nurtured from seed to table!
But the beauty of this DIY approach lies in its adaptability. Feel free to experiment with variations. For example, if you’re using [specific material mentioned in the main article, e.g., coffee grounds as a soil amendment], try different ratios to see what works best for your soil. If you’re implementing a [specific technique mentioned in the main article, e.g., vertical growing system], consider adapting the design to suit your available space and resources. Perhaps you could try companion planting with [suggest a companion plant, e.g., marigolds] to further deter pests. The possibilities are endless!
Don’t be afraid to get your hands dirty and embrace the learning process. Growing sweet melons is a rewarding experience, and this DIY trick is your secret weapon for success. We’re confident that you’ll be amazed by the results.
Now, it’s your turn! We wholeheartedly encourage you to try this DIY trick for growing sweet melons. Plant those seeds, implement the technique, and watch your melon patch flourish. And most importantly, share your experience with us! We’d love to hear about your successes, challenges, and any variations you discover along the way. Post photos of your melons, share your tips in the comments section, and let’s build a community of passionate melon growers. Together, we can unlock the secrets to cultivating the sweetest, most flavorful melons imaginable. Happy growing!
Frequently Asked Questions (FAQs)
What kind of melons does this DIY trick work best for?
This DIY trick is generally effective for a wide variety of melon types, including watermelon, cantaloupe, honeydew, and even smaller varieties like Galia melons. However, the specific adjustments you might need to make will depend on the particular melon you’re growing. For instance, larger melons like watermelons may require a sturdier support system if you’re using a vertical growing method, while smaller melons might benefit from slightly less intense sunlight. Always research the specific needs of your chosen melon variety for optimal results.
How often should I apply [specific material mentioned in the main article, e.g., Epsom salts] to my melon plants?
The frequency of application depends on several factors, including the type of soil you have, the age of your plants, and the weather conditions. As a general guideline, for [specific material mentioned in the main article, e.g., Epsom salts], you can apply it every [timeframe, e.g., two to four weeks] during the growing season. However, it’s crucial to monitor your plants for any signs of nutrient deficiencies or excesses. Yellowing leaves, stunted growth, or blossom-end rot can indicate a need for adjustments. Always err on the side of caution and avoid over-application, as this can be detrimental to your plants. Soil testing can provide valuable insights into your soil’s nutrient levels and help you fine-tune your application schedule.
What if I don’t have access to [specific material mentioned in the main article, e.g., coffee grounds]? Are there any alternatives?
Absolutely! The beauty of DIY gardening is its adaptability. If you can’t get your hands on [specific material mentioned in the main article, e.g., coffee grounds], there are several alternatives you can try. For example, [suggest an alternative, e.g., composted manure] can provide similar benefits as a soil amendment. [Suggest another alternative, e.g., Bone meal] is a good substitute for phosphorus. Remember to research the specific nutrient content of each alternative and adjust your application accordingly. The key is to provide your melon plants with the essential nutrients they need to thrive.
My melon plants are producing flowers, but no fruit. What could be the problem?
There are several reasons why your melon plants might be producing flowers but no fruit. One common issue is poor pollination. Melons require pollination to set fruit, and this is typically done by bees and other insects. You can encourage pollination by planting flowers that attract pollinators near your melon patch. If you suspect poor pollination is the problem, you can also try hand-pollinating the flowers yourself. Another possible cause is nutrient deficiencies. Make sure your plants are getting enough phosphorus and potassium, which are essential for fruit development. Stressful environmental conditions, such as extreme heat or drought, can also inhibit fruit set. Ensure your plants are adequately watered and protected from harsh weather. Finally, some melon varieties require both male and female flowers for pollination, so make sure you have both types present.
How do I know when my melons are ripe and ready to harvest?
Determining when a melon is ripe can be tricky, but there are several telltale signs to look for. For cantaloupes, the stem should slip easily from the fruit when gently tugged. The skin should also have a distinct aroma and a slightly softened texture. For watermelons, look for a dull, thumping sound when you tap the melon. The underside of the melon, where it rests on the ground, should also turn from white to yellow. Honeydew melons are ripe when the skin turns a creamy yellow color and the blossom end feels slightly soft. Ultimately, the best way to determine ripeness is to taste a small piece of the melon. If it’s sweet and juicy, it’s ready to harvest!
Are there any specific pests or diseases that I should be aware of when growing melons?
Yes, melons are susceptible to several pests and diseases. Common pests include aphids, squash bugs, and cucumber beetles. These pests can damage the leaves and stems of your plants, and they can also transmit diseases. To control pests, you can use insecticidal soap, neem oil, or hand-pick them off the plants. Common diseases include powdery mildew, downy mildew, and fusarium wilt. These diseases can cause leaf spots, wilting, and even plant death. To prevent diseases, ensure good air circulation around your plants, avoid overhead watering, and use disease-resistant varieties. If you notice any signs of pests or diseases, take action immediately to prevent them from spreading.
Can I grow melons in containers?
Yes, you can absolutely grow melons in containers, especially smaller varieties. Choose a large container with good drainage and use a high-quality potting mix. Make sure the container is placed in a sunny location that receives at least six to eight hours of sunlight per day. Water regularly and fertilize every two to three weeks with a balanced fertilizer. You may also need to provide support for the vines as they grow. Container gardening is a great option for those with limited space or poor soil conditions.
How important is sunlight for growing sweet melons?
Sunlight is absolutely crucial for growing sweet melons. Melons need at least six to eight hours of direct sunlight per day to produce sweet, flavorful fruit. Without enough sunlight, the plants will be weak and spindly, and the fruit will be small and bland. Choose a sunny location for your melon patch and make sure the plants are not shaded by trees or buildings. If you live in an area with limited sunlight, you may need to supplement with artificial lighting.
What is the best type of soil for growing melons?
Melons prefer well-drained, fertile soil that is rich in organic matter. The ideal soil pH is between 6.0 and 7.0. Before planting, amend the soil with compost, manure, or other organic matter to improve its fertility and drainage. Avoid heavy clay soils, as they can become waterlogged and inhibit root growth. If you have heavy clay soil, you can improve its drainage by adding sand or perlite.
How can I improve the sweetness of my melons?
Several factors can influence the sweetness of your melons. First, make sure your plants are getting enough sunlight. Sunlight is essential for sugar production. Second, provide your plants with adequate water and nutrients. Water stress can reduce the sweetness of the fruit. Third, harvest the melons at the peak of ripeness. Overripe melons can become mushy and lose their sweetness. Finally, choose melon varieties that are known for their sweetness. Some varieties, such as ‘Sugar Baby’ watermelon and ‘Honeydew Green Flesh’, are naturally sweeter than others.
Leave a Comment