

Growing mushrooms at home might sound like something only professional mycologists can achieve, but I’m here to tell you it’s surprisingly accessible and incredibly rewarding! Forget those expensive grocery store prices and the limited selection – imagine harvesting fresh, flavorful mushrooms right from your own kitchen or garden.
Humans have been cultivating mushrooms for centuries, with evidence suggesting organized mushroom farming dates back to ancient China. These fascinating fungi have been prized for their culinary and medicinal properties across various cultures. Today, the allure of growing your own food, coupled with the unique appeal of mushrooms, has sparked a surge in home cultivation.
Why should you try this DIY project? Well, for starters, it’s a fantastic way to reduce your carbon footprint by sourcing food locally – literally from your own home! Plus, it’s a fun and educational experience that connects you with the natural world. But more importantly, growing mushrooms at home allows you to enjoy a wider variety of gourmet mushrooms that are often unavailable or prohibitively expensive in stores. I’m going to show you some simple tricks and DIY methods that will have you harvesting your own delicious mushrooms in no time. Get ready to unlock the secrets of the fungal kingdom and transform your space into a mini mushroom farm!
Growing Mushrooms at Home: A Beginner’s Guide
Okay, so you want to grow mushrooms at home? Awesome! It’s a surprisingly rewarding and fascinating hobby. I’m going to walk you through a simple method using a substrate called “straw,” which is relatively easy to source and work with. We’ll focus on growing oyster mushrooms, as they’re known for being beginner-friendly and delicious.
What You’ll Need
Before we dive in, let’s gather our supplies. This is crucial for a smooth and successful mushroom-growing experience.
* **Oyster Mushroom Spawn:** This is the most important ingredient! You can find it online or at specialty gardening stores. Make sure it’s a reputable source to ensure healthy spawn. I recommend starting with a few pounds.
* **Straw:** Wheat straw is ideal, but other types of straw can work too. Avoid hay, as it contains seeds that can contaminate your grow. You’ll need a good amount, depending on the size of your container.
* **Large Container:** A plastic storage tote with a lid works perfectly. The size will depend on how much straw you’re using. I usually go for a 20-30 gallon tote.
* **Drill:** For drilling ventilation holes in the container.
* **Drill Bits:** You’ll need a small drill bit for ventilation holes (around 1/4 inch) and a larger one (around 1 inch) if you want to add larger fruiting holes.
* **Large Pot or Tub:** For pasteurizing the straw.
* **Heat Source:** A stove or propane burner to heat the water for pasteurization.
* **Thermometer:** To monitor the water temperature during pasteurization.
* **Spray Bottle:** Filled with water for misting.
* **Gloves:** To keep things sanitary.
* **Rubbing Alcohol:** For sanitizing surfaces and tools.
* **Optional: Lime (Calcium Hydroxide):** To adjust the pH of the water during pasteurization. This helps inhibit the growth of unwanted molds.
Phase 1: Preparing the Straw
This is a crucial step. We need to pasteurize the straw to kill off any competing organisms that might prevent our oyster mushrooms from thriving.
1. **Chop the Straw:** Cut the straw into smaller pieces, about 3-5 inches long. This will make it easier to pack into the container and allow the mycelium (the mushroom’s root system) to colonize it more effectively. I usually use garden shears for this.
2. **Pasteurize the Straw:** This is where the magic happens.
* Fill your large pot or tub with water.
* Add lime (optional): If you’re using lime, add about 1 tablespoon per gallon of water. This will raise the pH to around 12, which helps kill off unwanted bacteria and fungi.
* Heat the water to 160-180°F (71-82°C). Use your thermometer to monitor the temperature. It’s important not to boil the water, as this can damage the straw.
* Submerge the chopped straw in the hot water. Make sure all the straw is completely submerged. You might need to weigh it down with a brick or a heavy object.
* Maintain the temperature for 1-2 hours. This will kill off most of the competing organisms.
* After 1-2 hours, turn off the heat and let the straw cool down in the water. This can take several hours, or even overnight.
3. **Drain the Straw:** Once the straw is cool enough to handle, drain it thoroughly. You want the straw to be moist, but not soaking wet. A good test is to squeeze a handful of straw – you should only get a few drops of water. I usually use a colander or a large mesh bag to drain the straw.
Phase 2: Inoculating the Straw
Now comes the fun part – introducing the mushroom spawn to the prepared straw!
1. **Sanitize Everything:** Before you start, sanitize your container, gloves, and any other tools you’ll be using with rubbing alcohol. This will help prevent contamination.
2. **Layer the Straw and Spawn:** In your sanitized container, create layers of straw and spawn.
* Start with a layer of straw at the bottom of the container.
* Sprinkle a layer of oyster mushroom spawn over the straw.
* Add another layer of straw, followed by another layer of spawn.
* Continue layering until you’ve used all the straw and spawn. Make sure the top layer is straw.
* I usually aim for about 4-6 inches of straw per layer. The more spawn you use, the faster the colonization process will be.
3. **Close the Container:** Put the lid on the container. You don’t need to seal it completely, as the mushrooms need air to breathe.
Phase 3: Colonization
This is where the mycelium starts to grow and spread throughout the straw.
1. **Find a Suitable Location:** Place the container in a dark, humid, and well-ventilated area. A basement, closet, or spare room works well. The ideal temperature for colonization is around 65-75°F (18-24°C).
2. **Ventilation:** Drill small (1/4 inch) ventilation holes around the container, especially near the top. This will allow for air exchange and prevent the buildup of carbon dioxide.
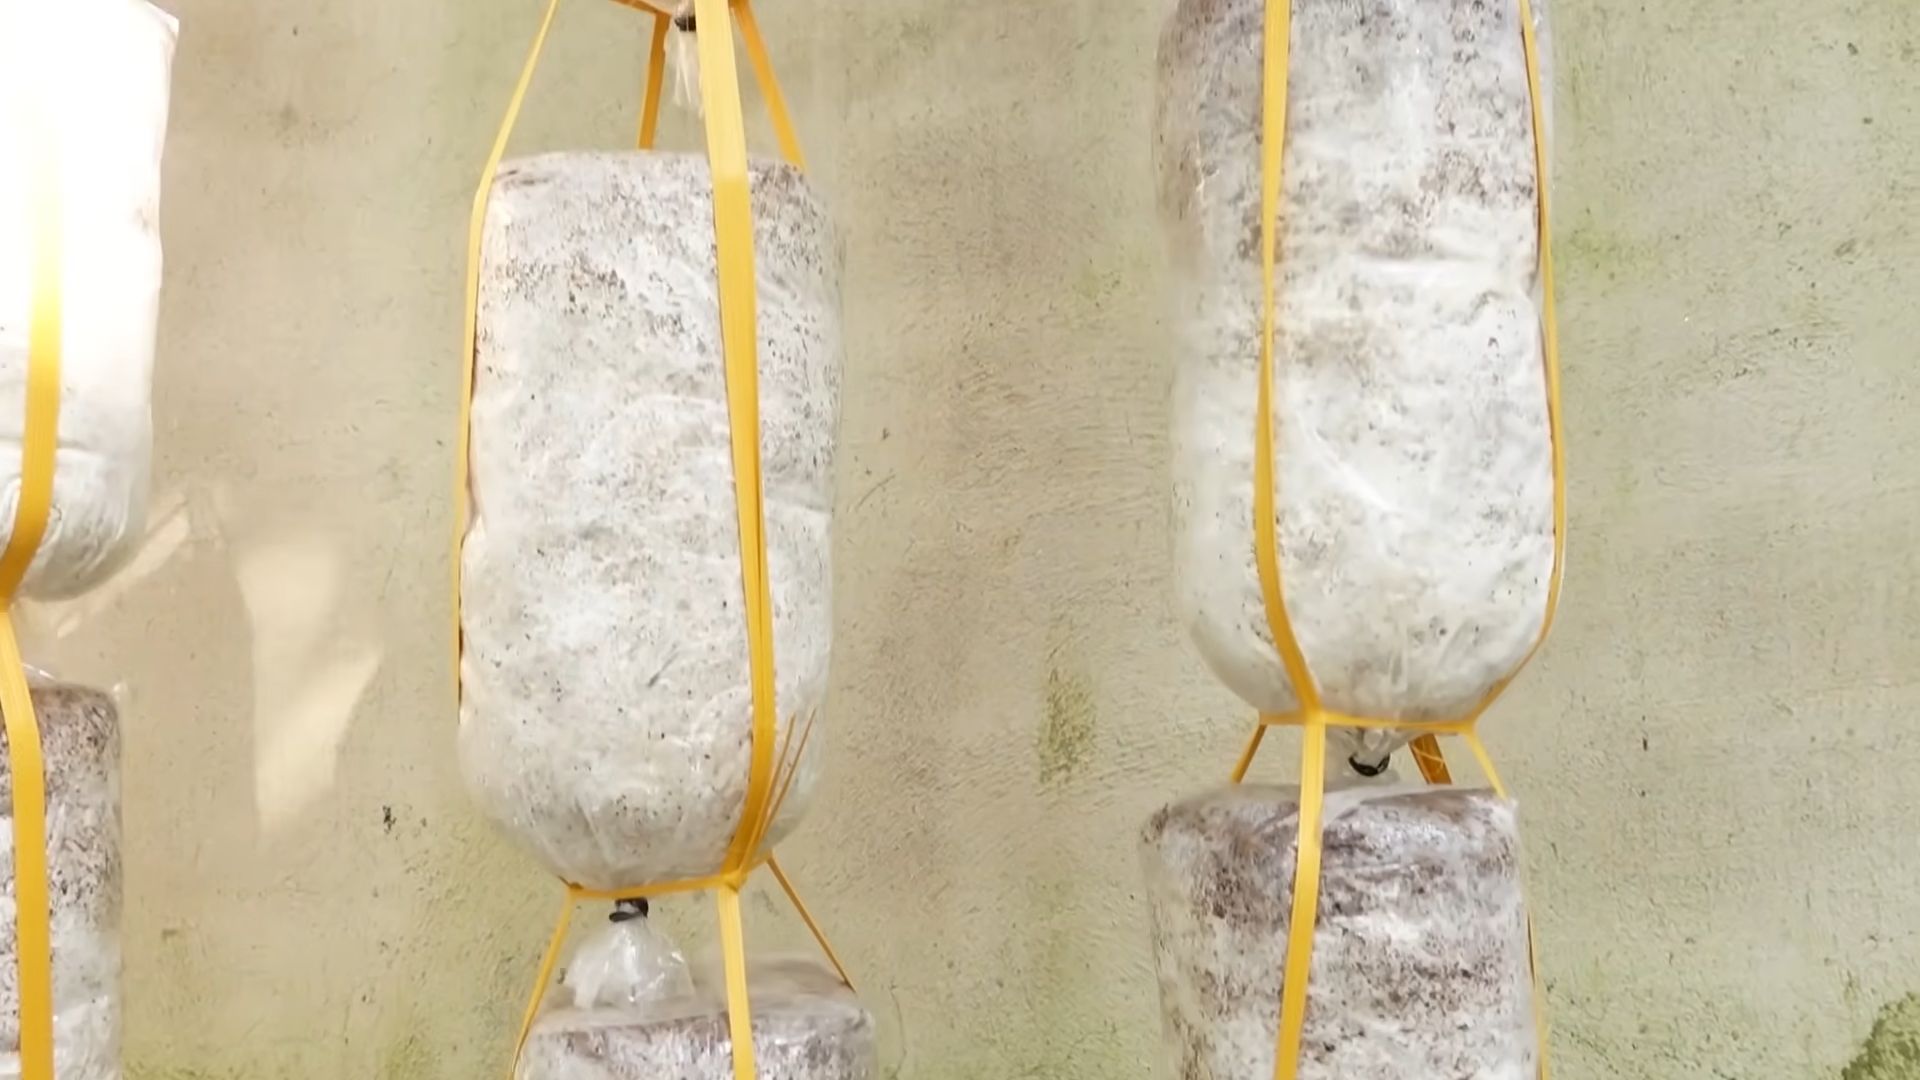
3. **Monitor the Colonization:** Check the container regularly for signs of colonization. You should start to see white, fuzzy mycelium growing on the straw within a few days. The mycelium will gradually spread throughout the entire container.
4. **Patience is Key:** The colonization process can take anywhere from 2-4 weeks, depending on the temperature, humidity, and the amount of spawn you used. Don’t disturb the container during this time.
Phase 4: Fruiting
Once the straw is fully colonized, it’s time to trigger fruiting – the formation of mushrooms!
1. **Introduce Light:** Move the container to a location with indirect light. Direct sunlight can dry out the mushrooms.
2. **Increase Humidity:** Oyster mushrooms need high humidity to fruit. You can increase the humidity by misting the inside of the container with water several times a day. You can also use a humidifier or place the container in a humidity tent.
3. **Ventilation:** Ensure good ventilation. This will help prevent the buildup of carbon dioxide and promote healthy mushroom growth.
4. **Fruiting Holes (Optional):** If you want to encourage fruiting in specific areas, you can drill larger (1 inch) holes in the container. The mushrooms will often grow out of these holes.
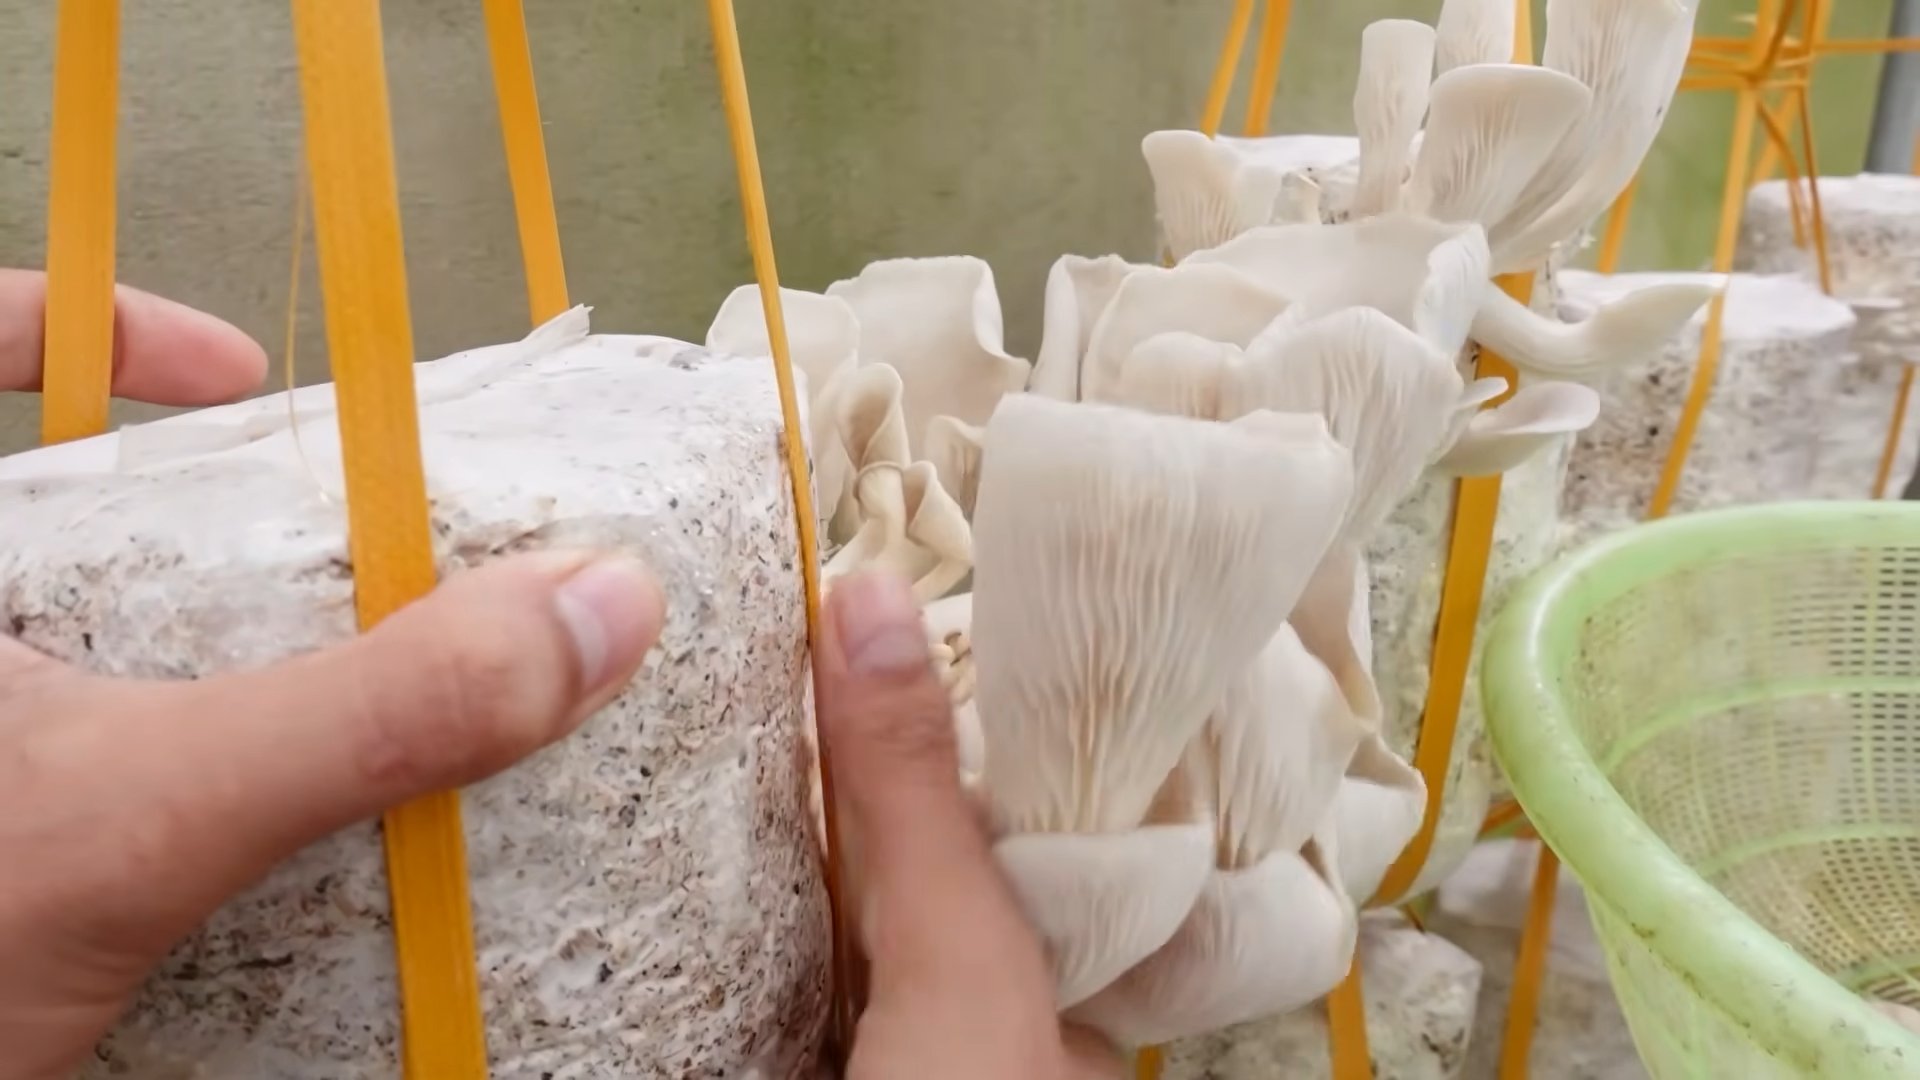
5. **Monitor for Pinning:** After a few days, you should start to see small mushroom “pins” forming on the surface of the straw. These pins will gradually grow into mature mushrooms.
6. **Harvesting:** Harvest the mushrooms when the caps are fully developed but before they start to drop spores. To harvest, simply twist and pull the mushrooms from the straw.
Phase 5: Subsequent Flushes
After you harvest the first flush of mushrooms, you can often get several more flushes from the same container.
1. **Soak the Substrate:** After harvesting, soak the straw substrate in water for 12-24 hours. This will rehydrate the mycelium and encourage it to produce more mushrooms.
2. **Drain and Repeat:** Drain the water and return the container to its fruiting location. Repeat the misting and ventilation process.
3. **Expect Diminishing Returns:** Each subsequent flush will likely produce fewer mushrooms than the previous one. Eventually, the substrate will become depleted, and you’ll need to start a new batch.
Troubleshooting
Even with the best preparation, things can sometimes go wrong. Here are a few common problems and how to address them:
* **Contamination:** If you see green, black, or other colored molds growing in the container, it’s likely contaminated. Unfortunately, there’s not much you can do at this point except discard the contaminated substrate. Prevention is key – sanitize everything thoroughly!
* **Slow Colonization:** If the mycelium is growing slowly, it could be due to low temperature, low humidity, or poor ventilation. Make sure the temperature is within the ideal range, increase the humidity, and ensure good ventilation.
* **No Fruiting:** If the straw is fully colonized but no mushrooms are forming, it could be due to lack of light, low humidity, or poor ventilation. Introduce indirect light, increase the humidity, and ensure good ventilation.
* **Small Mushrooms:** If the mushrooms are small and stunted, it could be due to lack of humidity or poor ventilation. Increase the humidity and ensure good ventilation.
Tips for Success
* Start Small: Don’t try to grow too much at once. Start with a small container and a small amount of spawn.
* Be Patient: Mushroom growing takes time and patience
Conclusion
So, there you have it! Growing mushrooms at home, while it might seem like a task reserved for seasoned mycologists, is surprisingly accessible and incredibly rewarding. We’ve walked you through the process, demystified the jargon, and hopefully, ignited a spark of curiosity within you to cultivate your own fungal bounty.
Why is this DIY trick a must-try? Beyond the sheer satisfaction of nurturing life from spore to fruiting body, growing your own mushrooms offers a multitude of benefits. First and foremost, you gain access to incredibly fresh, flavorful mushrooms that far surpass anything you’ll find on a grocery store shelf. Imagine the earthy aroma and delicate texture of homegrown oyster mushrooms gracing your next pasta dish, or the robust, nutty flavor of shiitakes enhancing your stir-fries. The possibilities are endless!
Furthermore, you have complete control over the growing environment, ensuring that your mushrooms are free from harmful pesticides and chemicals. This is a significant advantage for health-conscious individuals who prioritize organic and sustainable food sources. Plus, let’s not forget the environmental benefits. By growing your own mushrooms, you’re reducing your carbon footprint associated with transportation and packaging.
But the advantages don’t stop there. Growing mushrooms can be a fascinating and educational hobby, providing a unique opportunity to learn about the intricate world of fungi. It’s a chance to connect with nature, develop new skills, and even impress your friends and family with your newfound expertise.
Ready to take your mushroom cultivation to the next level? Consider experimenting with different substrates. While we focused on straw and wood chips, you can also use coffee grounds, cardboard, or even old newspapers. Each substrate will impart a slightly different flavor and texture to your mushrooms, allowing you to tailor your harvest to your specific culinary preferences.
Another exciting variation is to explore different mushroom varieties. Oyster mushrooms are a great starting point, but don’t be afraid to branch out and try growing shiitakes, lion’s mane, or even wine caps. Each variety has its own unique characteristics and growing requirements, so be sure to do your research before embarking on a new cultivation adventure.
And finally, think about incorporating your mushroom growing setup into your existing garden or indoor space. Mushrooms thrive in dark, humid environments, so a basement, shed, or even a closet can be transformed into a productive mushroom farm. Get creative and find a space that works best for you.
We wholeheartedly encourage you to try this DIY trick and experience the joy of growing your own mushrooms. It’s a rewarding, sustainable, and delicious way to connect with nature and enhance your culinary creations. Don’t be intimidated by the process – with a little patience and attention to detail, you’ll be harvesting your own mushrooms in no time.
Once you’ve embarked on your mushroom growing journey, we’d love to hear about your experiences! Share your tips, tricks, and successes (and even your failures!) in the comments below. Let’s build a community of mushroom enthusiasts and learn from each other. Happy growing!
Frequently Asked Questions (FAQ)
What are the easiest types of mushrooms to grow at home for beginners?
Oyster mushrooms are generally considered the easiest type of mushroom to grow for beginners. They are fast-growing, relatively forgiving of environmental fluctuations, and can be grown on a variety of substrates, including straw, coffee grounds, and even cardboard. Shiitake mushrooms are another popular choice, although they require a bit more patience as they take longer to fruit. Wine cap mushrooms are also relatively easy to grow outdoors in wood chip beds.
How long does it take to grow mushrooms at home?
The time it takes to grow mushrooms at home varies depending on the type of mushroom, the substrate used, and the environmental conditions. Oyster mushrooms can typically be harvested within a few weeks of inoculation, while shiitake mushrooms may take several months. Wine cap mushrooms can take even longer, sometimes up to a year, to establish a colony and begin fruiting.
What kind of environment do mushrooms need to grow?
Mushrooms generally prefer dark, humid environments with good air circulation. The ideal temperature range varies depending on the species, but most mushrooms thrive in temperatures between 60°F and 75°F (15°C and 24°C). Humidity levels should be maintained at around 80-90%. A basement, shed, or even a closet can be suitable for growing mushrooms, as long as you can control the temperature and humidity.
What is the best substrate to use for growing mushrooms?
The best substrate to use for growing mushrooms depends on the type of mushroom you are growing. Oyster mushrooms can be grown on a variety of substrates, including straw, coffee grounds, cardboard, and wood chips. Shiitake mushrooms are typically grown on hardwood logs or sawdust. Wine cap mushrooms are best grown on wood chip beds. It’s important to sterilize or pasteurize the substrate before inoculation to prevent contamination from other fungi and bacteria.
How do I prevent contamination when growing mushrooms?
Preventing contamination is crucial for successful mushroom cultivation. Sterilizing or pasteurizing the substrate is the first step. This kills off any competing organisms that could inhibit mushroom growth. It’s also important to work in a clean environment and use sterile tools. Wear gloves and a mask when handling the substrate and inoculating with mushroom spawn. Keep the growing area clean and free from dust and debris. Monitor the substrate regularly for signs of contamination, such as mold or discoloration. If you see any contamination, remove the affected area immediately.
Where can I buy mushroom spawn?
Mushroom spawn can be purchased from a variety of sources, including online retailers, garden centers, and specialty mushroom suppliers. Look for reputable suppliers that offer high-quality spawn. Be sure to choose the right type of spawn for the type of mushroom you want to grow. Spawn comes in various forms, including grain spawn, sawdust spawn, and plug spawn.
How do I know when my mushrooms are ready to harvest?
The signs of maturity vary depending on the type of mushroom. Oyster mushrooms are typically ready to harvest when the caps are fully formed and the edges are still slightly curled under. Shiitake mushrooms are ready when the caps have flattened out and the gills are visible. Wine cap mushrooms are ready when the caps have fully expanded and the stems are firm. Harvest mushrooms by gently twisting or cutting them off at the base of the stem.
Can I grow mushrooms indoors without any special equipment?
Yes, you can grow mushrooms indoors without any special equipment, especially oyster mushrooms. A simple setup can involve a plastic tub or bag filled with pasteurized straw or coffee grounds, inoculated with oyster mushroom spawn. You’ll need to provide a dark, humid environment and mist the substrate regularly to maintain moisture. Good air circulation is also important. While specialized equipment like humidity controllers and grow tents can improve yields, they are not essential for beginners.
Are there any health benefits to eating homegrown mushrooms?
Yes, there are numerous health benefits to eating homegrown mushrooms. Mushrooms are a good source of vitamins, minerals, and antioxidants. They are also low in calories and fat. Some studies have shown that mushrooms can boost the immune system, lower cholesterol, and even have anti-cancer properties. Growing your own mushrooms allows you to ensure that they are free from harmful pesticides and chemicals, making them an even healthier choice.
What should I do if my mushrooms don’t fruit?
If your mushrooms don’t fruit, there could be several reasons. The most common causes are insufficient humidity, incorrect temperature, poor air circulation, or contamination. Make sure the humidity is high enough by misting the substrate regularly. Check the temperature and ensure it is within the optimal range for the type of mushroom you are growing. Provide good air circulation by opening a window or using a fan. Inspect the substrate for signs of contamination and remove any affected areas. If you’ve addressed all of these factors and your mushrooms still don’t fruit, it may be necessary to re-inoculate with fresh spawn.
Leave a Comment