

Grow Carrots at Home? Absolutely! Imagine plucking vibrant, sweet carrots straight from your own backyard – fresher than anything you’ll find at the store. For centuries, cultivating our own food has been a cornerstone of self-sufficiency and a connection to the earth. From ancient civilizations tending their kitchen gardens to modern-day urban farmers, the desire to nurture and harvest our own produce runs deep.
But let’s be honest, the thought of growing carrots can sometimes feel a little daunting. Maybe you’ve tried before and ended up with stunted, forked roots, or perhaps you’re just not sure where to start. That’s where these DIY tricks and hacks come in! I’m here to share simple, effective methods that will help you grow carrots at home successfully, no matter your experience level or garden size.
Why do you need these tricks? Because store-bought carrots simply can’t compare to the flavor and satisfaction of homegrown ones. Plus, you’ll know exactly what’s gone into them – no pesticides or mystery ingredients! Get ready to transform your garden (or even a container on your balcony) into a carrot-growing haven. Let’s dig in!
Growing Carrots at Home: A Beginner’s Guide
Hey there, fellow gardening enthusiasts! Ever dreamt of pulling fresh, crunchy carrots straight from your own backyard? Well, dream no more! Growing carrots at home is surprisingly easy and rewarding. I’m going to walk you through everything you need to know, from choosing the right variety to harvesting your delicious bounty. Let’s get started!
Choosing the Right Carrot Variety
First things first, let’s talk carrots! There are tons of different varieties, and picking the right one for your space and climate is key. Here’s a quick rundown:
* Nantes: These are classic, cylindrical carrots, known for their sweet flavor and smooth texture. They’re a great all-around choice and mature relatively quickly.
* Danvers: These are longer and more tapered than Nantes, with a slightly stronger flavor. They’re also good for heavier soils.
* Chantenay: These are shorter and thicker, making them ideal for shallow or rocky soils. They have a robust flavor and store well.
* Baby Carrots: These are quick-maturing and perfect for containers or small gardens.
* Heirloom Varieties: Don’t be afraid to experiment with colorful heirloom varieties like ‘Purple Haze’ or ‘Yellowstone’! They add a fun twist to your garden and your plate.
Consider your soil type and the amount of space you have when making your choice. I personally love Nantes for their sweetness and ease of growing.
Preparing Your Carrot Patch
Carrots need loose, well-drained soil to thrive. Rocky or compacted soil will result in stunted, misshapen roots. So, let’s get that soil prepped!
1. Choose a Sunny Spot: Carrots need at least 6 hours of sunlight per day. Pick a spot in your garden that gets plenty of sunshine.
2. Clear the Area: Remove any rocks, weeds, or debris from the planting area. Carrots hate competition!
3. Loosen the Soil: This is the most important step! Use a garden fork or tiller to loosen the soil to a depth of at least 12 inches. This will allow the carrot roots to grow freely.
4. Amend the Soil: Carrots prefer slightly acidic soil with a pH between 6.0 and 6.8. Amend the soil with compost or well-rotted manure to improve drainage and fertility. Avoid adding too much nitrogen, as this can lead to excessive leafy growth at the expense of root development.
5. Create Raised Beds (Optional): If your soil is heavy or poorly drained, consider creating raised beds. This will improve drainage and warm the soil more quickly in the spring.
Planting Your Carrot Seeds
Carrot seeds are tiny, so planting them can be a bit tricky. But don’t worry, I’ve got some tips to help you succeed!
1. Timing is Key: Carrots are a cool-season crop, so plant them in early spring or late summer for a fall harvest. Check your local frost dates to determine the best planting time for your area. I usually aim to plant about 2-3 weeks before the last expected frost in spring.
2. Sow the Seeds: Create shallow furrows about 1/4 to 1/2 inch deep and 1-2 inches apart. Sprinkle the carrot seeds evenly into the furrows. Because the seeds are so small, I often mix them with sand to help distribute them more evenly.
3. Cover the Seeds: Gently cover the seeds with a thin layer of soil or compost.
4. Water Gently: Water the area gently with a watering can or hose with a gentle spray nozzle. Avoid washing away the seeds.
5. Keep the Soil Moist: Carrots need consistent moisture to germinate. Keep the soil moist but not soggy until the seedlings emerge. This might mean watering daily, especially in dry weather.
Caring for Your Carrot Plants
Once your carrot seedlings emerge, it’s time to provide them with the care they need to thrive.
1. Thin the Seedlings: This is crucial! Carrots need space to grow. When the seedlings are about 2 inches tall, thin them to about 1-2 inches apart. You can use small scissors to snip off the unwanted seedlings at the soil line. Don’t pull them out, as this can disturb the roots of the remaining plants.
2. Weed Regularly: Carrots don’t like competition from weeds. Keep the area around your carrot plants free of weeds by hand-pulling or using a hoe. Be careful not to damage the carrot roots.
3. Water Consistently: Carrots need consistent moisture to develop properly. Water deeply and regularly, especially during dry spells. Aim for about 1 inch of water per week.
4. Fertilize Sparingly: Carrots don’t need a lot of fertilizer. If your soil is poor, you can side-dress with a balanced fertilizer a few weeks after the seedlings emerge. Avoid using fertilizers that are high in nitrogen, as this can lead to excessive leafy growth.
5. Protect from Pests: Carrot rust flies and carrot weevils can be a problem. Cover your carrot plants with row covers to protect them from these pests. You can also use organic pest control methods, such as neem oil or insecticidal soap.
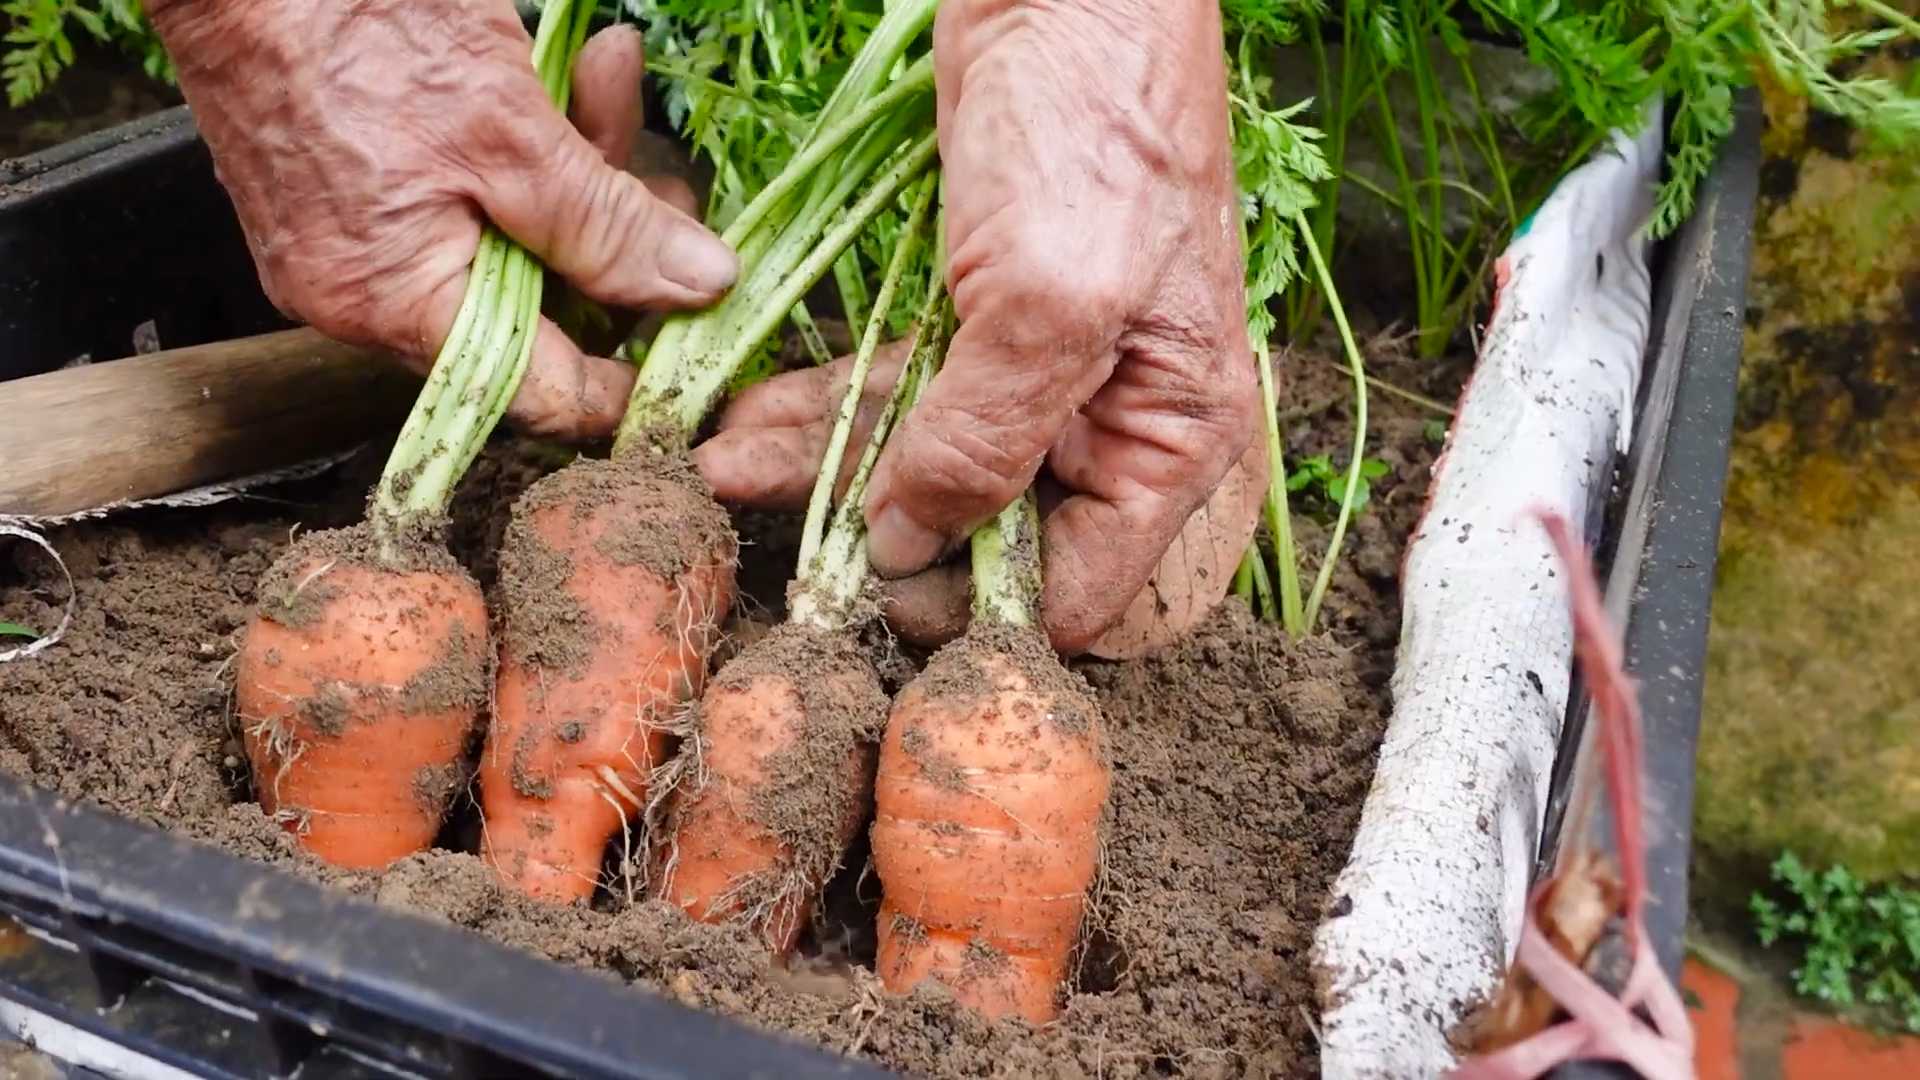
Harvesting Your Carrots
The moment you’ve been waiting for! Harvesting your own homegrown carrots is incredibly satisfying.
1. Check for Maturity: Carrots are typically ready to harvest 60-80 days after planting, depending on the variety. Check the seed packet for specific maturity dates. You can also gently brush away the soil around the top of the carrot to check its size.
2. Loosen the Soil: Before pulling the carrots, loosen the soil around them with a garden fork or trowel. This will make it easier to pull them out without breaking them.
3. Pull the Carrots: Grasp the carrot tops firmly and gently pull the carrots straight up out of the ground. If they’re difficult to pull, use the garden fork to loosen the soil further.
4. Clean and Store: Brush off any excess soil from the carrots. You can store them in the refrigerator for several weeks. To store them for longer periods, cut off the tops and store them in a cool, moist place, such as a root cellar or a plastic bag in the refrigerator.
Troubleshooting Common Carrot Problems
Even with the best care, you might encounter some problems when growing carrots. Here are a few common issues and how to address them:
* Forked or Stunted Roots: This is usually caused by rocky or compacted soil. Make sure to prepare your soil properly before planting.
* Bitter Taste: This can be caused by inconsistent watering or hot weather. Water your carrots regularly and provide shade during the hottest part of the day.
* Pest Damage: Carrot rust flies and carrot weevils can damage the roots. Use row covers or organic pest control methods to protect your plants.
* Bolting: This is when the carrot plants flower prematurely. It’s usually caused by stress, such as hot weather or inconsistent watering. Choose bolt-resistant varieties and provide consistent care.
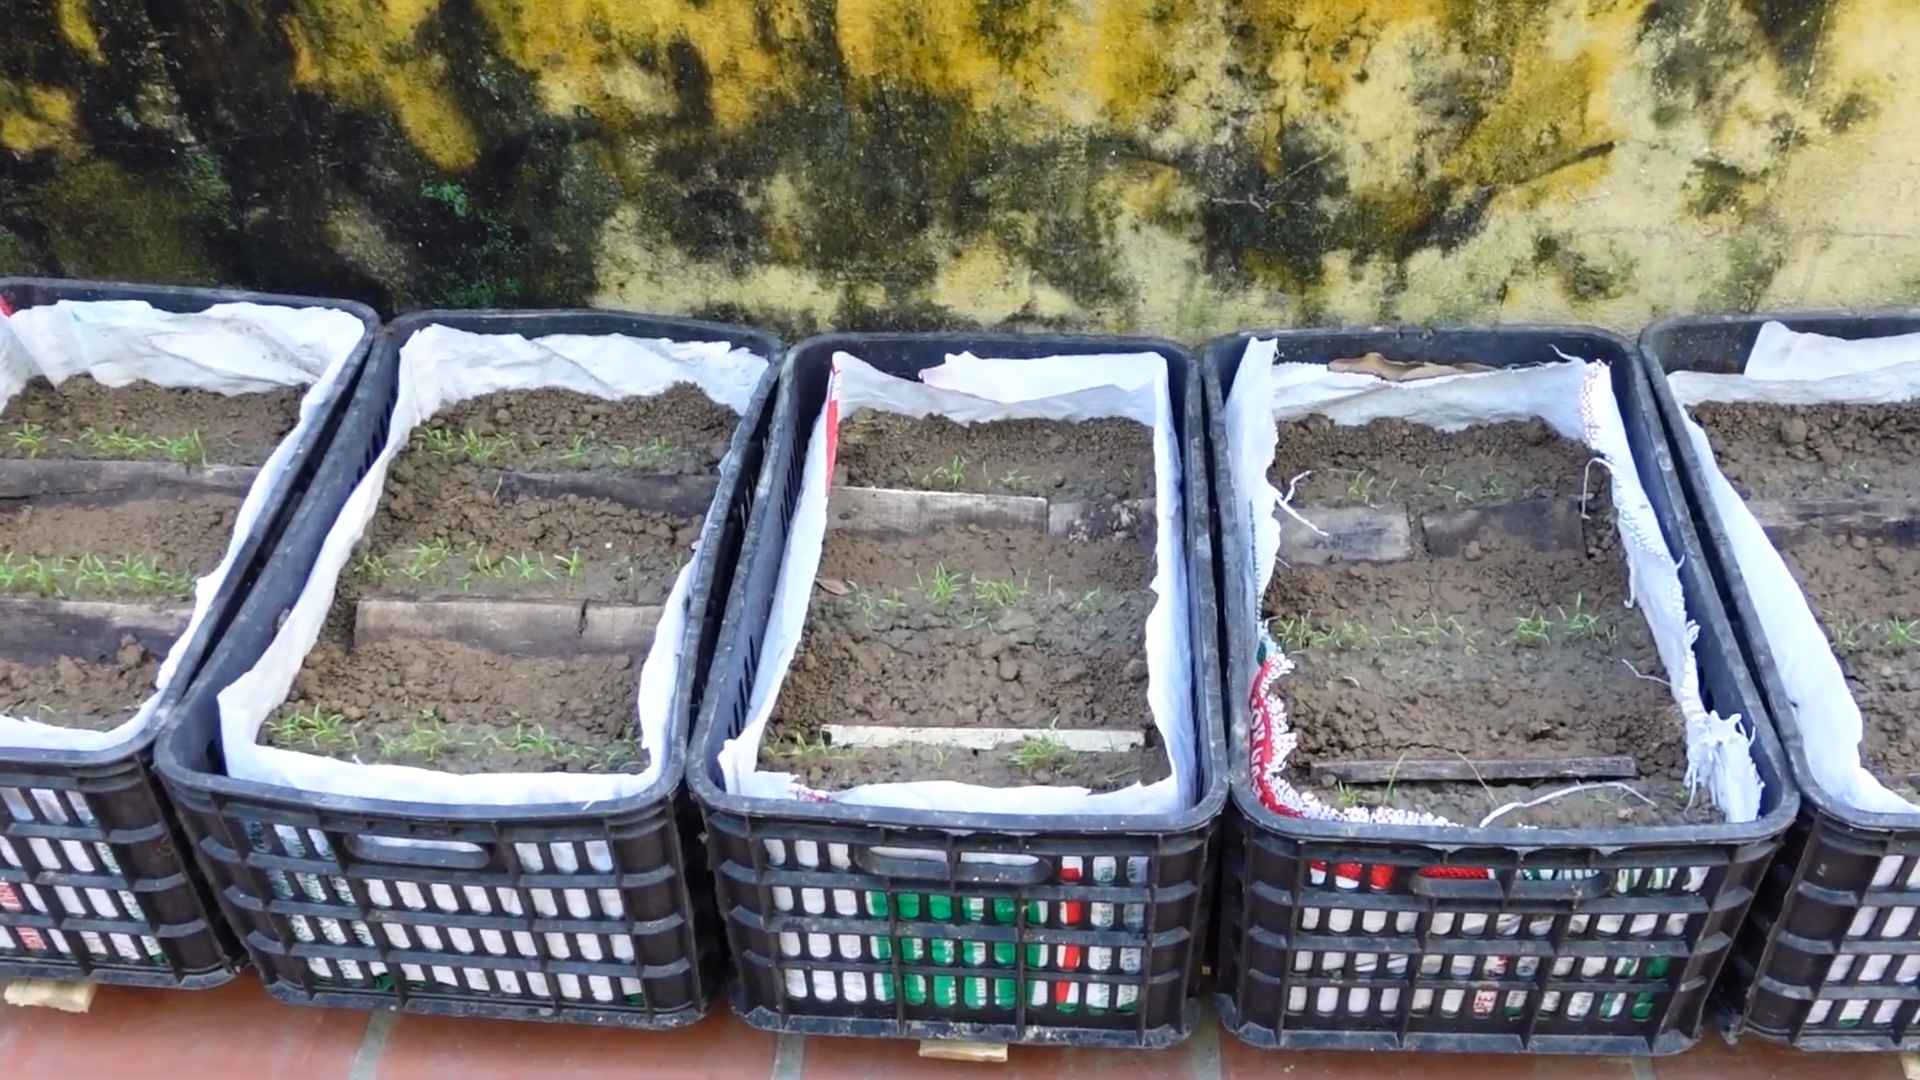
Growing Carrots in Containers
Don’t have a garden? No problem! You can still grow carrots in containers.
1. Choose the Right Container: Select a container that is at least 12 inches deep and wide.
2. Use a Good Quality Potting Mix: Avoid using garden soil in containers, as it can become compacted. Use a well-draining potting mix.
3. Plant the Seeds: Sow the carrot seeds directly into the container, following the same instructions as for planting in the garden.
4. Thin the Seedlings: Thin the seedlings to about 1-2 inches apart.
5. Water Regularly: Container-grown carrots need more frequent watering than those grown in the garden. Water when the top inch of soil feels dry.
6. Fertilize Regularly: Container-grown carrots also need more frequent fertilization. Use a balanced liquid fertilizer every 2-3 weeks.
7. Choose the Right Variety: Shorter, rounder varieties like ‘Parisian’ or ‘Thumbelina’ are best suited for container growing.
Enjoying Your Homegrown Carrots
Now that you’ve harvested your delicious homegrown carrots, it’s time to enjoy them! Here are a few ideas:
* Eat them raw: Freshly harvested carrots are incredibly sweet and crunchy.
* Roast them: Roasting carrots brings out their natural sweetness.
* Add them to soups and stews: Carrots add flavor and nutrients to soups and stews.
* Make carrot cake: A classic dessert that’s always a crowd-pleaser.
* Juice them: Carrot juice is a healthy and refreshing drink.
Growing carrots at home is a rewarding experience that anyone can enjoy. With a little bit of planning
Conclusion
So, there you have it! Growing carrots at home isn’t just a whimsical gardening dream; it’s a tangible reality accessible to anyone with a little space, patience, and the right know-how. We’ve walked you through the essential steps, from selecting the perfect carrot variety to nurturing your seedlings and finally, harvesting those vibrant, homegrown treasures.
Why is this DIY trick a must-try? Because the satisfaction of pulling a perfectly formed, crisp carrot from your own soil is unparalleled. It’s a connection to nature, a step towards self-sufficiency, and a guarantee of fresh, flavorful produce free from the chemicals and long-distance transportation often associated with store-bought carrots. Plus, homegrown carrots often boast a sweetness and tenderness that you simply won’t find in commercially grown varieties.
But the benefits extend beyond taste and freshness. Growing your own carrots is a fantastic way to reduce your carbon footprint, support sustainable practices, and even get some exercise and fresh air. It’s a rewarding hobby that can be enjoyed by individuals, families, and communities alike.
Looking to personalize your carrot-growing experience? Consider these variations:
* Container Gardening: If you’re short on space, don’t despair! Carrots thrive in containers, making them perfect for balconies, patios, or even sunny windowsills. Just ensure your container is deep enough to accommodate the carrot’s root length.
* Succession Planting: Extend your harvest by planting carrots every few weeks. This ensures a continuous supply of fresh carrots throughout the growing season.
* Companion Planting: Plant carrots alongside other beneficial plants like onions, rosemary, or sage. These companions can help deter pests and improve soil health.
* Experiment with Varieties: Don’t limit yourself to the standard orange carrot! Explore different varieties like purple, yellow, or white carrots for a colorful and flavorful twist. Nantes, Chantenay, and Danvers are all popular and reliable choices.
* Hydroponic Carrots: For the truly adventurous, consider growing carrots hydroponically. This soilless method can yield impressive results and allows for year-round cultivation.
We’ve provided you with the tools and knowledge to embark on your carrot-growing journey. Now, it’s your turn to get your hands dirty! We wholeheartedly encourage you to try this DIY trick and experience the joy of harvesting your own homegrown carrots.
And most importantly, don’t be afraid to experiment and learn along the way. Gardening is a journey of discovery, and every carrot you grow will teach you something new.
So, grab your seeds, prepare your soil, and get ready to witness the magic of nature unfold in your own backyard. We’re confident that you’ll be amazed by the results.
Finally, we want to hear about your experiences! Share your photos, tips, and challenges in the comments below. Let’s create a community of carrot-growing enthusiasts and inspire others to embrace the joys of homegrown produce. Happy gardening! Let us know how your grow carrots at home project goes!
Frequently Asked Questions (FAQ)
What is the best time of year to plant carrots?
The best time to plant carrots depends on your climate. In general, carrots are a cool-season crop, meaning they thrive in temperatures between 60°F and 70°F (15°C and 21°C). For most regions, this means planting in early spring or late summer/early fall. Spring plantings should occur as soon as the soil can be worked, typically a few weeks before the last expected frost. Fall plantings should be timed to allow for at least 60-70 days of growth before the first hard frost. In warmer climates, you may be able to grow carrots throughout the winter. Check your local climate data and planting guides for specific recommendations.
What kind of soil is best for growing carrots?
Carrots need loose, well-drained soil that is free of rocks and debris. Rocky or compacted soil can cause the roots to become stunted or deformed. Sandy loam soil is ideal, as it provides good drainage and allows the roots to easily penetrate the soil. Before planting, amend your soil with compost or other organic matter to improve its fertility and drainage. Avoid using heavy clay soils, as they can become waterlogged and prevent proper root development. If you have clay soil, consider growing carrots in raised beds or containers filled with a suitable potting mix. The pH of the soil should be between 6.0 and 6.8 for optimal growth.
How deep should I plant carrot seeds?
Carrot seeds are very small and should be planted shallowly. Sow the seeds about ¼ to ½ inch deep and space them about 1-2 inches apart. Gently cover the seeds with soil and water thoroughly. Keep the soil consistently moist until the seeds germinate, which typically takes 7-21 days. You can use a light layer of mulch, such as straw or grass clippings, to help retain moisture and prevent the soil from crusting over. Once the seedlings emerge, thin them to about 2-3 inches apart to allow them enough space to develop.
How often should I water carrots?
Carrots need consistent moisture to thrive, especially during germination and early growth. Water deeply and regularly, aiming to keep the soil consistently moist but not waterlogged. The frequency of watering will depend on your climate, soil type, and the stage of growth. In general, water 1-2 times per week, or more often during hot, dry weather. Use a soaker hose or drip irrigation to deliver water directly to the roots and avoid wetting the foliage, which can increase the risk of fungal diseases. Check the soil moisture regularly by sticking your finger into the soil about an inch deep. If the soil feels dry, it’s time to water.
What are some common pests and diseases that affect carrots?
Carrots can be susceptible to several pests and diseases, including carrot rust flies, aphids, nematodes, and fungal diseases like leaf blight. Carrot rust flies are a common pest that lays eggs near the base of the plant. The larvae then burrow into the roots, causing damage and making them unmarketable. Aphids are small, sap-sucking insects that can weaken the plants and transmit diseases. Nematodes are microscopic worms that live in the soil and can damage the roots. Leaf blight is a fungal disease that causes brown spots on the leaves.
To prevent pests and diseases, practice good garden hygiene, such as removing weeds and debris, and rotating your crops. Use row covers to protect your plants from carrot rust flies and other pests. Introduce beneficial insects, such as ladybugs and lacewings, to control aphids. Amend your soil with compost to improve its health and resistance to diseases. If you encounter pests or diseases, treat them promptly with appropriate organic or chemical controls.
How long does it take for carrots to mature?
The time it takes for carrots to mature depends on the variety and growing conditions. In general, carrots take 60-80 days to mature. Check the seed packet for specific information on the maturity time for your chosen variety. You can start harvesting carrots when they reach a usable size, even if they are not fully mature. To harvest, gently loosen the soil around the carrot and pull it straight up. If the soil is dry, water it thoroughly before harvesting to make it easier to pull the carrots.
Can I grow carrots in containers?
Yes, carrots can be successfully grown in containers, making them a great option for gardeners with limited space. Choose a container that is at least 12 inches deep to accommodate the carrot’s root length. Use a well-draining potting mix and ensure the container has drainage holes. Follow the same planting and care instructions as for growing carrots in the ground. Container-grown carrots may need more frequent watering and fertilization than those grown in the ground.
How do I store harvested carrots?
To store harvested carrots, remove the tops and gently brush off any excess soil. Do not wash the carrots until you are ready to use them. Store the carrots in a cool, dark, and humid place, such as a refrigerator or root cellar. You can store them in a plastic bag or container with a damp paper towel to help maintain humidity. Carrots can be stored for several weeks or even months under the right conditions.

Leave a Comment