

Growing Kohlrabi at Home might sound intimidating, but trust me, it’s easier than you think! Imagine plucking crisp, slightly sweet, and utterly delicious kohlrabi straight from your own backyard. Forget those bland grocery store veggies; we’re talking about fresh, vibrant flavor that explodes in your mouth. This DIY guide will unlock the secrets to successfully cultivating this unique vegetable, even if you’re a complete beginner.
Kohlrabi, sometimes called a German turnip, has a fascinating history. Originating in Europe, it’s been a staple in German and Eastern European cuisine for centuries. It’s not just a tasty treat; it’s packed with vitamins and fiber, making it a healthy addition to your diet. But why bother growing it yourself? Well, store-bought kohlrabi often lacks the freshness and tenderness of homegrown varieties. Plus, growing kohlrabi at home allows you to control the growing conditions, ensuring you get the best possible flavor and quality.
In this article, I’ll share my favorite DIY tricks and hacks for successful kohlrabi cultivation. From choosing the right variety to protecting your plants from pests, I’ll cover everything you need to know. So, grab your gardening gloves, and let’s get started on your kohlrabi-growing adventure! You’ll be amazed at how rewarding it is to nurture these quirky vegetables from seed to table.

Growing Kohlrabi at Home: A Beginner’s Guide
Kohlrabi, often called the “German turnip,” is a unique and delicious vegetable that’s surprisingly easy to grow at home. Its bulbous stem offers a mild, slightly sweet flavor, perfect for salads, slaws, or even roasted as a side dish. I’ve had great success growing kohlrabi in my own garden, and I’m excited to share my tips and tricks with you! This guide will walk you through everything you need to know, from choosing the right variety to harvesting your bounty.
Choosing the Right Kohlrabi Variety
Before you even think about planting, you need to decide which kohlrabi variety is right for you. There are several options, each with its own characteristics:
* Early White Vienna: This is a classic choice, known for its early maturity (around 55 days) and mild flavor. It’s a great option if you’re looking for a quick harvest.
* Early Purple Vienna: Similar to the Early White Vienna, but with a beautiful purple skin. The flesh is still white and tastes the same.
* Grand Duke: This variety is known for its disease resistance and large size. It can take a bit longer to mature (around 60 days), but it’s worth it for the impressive yield.
* Superschmelz: If you’re looking for truly massive kohlrabi, this is the one for you! It can grow to enormous sizes (think softball-sized or even larger) without becoming woody or tough. It takes longer to mature (around 75 days).
* Kossak: Another giant variety, similar to Superschmelz, with excellent flavor and texture even at a large size.
I personally love growing both Early White Vienna and Early Purple Vienna for their quick turnaround and reliable flavor. I’ve also experimented with Grand Duke and Superschmelz, and they’re definitely fun to grow if you have the space and patience!
When to Plant Kohlrabi
Timing is crucial for successful kohlrabi growing. This cool-season crop thrives in temperatures between 60°F and 70°F (15°C and 21°C).
* Spring Planting: Start seeds indoors 4-6 weeks before the last expected frost. You can also direct sow seeds outdoors 2-3 weeks before the last frost, as long as the soil is workable.
* Fall Planting: For a fall harvest, sow seeds outdoors 6-8 weeks before the first expected frost.
I usually start my spring kohlrabi indoors to get a head start, especially if I’m growing a variety that takes longer to mature. For fall crops, I prefer direct sowing since the weather is usually more stable.
Preparing the Soil
Kohlrabi needs well-drained, fertile soil with a pH between 6.0 and 7.5.
1. Choose a Sunny Location: Kohlrabi needs at least 6 hours of sunlight per day.
2. Amend the Soil: Before planting, amend the soil with plenty of compost or well-rotted manure. This will improve drainage, add nutrients, and help retain moisture.
3. Loosen the Soil: Use a garden fork or tiller to loosen the soil to a depth of at least 12 inches. This will allow the roots to penetrate easily.
4. Remove Rocks and Debris: Clear the area of any rocks, weeds, or other debris that could hinder growth.
I always add a generous amount of compost to my garden beds before planting anything, and kohlrabi is no exception. It really makes a difference in the overall health and productivity of the plants.
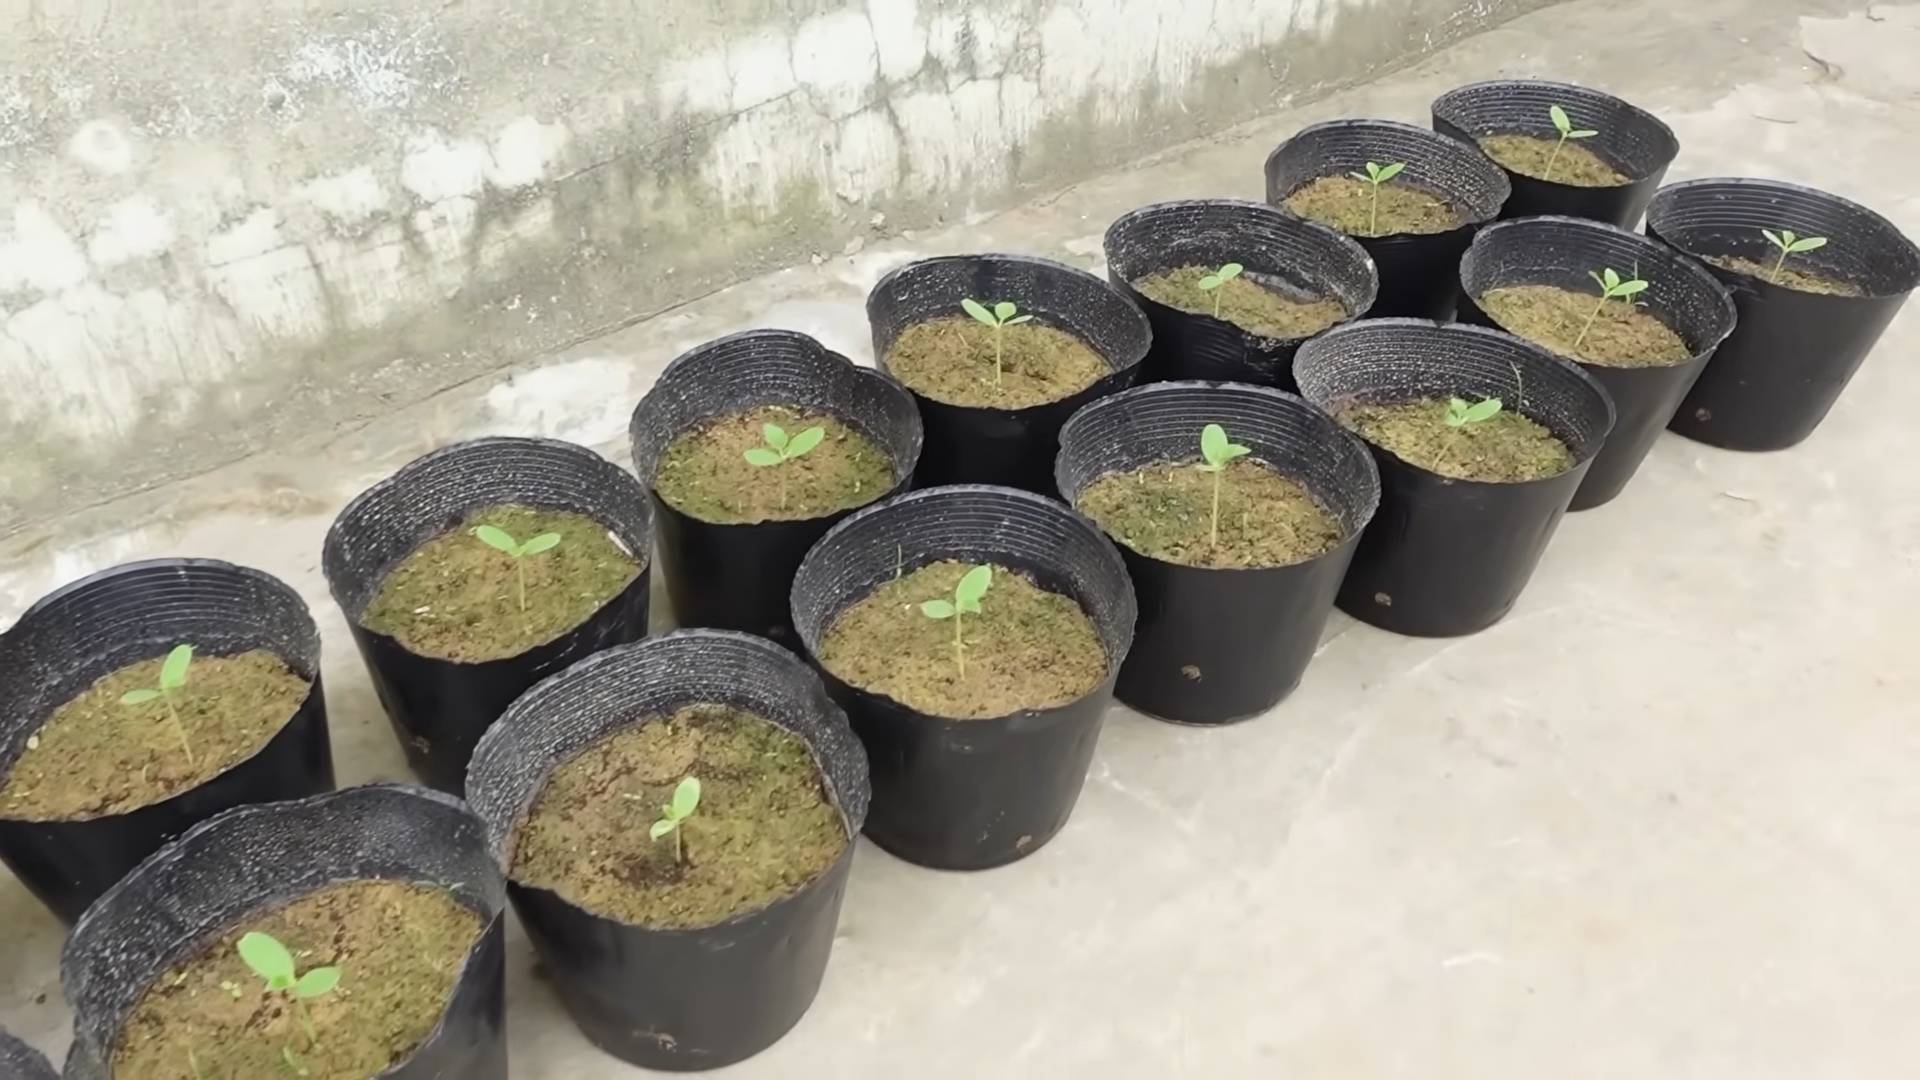
Planting Kohlrabi Seeds or Transplants
Whether you’re starting from seeds or transplants, the planting process is relatively straightforward.
Starting from Seeds Indoors:
1. Fill Seed Trays or Pots: Fill seed trays or small pots with a seed-starting mix.
2. Sow Seeds: Sow seeds about ¼ inch deep and gently cover with soil.
3. Water Gently: Water the soil gently to moisten it, but avoid overwatering.
4. Provide Light: Place the trays or pots under grow lights or in a sunny window.
5. Keep Soil Moist: Keep the soil consistently moist, but not soggy.
6. Harden Off Seedlings: Before transplanting outdoors, harden off the seedlings by gradually exposing them to outdoor conditions for a week or two.
Direct Sowing Seeds Outdoors:
1. Create Furrows: Create shallow furrows in the prepared soil, spacing them about 12 inches apart.
2. Sow Seeds: Sow seeds about ½ inch deep and space them about 2 inches apart.
3. Cover Seeds: Gently cover the seeds with soil and water thoroughly.
4. Thin Seedlings: Once the seedlings emerge and have a few true leaves, thin them to about 6-8 inches apart.
Transplanting Seedlings:
1. Dig Holes: Dig holes in the prepared soil, spacing them about 6-8 inches apart.
2. Remove Seedlings: Gently remove the seedlings from their pots or trays, being careful not to damage the roots.
3. Place Seedlings: Place the seedlings in the holes, making sure the top of the root ball is level with the soil surface.
4. Fill Holes: Fill the holes with soil and gently firm around the base of the plants.
5. Water Thoroughly: Water the transplants thoroughly.
I’ve found that transplanting seedlings gives me a bit of an edge, especially in areas with unpredictable spring weather. It allows me to protect the young plants from late frosts and get them off to a strong start.
Caring for Kohlrabi Plants
Once your kohlrabi plants are in the ground, it’s important to provide them with the care they need to thrive.
* Watering: Kohlrabi needs consistent moisture to grow properly. Water deeply and regularly, especially during dry periods. Aim for about 1 inch of water per week.
* Fertilizing: Fertilize kohlrabi plants every 2-3 weeks with a balanced fertilizer. You can also side-dress with compost or well-rotted manure.
* Weeding: Keep the area around the plants free of weeds, which can compete for nutrients and water.
* Mulching: Apply a layer of mulch around the plants to help retain moisture, suppress weeds, and regulate soil temperature.
* Pest Control: Keep an eye out for common pests like cabbage worms, aphids, and flea beetles. Use organic pest control methods like insecticidal soap or neem oil to control infestations.
* Row Covers: Using row covers can help protect young plants from pests and frost.
I’m a big believer in organic gardening practices, so I always try to use natural methods to control pests and diseases. A healthy plant is always more resistant to problems, so focusing on good soil health and proper watering is key.
Harvesting Kohlrabi
Harvesting kohlrabi at the right time is essential for getting the best flavor and texture.
* Timing: Kohlrabi is typically ready to harvest when the bulbous stem is about 2-3 inches in diameter. Larger bulbs can become tough and woody.
* Method: Use a sharp knife to cut the stem just above the soil surface.
* Storage: Store kohlrabi in the refrigerator for up to several weeks. Remove the leaves before storing, as they can draw moisture from the bulb.
I usually start checking my kohlrabi plants regularly once they reach about 2 inches in diameter. It’s better to harvest them a little early than to let them get too big. The smaller bulbs are much more tender and flavorful.
Common Problems and Solutions
Even with the best care, you might encounter some problems while growing kohlrabi. Here are a few common issues and how to address them:
* Splitting Bulbs: This can happen if the plants experience inconsistent watering. Make sure to water regularly and deeply, especially during dry periods.
* Woody Texture: This is usually caused by harvesting the bulbs too late. Harvest when the bulbs are still relatively small and tender.
* Pest Infestations: As mentioned earlier, keep an eye out for common pests and use organic pest control methods to control infestations.
* Bolting: Bolting (premature flowering) can occur if the plants are exposed to prolonged periods of hot weather. Choose heat-tolerant varieties and provide shade during the hottest part of the day.
I’ve learned that prevention is always the best approach when it comes to gardening problems. By providing my plants with the right conditions and keeping a close eye on them, I can usually avoid major issues.
Enjoying Your Harvest
Now that you’ve successfully grown and harvested your kohlr
Conclusion
So, there you have it! Growing kohlrabi at home isn’t just a gardening project; it’s a gateway to incredibly fresh, flavorful, and versatile produce right at your fingertips. We’ve walked you through the entire process, from selecting the right variety to harvesting your bounty. But why should you take the plunge and dedicate some space in your garden to this unusual vegetable?
The answer lies in the unparalleled freshness and flavor you simply can’t replicate with store-bought kohlrabi. Imagine crisp, slightly sweet stems and bulbs, bursting with nutrients, ready to be transformed into salads, slaws, stir-fries, or even enjoyed raw as a healthy snack. The difference is truly remarkable.
Beyond the superior taste, growing your own kohlrabi allows you to control every aspect of its cultivation. You can choose organic methods, avoiding harmful pesticides and herbicides, ensuring that you and your family are consuming the healthiest possible food. Plus, there’s an undeniable satisfaction that comes from nurturing a plant from seed to table.
But the benefits don’t stop there. Growing kohlrabi is also a fantastic way to extend your gardening season. Its cool-weather tolerance makes it an ideal crop for spring and fall, filling the gaps between your summer harvests. And let’s not forget the educational aspect – it’s a wonderful project to involve children in, teaching them about where their food comes from and fostering a love for gardening.
Ready to experiment? Consider these variations to personalize your kohlrabi growing experience:
* Purple Vienna: For a visually stunning addition to your garden and plate, try growing the Purple Vienna variety. Its vibrant purple skin adds a pop of color and its flavor is just as delicious as its green counterpart.
* White Vienna: A classic choice, the White Vienna is known for its mild, sweet flavor and crisp texture. It’s a reliable and easy-to-grow variety, perfect for beginners.
* Kohlrabi Greens: Don’t discard the leaves! Kohlrabi greens are edible and nutritious. Sauté them like spinach or add them to soups and stews for a boost of flavor and vitamins.
* Container Gardening: If you’re short on space, kohlrabi can be successfully grown in containers. Choose a large pot (at least 12 inches in diameter) and use a well-draining potting mix.
We are confident that once you taste the difference between homegrown and store-bought, you’ll be hooked. So, grab some seeds, prepare your soil, and get ready to embark on a rewarding gardening adventure.
We encourage you to try growing kohlrabi at home. It’s easier than you think, and the rewards are well worth the effort. And don’t forget to share your experiences with us! We’d love to hear about your successes, challenges, and favorite ways to enjoy your homegrown kohlrabi. Share your photos and stories on social media using #HomegrownKohlrabi and let’s build a community of kohlrabi enthusiasts!
Frequently Asked Questions (FAQ)
What is kohlrabi, and what does it taste like?
Kohlrabi, often called a German turnip, is a cruciferous vegetable related to cabbage, broccoli, and kale. It features a bulbous stem that grows above ground and edible leaves. The taste is often described as a cross between a turnip and a cabbage, with a mild, slightly sweet flavor and a crisp, refreshing texture. Younger kohlrabi tends to be sweeter and more tender. The leaves taste similar to collard greens or kale.
When is the best time to plant kohlrabi?
Kohlrabi is a cool-season crop, so the best time to plant it is in early spring or late summer for a fall harvest. For a spring crop, start seeds indoors 4-6 weeks before the last expected frost. Transplant seedlings outdoors 2-3 weeks before the last frost. For a fall crop, sow seeds directly into the garden 6-8 weeks before the first expected frost. In warmer climates, you can grow kohlrabi throughout the winter.
How much sunlight does kohlrabi need?
Kohlrabi thrives in full sun, which means at least 6 hours of direct sunlight per day. However, it can tolerate partial shade, especially in hotter climates. If you’re growing kohlrabi in a container, make sure to place it in a sunny location.
What kind of soil does kohlrabi need?
Kohlrabi prefers well-drained, fertile soil with a pH between 6.0 and 7.5. Amend the soil with compost or other organic matter before planting to improve drainage and fertility. Avoid heavy clay soils, as they can lead to stunted growth.
How often should I water kohlrabi?
Kohlrabi needs consistent moisture to grow properly. Water regularly, especially during dry periods, to keep the soil evenly moist but not waterlogged. Aim for about 1 inch of water per week. Mulching around the plants can help retain moisture and suppress weeds.
How far apart should I plant kohlrabi?
Space kohlrabi plants 6-8 inches apart in rows that are 12-18 inches apart. This allows for adequate air circulation and prevents overcrowding, which can lead to disease. If you’re growing kohlrabi in containers, plant one plant per pot.
How long does it take for kohlrabi to mature?
Kohlrabi typically matures in 55-60 days from seed. However, the exact time can vary depending on the variety and growing conditions. You can start harvesting kohlrabi when the bulbs are about 2-3 inches in diameter.
How do I know when kohlrabi is ready to harvest?
Kohlrabi is best harvested when the bulbs are young and tender, typically around 2-3 inches in diameter. Larger bulbs can become tough and woody. To harvest, simply cut the bulb from the stem just above the soil line. You can also harvest the leaves, which are best when young and tender.
Can I eat the leaves of kohlrabi?
Yes, the leaves of kohlrabi are edible and nutritious. They can be eaten raw in salads or cooked like spinach or kale. Choose young, tender leaves for the best flavor and texture.
What are some common pests and diseases that affect kohlrabi?
Common pests that affect kohlrabi include cabbage worms, aphids, and flea beetles. Diseases include clubroot and black rot. To prevent pests and diseases, practice crop rotation, use row covers, and keep the garden free of weeds.
How do I store kohlrabi?
Store kohlrabi bulbs in the refrigerator for up to several weeks. Remove the leaves before storing, as they can draw moisture from the bulb. Kohlrabi leaves can be stored in the refrigerator for a few days.
Can I freeze kohlrabi?
Yes, you can freeze kohlrabi. Blanch the bulbs for 2-3 minutes before freezing to preserve their color and texture. Kohlrabi leaves can also be frozen, but they may become mushy after thawing.
What are some ways to use kohlrabi in cooking?
Kohlrabi can be eaten raw or cooked. It can be sliced and added to salads, shredded for slaws, stir-fried, roasted, or steamed. The leaves can be used in soups, stews, or sautéed as a side dish.
Is kohlrabi nutritious?
Yes, kohlrabi is a nutritious vegetable. It is a good source of vitamin C, potassium, and fiber. It is also low in calories and fat.
Can I grow kohlrabi in containers?
Yes, kohlrabi can be successfully grown in containers. Choose a large pot (at least 12 inches in diameter) and use a well-draining potting mix. Make sure the container has drainage holes to prevent waterlogging.
Leave a Comment