

DIY Home Decor Ideas – ever feel like your space is missing that *something*? Like it needs a personal touch, a spark of your own creativity? I totally get it! We all crave a home that reflects our unique style, but sometimes, store-bought decor just doesn’t cut it. It can feel generic, mass-produced, and frankly, a little soulless.
For centuries, cultures around the globe have embraced the art of handcrafted home embellishments. From intricate tapestries woven with family stories to hand-painted pottery passed down through generations, DIY decor has always been a way to infuse our living spaces with meaning and connection. Think about it – even the simplest hand-stitched quilt carries a warmth and history that no department store purchase can replicate.
That’s why I’m so excited to share these amazing DIY Home Decor Ideas with you! In today’s world, where we’re constantly bombarded with trends and fleeting styles, creating your own decor is a powerful way to reclaim your space and express your individuality. Plus, it’s incredibly rewarding! Not only will you save money by upcycling and repurposing materials, but you’ll also gain a sense of accomplishment and pride in your handcrafted creations. Ready to transform your house into a home that truly reflects you? Let’s dive in!
DIY Miracle Cleaner: Vinegar and Vaseline Hacks You Need to Know!
Hey everyone! I’m so excited to share these amazing cleaning hacks with you using just two simple ingredients: vinegar and Vaseline! You probably already have these lying around your house, and you won’t believe the magic they can work. Forget expensive cleaning products loaded with chemicals; these DIY solutions are effective, affordable, and eco-friendly. Let’s dive in!
Tackling Stubborn Water Stains on Faucets and Showerheads
Water stains are the bane of my existence! They seem to appear overnight and can make even the cleanest bathroom look dingy. But fear not, because vinegar is here to save the day!
What you’ll need:
* White vinegar
* A plastic bag (sandwich bag or grocery bag will work)
* Rubber band or twist tie
* Old toothbrush or scrubbing brush
* Clean cloth or paper towels
Step-by-step instructions:
1. Prepare the vinegar bath: Pour enough white vinegar into the plastic bag to fully submerge the faucet or showerhead. You want to make sure the affected area is completely covered.
2. Secure the bag: Carefully place the bag over the faucet or showerhead, ensuring the water stains are submerged in the vinegar. Use a rubber band or twist tie to secure the bag tightly around the base of the fixture. This will prevent leaks and keep the vinegar in contact with the stains.
3. Soak overnight (or for several hours): This is the key! Let the vinegar work its magic. I usually leave it overnight for really stubborn stains, but even a few hours can make a big difference. The vinegar will dissolve the mineral deposits that cause the water stains.
4. Remove the bag and scrub: After soaking, remove the bag and discard the vinegar. You’ll likely see that the stains have already loosened significantly. Use an old toothbrush or scrubbing brush to gently scrub away any remaining residue.
5. Rinse and dry: Rinse the faucet or showerhead thoroughly with clean water to remove any traces of vinegar. Finally, dry it with a clean cloth or paper towel. Voila! Sparkling clean and stain-free!
Removing Sticky Residue from Jars and Surfaces
We’ve all been there: trying to peel off a label and ending up with a sticky, gooey mess. It’s frustrating, but Vaseline can come to the rescue!
What you’ll need:
* Vaseline (petroleum jelly)
* Clean cloth or paper towels
Step-by-step instructions:
1. Apply Vaseline generously: Apply a generous amount of Vaseline directly to the sticky residue. Make sure to cover the entire area.
2. Let it sit for a few minutes: Give the Vaseline a few minutes to work its magic. It will penetrate the adhesive and loosen the bond. I usually wait about 5-10 minutes, depending on how stubborn the residue is.
3. Wipe away the residue: Use a clean cloth or paper towel to wipe away the Vaseline and the sticky residue. You’ll be amazed at how easily it comes off! You might need to apply a little pressure and rub in a circular motion.
4. Clean the surface: Once you’ve removed all the residue, clean the surface with a damp cloth or soapy water to remove any remaining Vaseline. Dry with a clean cloth.
Polishing Stainless Steel Appliances
Stainless steel appliances look great, but they’re notorious for showing fingerprints and smudges. Vaseline can help you achieve a streak-free shine!
What you’ll need:
* Vaseline (petroleum jelly)
* Two clean, soft cloths (microfiber cloths work best)
Step-by-step instructions:
1. Apply a tiny amount of Vaseline: This is important: a little goes a long way! Dab a very small amount of Vaseline onto one of the clean cloths. You only need a pea-sized amount for a small area.
2. Rub onto the stainless steel: Gently rub the Vaseline onto the stainless steel surface, following the grain of the metal. Use circular motions to distribute the Vaseline evenly.
3. Buff with a clean cloth: Use the second clean cloth to buff the surface until it shines. This will remove any excess Vaseline and leave a protective layer that repels fingerprints.
4. Repeat as needed: Repeat the process on other areas of your stainless steel appliances. You’ll be amazed at how shiny and fingerprint-resistant they become!
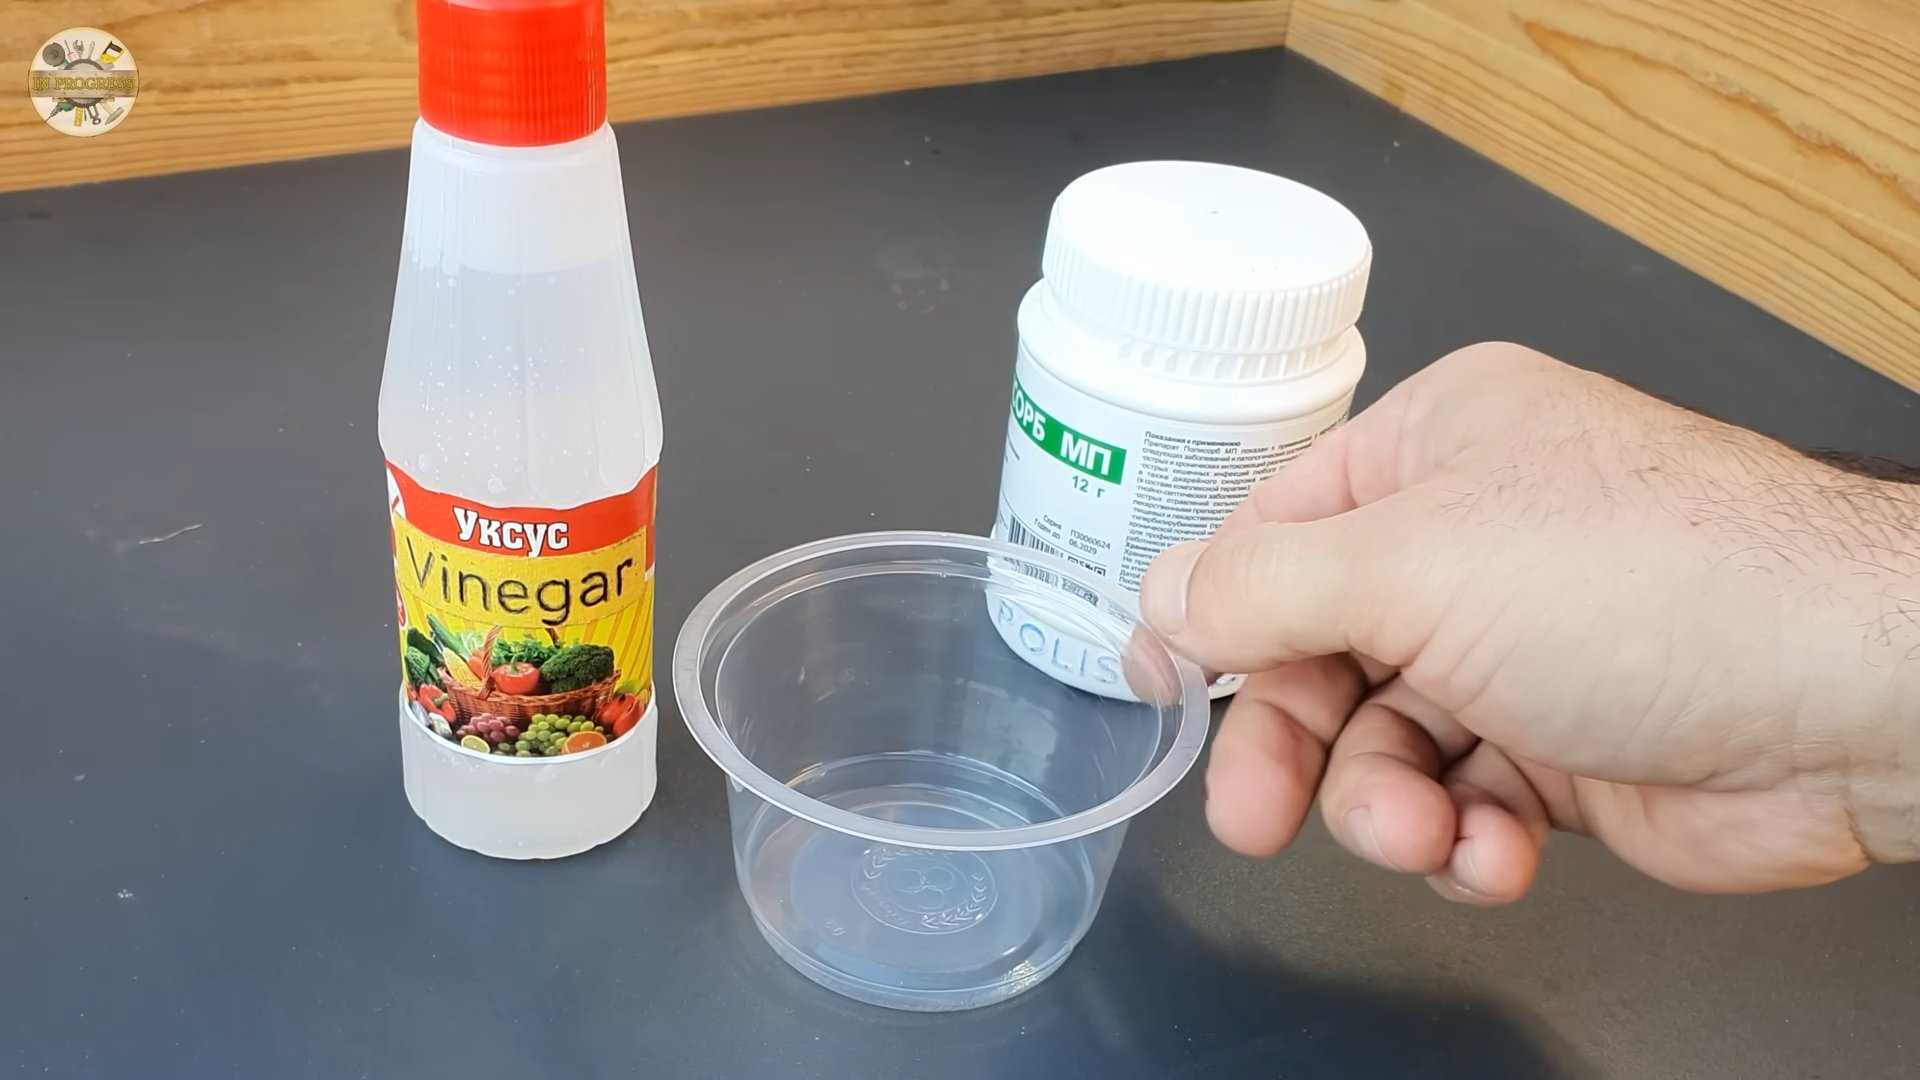
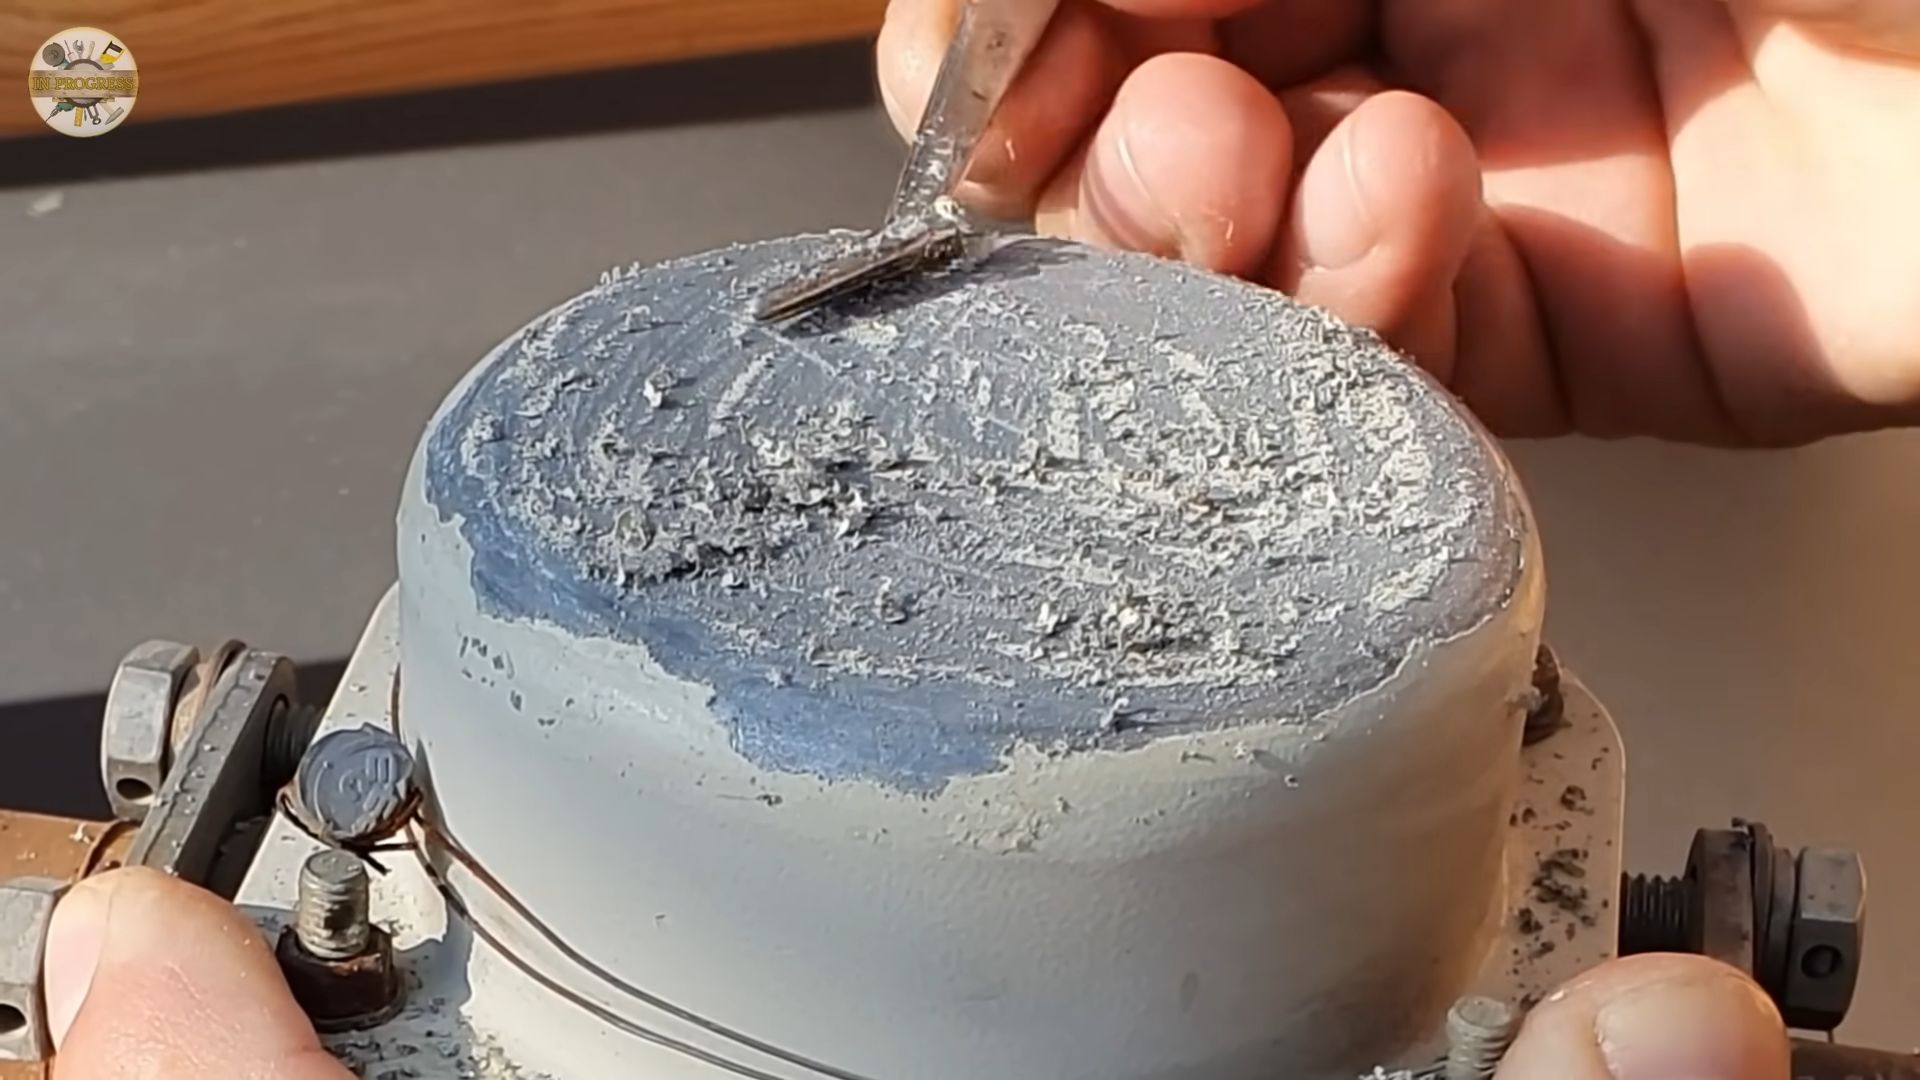
Removing Rust from Chrome Fixtures
Rust can make chrome fixtures look old and neglected. Vinegar’s acidity can help dissolve the rust and restore the shine.
What you’ll need:
* White vinegar
* Old toothbrush or scrubbing brush
* Clean cloth or paper towels
* Optional: Baking soda (for extra stubborn rust)
Step-by-step instructions:
1. Soak a cloth in vinegar: Soak a clean cloth in white vinegar.
2. Apply the cloth to the rusted area: Wrap the vinegar-soaked cloth around the rusted area of the chrome fixture. Make sure the rust is completely covered.
3. Let it sit for at least 30 minutes: Allow the vinegar to sit on the rust for at least 30 minutes. For heavier rust, you can let it sit for several hours or even overnight.
4. Scrub the rust: After soaking, use an old toothbrush or scrubbing brush to scrub away the rust. The vinegar should have loosened the rust, making it easier to remove.
5. For stubborn rust: If the rust is particularly stubborn, make a paste of baking soda and water. Apply the paste to the rusted area and let it sit for a few minutes before scrubbing. The baking soda will act as a mild abrasive to help remove the rust.
6. Rinse and dry: Rinse the chrome fixture thoroughly with clean water to remove any traces of vinegar or baking soda. Dry with a clean cloth or paper towel.
Lubricating Sticky Drawers and Hinges
Sticky drawers and squeaky hinges are annoying! Vaseline can act as a lubricant to smooth things out.
What you’ll need:
* Vaseline (petroleum jelly)
* Small paintbrush or cotton swab
* Clean cloth or paper towels
Step-by-step instructions:
1. Apply Vaseline to the drawer slides or hinges: Use a small paintbrush or cotton swab to apply a thin layer of Vaseline to the drawer slides or hinges. Be sure to get into all the nooks and crannies.
2. Work the drawer or hinge: Open and close the drawer or move the hinge back and forth several times to distribute the Vaseline evenly.
3. Wipe away excess Vaseline: Use a clean cloth or paper towel to wipe away any excess Vaseline. You don’t want to leave a thick layer that will attract dust and dirt.
4. Enjoy smooth operation: Enjoy your smoothly operating drawers and silent hinges!
Removing Makeup Stains from Clothing
Accidentally smudged foundation on your favorite shirt? Don’t panic! Vaseline can help lift the stain.
What you’ll need:
* Vaseline (petroleum jelly)
* Clean cloth or paper towels
* Laundry detergent
Step-by-step instructions:
1. Apply Vaseline to the stain: Apply a generous amount of Vaseline directly to the makeup stain.
2. Let it sit for a few minutes: Allow the Vaseline to sit on the stain for a few minutes. This will help to loosen the makeup particles.
3. Blot the stain: Use a clean cloth or paper towel to blot the stain. Do not rub, as this can spread the stain.
4. Repeat as needed: Repeat the process of applying Vaseline and blotting until the stain is mostly gone.
5. Launder as usual: Launder the garment as usual, using your regular laundry detergent. Check the stain after washing to make sure it’s completely gone before drying.
Cleaning and Shining Leather Shoes
Keep your leather shoes looking their best with a simple Vaseline treatment.
What you’ll need:
* Vaseline (petroleum jelly)
* Two clean, soft cloths
Step-by-step instructions:
1. Clean the shoes: First, clean your leather shoes with a damp cloth to remove any dirt or debris.
2. Apply a small amount of Vaseline: Apply a small amount of Vaseline to one of the clean cloths.
3. Rub onto the leather: Gently rub the Vaseline onto the leather shoes, using circular motions.
4. Buff with a clean cloth: Use the second clean cloth to buff the shoes until they shine. This will remove any excess Vaseline and leave a protective layer.
Cleaning Grout
Grout can get really dirty and
Conclusion
So, there you have it! Transforming your living space doesn’t require a hefty budget or professional interior designer. These DIY home decor ideas offer a fantastic way to inject your personality and creativity into every corner of your home. From repurposing old materials to crafting unique wall art, the possibilities are truly endless.
Why is this a must-try? Because it’s more than just decorating; it’s about creating a home that reflects *you*. It’s about the satisfaction of knowing you built something beautiful with your own two hands. It’s about saving money while simultaneously reducing waste and embracing sustainability. And most importantly, it’s about having fun and expressing your individual style.
Consider these variations to further personalize your DIY projects:
* **Color Palettes:** Don’t be afraid to experiment with different color schemes. A fresh coat of paint can completely transform a room. Think about using complementary colors for a vibrant look or sticking to a monochromatic palette for a more sophisticated feel.
* **Texture Play:** Incorporate different textures to add depth and interest. Think about adding a chunky knit throw to your sofa, a woven rug to your floor, or some macrame wall hangings.
* **Upcycled Materials:** Get creative with upcycling! Old jars can become stylish vases, wooden pallets can be transformed into coffee tables, and fabric scraps can be used to create unique throw pillows.
* **Seasonal Updates:** Change up your decor with the seasons. Add cozy blankets and warm-toned accents in the fall and winter, and opt for lighter fabrics and brighter colors in the spring and summer.
* **Personal Touches:** The most important thing is to add personal touches that reflect your interests and hobbies. Display your favorite books, artwork, or travel souvenirs.
We strongly encourage you to dive into these **DIY home decor ideas** and unleash your inner artist. Don’t be intimidated if you’re not a seasoned crafter; these projects are designed to be accessible to everyone, regardless of skill level. Start small, be patient, and most importantly, have fun!
Once you’ve completed your DIY masterpiece, we’d love to see it! Share your creations with us on social media using [Your Hashtag] and tell us about your experience. What challenges did you face? What did you learn? What are you most proud of? Your feedback will not only inspire others but also help us continue to provide valuable and engaging content. Let’s build a community of DIY enthusiasts who are passionate about creating beautiful and sustainable homes. So, grab your tools, gather your materials, and get ready to transform your living space into a reflection of your unique personality. Happy crafting!
Frequently Asked Questions (FAQ)
What are some easy DIY home decor ideas for beginners?
Starting with simple projects is always a good idea. Consider painting an accent wall, creating a gallery wall with framed prints, or making your own throw pillows. Upcycling old jars into vases or creating simple macrame plant hangers are also great options for beginners. These projects require minimal skills and materials, allowing you to build confidence and develop your crafting abilities. Remember to watch tutorials and read instructions carefully before starting any project.
Where can I find affordable materials for DIY home decor?
You don’t have to break the bank to create beautiful DIY home decor. Check out thrift stores, flea markets, and garage sales for affordable materials. You can often find unique and interesting items that can be repurposed or upcycled. Online marketplaces like Craigslist and Facebook Marketplace are also great resources for finding discounted materials. Don’t forget to look around your own home for items that you can repurpose or upcycle. Old clothes, furniture, and even cardboard boxes can be transformed into something new and beautiful.
How can I personalize my DIY home decor projects?
Personalization is key to creating a home that reflects your unique style. Incorporate your favorite colors, patterns, and textures into your projects. Display your favorite artwork, books, and travel souvenirs. Create a gallery wall with photos of your family and friends. Add personal touches that reflect your interests and hobbies. Don’t be afraid to experiment and try new things. The most important thing is to create a space that you love and that makes you feel comfortable and happy.
What are some sustainable DIY home decor ideas?
Sustainability is becoming increasingly important, and there are many ways to incorporate it into your DIY home decor projects. Upcycle old materials instead of buying new ones. Use eco-friendly paints and finishes. Create your own cleaning products using natural ingredients. Grow your own herbs and vegetables. Reduce your waste by composting and recycling. By making small changes, you can create a more sustainable and eco-friendly home.
How do I choose the right colors for my DIY home decor projects?
Choosing the right colors can be tricky, but there are a few things to keep in mind. Consider the size and lighting of the room. Lighter colors can make a small room feel larger and brighter, while darker colors can create a cozy and intimate atmosphere. Think about the mood you want to create. Warm colors like red, orange, and yellow can create a sense of energy and excitement, while cool colors like blue, green, and purple can create a sense of calm and relaxation. Experiment with different color combinations to find what works best for you. You can use online color palettes or consult with a professional interior designer for inspiration.
What tools do I need for DIY home decor projects?
The tools you need will depend on the specific projects you’re working on, but there are a few essential tools that every DIYer should have. These include a hammer, screwdriver, measuring tape, level, saw, drill, and paintbrushes. You may also need specialized tools for specific projects, such as a sewing machine for making curtains or throw pillows, or a jigsaw for cutting intricate shapes. Invest in high-quality tools that will last for years to come.
How can I find inspiration for DIY home decor projects?
There are many sources of inspiration for DIY home decor projects. Browse magazines, websites, and social media platforms like Pinterest and Instagram. Visit home decor stores and showrooms to see the latest trends. Attend craft fairs and workshops to learn new skills and techniques. Talk to friends and family members who are also interested in DIY. The most important thing is to keep your eyes open and be receptive to new ideas.
What if my DIY project doesn’t turn out as planned?
Don’t be discouraged if your DIY project doesn’t turn out exactly as planned. Mistakes are a part of the learning process. Take a step back and assess the situation. Can you fix the mistake? Can you repurpose the project into something else? Don’t be afraid to experiment and try new things. The most important thing is to learn from your mistakes and keep trying. Remember, even professional crafters make mistakes sometimes.
How can I involve my kids in DIY home decor projects?
Involving your kids in DIY home decor projects is a great way to spend quality time together and teach them new skills. Choose projects that are age-appropriate and that they will enjoy. Let them help with tasks like painting, gluing, and decorating. Encourage their creativity and let them express their own ideas. Make sure to supervise them closely and provide them with the necessary safety equipment. DIY projects can be a fun and educational experience for the whole family.

Leave a Comment