

Harvesting okra easily can be a game-changer for any home gardener, especially if you’ve ever battled with those prickly pods! I remember my first attempt at growing okra – I was so excited to see those beautiful flowers turn into what I thought would be a delicious harvest. But then came the harvesting part… ouch! It felt like a wrestling match with a very determined, slightly spiky vegetable.
Okra, with its origins tracing back to Africa and its significant role in Southern cuisine, has been cultivated for centuries. It’s a staple in gumbo, stews, and even fried dishes. But the key to enjoying okra’s unique flavor and texture lies in harvesting it at the right time, and that’s where many gardeners stumble.
Let’s face it, nobody wants to spend their precious gardening time battling thorny plants and ending up with tough, woody okra. That’s why I’m sharing some simple, effective DIY tricks to make harvesting okra easily a breeze. These hacks will not only protect your hands but also ensure you’re picking okra at its peak ripeness, resulting in a more tender and flavorful harvest. Get ready to say goodbye to prickly problems and hello to a bountiful okra bounty!
Harvesting Okra Like a Pro: No More Prickly Problems!
Okra. That delicious, slightly slimy (but in a good way!) vegetable that thrives in the summer heat. But let’s be honest, harvesting okra can be a prickly situation, literally! Those little spines can leave you itching and uncomfortable. But fear not, fellow gardeners! I’m here to share my tried-and-true methods for harvesting okra easily and painlessly. Get ready to enjoy your okra harvest without the ouch!
What You’ll Need
Before we dive in, let’s gather our supplies. Having everything ready will make the process smooth and efficient.
* Gardening Gloves: This is non-negotiable! Thick gardening gloves are your best defense against those pesky spines. I prefer leather gloves, but any durable, thick material will work.
* Long-Sleeved Shirt: Another layer of protection is always a good idea. A long-sleeved shirt will shield your arms from the okra plants.
* Sharp Knife or Pruning Shears: A sharp blade is essential for a clean cut, which helps the plant heal quickly and encourages further production. Dull blades can crush the stem and damage the plant.
* Harvesting Basket or Bucket: You’ll need something to collect your okra pods as you harvest them.
* Optional: Eye Protection: If you’re particularly sensitive or working with tall okra plants, safety glasses or goggles can protect your eyes from stray spines or plant debris.
* Optional: Oil or Lotion: If you’re still prone to itching, applying a thin layer of oil or lotion to your arms before harvesting can create a barrier.
When to Harvest Okra: Timing is Everything
Knowing when to harvest okra is crucial for getting the best flavor and texture. Okra pods grow quickly, and they can become tough and woody if left on the plant for too long.
* Check Daily: Okra pods can double in size in just a day or two, especially during peak growing season. I recommend checking your plants daily for harvest-ready pods.
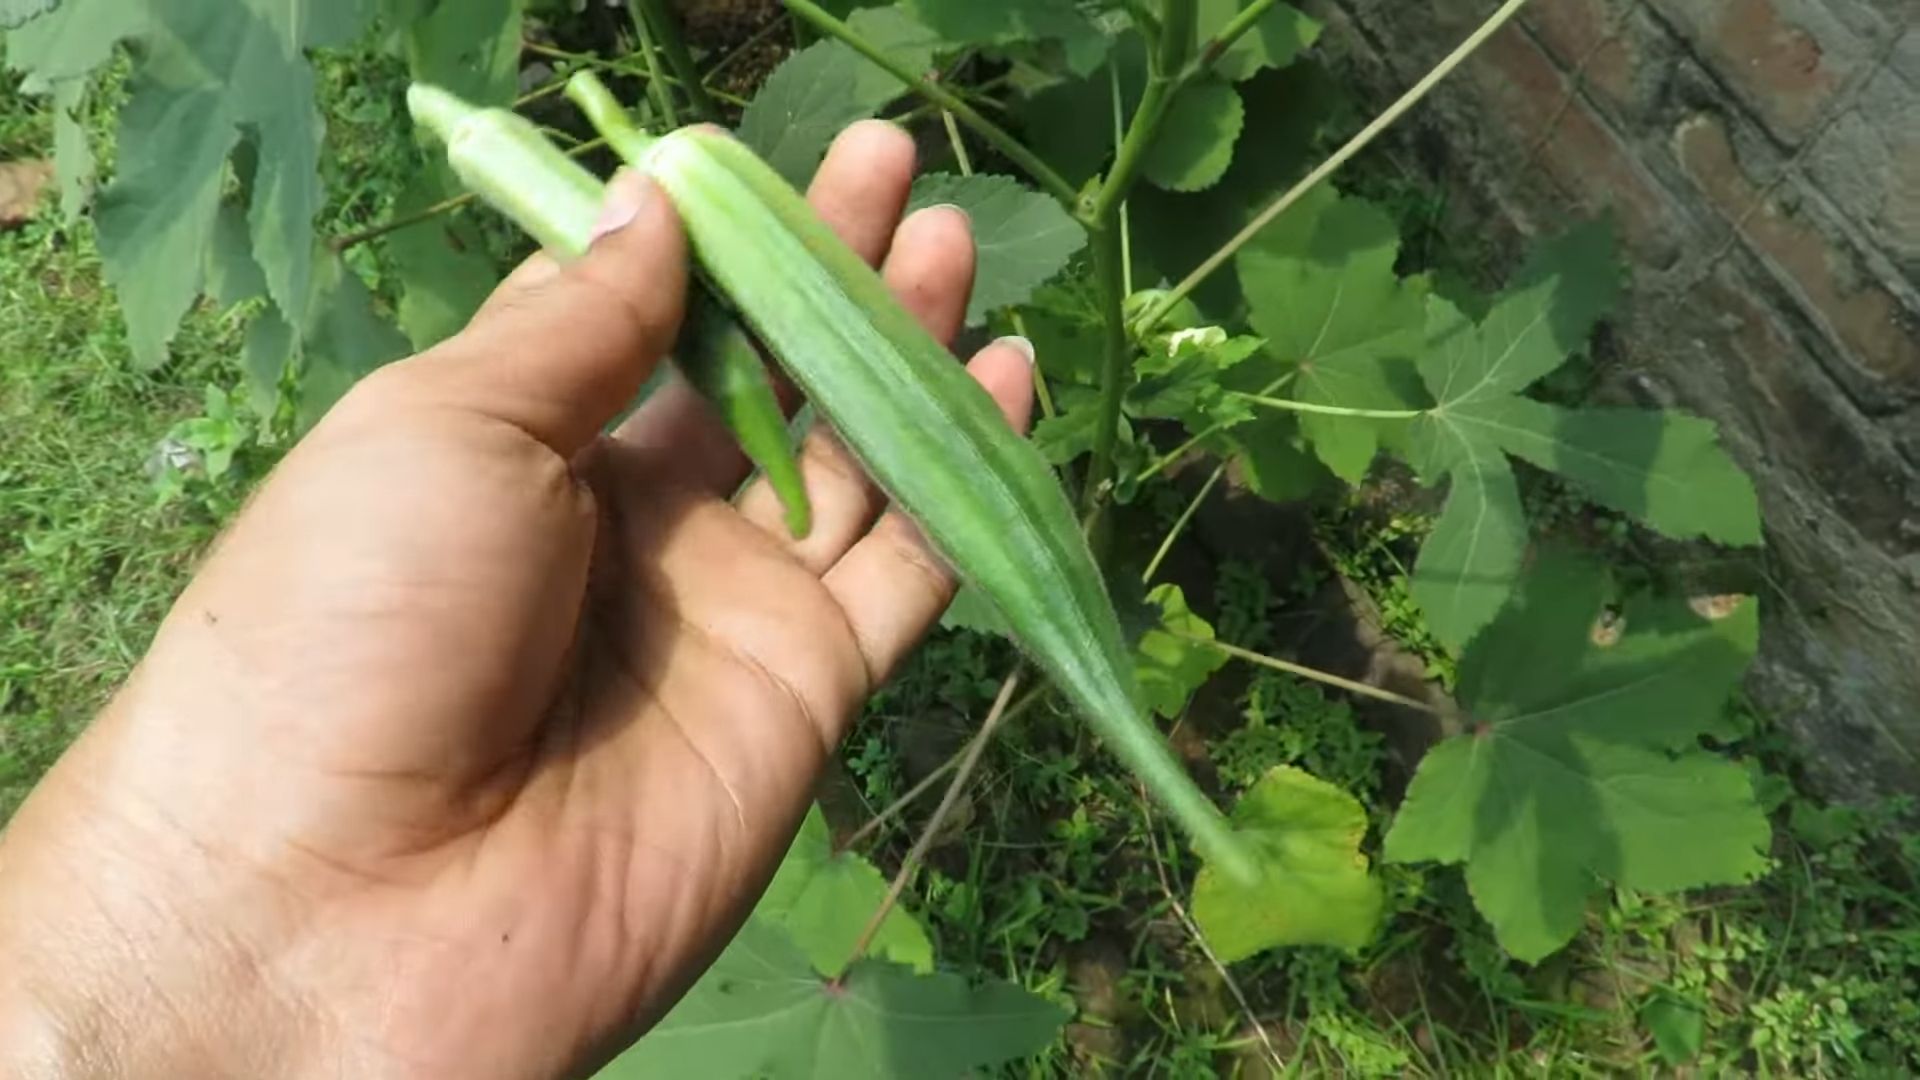
* Ideal Size: The ideal size for harvesting okra depends on the variety, but generally, pods should be 2-4 inches long. Some varieties can be harvested at a larger size, but it’s always best to err on the side of smaller rather than larger.
* Tenderness Test: Gently squeeze the pod. It should be firm but tender. If it feels hard or woody, it’s likely too mature.
* Snap Test: Try to snap the pod in half. If it snaps easily, it’s ready to harvest. If it bends or is difficult to break, it’s probably too tough.
* Color: Look for vibrant green pods. As okra matures, it can start to turn pale or yellow.
Harvesting Okra: Step-by-Step Guide
Now for the main event! Follow these steps for a successful and itch-free okra harvest.
1. Gear Up: Put on your gardening gloves and long-sleeved shirt. If you’re using eye protection or applying oil/lotion, do that now.
2. Locate Ready Pods: Carefully inspect your okra plants and identify the pods that are ready for harvest based on the size, tenderness, and color guidelines mentioned above.
3. Position Yourself: Position yourself so that you have easy access to the pod you want to harvest. Be mindful of the surrounding leaves and stems, and try to avoid brushing against them unnecessarily.
4. Use Your Sharp Tool: Using your sharp knife or pruning shears, make a clean cut through the stem just above the pod. Cut the stem about half an inch above the cap of the okra.
5. Handle with Care: Gently grasp the harvested pod and place it in your harvesting basket or bucket. Avoid squeezing the pod too tightly, as this can bruise it.
6. Repeat: Continue harvesting the ready pods, working your way through the okra plants.
7. Dispose of Debris: As you harvest, collect any fallen leaves or stems and dispose of them properly. This will help keep your garden clean and prevent the spread of disease.
8. Inspect Regularly: Continue to inspect your okra plants daily and harvest the pods as they become ready. Regular harvesting will encourage the plant to produce more pods.
Dealing with Prickly Plants: Extra Tips and Tricks
Even with gloves and long sleeves, you might still encounter some prickly situations. Here are a few extra tips to minimize the itch:
* Harvest in the Morning: Okra spines tend to be less irritating in the morning when they are still damp with dew.
* Work Slowly and Carefully: Avoid rushing through the harvesting process. Take your time and be mindful of your movements to minimize contact with the plants.
* Use Tongs: For particularly prickly varieties, consider using tongs to grasp the pods and avoid direct contact with your hands.
* Wash Immediately: After harvesting, wash your hands and arms thoroughly with soap and water. This will help remove any spines or irritants that may have come into contact with your skin.
* Vinegar Rinse: A vinegar rinse can help neutralize the irritants from okra spines. Mix equal parts water and vinegar and rinse your skin after washing.
* Baking Soda Paste: If you do get itchy, make a paste of baking soda and water and apply it to the affected area. This can help soothe the itch.
* Anti-Itch Cream: Over-the-counter anti-itch creams containing hydrocortisone or calamine lotion can also provide relief from itching.
Maintaining Your Okra Plants for a Bountiful Harvest
Harvesting is just one part of the okra-growing process. Proper maintenance is essential for a healthy and productive plant.
* Water Regularly: Okra needs consistent watering, especially during hot, dry weather. Water deeply and regularly, aiming for about an inch of water per week.
* Fertilize: Okra benefits from regular fertilization. Use a balanced fertilizer or side-dress with compost or manure.
* Weed Control: Keep your okra patch free of weeds. Weeds compete with okra plants for water and nutrients.
* Pest Control: Monitor your okra plants for pests such as aphids, flea beetles, and stink bugs. Take action to control pests as needed.
* Pruning: Prune away any yellowing or dead leaves to improve air circulation and prevent disease.
* Support: Taller okra varieties may need support to prevent them from falling over. Use stakes or trellises to provide support.
Storing Your Okra Harvest
Now that you’ve harvested your okra, it’s time to store it properly to maintain its freshness and flavor.
* Refrigerate: Okra is best stored in the refrigerator. Place the pods in a plastic bag or container and store them in the crisper drawer. Okra will typically last for 5-7 days in the refrigerator.
* Don’t Wash Before Storing: Avoid washing okra before storing it, as this can promote spoilage. Wash the pods just before you’re ready to use them.
* Freezing: Okra can also be frozen for longer storage. To freeze okra, blanch the pods in boiling water for 2-3 minutes, then plunge them into ice water to stop the cooking process. Drain the okra and pat it dry, then place it in freezer bags or containers. Frozen okra will last for 8-12 months.
* Pickling: Pickling is another great way to preserve okra. There are many different pickling recipes available online.
* Drying: Okra can also be dried, although this is less common. To dry okra, slice the pods into thin rounds and dry them in a dehydrator or oven at a low temperature.
Enjoying Your Okra Harvest
Now for the best part – enjoying the fruits (or rather, vegetables) of your labor! Okra is a versatile vegetable that can be used in a variety of dishes.
* Fried Okra: A classic Southern dish! Slice the okra into rounds, dredge it in cornmeal, and fry it until golden brown.
* Okra Gumbo: A hearty and flavorful stew that’s perfect for a cold day.
* Roasted Okra: Toss okra with olive oil, salt, and pepper, and roast it in the oven until tender and slightly browned.
* Grilled Okra: Skewer okra pods and grill them over medium heat until tender and slightly charred.
* Okra Curry: A delicious and flavorful Indian dish.
* Pickled Okra: A tangy and crunchy snack or side dish.
With these tips and tricks, you’ll be harvesting okra like a pro in no time! Happy gardening, and happy eating!
Conclusion
So, there you have it! Harvesting okra easily doesn’t have to be a thorny, frustrating experience. By implementing these simple yet effective techniques, you can transform your okra harvest from a chore into a rewarding part of your gardening routine. We’ve covered everything from identifying the perfect time to pick those tender pods to using the right tools and protective gear to avoid irritation. Remember, the key to a successful harvest lies in consistent monitoring and gentle handling.
This DIY trick is a must-try for several reasons. First and foremost, it significantly reduces the discomfort and potential skin irritation associated with okra’s prickly nature. No more itchy arms or hands! Second, it streamlines the harvesting process, allowing you to gather your bounty more quickly and efficiently. Imagine spending less time wrestling with prickly pods and more time enjoying the delicious results of your labor. Finally, it promotes healthier okra plants by encouraging regular harvesting, which in turn stimulates further pod production. A win-win-win situation!
Looking for variations to personalize your okra harvesting experience? Consider these options:
* Glove Upgrade: Experiment with different types of gloves to find the perfect balance between protection and dexterity. Some gardeners swear by dishwashing gloves, while others prefer thicker gardening gloves with reinforced fingertips.
* Tool Alternatives: If you don’t have pruning shears, a sharp kitchen knife can also work well. Just be sure to clean and sanitize it before and after each use to prevent the spread of disease.
* Harvesting Basket: Instead of carrying a bucket, try using a lightweight harvesting basket with a handle. This can make it easier to maneuver through your okra patch and keep your hands free.
* Early Bird Gets the Okra: Harvest early in the morning when the plants are cooler and the pods are at their most tender. The heat of the day can make the pods tougher and more difficult to cut.
We are confident that these tips will revolutionize your okra harvesting process. Don’t let the fear of prickles hold you back from enjoying the fruits (or rather, vegetables) of your labor. Embrace these techniques, adapt them to your specific needs, and watch as your okra harvest becomes a breeze.
Now, we want to hear from you! Give this DIY trick a try and share your experience in the comments below. Did it make harvesting okra easier? Did you discover any other helpful tips or variations? Your feedback will not only help other gardeners but also contribute to a thriving community of okra enthusiasts. Let’s make okra harvesting a joy, not a chore! We are excited to see how you are harvesting okra easily.
Frequently Asked Questions (FAQ)
Q: Why is okra so prickly, and what causes the itching?
A: Okra plants are covered in tiny hairs, called trichomes, that can cause skin irritation upon contact. These trichomes act like microscopic needles, injecting a mild irritant into the skin. The severity of the reaction varies from person to person, with some individuals experiencing only mild itching while others develop a more pronounced rash. The best way to avoid this irritation is to wear protective clothing, such as long sleeves and gloves, when harvesting okra.
Q: What is the best time of day to harvest okra?
A: The ideal time to harvest okra is early in the morning, before the heat of the day sets in. Okra pods tend to be more tender and easier to cut when they are cool. Harvesting in the morning also minimizes the risk of skin irritation, as the trichomes are less likely to release their irritant in cooler temperatures. Plus, harvesting early allows you to enjoy your fresh okra at its peak flavor and texture.
Q: How often should I harvest okra?
A: Okra pods grow quickly and should be harvested every one to two days. Regular harvesting encourages the plant to produce more pods. If you allow the pods to mature too much on the plant, they will become tough and fibrous, reducing their culinary appeal. Consistent harvesting is key to maximizing your okra yield and ensuring a continuous supply of tender, delicious pods.
Q: How do I know when okra is ready to be harvested?
A: Okra pods are typically ready to harvest when they are 2 to 4 inches long, depending on the variety. The pods should be firm but still tender enough to snap easily. If the pods are difficult to cut or feel woody, they are likely overripe and should be discarded. Regularly checking your okra plants will help you identify the pods that are at their peak ripeness.
Q: What tools do I need to harvest okra easily?
A: The essential tools for harvesting okra include:
* Gloves: To protect your hands from the prickly trichomes.
* Long sleeves: To shield your arms from irritation.
* Pruning shears or a sharp knife: To cleanly cut the pods from the plant.
* A basket or bucket: To collect the harvested okra.
Optional tools include:
* Eye protection: To prevent trichomes from getting into your eyes.
* A stool or ladder: To reach higher pods on taller plants.
Q: Can I eat okra that has become too large or tough?
A: While it’s best to harvest okra when it’s young and tender, overripe pods can still be used, although their texture will be different. You can try cutting them into smaller pieces and adding them to soups or stews, where they will soften during cooking. Alternatively, you can save the seeds from overripe pods to plant next season.
Q: How should I store harvested okra?
A: Freshly harvested okra is best used within a few days. To store it, place the pods in a perforated plastic bag in the refrigerator. Avoid washing the okra until you are ready to use it, as moisture can promote spoilage. Okra can also be frozen for longer storage. To freeze okra, blanch the pods in boiling water for a few minutes, then cool them in an ice bath before freezing them in a single layer on a baking sheet. Once frozen, transfer the okra to a freezer bag or container.
Q: What are some common problems that can affect okra plants?
A: Common problems that can affect okra plants include:
* Aphids: Small, sap-sucking insects that can weaken plants.
* Okra wilt: A fungal disease that causes plants to wilt and die.
* Root-knot nematodes: Microscopic worms that attack plant roots.
* Pod rot: A fungal disease that causes pods to rot on the plant.
Regularly inspecting your okra plants and taking appropriate measures to control pests and diseases will help ensure a healthy and productive harvest.
Q: How can I encourage my okra plants to produce more pods?
A: To encourage okra plants to produce more pods:
* Provide adequate sunlight: Okra needs at least 6 hours of sunlight per day.
* Water regularly: Keep the soil consistently moist, but not waterlogged.
* Fertilize properly: Use a balanced fertilizer to provide essential nutrients.
* Harvest frequently: Regular harvesting encourages the plant to produce more pods.
* Control pests and diseases: Protect your plants from common problems.
By following these tips, you can maximize your okra yield and enjoy a bountiful harvest.

Leave a Comment