

Indoor Malabar Spinach: Your Guide to Year-Round Greens
Have you ever dreamed of enjoying fresh, vibrant Malabar spinach all year round, regardless of the weather outside? Well, dream no more! This article is your passport to the world of indoor Malabar spinach gardening, revealing simple yet effective DIY tricks and hacks to cultivate this nutritious leafy green right in your own home. I’ve always loved the taste and versatility of Malabar spinach, but the limited growing season always frustrated me. That’s why I dedicated myself to mastering the art of indoor cultivation, and now I’m thrilled to share my secrets with you.
While Malabar spinach boasts a rich history in tropical regions, its cultivation indoors is a relatively recent development, driven by a growing desire for fresh, healthy food and a greater awareness of sustainable living. For centuries, it’s been a staple in many cultures, prized for its nutritional value and its ability to thrive in warm climates. Now, thanks to a few clever techniques, we can all enjoy the benefits of this amazing vegetable, regardless of where we live.
Why bother with indoor Malabar spinach? Because nothing beats the taste of homegrown produce! Imagine snipping fresh leaves for your stir-fries, curries, or even smoothies, knowing exactly where they came from and how they were grown. Beyond the delicious flavor, growing your own Malabar spinach ensures you’re getting the highest quality, nutrient-rich greens, free from pesticides and other harmful chemicals. Plus, it’s a rewarding and surprisingly simple process, perfect for beginners and experienced gardeners alike. This guide will walk you through everything you need to know, from seed starting to harvesting, ensuring your indoor Malabar spinach journey is a success.
Get Ready to Grow!
Let’s dive into the practical tips and tricks that will transform your home into a thriving Malabar spinach oasis. Get ready to experience the joy of indoor Malabar spinach gardening!
Easy Carrot Gardening: A Beginner’s Guide
I’ve always loved the sweet crunch of a homegrown carrot, and I’m excited to share how easy it is to grow your own! This guide will walk you through the entire process, from seed to harvest. Even if you’ve never gardened before, you’ll be surprised how simple it is.
Phase 1: Planning and Preparation
- Choose the right location: Carrots need at least six hours of sunlight per day. Select a sunny spot in your garden. Also, ensure the soil is well-drained. Carrots hate soggy soil!
- Prepare the soil: Carrots need loose, well-drained soil. If your soil is heavy clay, amend it with plenty of compost or other organic matter to improve drainage and texture. This is crucial for preventing forked or misshapen carrots. I usually add a generous amount – about 3-4 inches – of compost to my garden bed.
- Test your soil pH: Carrots prefer a slightly acidic to neutral pH (6.0-7.0). You can purchase a soil testing kit from most garden centers. Adjusting the pH might be necessary depending on your results. Lime raises the pH, while sulfur lowers it.
- Choose your carrot variety: There’s a wide variety of carrot types available, from Nantes (classic, short and stubby) to Imperator (long and slender). Consider the space you have and your preferred carrot shape when making your selection. I personally love Nantes carrots for their sweetness and ease of growing.
- Gather your supplies: You’ll need carrot seeds, a garden trowel or hoe, a watering can, and possibly some row covers (to protect seedlings from pests and frost). You might also want gloves to protect your hands while working in the soil.
Phase 2: Sowing the Seeds
- Prepare the seedbed: Loosen the soil to a depth of about 12 inches. This is important for allowing the taproot to grow straight down without encountering obstructions. Use a garden fork or tiller to achieve this depth.
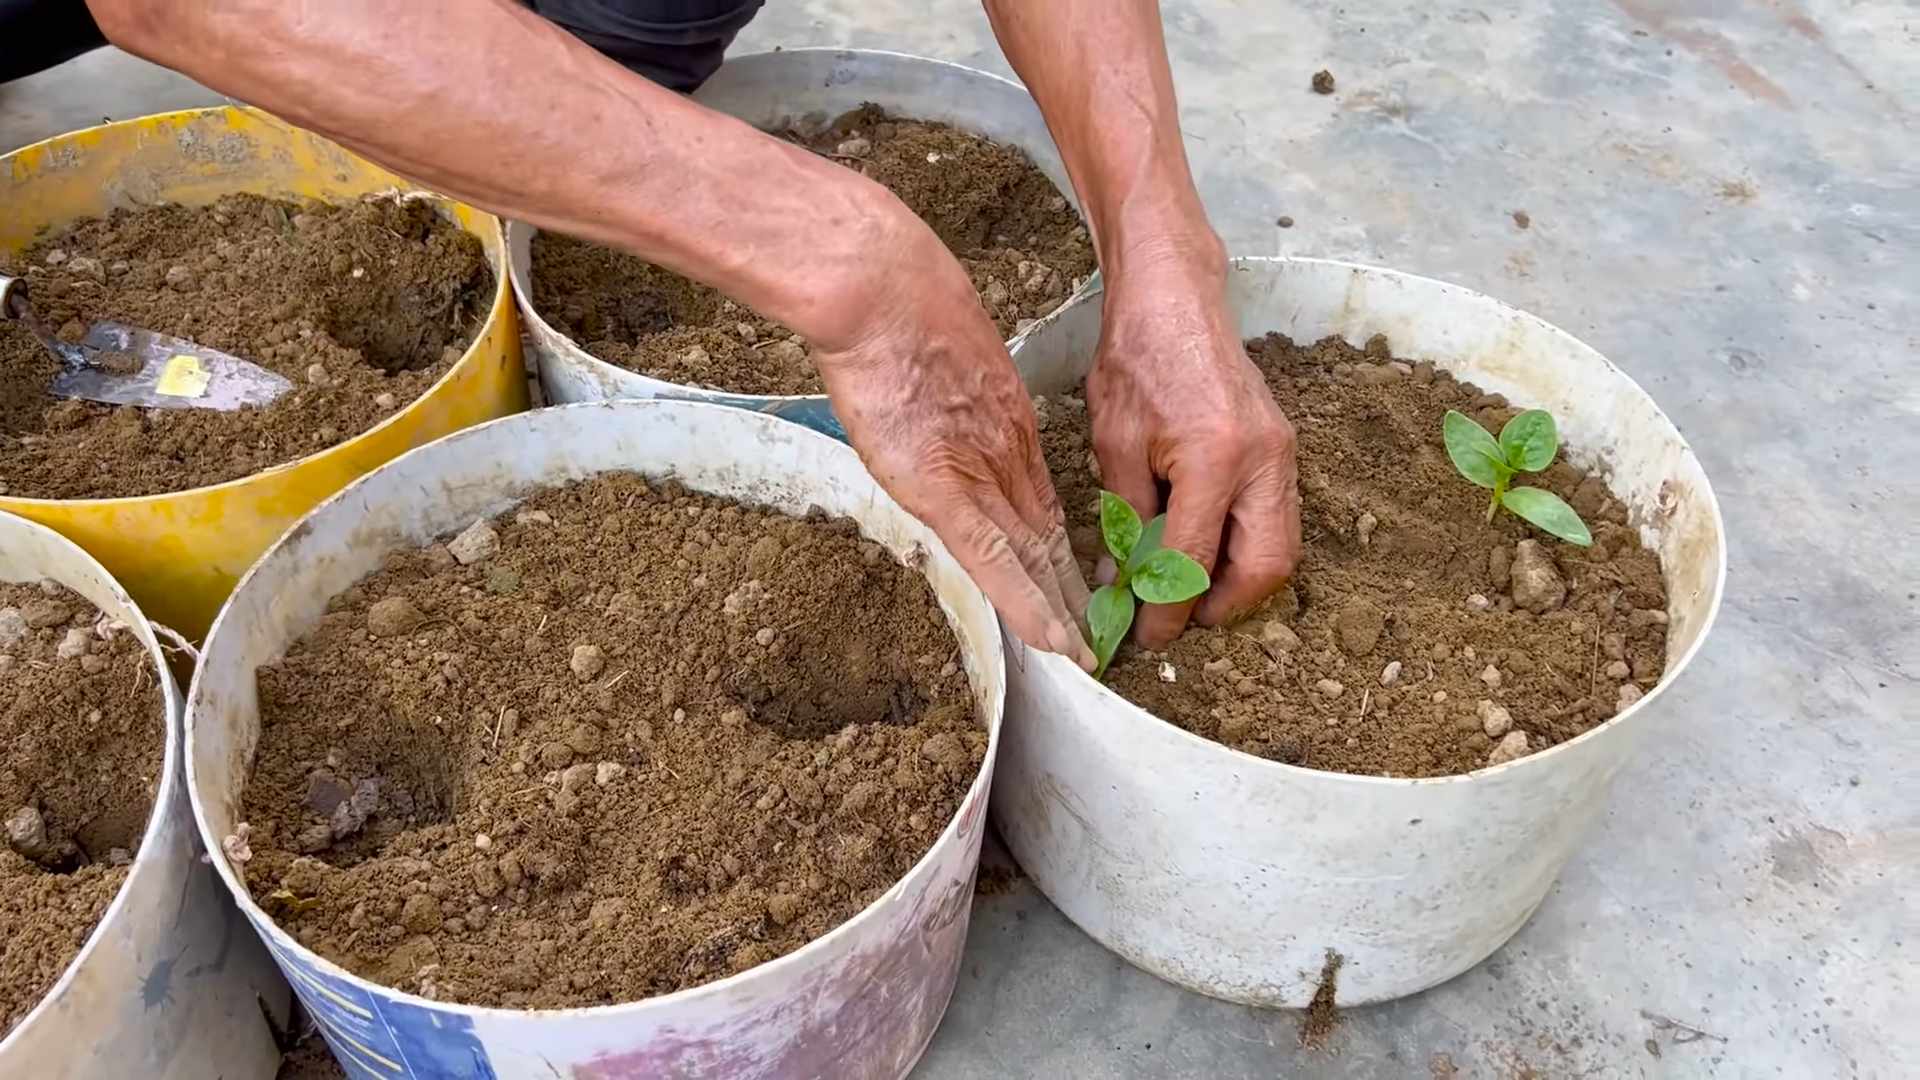
- Sow the seeds: Carrot seeds are tiny! I recommend sowing them thinly, about 1/2 inch deep and 1-2 inches apart. Don’t overcrowd them, as this will lead to smaller carrots. You can sow them directly into the prepared soil or start them indoors in seed trays about 4-6 weeks before the last expected frost.
- Water gently: After sowing, water the seeds gently using a watering can with a rose head. Avoid using a strong jet of water, as this can dislodge the seeds. Keep the soil consistently moist but not waterlogged.
- Thin the seedlings: Once the seedlings emerge (usually within 1-3 weeks), thin them out to about 2-4 inches apart. This gives each carrot enough space to grow to its full potential. Carefully pull out the weaker seedlings, leaving the strongest ones behind. This is a crucial step for maximizing your carrot yield.
- Weed regularly: Weeds compete with your carrots for water and nutrients. Keep the area around your carrots weed-free by hand-weeding or using a hoe. Regular weeding is essential for healthy carrot growth.
Phase 3: Carrot Care and Maintenance
- Water consistently: Carrots need consistent moisture, especially during dry periods. Water deeply and regularly, aiming for about 1 inch of water per week. Mulching around the plants can help retain moisture and suppress weeds.
- Monitor for pests and diseases: Carrots can be susceptible to pests like carrot root flies and diseases like leaf blight. Inspect your plants regularly and take appropriate action if you notice any problems. Organic pest control methods are often effective.
- Side-dress with fertilizer (optional): If your soil is poor in nutrients, you can side-dress your carrots with a balanced organic fertilizer about a month after sowing. Follow the instructions on the fertilizer packaging carefully.
- Protect from frost (if necessary): If you live in an area with late frosts, protect your young seedlings by covering them with row covers or other frost protection materials.
Phase 4: Harvesting Your Carrots
- Check for maturity: Carrots are typically ready for harvest 70-90 days after sowing, depending on the variety. You can check for maturity by gently pulling on a few carrots. If they feel firm and are the desired size, they’re ready to harvest.
- Harvest carefully: Use a garden fork or trowel to carefully loosen the soil around the carrots. Gently lift them out of the ground, avoiding damage to the roots. If you encounter any difficulty, you can use a garden fork to loosen the soil around the carrots before lifting them.
- Clean and store: Once harvested, wash the carrots gently and remove any excess soil. Store them in a cool, dark, and well-ventilated place. You can also store them in the refrigerator for a longer shelf life.
Tips for Success:
- Start small: Don’t feel pressured to plant a huge amount of carrots your first time. Start with a small area to get a feel for the process.
- Be patient: Growing carrots takes time. Don’t get discouraged if you don’t see results immediately.
- Have fun! Gardening should be enjoyable. Relax, experiment, and enjoy the process of growing your own food.
Troubleshooting:
- Forked carrots: This is often caused by rocky or compacted soil. Ensure your soil is loose and well-drained.
- Small carrots: This can be due to overcrowding, poor soil conditions, or lack of water. Thin your seedlings properly and ensure adequate watering and soil fertility.
- Pest damage: Use organic pest control methods to protect your carrots from pests.
Conclusion
So there you have it – a comprehensive guide to successfully growing your own indoor Malabar spinach! This DIY trick isn’t just about saving money on grocery bills; it’s about experiencing the unparalleled freshness and flavor of homegrown vegetables, all year round. The satisfying process of nurturing these vibrant plants from seed to plate is incredibly rewarding, and the taste difference is undeniable. Malabar spinach, grown indoors using this method, boasts a superior texture and a more intense, vibrant flavor compared to store-bought varieties. You’ll be amazed at the difference!
This method of indoor Malabar spinach cultivation is remarkably simple, requiring minimal space and effort. Whether you’re a seasoned gardener or a complete beginner, you’ll find this technique accessible and easy to follow. The ability to harvest fresh, tender leaves whenever you need them is a game-changer, adding a burst of nutritious goodness to your meals with ease. Beyond the convenience, growing your own Malabar spinach contributes to a more sustainable lifestyle, reducing your carbon footprint and fostering a deeper connection with your food.
Don’t be afraid to experiment! Try different types of containers, explore various growing mediums like coco coir or perlite, and play around with lighting arrangements to optimize growth. You can even try different varieties of Malabar spinach to discover your favorite. Some varieties boast larger leaves, while others offer a slightly different flavor profile. The possibilities are endless!
Consider incorporating your homegrown Malabar spinach into a variety of dishes. Its versatility shines through in stir-fries, soups, curries, and even as a delicious addition to salads. Its slightly tangy and slightly bitter flavor adds a unique depth to many culinary creations. Imagine the satisfaction of adding freshly picked leaves to your evening meal, knowing you nurtured them from tiny seeds to their full potential.
We strongly encourage you to try this DIY indoor Malabar spinach growing method. It’s a rewarding experience that will transform your cooking and your connection to nature. Share your experiences with us! Post pictures of your thriving plants and your culinary creations on social media using #IndoorMalabarSpinach. We’d love to see your success stories and learn from your experiences. Let’s build a community of indoor gardeners, sharing tips and tricks to ensure everyone can enjoy the bounty of homegrown Malabar spinach.
Frequently Asked Questions
What type of light is best for indoor Malabar spinach?
Malabar spinach thrives under bright, indirect sunlight. A south-facing window is ideal, but you can supplement with grow lights, especially during shorter winter days. Aim for at least 6-8 hours of light per day. Avoid direct, intense sunlight, which can scorch the leaves.
How often should I water my indoor Malabar spinach?
Water your Malabar spinach when the top inch of soil feels dry to the touch. Avoid overwatering, which can lead to root rot. Allow the soil to dry slightly between waterings. The frequency of watering will depend on factors like the size of your container, the type of growing medium, and the ambient temperature and humidity.
What kind of soil is best for indoor Malabar spinach?
A well-draining potting mix is ideal for indoor Malabar spinach. You can use a standard potting mix or create your own blend using a combination of peat moss, perlite, and vermiculite. Ensure the soil is rich in organic matter to provide essential nutrients.
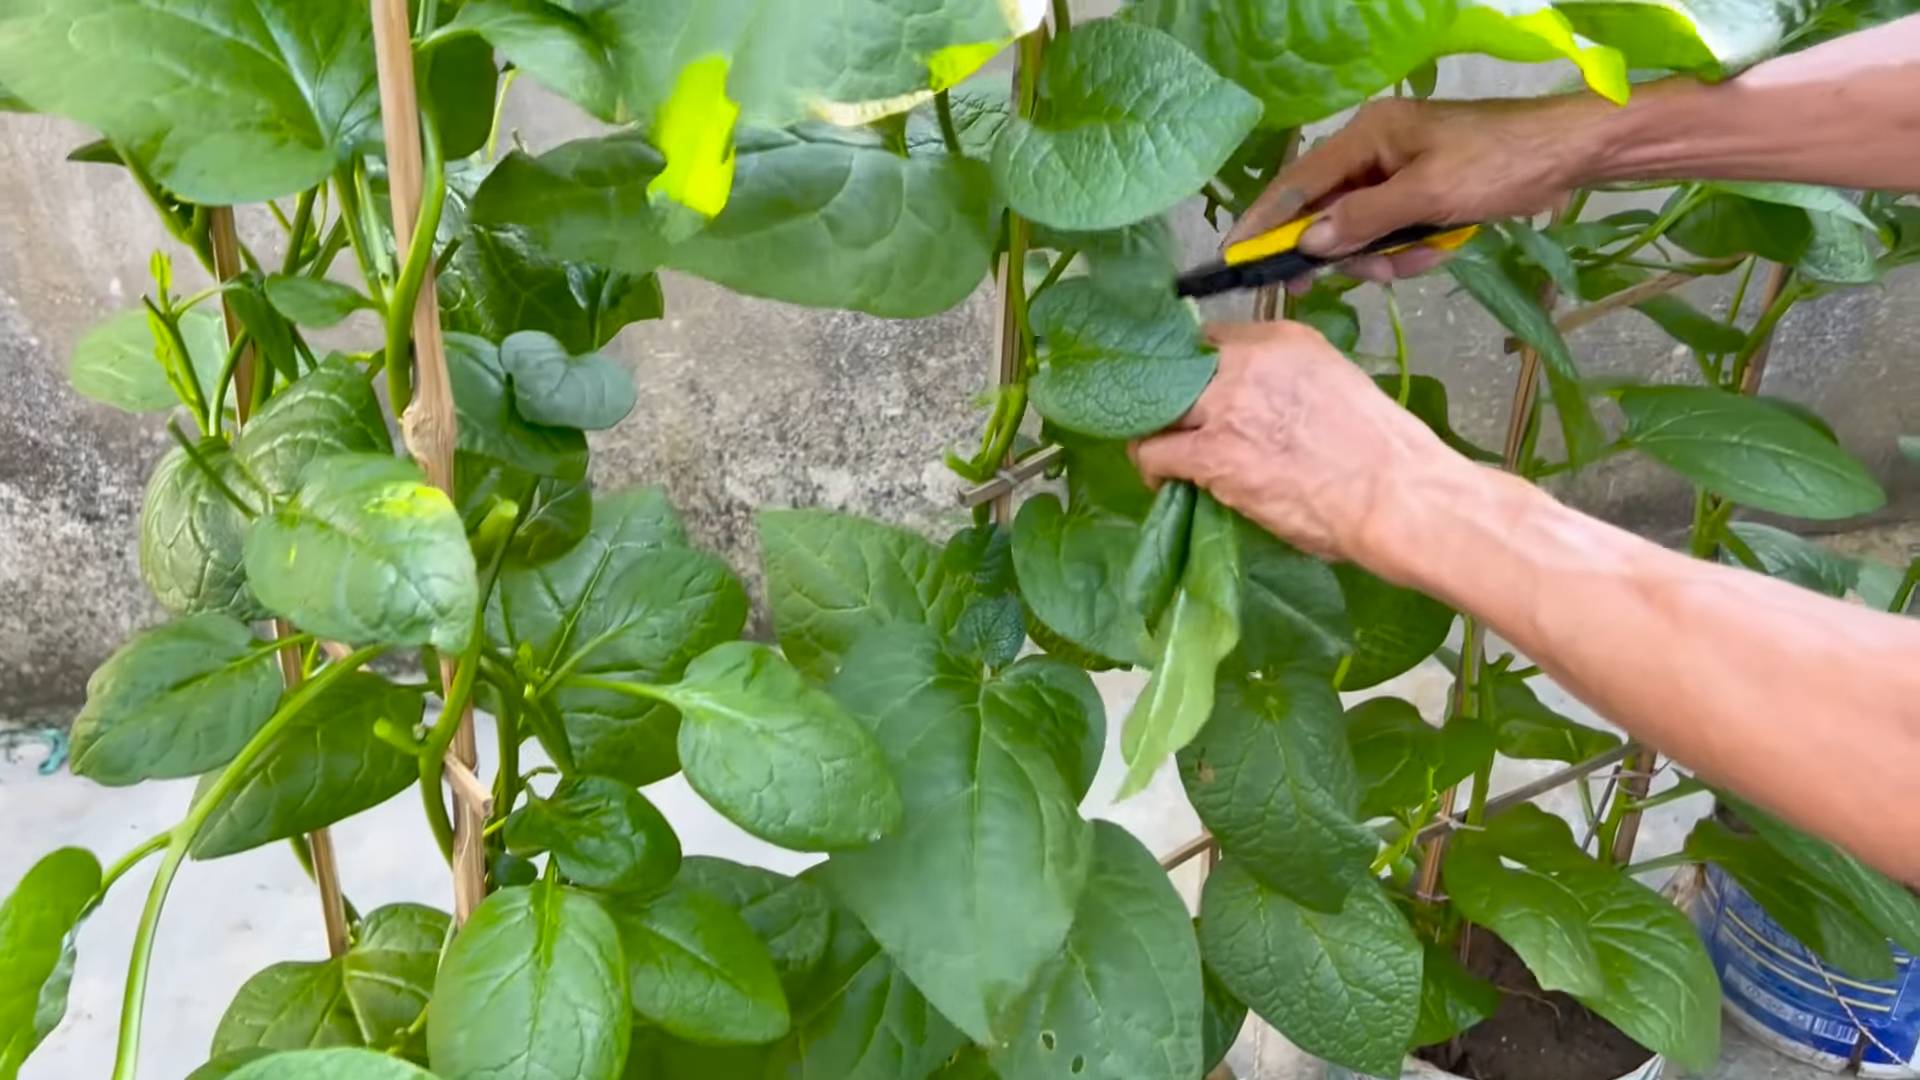
How often can I harvest Malabar spinach?
You can begin harvesting Malabar spinach leaves when they reach a size of about 4-6 inches. Harvest regularly by pinching off the top leaves or cutting stems back to encourage bushier growth. Regular harvesting will promote continuous growth and prevent the plant from becoming leggy.
Can I propagate Malabar spinach from cuttings?
Yes, Malabar spinach can be easily propagated from stem cuttings. Simply take a 4-6 inch stem cutting, remove the lower leaves, and place it in a glass of water or directly into moist soil. Keep the cutting moist and in bright, indirect light until roots develop. Once roots are established, transplant the cutting into a pot with potting mix.
What are the common problems encountered when growing indoor Malabar spinach?
Common problems include pests like aphids and spider mites, and diseases like fungal leaf spots. Regularly inspect your plants for signs of pests or diseases. Treat infestations promptly with insecticidal soap or neem oil. Ensure good air circulation to prevent fungal diseases. Overwatering can also lead to root rot, so ensure proper drainage.
How long does it take for Malabar spinach to grow indoors?
From seed to harvest, it typically takes about 6-8 weeks for indoor Malabar spinach to mature, depending on growing conditions and variety. With proper care and sufficient light, you can enjoy a continuous harvest for several months.
Can I grow Malabar spinach in a hydroponic system?
Yes, Malabar spinach can be successfully grown in a hydroponic system. Hydroponics provides excellent control over nutrient delivery and water management, potentially leading to faster growth and higher yields. However, it requires a bit more setup and maintenance than soil-based cultivation.
What are the nutritional benefits of Malabar spinach?
Malabar spinach is a nutritional powerhouse, packed with vitamins A, C, and K, as well as iron and other essential minerals. It’s a low-calorie, high-fiber vegetable that offers numerous health benefits. Regular consumption can contribute to improved immune function, better digestion, and enhanced overall health.
My Malabar spinach leaves are yellowing. What should I do?
Yellowing leaves can indicate several issues, including nutrient deficiencies, overwatering, underwatering, or pest infestations. Check the soil moisture, inspect for pests, and consider supplementing with a balanced liquid fertilizer. If the problem persists, adjust your watering schedule and consider repotting if necessary.

Leave a Comment