

Growing Ginger in Containers: Unlock the secrets to cultivating your own spicy treasure, right on your patio! Have you ever imagined the satisfaction of snipping fresh ginger root from your own plant, ready to add a zing to your favorite dishes? Well, stop dreaming and start doing! This DIY guide will walk you through everything you need to know to successfully grow ginger in containers, no matter your experience level.
Ginger, with its fiery flavor and incredible health benefits, has a rich history stretching back thousands of years. Originating in South Asia, it was prized by ancient civilizations for its medicinal properties and culinary uses. From traditional Ayurvedic remedies to the bustling spice routes of the past, ginger has always held a special place in human culture. Now, you can bring a piece of that history into your own home.
Why should you learn this DIY trick? Because store-bought ginger can be expensive and sometimes lacks the vibrant freshness of homegrown. Plus, growing ginger in containers is surprisingly easy and rewarding! Imagine the convenience of having a readily available supply of this versatile spice, knowing exactly where it came from and how it was grown. This guide will equip you with the knowledge to overcome common challenges and enjoy a bountiful harvest of your own homegrown ginger. Let’s get started!
Growing Ginger in Containers: A Beginner’s Guide
Hey there, fellow plant enthusiasts! Ever thought about growing your own ginger? It’s surprisingly easy, even if you don’t have a sprawling garden. Growing ginger in containers is a fantastic way to have fresh, flavorful ginger right at your fingertips. Plus, it’s a really rewarding experience to watch those little rhizomes sprout and thrive. Let’s dive into how you can make this happen!
What You’ll Need
Before we get started, let’s gather all the necessary supplies. Trust me, having everything ready will make the process much smoother.
* Ginger Rhizome: Look for a plump, healthy-looking ginger rhizome at your local grocery store or nursery. Ideally, it should have visible “eyes” or buds. Organic ginger is often recommended, as it’s less likely to have been treated with growth inhibitors.
* Container: Choose a container that’s at least 12 inches deep and wide. Ginger roots grow horizontally, so a wider container is better than a tall, narrow one. Make sure it has drainage holes!
* Potting Mix: Use a well-draining potting mix. A mix of equal parts potting soil, compost, and perlite or vermiculite works wonders. Good drainage is crucial to prevent root rot.
* Watering Can: A watering can with a gentle rose head is perfect for watering your ginger without disturbing the soil.
* Spray Bottle: This will help you maintain humidity, which ginger loves.
* Optional: Organic fertilizer (like compost tea or diluted fish emulsion) to give your ginger a boost.
Preparing the Ginger Rhizome
This step is crucial for successful germination. We want to wake up those little buds!
1. Soaking the Rhizome: Soak the ginger rhizome in lukewarm water for 12-24 hours. This rehydrates the rhizome and encourages those buds to start sprouting. I usually do this overnight.
2. Cutting (Optional): If your rhizome is large, you can cut it into smaller pieces, ensuring each piece has at least one or two “eyes.” Let the cut surfaces callous over for a day or two before planting to prevent rot. This is important! Just leave them out on a paper towel.
Planting Your Ginger
Now for the fun part – getting that ginger in the soil!
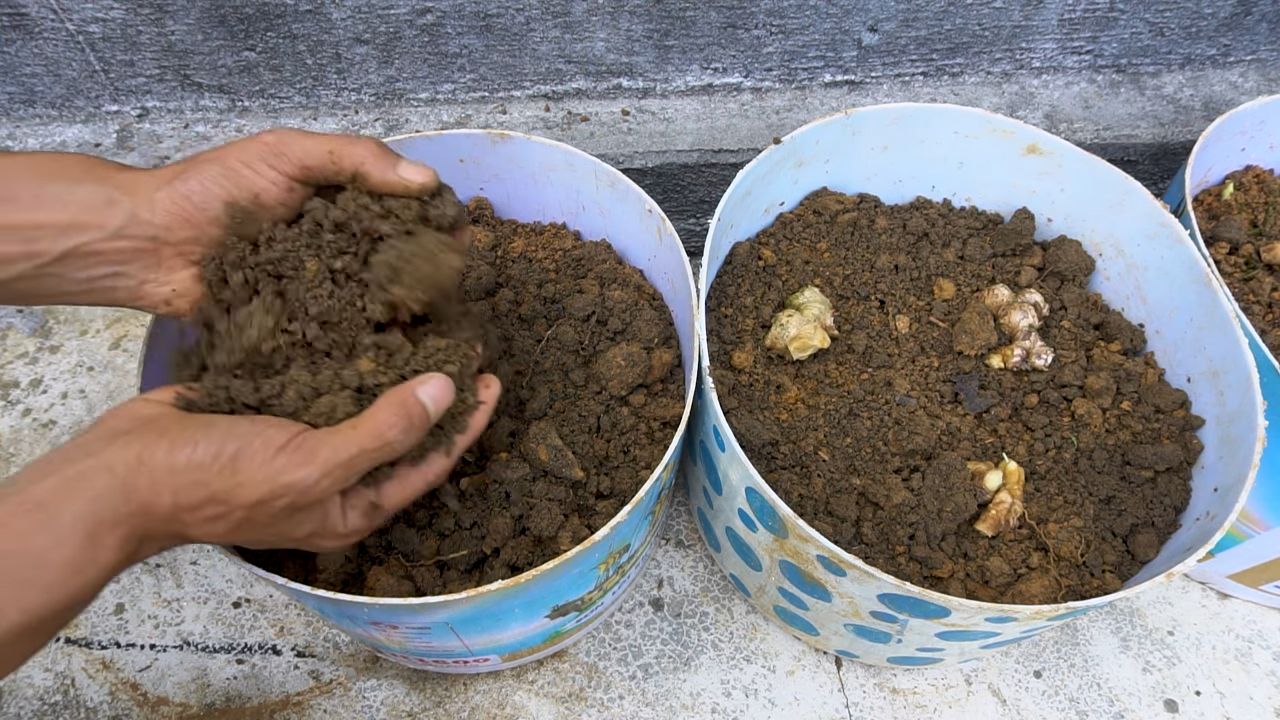
1. Fill the Container: Fill your container with the potting mix, leaving about an inch or two of space at the top.
2. Planting the Rhizome: Place the ginger rhizome horizontally on top of the soil, with the “eyes” facing upwards.
3. Covering the Rhizome: Cover the rhizome with about 1-2 inches of potting mix. Gently pat down the soil.
4. Watering: Water the soil thoroughly until water drains out of the drainage holes. This helps settle the soil and provides the initial moisture the ginger needs.
Caring for Your Ginger Plant
Ginger needs specific conditions to thrive. Here’s how to provide them:
1. Location: Place the container in a warm, humid location with partial shade. Ginger loves bright, indirect sunlight. Avoid direct sunlight, which can scorch the leaves. An east-facing window or a spot under a shade tree is ideal.
2. Watering: Keep the soil consistently moist, but not waterlogged. Water when the top inch of soil feels dry to the touch. Overwatering can lead to root rot, so be careful!
3. Humidity: Ginger thrives in humid environments. Mist the plant regularly with a spray bottle, especially during dry weather. You can also place the container on a tray filled with pebbles and water. As the water evaporates, it will increase the humidity around the plant.
4. Fertilizing: Feed your ginger plant every 2-3 weeks with a diluted organic fertilizer during the growing season (spring and summer). Compost tea or diluted fish emulsion are excellent choices.
5. Temperature: Ginger prefers temperatures between 65°F and 85°F (18°C and 29°C). Protect your plant from frost and cold drafts. If you live in a colder climate, you may need to bring your container indoors during the winter.
Harvesting Your Ginger
Patience is key! It takes time for ginger to mature.
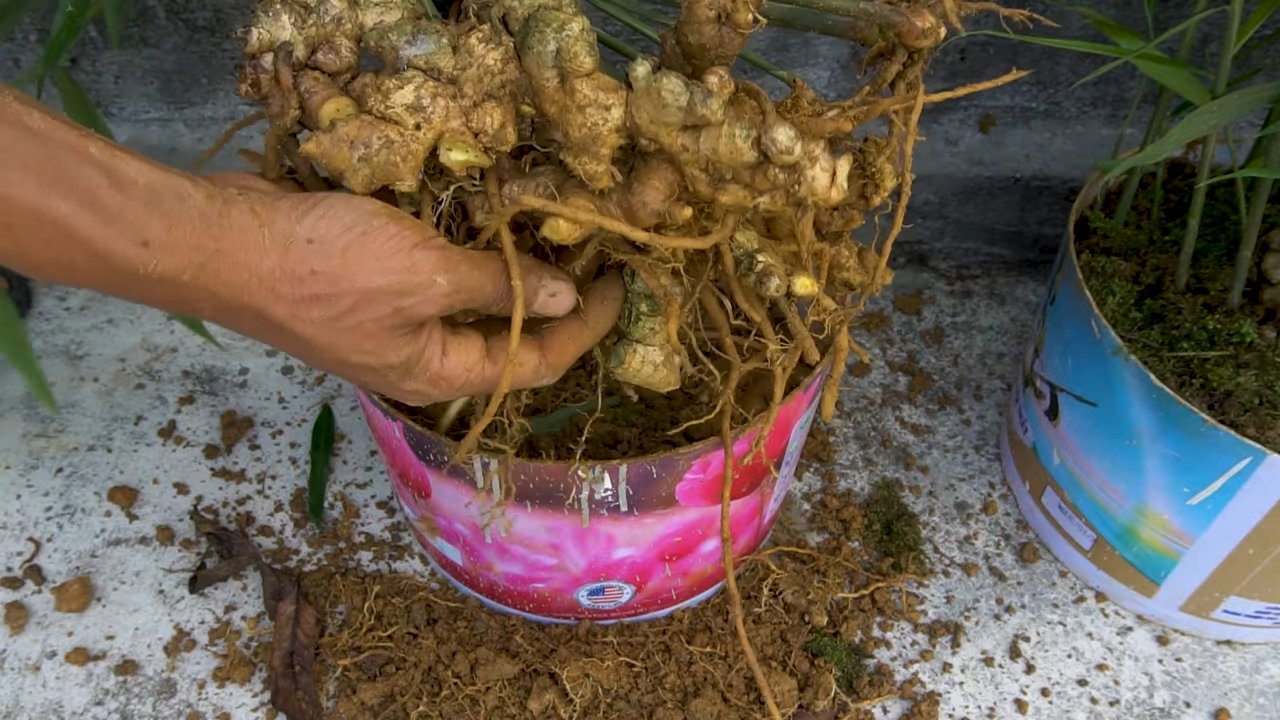
1. When to Harvest: You can start harvesting ginger about 8-10 months after planting. The leaves will start to turn yellow and die back, indicating that the rhizomes are mature.
2. Harvesting: Gently dig around the edges of the container and carefully lift the ginger rhizomes. You can harvest the entire plant or just take a few pieces, leaving the rest to continue growing.
3. Storing: Freshly harvested ginger can be stored in the refrigerator for several weeks. You can also freeze it for longer storage. To freeze, peel and chop the ginger, then place it in a freezer bag or container.
Troubleshooting
Even with the best care, you might encounter a few challenges. Here’s how to address them:
* Yellowing Leaves: This could be due to overwatering, underwatering, or nutrient deficiency. Check the soil moisture and adjust your watering accordingly. If the soil is consistently moist, reduce watering. If it’s dry, water more frequently. Also, consider fertilizing your plant.
* Root Rot: This is caused by overwatering and poor drainage. Make sure your container has drainage holes and that you’re using a well-draining potting mix. If you suspect root rot, carefully remove the plant from the container and inspect the roots. Remove any rotten or mushy roots and repot the plant in fresh potting mix.
* Pests: Ginger is generally pest-resistant, but occasionally you might encounter aphids or spider mites. Treat infestations with insecticidal soap or neem oil.
Section: Propagating Ginger
Want more ginger plants? Propagation is the answer!
1. Dividing Rhizomes: The easiest way to propagate ginger is by dividing the rhizomes. When you harvest your ginger, you can separate the rhizomes into smaller pieces, ensuring each piece has at least one or two “eyes.”
2. Planting Divided Rhizomes: Plant the divided rhizomes in separate containers, following the same planting instructions as above.
3. Care: Provide the same care as you would for a mature ginger plant.
Section: Ginger Varieties to Consider
While common ginger is readily available, exploring different varieties can add exciting flavors to your culinary adventures.
* Common Ginger (Zingiber officinale): This is the most widely available variety, known for its spicy and slightly sweet flavor. It’s perfect for cooking, baking, and making ginger tea.
* Galangal (Alpinia galanga): Also known as Thai ginger, galangal has a more citrusy and earthy flavor than common ginger. It’s a staple in Southeast Asian cuisine.
* Turmeric (Curcuma longa): While technically not ginger, turmeric belongs to the same family and has similar growing requirements. It’s prized for its vibrant color and medicinal properties.
* Ornamental Ginger: These varieties are grown for their beautiful flowers and foliage. While they may not be as flavorful as culinary ginger, they can add a touch of tropical beauty to your garden.
Section: Using Your Homegrown Ginger
Now that you’ve successfully grown your own ginger, it’s time to enjoy the fruits (or rather, rhizomes) of your labor!
* Cooking: Fresh ginger adds a wonderful flavor to stir-fries, soups, curries, and marinades. Simply peel and chop or grate the ginger before adding it to your dishes.
* Baking: Ginger is a key ingredient in many baked goods, such as gingerbread, ginger snaps, and ginger cakes.
* Tea: Ginger tea is a soothing and refreshing beverage that can help with digestion and nausea. Simply steep a few slices of fresh ginger in hot water for 10-15 minutes.
* Juicing: Add a small piece of ginger to your smoothies or juices for a spicy kick and a boost of nutrients.
* Candied Ginger: This sweet and spicy treat is a delicious way to preserve your homegrown ginger.
Section: Common Mistakes to Avoid
Let’s learn from potential pitfalls!
* Overwatering: This is the most common mistake when growing ginger in containers. Remember to let the soil dry out slightly between waterings.
* Underwatering: While ginger doesn’t like to be waterlogged, it also doesn’t like to dry out completely. Keep the soil consistently moist, but not soggy.
* Insufficient Sunlight: Ginger needs bright, indirect sunlight to thrive. Avoid placing your plant in a dark or shady location.
* Lack of Humidity: Ginger loves humidity. Mist your plant regularly or place it on a tray filled with pebbles and water.
* Poor Drainage: Make sure your container has drainage holes and that you’re
Conclusion
So, there you have it! Growing ginger in containers is not only achievable, but it’s also a rewarding and surprisingly simple process. We’ve walked through each step, from selecting the perfect rhizome to harvesting your own fresh, flavorful ginger. Why is this DIY trick a must-try? Because it puts the power of fresh, organic ginger right at your fingertips, regardless of your garden size or climate. Imagine the satisfaction of adding a pinch of homegrown ginger to your morning smoothie, a stir-fry, or even a soothing cup of tea. The flavor is simply unmatched by store-bought varieties, and you’ll know exactly where it came from and how it was grown.
Beyond the superior flavor, growing your own ginger offers a sustainable and cost-effective alternative to constantly purchasing it from the grocery store. Think of the reduced packaging waste and the money you’ll save over time. Plus, the lush, green foliage of the ginger plant adds a touch of tropical beauty to your home or patio. It’s a win-win situation!
But the beauty of this DIY project lies in its adaptability. Feel free to experiment with different container sizes and materials. While we recommended a wide, shallow container, you might find that a deeper pot works better for you, especially if you’re aiming for larger rhizomes. Consider using terracotta pots for better drainage or plastic containers for moisture retention – just be sure to monitor the soil moisture levels accordingly.
And don’t be afraid to try different varieties of ginger! While common ginger is readily available, you might be able to source other types, such as galangal or turmeric, which can be grown using similar methods. Each variety offers a unique flavor profile and potential health benefits, adding even more excitement to your container gardening adventure.
Furthermore, you can enhance the flavor of your ginger by experimenting with different soil amendments. Adding compost or well-rotted manure to your potting mix will provide essential nutrients and improve drainage. You can also try incorporating a slow-release fertilizer specifically formulated for root crops.
We encourage you to embrace the challenge and embark on your own ginger-growing journey. It’s a fantastic way to connect with nature, learn new skills, and enjoy the fruits (or rather, rhizomes) of your labor. Don’t be discouraged if your first attempt isn’t perfect. Gardening is all about learning and adapting.
Most importantly, we want to hear about your experiences! Share your tips, tricks, and triumphs in the comments section below. Let us know what worked for you, what challenges you faced, and any creative variations you tried. Your feedback will not only help other readers but also contribute to a collective knowledge base that will benefit the entire community of DIY ginger growers. So, grab a rhizome, a pot, and some soil, and get ready to experience the joy of growing your own fresh, flavorful ginger. Happy gardening! Let’s all become experts at growing ginger in containers!
Frequently Asked Questions (FAQ)
1. What kind of ginger should I plant?
The best type of ginger to plant in containers is common ginger, also known as culinary ginger (Zingiber officinale). You can typically find ginger rhizomes at your local grocery store or Asian market. Look for rhizomes that are plump, firm, and have visible “eyes” or buds. Avoid rhizomes that are shriveled, soft, or moldy. Organic ginger is often preferred as it’s less likely to have been treated with growth inhibitors. While you can experiment with other varieties like galangal or turmeric, common ginger is the easiest to find and grow successfully in containers.
2. How long does it take to grow ginger in a container?
Ginger typically takes around 8-10 months to mature fully. However, you can start harvesting small pieces of ginger after about 4 months. The longer you let it grow, the larger and more flavorful the rhizomes will become. Be patient and allow the plant to develop a strong root system before harvesting extensively. Remember that the growing season is influenced by your climate, so adjust your expectations accordingly.
3. What is the best soil for growing ginger in containers?
Ginger thrives in well-draining, nutrient-rich soil. A good potting mix for ginger should consist of equal parts of:
* Potting soil: Provides a base for the plant to grow.
* Compost: Adds organic matter and nutrients.
* Perlite or vermiculite: Improves drainage and aeration.
Avoid using heavy clay soil, as it can retain too much moisture and lead to root rot. You can also add a slow-release fertilizer to the potting mix to provide a steady supply of nutrients throughout the growing season.
4. How much sunlight does ginger need?
Ginger prefers partial shade, especially during the hottest part of the day. Direct sunlight can scorch the leaves. A location that receives morning sun and afternoon shade is ideal. If you’re growing ginger indoors, place it near a bright window but away from direct sunlight. You can also use sheer curtains to filter the light.
5. How often should I water ginger?
Keep the soil consistently moist but not waterlogged. Water thoroughly when the top inch of soil feels dry to the touch. Avoid letting the soil dry out completely, as this can stress the plant. During the warmer months, you may need to water more frequently. Reduce watering during the cooler months when the plant is not actively growing. Ensure your container has drainage holes to prevent water from accumulating at the bottom.
6. How do I harvest ginger from a container?
You can harvest ginger by gently digging around the edges of the container and lifting out a portion of the rhizome. Be careful not to damage the remaining plant. You can also harvest the entire plant at the end of the growing season. Simply tip the container over and remove the rhizomes. Wash the rhizomes thoroughly and store them in a cool, dry place.
7. Can I grow ginger indoors?
Yes, you can successfully grow ginger indoors, especially in colder climates. Provide it with bright, indirect light, consistent moisture, and good air circulation. You may also need to supplement with artificial light during the winter months. Ensure the container has adequate drainage to prevent root rot.
8. What are some common problems when growing ginger in containers?
Some common problems include:
* Root rot: Caused by overwatering or poor drainage.
* Leaf spot: A fungal disease that can be prevented by providing good air circulation.
* Pests: Aphids and spider mites can sometimes infest ginger plants. Treat them with insecticidal soap or neem oil.
* Yellowing leaves: Can be caused by overwatering, underwatering, or nutrient deficiencies.
9. Can I use store-bought ginger to grow new ginger plants?
Yes, you can use store-bought ginger to grow new plants, but it’s important to choose rhizomes that are plump, firm, and have visible buds. Soak the rhizome in water overnight before planting to encourage sprouting. Organic ginger is often preferred as it’s less likely to have been treated with growth inhibitors.
10. How do I store harvested ginger?
Freshly harvested ginger can be stored in the refrigerator for several weeks. Wrap it in a paper towel and place it in a plastic bag. You can also freeze ginger for longer storage. Peel the ginger and slice or grate it before freezing. Store it in an airtight container or freezer bag. Frozen ginger can be used directly from the freezer in your cooking.
Leave a Comment