

Plastic bottle chili growing – sounds a bit unconventional, right? But trust me, it’s a game-changer for anyone who dreams of fresh, fiery chilies without a sprawling garden! I’m so excited to share this incredibly simple and rewarding DIY trick with you. For centuries, chilies have added zest and flavor to cuisines around the globe, from the ancient civilizations of South America to the bustling markets of Asia. Now, you can easily bring that vibrant history and flavor right to your windowsill or balcony.
Let’s face it, not everyone has the space or time for a traditional garden. That’s where this ingenious hack comes in. Plastic bottle chili growing is not only budget-friendly and eco-conscious (hello, recycling!), but it’s also incredibly space-saving. Imagine harvesting your own chilies, knowing you nurtured them from tiny seedlings in repurposed plastic bottles. This DIY project is perfect for apartment dwellers, beginner gardeners, or anyone looking for a fun and sustainable way to spice up their life (literally!). I’ll guide you through each step, ensuring you’ll be enjoying a bountiful harvest of delicious chilies in no time. Get ready to unleash your inner gardener and transform those empty plastic bottles into mini chili paradises!
DIY: Grow Chilies in a Plastic Bottle – A Beginner’s Guide
Hey there, fellow gardening enthusiasts! Ever thought about growing your own chilies but felt intimidated by the space or the perceived difficulty? Well, I’m here to tell you that you can absolutely do it, and you can do it using something you probably already have lying around: a plastic bottle! This method is perfect for beginners, apartment dwellers, or anyone looking for a fun and sustainable way to add some spice to their life. Let’s dive in!
What You’ll Need
Before we get started, let’s gather our supplies. This is a pretty low-cost project, which is always a win in my book!
* **A large plastic bottle (2-liter soda bottle or similar):** Make sure it’s clean!
* **Chili seeds:** You can buy these online, at your local garden center, or even harvest them from a chili you bought at the grocery store (just make sure it’s organic to avoid treated seeds).
* **Potting soil:** A good quality potting mix is essential for healthy chili plants.
* **Scissors or a utility knife:** Be careful!
* **A marker:** For marking cutting lines.
* **Water:** Of course!
* **Optional: Small pebbles or gravel:** For drainage.
* **Optional: Seed starting tray or small pots:** If you want to start your seeds indoors.
* **Optional: Liquid fertilizer:** For boosting growth later on.
Preparing the Bottle: Creating Your Vertical Garden
This is where we transform a simple plastic bottle into a mini-greenhouse and self-watering system.
1. **Clean the bottle thoroughly:** Rinse the bottle with warm, soapy water to remove any residue. Make sure to rinse it well afterward to remove all traces of soap.
2. **Cut the bottle in half:** Using your marker, draw a line around the bottle about two-thirds of the way up from the bottom. Carefully cut along this line with your scissors or utility knife. You’ll now have two pieces: the top (with the bottle neck) and the bottom.
3. **Prepare the top section (the planting section):** Turn the top section upside down, so the bottle neck is pointing downwards. This will act as our watering system.
4. **Optional: Drill drainage holes:** If you’re concerned about waterlogging, you can drill a few small drainage holes in the bottle cap. However, I’ve found that it’s usually not necessary, as the soil will naturally absorb the water.
5. **Prepare the bottom section (the water reservoir):** This section will hold the water that your chili plant will draw up as needed. No modifications are needed here.
6. **Optional: Add pebbles or gravel to the bottom section:** Adding a layer of pebbles or gravel to the bottom of the reservoir can help prevent the soil from becoming waterlogged if the water level gets too high.
Planting Your Chili Seeds: From Seed to Sprout
Now comes the exciting part: planting your chili seeds! You have two options here: starting your seeds indoors or directly sowing them into the bottle. I prefer starting them indoors, as it gives them a head start and protects them from harsh weather.
Starting Seeds Indoors (Recommended)
1. **Fill your seed starting tray or small pots with potting soil:** Moisten the soil slightly before planting.
2. **Sow the chili seeds:** Make a small indentation in the soil (about 1/4 inch deep) and place 2-3 chili seeds in each indentation. Cover the seeds with soil and gently pat down.
3. **Water gently:** Use a spray bottle to mist the soil. Avoid overwatering, as this can cause the seeds to rot.
4. **Provide warmth and light:** Place the seed starting tray or pots in a warm location (around 70-80°F) with plenty of indirect sunlight. You can also use a grow light if you don’t have enough natural light.
5. **Keep the soil moist:** Check the soil daily and mist it with water as needed to keep it moist but not soggy.
6. **Wait for germination:** Chili seeds can take anywhere from 7 to 21 days to germinate, so be patient!
7. **Thin out seedlings (if necessary):** Once the seedlings have emerged and have a few true leaves, thin them out to one seedling per pot or cell. Choose the strongest and healthiest seedling to keep.
Direct Sowing (Alternative)
1. **Fill the top section of the bottle with potting soil:** Leave about an inch of space at the top.
2. **Sow the chili seeds:** Make small indentations in the soil (about 1/4 inch deep) and place 2-3 chili seeds in each indentation. Cover the seeds with soil and gently pat down.
3. **Water gently:** Use a spray bottle to mist the soil. Avoid overwatering.
4. **Provide warmth and light:** Place the bottle in a warm location with plenty of sunlight.
5. **Keep the soil moist:** Check the soil daily and mist it with water as needed.
6. **Thin out seedlings (if necessary):** Once the seedlings have emerged and have a few true leaves, thin them out to one seedling.
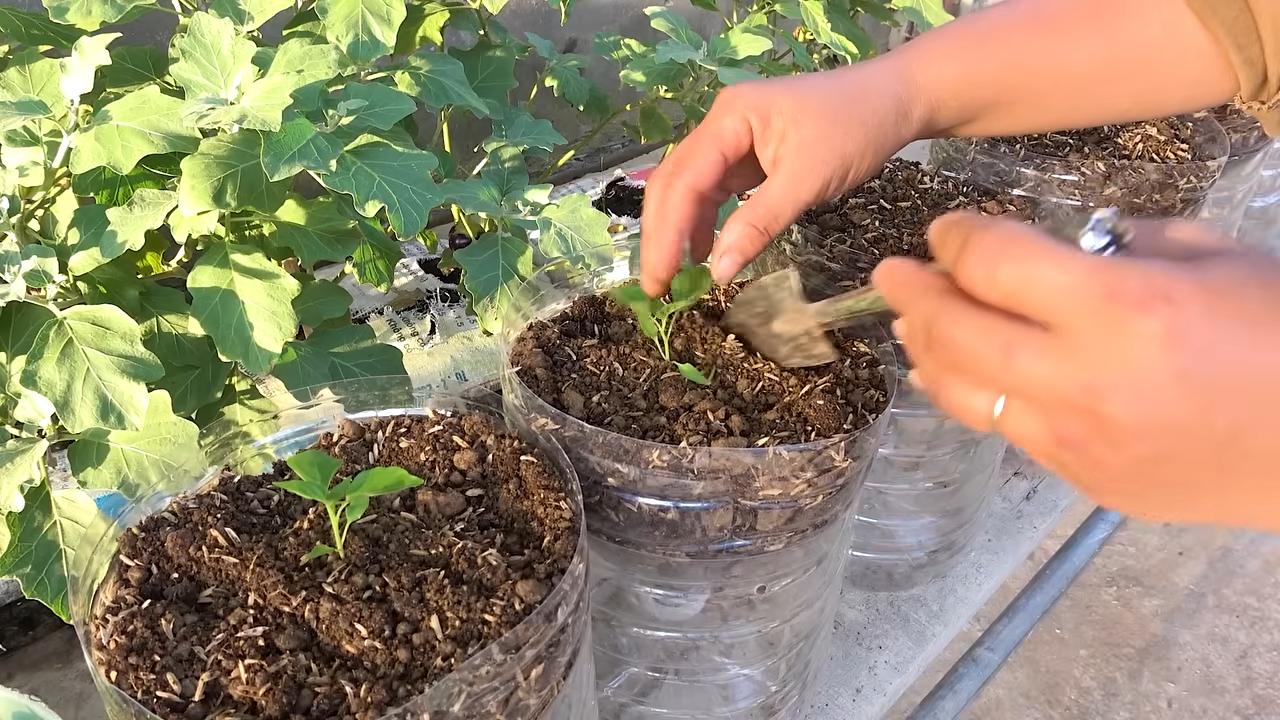
Transplanting and Assembling Your Self-Watering System
Once your seedlings are a few inches tall (if you started them indoors) or if you directly sowed and they are growing well, it’s time to transplant them into the bottle and assemble your self-watering system.
1. **Gently remove the seedling from its pot or cell:** Be careful not to damage the roots.
2. **Make a hole in the soil in the top section of the bottle:** The hole should be large enough to accommodate the seedling’s root ball.
3. **Place the seedling in the hole:** Gently spread out the roots and cover them with soil. Pat down the soil gently.
4. **Water the seedling:** Water the seedling thoroughly after transplanting.
5. **Assemble the self-watering system:** Carefully place the top section of the bottle (with the seedling) into the bottom section (the water reservoir).
6. **Fill the water reservoir:** Add water to the bottom section, making sure the water level doesn’t reach the bottom of the top section. You want the soil to be able to wick up the water, not be constantly submerged.
Caring for Your Chili Plant: Nurturing the Spice
Now that your chili plant is in its new home, it’s time to provide it with the care it needs to thrive.
1. **Sunlight:** Chili plants need at least 6-8 hours of sunlight per day. Place your bottle in a sunny location, such as a windowsill or balcony. If you don’t have enough natural light, you can use a grow light.
2. **Watering:** The self-watering system should take care of most of the watering, but you’ll still need to check the water level in the reservoir regularly. Refill the reservoir when the water level gets low. Avoid overwatering, as this can lead to root rot.
3. **Fertilizing:** Chili plants are heavy feeders, so you’ll need to fertilize them regularly. Use a liquid fertilizer specifically formulated for vegetables or tomatoes. Follow the instructions on the fertilizer label. I usually fertilize every 2-3 weeks.
4. **Pruning:** Pruning can help encourage bushier growth and more fruit production. Pinch off the tips of the branches to encourage side growth. You can also remove any yellowing or dead leaves.
5. **Pest control:** Keep an eye out for pests, such as aphids, spider mites, and whiteflies. If you spot any pests, you can try spraying them with insecticidal soap or neem oil.
6. **Pollination:** Chili plants are self-pollinating, but you can help them along by gently shaking the plant or using a small brush to transfer pollen from one flower to another. This is especially important if you’re growing your chili plant indoors, where there are no bees or other pollinators.
7. **Support:** As your chili plant grows, it may need some support. You can use a small stake or trellis to help support the branches and prevent them from breaking.
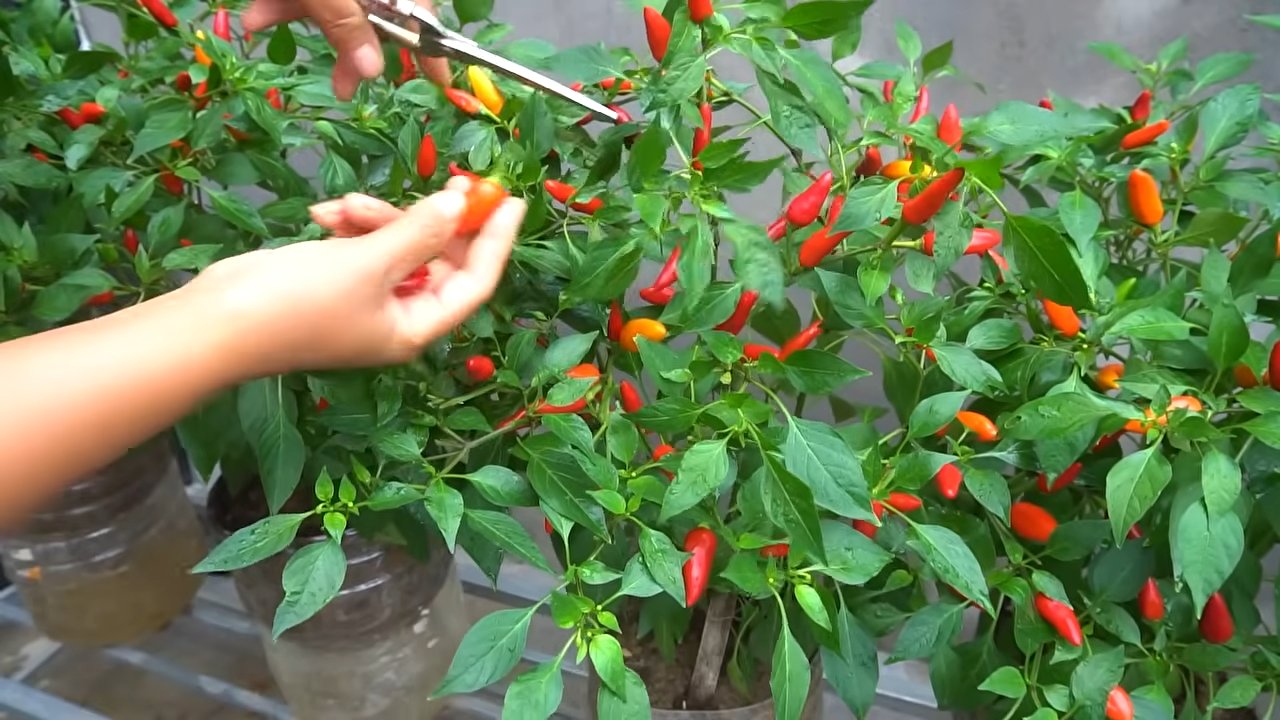
Harvesting Your Chilies: The Spicy Reward
After a few months of care, your chili plant should start producing chilies! The time it takes to harvest will depend on the variety of chili you’re growing.
1. **Check for ripeness:** Chilies are usually ready to harvest when they have reached their mature color (usually red, yellow, or orange) and are firm to the touch.
2. **Harvest the chilies:** Use scissors or pruning shears to cut the chilies from the plant. Be careful not to damage the plant.
3. **Enjoy your harvest:** You can use your fresh chilies in your favorite recipes, dry them for later use, or even make your own chili powder.
Troubleshooting: Common Issues and Solutions
Even with the best care, you may encounter some problems along the way. Here are some common issues and how to fix them
Conclusion
So, there you have it! Transforming a simple plastic bottle into a thriving chili garden is not just a fun project; it’s a sustainable, space-saving, and incredibly rewarding way to enjoy fresh, fiery peppers right at your fingertips. We’ve walked you through the process, highlighting the ease and accessibility of this DIY trick. Forget expensive gardening equipment or sprawling garden beds. With a little ingenuity and a recycled bottle, you can cultivate your own personal chili pepper paradise.
But why is this method a must-try? Beyond the obvious environmental benefits of repurposing plastic, growing chilies in bottles offers several distinct advantages. The contained environment allows for better control over soil conditions, watering, and pest management. This is particularly beneficial for those living in apartments, with limited outdoor space, or in regions with unpredictable weather. Imagine the satisfaction of harvesting vibrant chilies, knowing you nurtured them from seed to fruit within a recycled container.
And the possibilities don’t end there! Feel free to experiment with different varieties of chili peppers. From the mild Anaheim to the scorching Habanero, the choice is yours. You can also personalize your bottle gardens with decorative paint, labels, or even create a vertical garden by hanging multiple bottles together. Consider adding companion plants like basil or marigolds to deter pests and enhance the flavor of your chilies. For those looking to maximize yield, try using a nutrient-rich potting mix or supplementing with a balanced fertilizer during the growing season. You can even explore hydroponic variations by using a nutrient solution instead of soil.
This DIY trick is more than just a gardening hack; it’s a gateway to a more sustainable and self-sufficient lifestyle. It’s a chance to connect with nature, learn about plant growth, and enjoy the fruits (or rather, peppers) of your labor. Plus, it’s a fantastic conversation starter! Imagine the envy of your friends and neighbors when they see your flourishing chili garden, all grown from recycled plastic bottles.
We wholeheartedly encourage you to give this project a try. It’s simple, affordable, and incredibly satisfying. Don’t be afraid to get your hands dirty, experiment with different techniques, and most importantly, have fun! Once you’ve experienced the joy of growing your own chilies in bottles, you’ll wonder why you didn’t try it sooner.
And now, we want to hear from you! Share your experiences, tips, and photos of your bottle chili gardens in the comments below. Let’s create a community of passionate chili growers and inspire others to embrace this sustainable and rewarding DIY project. What chili varieties did you choose? What challenges did you face, and how did you overcome them? Your insights will be invaluable to fellow gardeners and help us all learn and grow together. So, grab a bottle, some soil, and your favorite chili seeds, and let the adventure begin! Let’s all embrace the power of **plastic bottle chili growing**!
Frequently Asked Questions (FAQ)
What type of plastic bottle is best for growing chilies?
The ideal plastic bottle is a clear or translucent one with a capacity of at least 1.5 liters. This provides enough space for the chili plant’s roots to develop. Avoid using bottles that have contained harmful chemicals or pesticides. Thoroughly wash the bottle with soap and water before use to remove any residue. Bottles made from PET (polyethylene terephthalate) are generally considered safe for growing plants.
How often should I water my chili plants in plastic bottles?
Watering frequency depends on several factors, including the size of the bottle, the type of soil, the climate, and the stage of growth of the chili plant. As a general rule, water when the top inch of soil feels dry to the touch. Avoid overwatering, as this can lead to root rot. Ensure the bottle has adequate drainage holes to prevent waterlogging. During hot weather, you may need to water more frequently. Check the soil moisture levels daily, especially during the initial stages of growth.
What type of soil should I use for growing chilies in plastic bottles?
A well-draining potting mix is essential for growing healthy chili plants in plastic bottles. Avoid using garden soil, as it can be too heavy and compact, hindering root growth. A good potting mix should contain a blend of peat moss, perlite, and vermiculite. You can also add compost or other organic matter to improve soil fertility. Consider using a potting mix specifically formulated for vegetables or peppers.
How much sunlight do chili plants need when grown in plastic bottles?
Chili plants thrive in full sunlight, requiring at least 6-8 hours of direct sunlight per day. Place your bottle chili garden in a sunny location, such as a south-facing window or balcony. If you don’t have access to enough natural sunlight, you can supplement with grow lights. Rotate the bottles regularly to ensure even light exposure on all sides of the plant. Insufficient sunlight can lead to leggy growth and reduced fruit production.
How do I prevent pests and diseases from affecting my chili plants in plastic bottles?
Regularly inspect your chili plants for signs of pests or diseases. Common pests include aphids, spider mites, and whiteflies. You can control these pests by spraying the plants with insecticidal soap or neem oil. Ensure good air circulation around the plants to prevent fungal diseases. Avoid overwatering, as this can create a favorable environment for disease development. Remove any infected leaves or stems promptly. Consider using organic pest control methods to minimize the use of harmful chemicals.
Can I grow different varieties of chili peppers in the same plastic bottle?
While it’s technically possible to grow different varieties of chili peppers in the same plastic bottle, it’s generally not recommended. Different varieties may have different growth rates, nutrient requirements, and susceptibility to pests and diseases. This can lead to competition and uneven growth. It’s best to grow each variety in its own separate bottle to ensure optimal growth and yield.
How do I harvest chili peppers from my plastic bottle garden?
Harvest chili peppers when they have reached their mature color and size. Use a sharp knife or scissors to cut the peppers from the plant, leaving a small stem attached. Avoid pulling the peppers, as this can damage the plant. Wear gloves when handling hot peppers to prevent skin irritation. Harvest regularly to encourage continued fruit production.
How do I overwinter my chili plants grown in plastic bottles?
In colder climates, chili plants can be overwintered indoors. Before the first frost, prune the plants back to about 6 inches tall. Repot the plants into slightly larger containers with fresh potting mix. Place the plants in a sunny location indoors and water sparingly. Reduce fertilization during the winter months. With proper care, your chili plants will survive the winter and be ready to produce again in the spring.
Can I use this method for other vegetables or herbs?
Absolutely! While this article focuses on chili peppers, the plastic bottle gardening method can be adapted for growing a variety of other vegetables and herbs, such as tomatoes, lettuce, spinach, basil, and mint. The key is to choose plants that are suitable for container gardening and provide them with the appropriate growing conditions.
How does growing chilies in plastic bottles help the environment?
Growing chilies in plastic bottles is an environmentally friendly practice because it repurposes waste materials, reduces the need for new plastic production, and minimizes the carbon footprint associated with transporting produce from farms to stores. It also promotes sustainable gardening practices and encourages people to grow their own food, reducing reliance on industrial agriculture.
Leave a Comment