

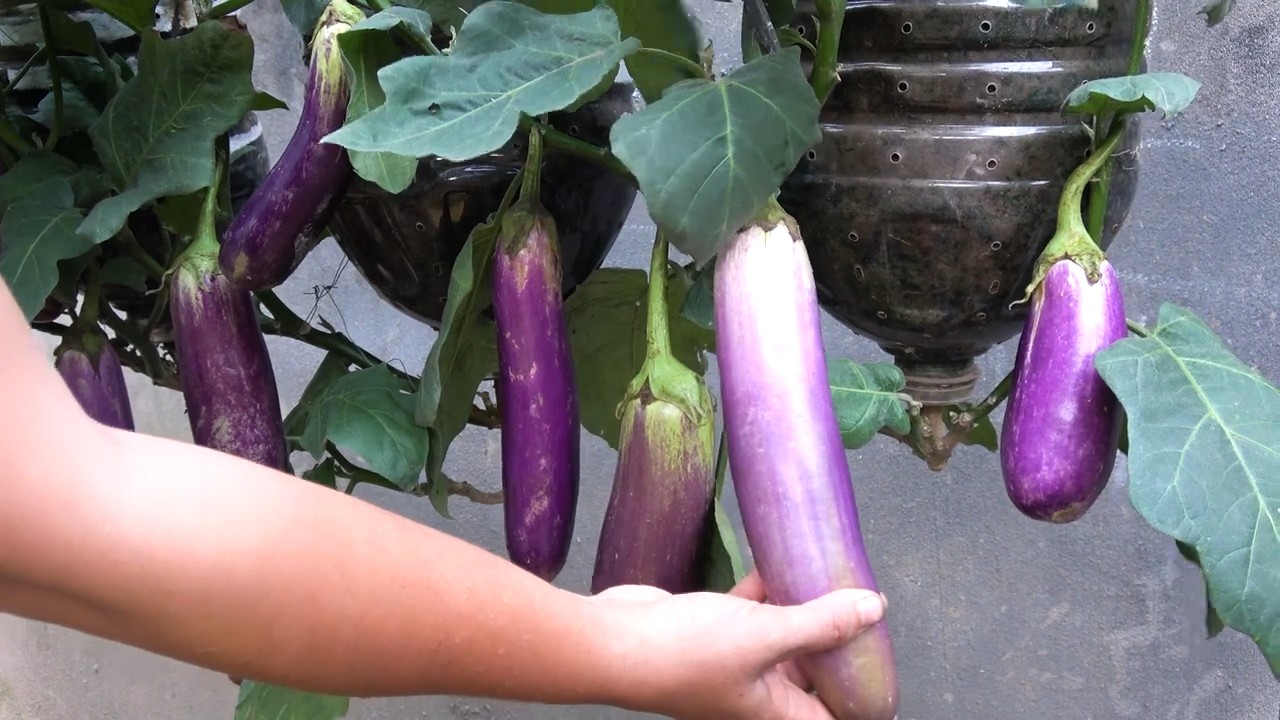
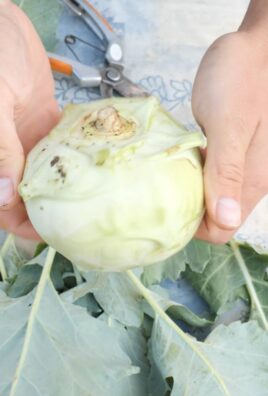
Recycled Bottle Eggplant Harvest: Imagine plucking plump, juicy eggplants from your very own garden, knowing you nurtured them from tiny seedlings to thriving beauties. But what if I told you that you could boost your eggplant yield and protect your precious plants using something you probably already have lying around – recycled plastic bottles?
For centuries, humans have cultivated eggplants, tracing their origins back to ancient India. These glossy, purple gems have graced tables across cultures, from the Mediterranean to Asia. But even seasoned gardeners sometimes struggle with pests, unpredictable weather, and the challenges of maximizing their harvest. That’s where this clever DIY trick comes in!
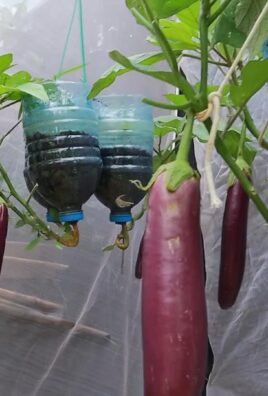
This isn’t just about growing eggplants; it’s about sustainable gardening and making the most of what you have. Using recycled bottles to protect your eggplants offers a simple, cost-effective solution to common gardening problems. Think of it as a mini-greenhouse, shielding your delicate plants from harsh winds, hungry critters, and even those late-season frosts. Plus, it’s a fantastic way to reduce waste and give those plastic bottles a new lease on life.
I’m excited to share this easy-to-follow guide that will show you exactly how to create your own recycled bottle eggplant protectors, leading to a more abundant and rewarding recycled bottle eggplant harvest. Get ready to transform your garden and enjoy the fruits (or rather, vegetables!) of your labor!
DIY Recycled Bottle Eggplant Harvest Protector
Hey there, fellow gardeners! Are you tired of losing your precious eggplant harvest to pesky critters like slugs, snails, and even the occasional nibbling rodent? I know I was! That’s why I came up with this super simple, super effective, and super budget-friendly solution: eggplant protectors made from recycled plastic bottles! Not only does this project save your eggplants, but it also gives those plastic bottles a new lease on life. Let’s dive in!
Materials You’ll Need
Before we get started, let’s gather our supplies. The beauty of this project is that you probably already have most of these lying around:
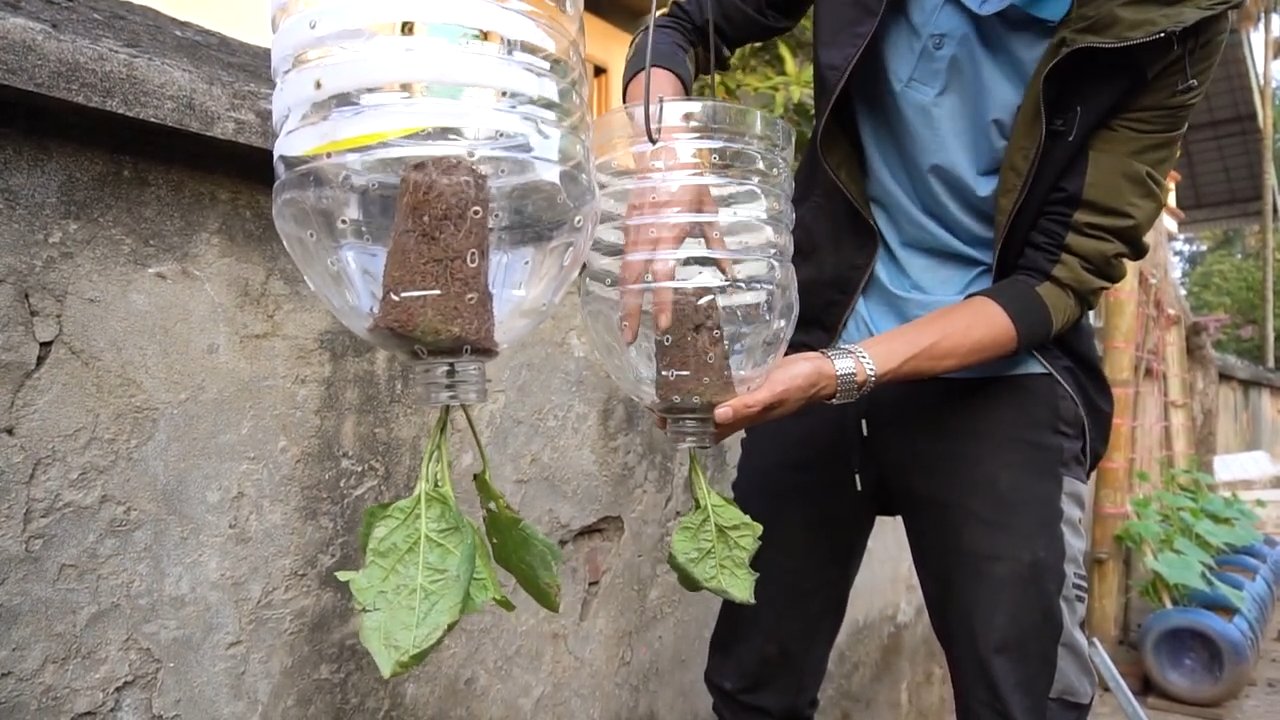
* Plastic Bottles: The size will depend on the size of your eggplant plants. I’ve found that 2-liter soda bottles work great for smaller plants, while larger juice or water bottles are better for more mature eggplants. You’ll need one bottle per eggplant plant you want to protect.
* Scissors or Utility Knife: Be careful with these! A sharp pair of scissors or a utility knife will make cutting the plastic bottles much easier.
* Gloves: Optional, but recommended to protect your hands from sharp edges.
* Measuring Tape or Ruler: To ensure consistent cuts.
* Permanent Marker: For marking cutting lines on the bottles.
* Small Stakes or Garden Staples: To secure the bottle protectors to the ground. These will prevent them from blowing away in the wind. I like using bamboo skewers cut in half.
* Drill or Awl (Optional): For creating drainage holes if your bottles don’t already have them.
* Sandpaper (Optional): To smooth out any rough edges after cutting.
Preparing the Plastic Bottles
This is where we transform those discarded bottles into eggplant-saving shields!
1. Clean the Bottles: First things first, give those bottles a good wash with soap and water. Remove any labels and sticky residue. This will ensure a clean surface for cutting and prevent any unwanted chemicals from leaching into the soil.
2. Determine the Cutting Height: This is crucial for proper protection. You want the bottle to be tall enough to cover the eggplant plant, but not so tall that it restricts airflow. I usually aim for a height that’s about two-thirds of the plant’s current size. Use your measuring tape or ruler to measure the desired height on the bottle and mark it with your permanent marker.
3. Cut the Bottle: Now comes the fun part! Using your scissors or utility knife, carefully cut along the marked line. I find it easiest to start with a small puncture and then follow the line around the bottle. Remember to take your time and be extra cautious to avoid any accidents.
4. Smooth the Edges (Optional): If the cut edges are rough or sharp, you can use sandpaper to smooth them down. This will prevent any accidental cuts when handling the protectors and make them look a bit more polished.
5. Create Drainage Holes (If Needed): Check the bottom of your bottles. If they don’t already have drainage holes, you’ll need to create some. This is essential to prevent water from pooling inside the protector and potentially rotting the plant. You can use a drill with a small drill bit or an awl to create a few holes in the bottom of the bottle.
Protecting Your Eggplant Plants
Now that we have our bottle protectors ready, let’s put them to work!
1. Position the Protector: Carefully place the cut bottle over your eggplant plant, ensuring that the plant is completely enclosed within the bottle. Make sure the bottle isn’t crushing any leaves or stems.
2. Secure the Protector: This is where the stakes or garden staples come in. Insert the stakes into the ground around the base of the bottle, pushing them through the plastic to secure the protector in place. I usually use 3-4 stakes per bottle, spaced evenly around the perimeter. This will prevent the bottle from being blown away by the wind or knocked over by animals.
3. Monitor and Adjust: Keep an eye on your eggplant plants and the bottle protectors. As the plants grow, you may need to adjust the height of the protectors or even replace them with larger bottles. Also, check for any signs of pests or diseases inside the protectors and take appropriate action.
Tips and Tricks for Success
Here are a few extra tips and tricks I’ve learned along the way:
* Choose the Right Bottle: Clear plastic bottles are best, as they allow sunlight to reach the plant. Avoid using colored bottles, as they may block sunlight or overheat the plant.
* Consider Ventilation: If you live in a hot climate, you may need to create additional ventilation holes in the sides of the bottle to prevent overheating.
* Watering: You can water your eggplant plants directly through the opening at the top of the bottle. Just be careful not to overwater, as the bottle can trap moisture.
* Fertilizing: You can also fertilize your plants through the opening at the top of the bottle. Use a liquid fertilizer and follow the instructions on the label.
* Stacking Bottles: For taller eggplant plants, you can cut the bottoms off of multiple bottles and stack them on top of each other to create a taller protector. Just make sure to secure the bottles together with tape or glue.
* Alternative Materials: If you don’t have plastic bottles, you can also use other materials to create eggplant protectors, such as wire mesh, chicken wire, or even old pantyhose.
* Slug and Snail Control: Even with the bottle protectors, slugs and snails can sometimes find their way inside. To prevent this, you can sprinkle diatomaceous earth around the base of the plant or use slug and snail bait.
* Sun Protection: In extremely hot climates, the plastic bottle can act like a mini-greenhouse and overheat the plant. If you notice your plant wilting, consider shading the bottle with a piece of cloth or cardboard during the hottest part of the day.
* Recycle Responsibly: When you’re finished with the bottle protectors, be sure to recycle them properly.
Troubleshooting
Sometimes, things don’t go exactly as planned. Here are a few common problems you might encounter and how to fix them:
* Bottle Blows Away: If the bottle keeps blowing away, even with the stakes, try using heavier stakes or adding more stakes around the base. You can also try burying the bottom of the bottle slightly in the soil.
* Plant Overheats: If the plant is overheating inside the bottle, create more ventilation holes or shade the bottle during the hottest part of the day.
* Pests Inside the Bottle: If you find pests inside the bottle, remove them manually or use an appropriate insecticide. You can also try sealing the top of the bottle with netting or cheesecloth to prevent pests from entering.
* Mold or Mildew: If you notice mold or mildew growing inside the bottle, remove the affected leaves and spray the plant with a fungicide. Ensure adequate ventilation to prevent future growth.
Long-Term Benefits
Beyond protecting your eggplants from pests, these recycled bottle protectors offer several long-term benefits:
* Reduced Pest Damage: By creating a physical barrier around your plants, you’ll significantly reduce the amount of damage caused by slugs, snails, and other pests.
* Improved Plant Health: Protected plants are healthier and more vigorous, leading to higher yields and better-quality fruit.
* Extended Growing Season: The bottle protectors can help to warm the soil and protect plants from frost, extending the growing season in cooler climates.
* Reduced Need for Pesticides: By preventing pest damage, you’ll reduce the need to use harmful pesticides in your garden.
* Environmental Benefits: Recycling plastic bottles helps to reduce waste and conserve resources.
Adapting the Technique
This technique isn’t just limited to eggplants! You can adapt it to protect other vulnerable plants in your garden, such as:
* Tomatoes: Protect young tomato seedlings from cutworms and other pests.
* Peppers: Shield pepper plants from slugs and snails.
* Lettuce: Prevent rabbits and other animals from nibbling on your lettuce.
* Herbs: Protect delicate herbs from frost and wind.
* Seedlings: Give newly planted seedlings a head start by creating a warm and protected environment.
By adjusting the size and shape of the bottle, you can customize the protector to fit the specific needs of each plant.
So there you have it! A simple, effective, and eco-friendly way to protect your eggplant harvest using recycled plastic bottles. I hope you found this guide helpful. Happy gardening!
Conclusion
So, there you have it! Transforming a humble recycled bottle into a thriving eggplant haven is not just a clever gardening hack; it’s a testament to sustainable practices and a rewarding way to cultivate your own delicious produce. This DIY trick offers a multitude of benefits, from reducing waste and saving money to providing a controlled environment that fosters healthy eggplant growth.
Why is this a must-try? Because it’s accessible, effective, and environmentally conscious. You don’t need acres of land or expensive equipment to enjoy the satisfaction of harvesting your own eggplants. This method is perfect for urban gardeners, balcony enthusiasts, or anyone looking to maximize their growing space. The recycled bottle acts as a mini-greenhouse, protecting your seedlings from harsh weather and pests while retaining moisture for optimal growth. Plus, it’s incredibly satisfying to witness the transformation of a discarded item into a source of nourishment.
But the beauty of this DIY project lies in its adaptability. Feel free to experiment with different bottle sizes to accommodate various eggplant varieties. Consider painting the bottles white to reflect sunlight and prevent overheating in warmer climates. You can also add drainage holes to the bottom of the bottle to prevent waterlogging. For an extra boost, incorporate a slow-release fertilizer into the soil mix to provide your eggplants with a steady supply of nutrients.
Think about using different types of soil mixes. A well-draining potting mix is generally recommended, but you can also amend it with compost or other organic matter to improve its fertility. Experiment with different watering techniques to find what works best for your climate and growing conditions. Some gardeners prefer to water from the top, while others prefer to water from the bottom by placing the bottle in a tray of water.
Furthermore, don’t limit yourself to just eggplants! This recycled bottle gardening method can be adapted for other vegetables and herbs, such as tomatoes, peppers, lettuce, and basil. The possibilities are endless!
We wholeheartedly encourage you to try this DIY recycled bottle eggplant harvest method. It’s a fun, educational, and rewarding experience that will connect you with nature and provide you with fresh, homegrown produce.
Once you’ve given it a try, we’d love to hear about your experience! Share your photos, tips, and variations in the comments section below. Let’s create a community of resourceful gardeners who are passionate about sustainability and delicious food. Your insights could inspire others to embark on their own recycled bottle gardening adventures. Let’s all work together to make the world a greener and more sustainable place, one eggplant at a time!
Frequently Asked Questions (FAQ)
1. What type of plastic bottle is best for growing eggplants?
Ideally, you should use a sturdy, food-grade plastic bottle. Look for bottles that are labeled with a recycling symbol and a number 1 (PET or PETE) or number 2 (HDPE). These types of plastic are generally considered safe for food contact and are less likely to leach harmful chemicals into the soil. Avoid using bottles that are made from PVC (number 3) or polystyrene (number 6), as these plastics may contain harmful chemicals. The size of the bottle will depend on the variety of eggplant you are growing. Smaller varieties can thrive in smaller bottles, while larger varieties will require larger bottles to accommodate their root systems. A good starting point is a 2-liter bottle or larger.
2. How do I prepare the plastic bottle for planting?
First, thoroughly clean the bottle with soap and water to remove any residue. Then, cut the bottle in half horizontally. You can either discard the top half or use it as a makeshift greenhouse dome to protect your seedlings. If you choose to use the top half, make sure to create ventilation holes to prevent condensation buildup. Next, create drainage holes in the bottom of the bottle to prevent waterlogging. You can use a drill, a nail, or a sharp knife to create these holes. Finally, fill the bottle with a well-draining potting mix.
3. What kind of soil should I use for growing eggplants in a recycled bottle?
A well-draining potting mix is essential for growing healthy eggplants in a recycled bottle. You can purchase a pre-made potting mix from your local garden center or create your own by mixing equal parts of peat moss, perlite, and vermiculite. Avoid using garden soil, as it can be too heavy and compact, which can lead to poor drainage and root rot. You can also amend your potting mix with compost or other organic matter to improve its fertility and water retention.
4. How often should I water my eggplant plant in a recycled bottle?
Water your eggplant plant regularly, especially during hot and dry weather. The frequency of watering will depend on the climate, the size of the bottle, and the type of soil you are using. A good rule of thumb is to water when the top inch of soil feels dry to the touch. Avoid overwatering, as this can lead to root rot. When watering, make sure to water thoroughly, allowing the water to drain out of the drainage holes.
5. How much sunlight does my eggplant plant need?
Eggplants need at least 6-8 hours of direct sunlight per day to thrive. Place your recycled bottle eggplant plant in a sunny location where it will receive plenty of sunlight. If you live in a hot climate, you may need to provide some afternoon shade to prevent the plant from overheating.
6. Do I need to fertilize my eggplant plant in a recycled bottle?
Yes, eggplants are heavy feeders and will benefit from regular fertilization. You can use a slow-release fertilizer or a liquid fertilizer. If you are using a slow-release fertilizer, incorporate it into the soil mix when you plant your eggplant seedling. If you are using a liquid fertilizer, apply it every 2-3 weeks according to the package directions. Choose a fertilizer that is specifically formulated for vegetables or tomatoes.
7. How do I protect my eggplant plant from pests and diseases?
Regularly inspect your eggplant plant for pests and diseases. Common pests that affect eggplants include aphids, flea beetles, and spider mites. Common diseases include powdery mildew and blossom-end rot. If you notice any pests or diseases, take action immediately to prevent them from spreading. You can use organic pest control methods, such as insecticidal soap or neem oil, to control pests. To prevent diseases, make sure to provide good air circulation and avoid overwatering.
8. How long does it take for eggplants to grow in a recycled bottle?
The time it takes for eggplants to grow in a recycled bottle will depend on the variety of eggplant, the climate, and the growing conditions. Generally, it takes about 60-80 days from transplanting to harvest. You can start harvesting eggplants when they are about two-thirds of their mature size.
9. Can I reuse the plastic bottle for another planting season?
Yes, you can reuse the plastic bottle for another planting season, but it’s important to properly clean and sanitize it first. Remove any remaining soil and debris, and then wash the bottle with soap and water. You can also disinfect the bottle with a solution of bleach and water (1 part bleach to 9 parts water). Rinse the bottle thoroughly before reusing it.
10. What are some variations I can try with this recycled bottle eggplant growing method?
There are many variations you can try with this method. You can experiment with different types of soil mixes, different watering techniques, and different fertilizers. You can also try growing different varieties of eggplants or other vegetables and herbs. Consider adding a trellis or support system to the bottle to help support the eggplant plant as it grows. You can also try painting the bottle to add a decorative touch to your garden. The possibilities are endless!
Leave a Comment