

Growing rice at home might sound like something only large-scale farmers can achieve, but I’m here to tell you it’s entirely possible, even in your backyard or on your balcony! Forget the image of vast paddy fields for a moment; we’re about to embark on a surprisingly accessible DIY adventure.
Rice, a staple food for billions across the globe, boasts a rich history dating back thousands of years. From ancient China to the fertile lands of India, rice cultivation has shaped cultures and economies. While we might not be feeding a nation from our home gardens, there’s something incredibly satisfying about nurturing this essential grain from seed to harvest.
Why would you want to try growing rice at home? Well, for starters, imagine the bragging rights! Beyond that, it’s a fantastic way to connect with your food source, learn about sustainable practices, and enjoy the freshest, most flavorful rice you’ve ever tasted. Plus, in a world increasingly concerned with food security and reducing our carbon footprint, cultivating even a small portion of your own food can make a real difference. This DIY guide will provide you with simple, effective tricks and hacks to successfully grow rice, regardless of your gardening experience. Let’s get started and transform your green space into a mini rice paddy!
Growing Rice at Home: A Beginner’s Guide to Paddy Power!
Okay, so you want to grow rice at home? Awesome! It might seem daunting, but trust me, with a little patience and the right setup, you can totally do it. I’m going to walk you through everything you need to know, from choosing the right variety to harvesting your very own homegrown rice. Let’s get started!
Choosing Your Rice Variety
First things first, you can’t just grab any old rice from the supermarket and expect it to grow. You need to choose a variety that’s suited to your climate and growing conditions. Here’s what to consider:
* Climate: Are you in a warm, tropical area or a cooler, temperate zone? Some rice varieties thrive in hot, humid conditions, while others are more tolerant of cooler temperatures. Look for varieties specifically recommended for your region.
* Growing Season Length: Different rice varieties have different maturity times. Some mature in as little as 90 days, while others can take up to 150 days or more. Make sure you choose a variety that will have enough time to mature before the first frost in your area.
* Water Requirements: Most rice varieties need to be grown in flooded conditions, but some are more drought-tolerant than others. If you’re limited on water, look for a variety that can tolerate drier conditions.
* Grain Type: Do you prefer long-grain, medium-grain, or short-grain rice? This is purely a matter of personal preference.
* Disease Resistance: Some rice varieties are more resistant to common rice diseases than others. If you live in an area where rice diseases are prevalent, choose a disease-resistant variety.
Some popular and relatively easy-to-grow rice varieties for home gardeners include:
* ‘M-202’: A medium-grain rice that’s well-suited to cooler climates.
* ‘Carolina Gold’: An heirloom variety with a nutty flavor.
* ‘Japonica’: A short-grain rice that’s often used in sushi.
* ‘Wehani’: An aromatic long-grain rice with a reddish color.
You can usually find rice seeds or seedlings at your local garden center or online. Just make sure you’re buying from a reputable source.
Preparing Your Paddy Field (or Container!)
Okay, so you’ve got your rice variety picked out. Now it’s time to prepare your growing area. You have two main options here: a traditional paddy field or a container.
Option 1: The Paddy Field
If you have a large, flat area of land that you can flood, you can create a traditional paddy field. This is the most authentic way to grow rice, but it requires a bit more work.
* Leveling the Land: The first step is to level the land as much as possible. This will ensure that the water is evenly distributed across the field.
* Creating Bunds: Next, you need to create bunds (small earthen walls) around the perimeter of the field to hold the water in. The bunds should be about 1-2 feet high and wide enough to walk on.
* Puddling the Soil: Once the bunds are in place, you need to puddle the soil. This involves flooding the field with water and then tilling or plowing the soil until it’s a thick, muddy slurry. Puddling helps to create an impermeable layer that will prevent water from seeping out of the field.
* Fertilizing the Soil: Before planting, it’s a good idea to fertilize the soil with compost or other organic matter. This will provide the rice plants with the nutrients they need to grow.
Option 2: Container Growing
If you don’t have a large area of land or you live in an apartment, you can still grow rice in containers. This is a much simpler option, but you’ll need to pay close attention to watering.
* Choosing the Right Container: You’ll need a large container that can hold at least 10 gallons of water. A plastic tub or a large planter will work well. Make sure the container has drainage holes.
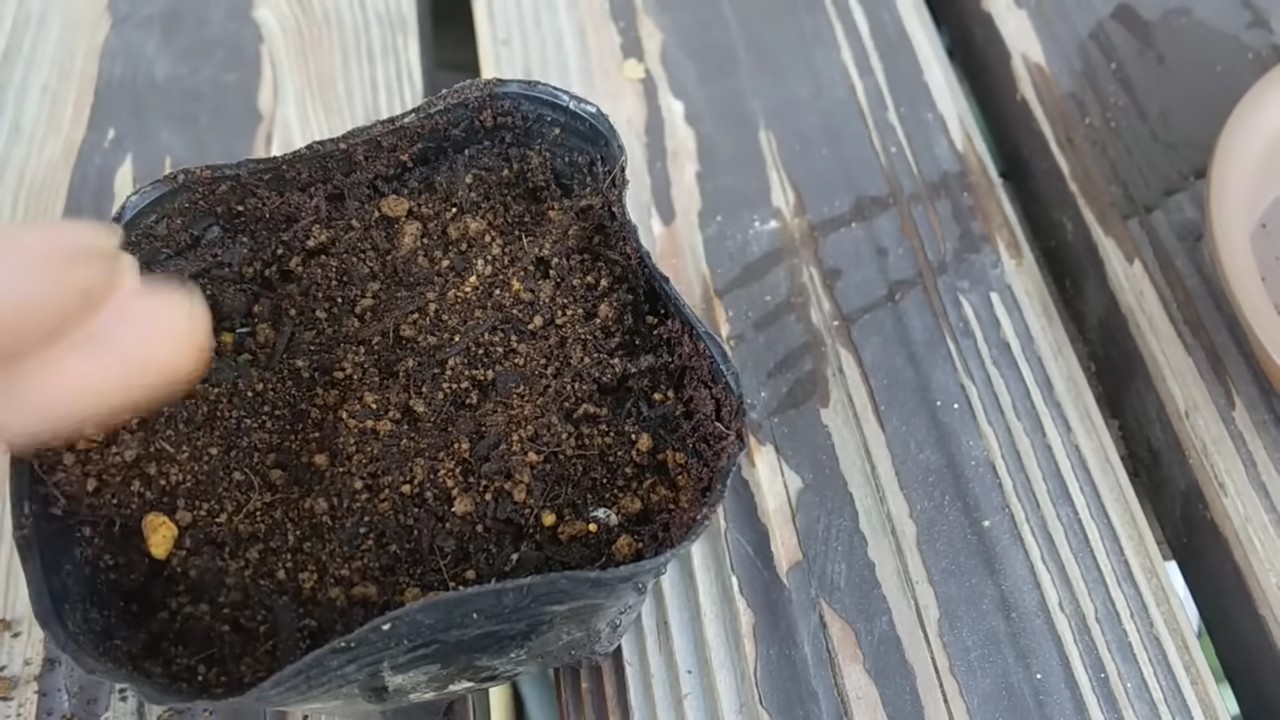
* Preparing the Soil: Fill the container with a mixture of potting soil and compost. The soil should be rich and well-draining.
* Waterproofing (Optional): To help retain water, you can line the container with a plastic bag or a pond liner. Just make sure to poke a few holes in the bottom for drainage.
Planting Your Rice
Now for the fun part: planting your rice! There are two main ways to plant rice: direct seeding and transplanting.
Direct Seeding
Direct seeding involves sowing the rice seeds directly into the prepared soil. This is the easiest method, but it can be less reliable than transplanting.
1. Soaking the Seeds: Before planting, soak the rice seeds in water for 24-48 hours. This will help to soften the seed coat and improve germination.
2. Sowing the Seeds: Spread the seeds evenly over the surface of the soil. You can either broadcast them by hand or use a seed spreader.
3. Covering the Seeds: Lightly cover the seeds with a thin layer of soil.
4. Watering: Gently water the soil to keep it moist.
Transplanting
Transplanting involves starting the rice seeds indoors and then transplanting the seedlings into the prepared soil. This method is more labor-intensive, but it can result in a higher yield.
1. Starting the Seeds Indoors: Start the rice seeds indoors about 4-6 weeks before the last expected frost. Sow the seeds in small pots or trays filled with potting soil.
2. Watering: Keep the soil moist but not soggy.
3. Hardening Off: Before transplanting the seedlings outdoors, you need to harden them off. This involves gradually exposing them to outdoor conditions over a period of 1-2 weeks.
4. Transplanting: Once the seedlings are hardened off, you can transplant them into the prepared soil. Space the seedlings about 6-8 inches apart.
Watering and Maintaining Your Rice
Water is the key to growing rice. Rice plants need to be constantly submerged in water, especially during the early stages of growth.
* Maintaining Water Levels:
Okay, so you want to grow rice at home? Awesome! It might seem daunting, but trust me, with a little patience and the right setup, you can totally do it. I’m going to walk you through everything you need to know, from choosing the right variety to harvesting your very own homegrown rice. Let’s get started!
Choosing Your Rice Variety
First things first, you can’t just grab any old rice from the supermarket and expect it to grow. You need to choose a variety that’s suited to your climate and growing conditions. Here’s what to consider:
* Climate: Are you in a warm, tropical area or a cooler, temperate zone? Some rice varieties thrive in hot, humid conditions, while others are more tolerant of cooler temperatures. Look for varieties specifically recommended for your region.
* Growing Season Length: Different rice varieties have different maturity times. Some mature in as little as 90 days, while others can take up to 150 days or more. Make sure you choose a variety that will have enough time to mature before the first frost in your area.
* Water Requirements: Most rice varieties need to be grown in flooded conditions, but some are more drought-tolerant than others. If you’re limited on water, look for a variety that can tolerate drier conditions.
* Grain Type: Do you prefer long-grain, medium-grain, or short-grain rice? This is purely a matter of personal preference.
* Disease Resistance: Some rice varieties are more resistant to common rice diseases than others. If you live in an area where rice diseases are prevalent, choose a disease-resistant variety.
Some popular and relatively easy-to-grow rice varieties for home gardeners include:
* ‘M-202’: A medium-grain rice that’s well-suited to cooler climates.
* ‘Carolina Gold’: An heirloom variety with a nutty flavor.
* ‘Japonica’: A short-grain rice that’s often used in sushi.
* ‘Wehani’: An aromatic long-grain rice with a reddish color.
You can usually find rice seeds or seedlings at your local garden center or online. Just make sure you’re buying from a reputable source.
Preparing Your Paddy Field (or Container!)
Okay, so you’ve got your rice variety picked out. Now it’s time to prepare your growing area. You have two main options here: a traditional paddy field or a container.
Option 1: The Paddy Field
If you have a large, flat area of land that you can flood, you can create a traditional paddy field. This is the most authentic way to grow rice, but it requires a bit more work.
* Leveling the Land: The first step is to level the land as much as possible. This will ensure that the water is evenly distributed across the field.
* Creating Bunds: Next, you need to create bunds (small earthen walls) around the perimeter of the field to hold the water in. The bunds should be about 1-2 feet high and wide enough to walk on.
* Puddling the Soil: Once the bunds are in place, you need to puddle the soil. This involves flooding the field with water and then tilling or plowing the soil until it’s a thick, muddy slurry. Puddling helps to create an impermeable layer that will prevent water from seeping out of the field.
* Fertilizing the Soil: Before planting, it’s a good idea to fertilize the soil with compost or other organic matter. This will provide the rice plants with the nutrients they need to grow.
Option 2: Container Growing
If you don’t have a large area of land or you live in an apartment, you can still grow rice in containers. This is a much simpler option, but you’ll need to pay close attention to watering.
* Choosing the Right Container: You’ll need a large container that can hold at least 10 gallons of water. A plastic tub or a large planter will work well. Make sure the container has drainage holes.
* Preparing the Soil: Fill the container with a mixture of potting soil and compost. The soil should be rich and well-draining.
* Waterproofing (Optional): To help retain water, you can line the container with a plastic bag or a pond liner. Just make sure to poke a few holes in the bottom for drainage.
Planting Your Rice
Now for the fun part: planting your rice! There are two main ways to plant rice: direct seeding and transplanting.
Direct Seeding
Direct seeding involves sowing the rice seeds directly into the prepared soil. This is the easiest method, but it can be less reliable than transplanting.
1. Soaking the Seeds: Before planting, soak the rice seeds in water for 24-48 hours. This will help to soften the seed coat and improve germination.
2. Sowing the Seeds: Spread the seeds evenly over the surface of the soil. You can either broadcast them by hand or use a seed spreader.
3. Covering the Seeds: Lightly cover the seeds with a thin layer of soil.
4. Watering: Gently water the soil to keep it moist.
Transplanting
Transplanting involves starting the rice seeds indoors and then transplanting the seedlings into the prepared soil. This method is more labor-intensive, but it can result in a higher yield.
1. Starting the Seeds Indoors: Start the rice seeds indoors about 4-6 weeks before the last expected frost. Sow the seeds in small pots or trays filled with potting soil.
2. Watering: Keep the soil moist but not soggy.
3. Hardening Off: Before transplanting the seedlings outdoors, you need to harden them off. This involves gradually exposing them to outdoor conditions over a period of 1-2 weeks.
4. Transplanting: Once the seedlings are hardened off, you can transplant them into the prepared soil. Space the seedlings about 6-8 inches apart.
Watering and Maintaining Your Rice
Water is the key to growing rice. Rice plants need to be constantly submerged in water, especially during the early stages of growth.
* Maintaining Water Levels: Keep the water level in your paddy field or container at a depth of about 2-4 inches. You may need to add water regularly to compensate for evaporation.
* Weeding: Keep the growing area free of weeds. Weeds can compete with the rice plants for nutrients and water.
* Fertilizing: Fertilize the rice plants every few weeks with a balanced fertilizer.
* Pest Control: Keep an eye out for pests, such as rice weevils and stem borers. If you see any pests, take action to control them. Organic options like neem oil can be effective.
Harvesting Your Rice
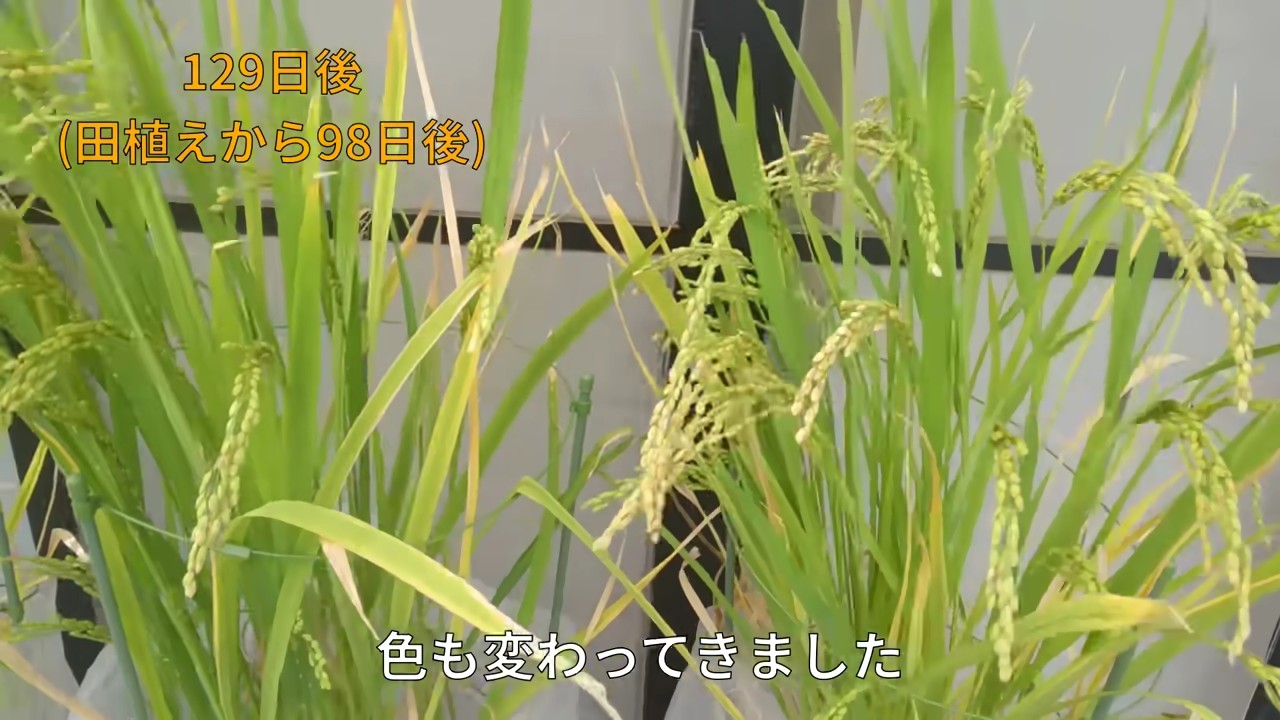
After several months of care, your rice plants will be ready to harvest. Here’s how to tell when it’s time:
* Grain Color: The grains will turn from green to golden brown.
* Grain Hardness: The grains will be hard and firm to the touch.
* Plant Maturity: The plants will start to turn yellow and dry out.
Here’s how to harvest your rice:
1. Cutting the Plants: Cut the rice plants at the base with a sickle or a pair of scissors.
2. Bundling the Plants: Bundle the plants together and tie them with twine.
3. Drying the Plants: Hang the bundles upside down in a dry, well-ventilated place for 2-3 weeks. This will allow the grains to dry completely.
4. Threshing the Rice: Once the grains are dry, you can thresh them to separate them from the stalks. This can be done by hand or with a threshing machine. A simple method is to beat the bundles against a hard surface.
5. Winnowing the Rice: After threshing, you need to winnow the rice to remove the chaff (the outer covering of the grain). This can be done by tossing the rice into the air on a windy day. The wind will blow away the chaff, leaving the clean rice grains behind.
6. Storing the Rice: Store the rice in an airtight container in a cool, dry place.
Milling Your Rice (Optional)
If you want to remove the bran layer from your rice, you’ll need to mill it. This can be done with a rice mill, but you can also do it at home with a mortar and pestle.
1. Pounding the Rice: Place the rice in the mortar and pound it with the pestle until the bran layer is removed.
2. Winnowing the Rice: Winnow the rice again to remove the bran.
And there you have it! You’ve successfully grown and harvested your own rice.
Conclusion
So, there you have it! Growing rice at home, while seemingly daunting, is an incredibly rewarding and surprisingly accessible project. It’s more than just a gardening endeavor; it’s a connection to the origins of a staple food, a lesson in sustainable living, and a fascinating experiment in self-sufficiency. We’ve walked you through the entire process, from selecting the right variety and preparing your paddy to nurturing your seedlings and harvesting your very own grains.
Why is this DIY trick a must-try? Because it empowers you to take control of your food source, understand the intricacies of agriculture, and appreciate the journey of rice from field to plate. In a world increasingly disconnected from nature, this is a tangible way to reconnect and experience the satisfaction of cultivating your own food. Imagine the pride of serving a meal made with rice you grew yourself – a conversation starter, a testament to your resourcefulness, and a delicious reward for your efforts.
But the adventure doesn’t stop here! Feel free to experiment with different rice varieties. Try growing aromatic varieties like Jasmine or Basmati for a fragrant twist. Consider adding companion plants to your paddy field to attract beneficial insects and improve soil health. You could even explore different irrigation techniques, such as using rainwater harvesting systems to conserve water. The possibilities are endless!
Don’t be afraid to get your hands dirty and embrace the learning process. Growing rice at home is a journey of discovery, and every step, from sowing the seeds to harvesting the grains, is an opportunity to learn and grow.
We are confident that with a little patience, dedication, and the guidance provided in this article, you can successfully cultivate your own rice crop. We encourage you to take the plunge and embark on this exciting adventure.
And most importantly, we want to hear about your experience! Share your successes, your challenges, and your tips with us in the comments below. Let’s build a community of home rice growers and learn from each other. What variety did you choose? What challenges did you face? What advice would you give to other beginners? Your insights could be invaluable to someone else just starting out. So, go ahead, give it a try, and let us know how it goes! Happy growing!
Frequently Asked Questions (FAQ)
What type of rice is best for growing at home?
The best type of rice for growing at home depends largely on your climate and the space you have available. Short-grain rice varieties, like Calrose, are generally more adaptable and easier to grow in smaller spaces. If you live in a warmer climate with a longer growing season, you might consider long-grain varieties like Jasmine or Basmati. However, these require more heat and a longer growing period. Research the specific varieties that are well-suited to your local climate and consider the size of your growing area when making your selection. Also, look for varieties that are disease-resistant to minimize potential problems.
How much space do I need to grow rice?
While rice is traditionally grown in large paddy fields, you can successfully grow it on a smaller scale at home. A minimum of 4 square feet per plant is recommended, but more space is always better. Consider using large containers, raised beds, or even a small, dedicated area in your garden. The key is to provide enough space for the rice plants to spread out and receive adequate sunlight. Remember that rice needs to be submerged in water, so your chosen area or container must be able to hold water effectively.
How often should I water my rice plants?
Maintaining a consistent water level is crucial for successful rice cultivation. The soil should be consistently submerged in water, typically 2-4 inches deep. Check the water level daily, especially during hot weather, and replenish as needed. Avoid letting the soil dry out completely, as this can stress the plants and reduce yields. As the rice plants mature and begin to flower, you may need to increase the water level slightly.
What kind of soil is best for growing rice?
Rice thrives in heavy, clay-rich soil that retains water well. If your soil is sandy or loamy, you can amend it with clay or compost to improve its water-holding capacity. The ideal soil pH for rice is between 5.5 and 6.5. Before planting, consider conducting a soil test to determine its pH and nutrient levels. You may need to add lime to raise the pH or sulfur to lower it. Incorporating organic matter, such as compost or well-rotted manure, can also improve soil fertility and drainage.
How long does it take to grow rice from seed to harvest?
The time it takes to grow rice from seed to harvest varies depending on the variety and your local climate. Generally, it takes between 3 to 6 months. Short-grain varieties tend to mature faster than long-grain varieties. Keep a close eye on your plants and monitor their progress. The rice is ready for harvest when the grains have turned golden brown and the stalks have begun to dry out.
What are some common pests and diseases that affect rice plants?
Rice plants can be susceptible to various pests and diseases, including rice weevils, stem borers, and fungal diseases like rice blast. Regularly inspect your plants for signs of infestation or disease. Use organic pest control methods, such as neem oil or insecticidal soap, to manage pests. Ensure good air circulation around your plants to prevent fungal diseases. If you notice any signs of disease, remove the affected leaves or plants immediately to prevent the spread. Choosing disease-resistant varieties can also help minimize problems.
How do I harvest rice?
Harvesting rice involves cutting the stalks when the grains have turned golden brown and the stalks have begun to dry out. Use a sharp knife or sickle to cut the stalks close to the ground. Gather the stalks into bundles and allow them to dry in a well-ventilated area for several days. Once the stalks are dry, you can thresh the rice by beating the bundles against a hard surface to separate the grains from the stalks. Winnow the rice to remove any remaining chaff or debris.
How do I store harvested rice?
Proper storage is essential to prevent spoilage and maintain the quality of your harvested rice. Store the rice in an airtight container in a cool, dry, and dark place. Avoid storing rice in areas with high humidity or temperature fluctuations. Properly stored rice can last for several months.
Can I grow rice indoors?
While it’s more challenging, growing rice indoors is possible with the right conditions. You’ll need a large container, a sunny location (or grow lights), and a way to maintain a consistent water level. Choose a short-grain variety that is well-suited to container growing. Be sure to provide adequate ventilation and monitor the plants closely for pests and diseases. Indoor rice cultivation may not yield as much as outdoor growing, but it can still be a rewarding experience.
What are some variations on growing rice at home?
Beyond simply growing rice, you can explore several variations. Consider aquaponics, where you grow rice in conjunction with fish, creating a symbiotic ecosystem. You could also experiment with different planting densities to see how it affects yield. Another variation is to try growing rice in a raised bed system, which can improve drainage and soil quality. Finally, you can explore different fertilization methods, such as using compost tea or other organic fertilizers, to enhance plant growth and grain quality.
Leave a Comment