

Growing Pumpkins in Tires: Sounds a little unconventional, right? But trust me, this quirky DIY trick might just be the secret to your most bountiful pumpkin harvest yet! For centuries, pumpkins have symbolized autumn, abundance, and, of course, Halloween. From Native American traditions where they were a staple food source to the elaborate jack-o’-lanterns we carve today, pumpkins hold a special place in our hearts and gardens.
But let’s face it, growing these glorious gourds can be a challenge. They need space, rich soil, and a whole lot of sunshine. That’s where this clever hack comes in. Using tires as planters offers a surprising number of benefits. It helps warm the soil faster in the spring, provides excellent drainage, and keeps those sprawling vines contained (somewhat!). Plus, it’s a fantastic way to recycle old tires, giving them a new lease on life.
I know what you’re thinking: “Tires? Really?” But believe me, once you see how well this works, you’ll be hooked. This DIY project is perfect for anyone who wants to maximize their pumpkin yield, especially if you’re short on space or dealing with less-than-ideal soil conditions. So, grab those old tires, and let’s get ready to grow some seriously impressive pumpkins! I’m excited to share all my tips and tricks for growing pumpkins in tires, ensuring you have a pumpkin patch to be proud of this fall.
Growing Giant Pumpkins in Tires: My Secret Weapon!
Okay, pumpkin fanatics! Let’s talk about growing those behemoth pumpkins you see at county fairs. I’m going to let you in on a little secret: using tires. Yes, you read that right! Tires can be a fantastic tool for nurturing your pumpkin dreams, providing warmth, drainage, and a contained space for those hungry roots. I’ve had great success with this method, and I’m excited to share my tips and tricks with you.
Why Tires? The Benefits Explained
Before we dive into the how-to, let’s quickly cover why I swear by this method.
* Warmth Retention: Tires are black, which means they absorb heat from the sun like crazy. This extra warmth is crucial, especially in cooler climates or during those unpredictable spring and fall nights. Pumpkins thrive in warm soil, and the tires give them a significant head start.
* Improved Drainage: By cutting out the bottom of the tire, you create a well-draining environment. Pumpkins hate sitting in soggy soil, which can lead to root rot and other nasty diseases. The tire acts as a raised bed, allowing excess water to escape.
* Root Confinement (in a good way!): While pumpkins need space, containing the initial root system within the tire helps them establish a strong base. This allows them to focus their energy on growing upwards and outwards once they break free of the tire’s boundaries.
* Easy Weed Control: The tire acts as a barrier, making it much easier to keep weeds away from your precious pumpkin plant. Less weeding means more time to admire your growing giant!
* Soil Enrichment: You can easily amend the soil inside the tire with compost, manure, and other goodies, creating a super-rich growing medium that your pumpkin will devour.
Materials You’ll Need
* Old Tires: The bigger, the better! Look for used tires at local tire shops. They’re usually happy to get rid of them. Avoid tires with exposed steel belts, as these can rust and potentially harm your plant. I usually aim for at least a 24-inch diameter tire.
* Utility Knife or Sawzall: For cutting out the bottom of the tire. Be careful!
* Gloves: Protect your hands from dirt and sharp edges.
* Safety Glasses: Always a good idea when using power tools.
* Cardboard or Landscape Fabric: To line the bottom of the tire (optional, but recommended).
* High-Quality Soil Mix: A blend of compost, topsoil, and well-rotted manure is ideal.
* Pumpkin Seeds: Choose a variety known for producing large pumpkins, such as Atlantic Giant.
* Starter Pots: For starting your seeds indoors (optional).
* Watering Can or Hose: For watering your pumpkin plant.
* Fertilizer: A balanced fertilizer formulated for pumpkins.
* Mulch: Straw or hay to help retain moisture and suppress weeds.
Step-by-Step Guide: From Tire Prep to Pumpkin Glory
Okay, let’s get our hands dirty! Here’s my tried-and-true method for growing giant pumpkins in tires.
Phase 1: Tire Preparation
1. Clean the Tires: Give those tires a good scrub with soap and water to remove any dirt, grime, or debris. This will also help prevent any potential contaminants from leaching into your soil. Let them dry completely.
2. Cut Out the Bottom: This is the most important step! Using your utility knife or Sawzall, carefully cut out the bottom of the tire. I find it easiest to make a series of small cuts around the circumference, rather than trying to cut all the way through in one go. Be extremely cautious and wear safety glasses! You want the roots to be able to reach the ground below.
3. Choose Your Location: Select a sunny spot in your garden that receives at least 6-8 hours of direct sunlight per day. Pumpkins are sun-worshippers! Make sure the location has well-draining soil.
4. Prepare the Ground: Before placing the tire, loosen the soil in the chosen location with a garden fork or tiller. This will make it easier for the pumpkin roots to penetrate the ground.
5. Place the Tire: Position the tire in your prepared location. Make sure it’s level and stable.
6. Line the Bottom (Optional): I like to line the bottom of the tire with cardboard or landscape fabric. This helps prevent weeds from growing up into the tire and also helps retain moisture. If using cardboard, make sure to poke a few holes for drainage.
Phase 2: Soil Preparation and Planting
1. Fill the Tire with Soil: Now for the fun part! Fill the tire with your high-quality soil mix. I usually use a blend of equal parts compost, topsoil, and well-rotted manure. This creates a nutrient-rich environment that your pumpkin will love. Leave a few inches of space at the top of the tire.
2. Start Seeds Indoors (Optional): To get a head start, I often start my pumpkin seeds indoors about 2-3 weeks before the last expected frost. Plant the seeds in starter pots filled with seed-starting mix. Keep the soil moist and warm. Once the seedlings have developed a few true leaves, they’re ready to transplant.
3. Direct Sow Seeds (Alternative): If you prefer, you can direct sow the pumpkin seeds directly into the tire after the last frost. Plant 2-3 seeds per tire, about 1 inch deep. Once the seedlings emerge, thin them to the strongest one.
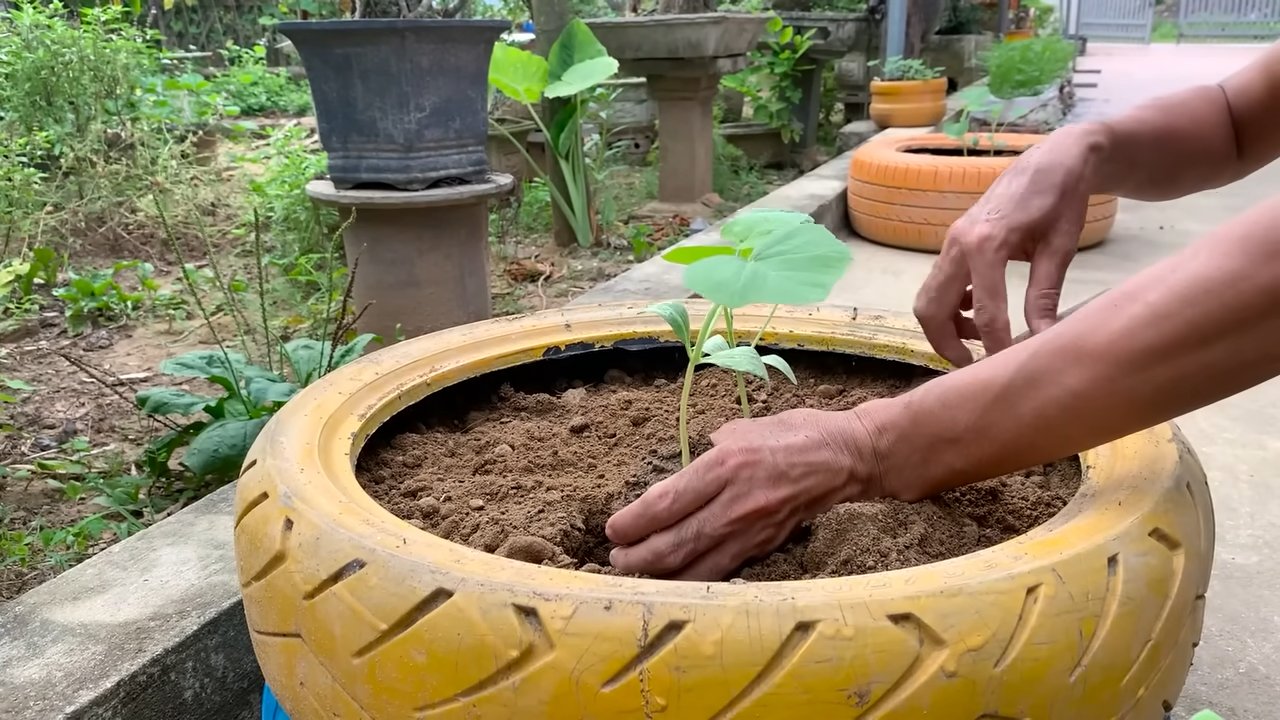
4. Transplant Seedlings (If Starting Indoors): Carefully transplant the seedlings into the tire, spacing them evenly. Water them thoroughly after transplanting.
5. Water Thoroughly: Give the soil a good soaking after planting or transplanting. This will help settle the soil and encourage root growth.
Phase 3: Ongoing Care and Maintenance
1. Water Regularly: Pumpkins need a lot of water, especially during hot weather. Water deeply and regularly, aiming for about 1-2 inches of water per week. Avoid getting the leaves wet, as this can lead to fungal diseases. I prefer to water in the morning so the leaves have time to dry before nightfall.
2. Fertilize Regularly: Feed your pumpkin plant with a balanced fertilizer every 2-3 weeks. Follow the instructions on the fertilizer package. I like to use a fertilizer that’s high in phosphorus, which promotes strong root growth and flowering.
3. Weed Control: Keep the area around the tire free of weeds. Hand-pull any weeds that pop up. The tire should help minimize weed growth, but vigilance is key.
4. Mulch: Apply a layer of mulch around the pumpkin plant to help retain moisture, suppress weeds, and regulate soil temperature. Straw or hay works well.
5. Prune Vines (Optional): Some growers prune the vines to encourage the plant to focus its energy on producing one or two large pumpkins. This is a more advanced technique, but it can definitely help you grow a giant. I usually wait until the plant has set a few pumpkins before pruning.
6. Hand-Pollinate (If Necessary): If you’re not seeing a lot of bees in your garden, you may need to hand-pollinate the female flowers. Female flowers have a small pumpkin-like structure at the base of the flower. To hand-pollinate, use a small paintbrush to transfer pollen from the male flower (which has a long, thin stem) to the female flower.
7. Protect from Pests and Diseases: Keep an eye out for common pumpkin pests and diseases, such as squash bugs, squash vine borers, and powdery mildew. Take action promptly to control any infestations or infections. I use organic pest control methods whenever possible.
8. Provide Shade (If Necessary): In extremely hot climates, you may need to provide some shade for your pumpkin to prevent it from getting sunburned. You can use shade cloth or a large umbrella.
9. Support the Pumpkin (As It Grows): As your pumpkin grows larger, you may need to provide some support to prevent it from breaking off the vine. You can use a sling made of cloth or netting to support the pumpkin’s weight. I’ve even used old blankets folded up to cushion the pumpkin.
10. Monitor and Admire: Keep a close eye on your pumpkin’s growth and development. Take pictures and marvel at its progress! Growing giant pumpkins is a rewarding experience, and it’s important to enjoy the journey.
Troubleshooting Tips
* Yellowing Leaves: This could be a sign of overwatering, underwatering, or nutrient deficiency. Check the soil moisture and adjust your watering accordingly. Fertilize with a balanced fertilizer.
* Powdery Mildew: This fungal disease can cause a white, powdery coating on the leaves. Treat with a fungicide or a homemade remedy, such as a baking soda solution
Conclusion
So, there you have it! Growing pumpkins in tires isn’t just a quirky gardening hack; it’s a game-changer for maximizing space, conserving water, and ultimately, yielding a bountiful harvest of those glorious orange gourds. We’ve explored how this simple method can transform your backyard, patio, or even a small balcony into a pumpkin patch paradise. The benefits are undeniable: the tire acts as a mini-raised bed, providing excellent drainage and warming the soil quickly in the spring, giving your pumpkin seedlings a head start. Plus, the tire’s dark color absorbs heat, further accelerating growth and protecting the roots from temperature fluctuations.
But the advantages extend beyond just the practical. Growing pumpkins in tires is also an incredibly sustainable practice. You’re repurposing a discarded item, preventing it from ending up in a landfill and giving it a new lease on life. It’s a small act of environmental stewardship that can make a big difference.
Don’t be afraid to experiment with different varieties of pumpkins. While the traditional Jack-o’-lantern pumpkins thrive in this setup, you can also try smaller pie pumpkins, decorative gourds, or even unique heirloom varieties. Consider the size of the tire and the space you have available when choosing your pumpkin type. For smaller spaces, bush varieties are ideal.
Ready to take your pumpkin growing to the next level?
Here are a few variations to consider:
* **Vertical Gardening:** Stack multiple tires to create a tiered garden, allowing you to grow even more pumpkins in a limited space. Just be sure to reinforce the structure for stability.
* **Companion Planting:** Plant beneficial herbs and flowers around the base of the tire to attract pollinators and deter pests. Marigolds, basil, and nasturtiums are excellent choices.
* **Aesthetic Enhancements:** Paint the tires with vibrant colors or decorate them with stencils to add a touch of personality to your garden. Get creative and make your tire pumpkin patch a visual delight!
* **Soil Amendments:** While we’ve emphasized the importance of well-draining soil, don’t hesitate to enrich it further with compost, aged manure, or other organic matter. This will provide your pumpkin plants with the nutrients they need to flourish.
* **Watering System:** Consider installing a simple drip irrigation system within the tire to ensure consistent and efficient watering, especially during hot and dry periods.
The key to success with this DIY trick is consistent care and attention. Monitor your plants regularly for pests and diseases, provide adequate water and nutrients, and don’t be afraid to prune the vines to encourage fruit production. Remember, patience is a virtue when it comes to gardening.
We are confident that you’ll be amazed by the results of growing pumpkins in tires. It’s a fun, rewarding, and environmentally friendly way to enjoy the magic of gardening. So, grab some tires, gather your supplies, and get ready to grow some pumpkins!
We encourage you to try this method and share your experiences with us. Post photos of your tire pumpkin patch on social media using #TirePumpkinPatch and let us know what worked best for you. We’re eager to see your creative variations and learn from your successes. Happy growing!
Frequently Asked Questions (FAQ)
What type of tires are best for growing pumpkins?
Ideally, you should use tires that are free of any exposed steel belts or wires. Passenger car tires are generally a good size and readily available. Avoid using tires from heavy machinery or trucks, as they may be too large and difficult to manage. Also, ensure the tires are clean and free of any debris before using them. It’s best to source tires from a local tire shop; they often have used tires they are willing to give away or sell at a very low cost.
Are there any safety concerns with using tires in the garden?
There has been some debate about the potential leaching of chemicals from tires into the soil. However, studies have shown that the risk is minimal, especially when using tires that are not excessively worn or damaged. To further minimize any potential risk, you can line the inside of the tire with a layer of landscape fabric or plastic sheeting before adding soil. This will create a barrier between the soil and the tire. Also, ensure you wash the tires thoroughly before use to remove any surface contaminants.
How do I prepare the tires for planting?
First, clean the tires thoroughly with soap and water to remove any dirt, grime, or debris. If desired, you can paint the tires with exterior paint to add a decorative touch and protect them from the elements. Once the tires are clean and dry, place them in your desired location. If you’re concerned about potential leaching, line the inside of the tire with landscape fabric or plastic sheeting. Finally, fill the tire with a well-draining soil mix, such as a combination of topsoil, compost, and peat moss.
What kind of soil should I use?
Pumpkins are heavy feeders and require nutrient-rich soil. A well-draining soil mix is essential to prevent root rot. A good combination is equal parts topsoil, compost, and peat moss or coconut coir. Compost provides essential nutrients, while peat moss or coconut coir helps retain moisture. You can also add slow-release fertilizer to the soil mix to provide a steady supply of nutrients throughout the growing season. Before planting, test the soil pH and amend it if necessary to achieve a pH of 6.0 to 7.0.
How often should I water my pumpkin plants in tires?
Watering frequency will depend on the weather conditions and the type of soil you’re using. Generally, you should water your pumpkin plants deeply whenever the top inch of soil feels dry to the touch. Avoid overwatering, as this can lead to root rot. A good rule of thumb is to water thoroughly in the morning, allowing the foliage to dry out during the day. During hot and dry periods, you may need to water more frequently. Consider using a soaker hose or drip irrigation system to deliver water directly to the roots.
Do I need to fertilize my pumpkin plants?
Yes, pumpkins are heavy feeders and require regular fertilization. Start with a balanced fertilizer, such as 10-10-10, at planting time. As the plants grow, switch to a fertilizer that is higher in phosphorus and potassium to promote fruit development. You can also supplement with organic fertilizers, such as compost tea or fish emulsion. Apply fertilizer according to the package directions, and avoid over-fertilizing, as this can burn the roots.
How do I protect my pumpkin plants from pests and diseases?
Monitor your plants regularly for pests and diseases. Common pumpkin pests include squash bugs, squash vine borers, and aphids. You can control these pests with insecticidal soap, neem oil, or handpicking. Common pumpkin diseases include powdery mildew and downy mildew. You can prevent these diseases by providing good air circulation, avoiding overhead watering, and applying a fungicide if necessary. Companion planting with marigolds and nasturtiums can also help deter pests.
How many pumpkins can I grow in one tire?
It’s generally recommended to grow only one pumpkin plant per tire. This will ensure that the plant has enough space and nutrients to thrive. If you’re growing smaller pumpkin varieties, you may be able to grow two plants per tire, but be sure to provide adequate spacing and nutrients. Overcrowding can lead to reduced fruit size and increased susceptibility to pests and diseases.
When is the best time to plant pumpkins in tires?
The best time to plant pumpkins is after the last frost, when the soil has warmed up to at least 60 degrees Fahrenheit. In most regions, this is typically in late May or early June. You can start pumpkin seeds indoors 2-3 weeks before the last frost to get a head start on the growing season. Transplant the seedlings into the tires once the weather has warmed up and the risk of frost has passed.
How do I know when my pumpkins are ripe?
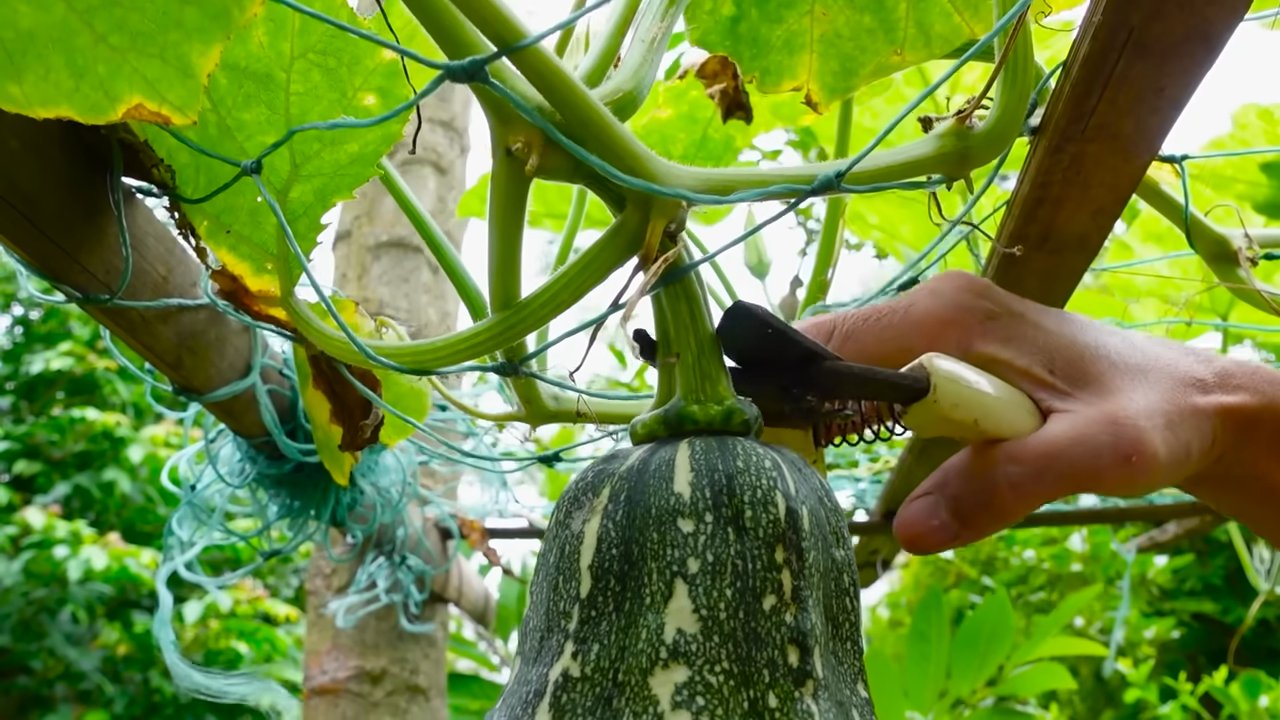
Pumpkins are typically ready to harvest in the fall, when the skin has hardened and turned a deep, uniform color. The stem should also be dry and hard. To test for ripeness, tap the pumpkin with your knuckles. A ripe pumpkin will sound hollow. Use a sharp knife or pruning shears to cut the pumpkin from the vine, leaving a few inches of stem attached. Handle the pumpkins carefully to avoid bruising or damaging the skin.
Leave a Comment