

Container Bush Beans: Imagine stepping onto your balcony or into your backyard and harvesting a bounty of fresh, crisp beans, all grown by your own hand. Sounds idyllic, right? Well, it’s more achievable than you might think! For centuries, people have cultivated beans in various ways, from sprawling fields to small, carefully tended plots. The beauty of bush beans, however, lies in their compact nature, making them perfect for container gardening, even if you’re short on space.
But let’s be honest, sometimes gardening feels like a daunting task, especially when you’re juggling a busy life. That’s where clever DIY tricks and hacks come in! I’m here to share some of my favorite, tried-and-true methods for maximizing your container bush beans harvest. Whether you’re a seasoned gardener or a complete newbie, these tips will help you overcome common challenges, from pest control to watering woes, and ensure you’re enjoying delicious, homegrown beans in no time.
Why do you need these DIY tricks? Because growing your own food is incredibly rewarding! Not only do you get to enjoy the freshest, most flavorful produce, but you also gain a deeper connection to nature and a sense of accomplishment. Plus, knowing exactly where your food comes from is a huge peace of mind. So, let’s dive in and unlock the secrets to successful container bush bean gardening!
Growing Bush Beans in Containers: A Complete DIY Guide
Hey there, fellow gardening enthusiasts! I’m so excited to share my tried-and-true method for growing delicious, bountiful bush beans right in containers. Forget sprawling gardens – with a little know-how, you can enjoy fresh, homegrown beans even if you only have a balcony or patio. This guide will walk you through every step, from choosing the right container to harvesting your juicy beans. Let’s get started!
Choosing the Right Bush Bean Variety
First things first, let’s talk beans! Not all beans are created equal, especially when it comes to container gardening. Bush beans are your best bet because they’re compact and don’t require trellising like pole beans. Here are a few of my favorite bush bean varieties that thrive in containers:
* Blue Lake Bush: A classic choice, known for its excellent flavor and high yields.
* Contender: Early maturing and very productive, perfect if you’re impatient like me!
* Provider: As the name suggests, this variety is a reliable producer, even in less-than-ideal conditions.
* Derby: Another early variety with long, slender pods.
* Roma II: A flat-podded Italian bean with a rich, buttery flavor.
Gathering Your Supplies
Okay, now that we’ve picked our bean stars, let’s gather the necessary supplies. Here’s what you’ll need:
* Containers: Choose containers that are at least 12 inches in diameter and 12 inches deep. This gives the roots enough room to spread out. I prefer using fabric pots because they allow for better drainage and aeration, but plastic or terracotta pots work just fine too.
* Potting Mix: Don’t use garden soil! It’s too heavy and compacts easily in containers. Instead, opt for a high-quality potting mix that’s lightweight and well-draining. I like to mix equal parts of peat moss, perlite, and compost for a nutrient-rich blend.
* Bean Seeds: Of course! Make sure you’re using fresh, viable seeds for the best germination rate.
* Watering Can or Hose: For keeping your beans hydrated.
* Fertilizer: A balanced, slow-release fertilizer or a liquid fertilizer formulated for vegetables.
* Optional: A small trowel, gardening gloves, and mulch (like straw or wood chips).
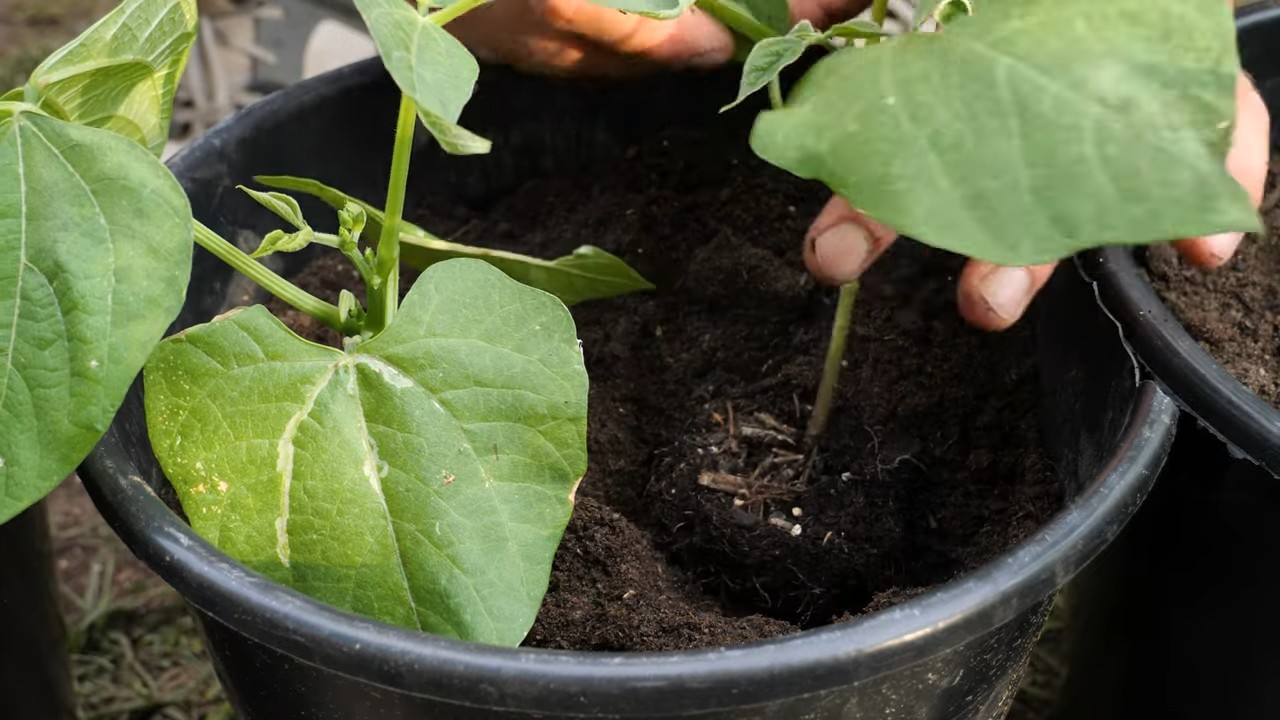
Step-by-Step Planting Guide
Alright, let’s get our hands dirty! Here’s how to plant your bush bean seeds in containers:
1. Prepare Your Containers: Fill your containers with the potting mix, leaving about an inch or two of space at the top. Gently pat down the soil to remove any air pockets.
2. Sow the Seeds: Plant the bean seeds about 1 inch deep and 2-3 inches apart. I usually plant 4-5 seeds per container, depending on the size.
3. Water Thoroughly: After planting, water the soil gently but thoroughly until water drains out of the bottom of the container. This helps settle the soil and encourages germination.
4. Find a Sunny Spot: Bush beans need at least 6-8 hours of sunlight per day to thrive. Place your containers in a sunny location where they’ll get plenty of light.
5. Keep the Soil Moist: Keep the soil consistently moist, but not waterlogged. Water when the top inch of soil feels dry to the touch. Avoid overhead watering, as this can lead to fungal diseases.
Caring for Your Bush Beans
Now that your beans are planted, it’s time to nurture them and watch them grow! Here’s how to care for your bush beans in containers:
1. Watering: As I mentioned before, consistent watering is key. Check the soil moisture regularly and water accordingly. During hot, dry weather, you may need to water daily.
2. Fertilizing: Bush beans are relatively light feeders, but they still benefit from regular fertilization. Apply a balanced, slow-release fertilizer at planting time, or use a liquid fertilizer every 2-3 weeks. Follow the instructions on the fertilizer package. I like to use a fertilizer that is higher in phosphorus, as this encourages flowering and bean production.
3. Mulching: Adding a layer of mulch around the base of the plants helps retain moisture, suppress weeds, and regulate soil temperature. Straw, wood chips, or shredded leaves work well.
4. Pest Control: Keep an eye out for common bean pests like aphids, bean beetles, and spider mites. If you spot any pests, you can try hand-picking them off the plants or using an insecticidal soap or neem oil. I prefer organic pest control methods whenever possible.
5. Support (Optional): While bush beans don’t typically need trellising, you can provide some support if the plants become top-heavy with beans. A small tomato cage or a few stakes can help keep them upright.
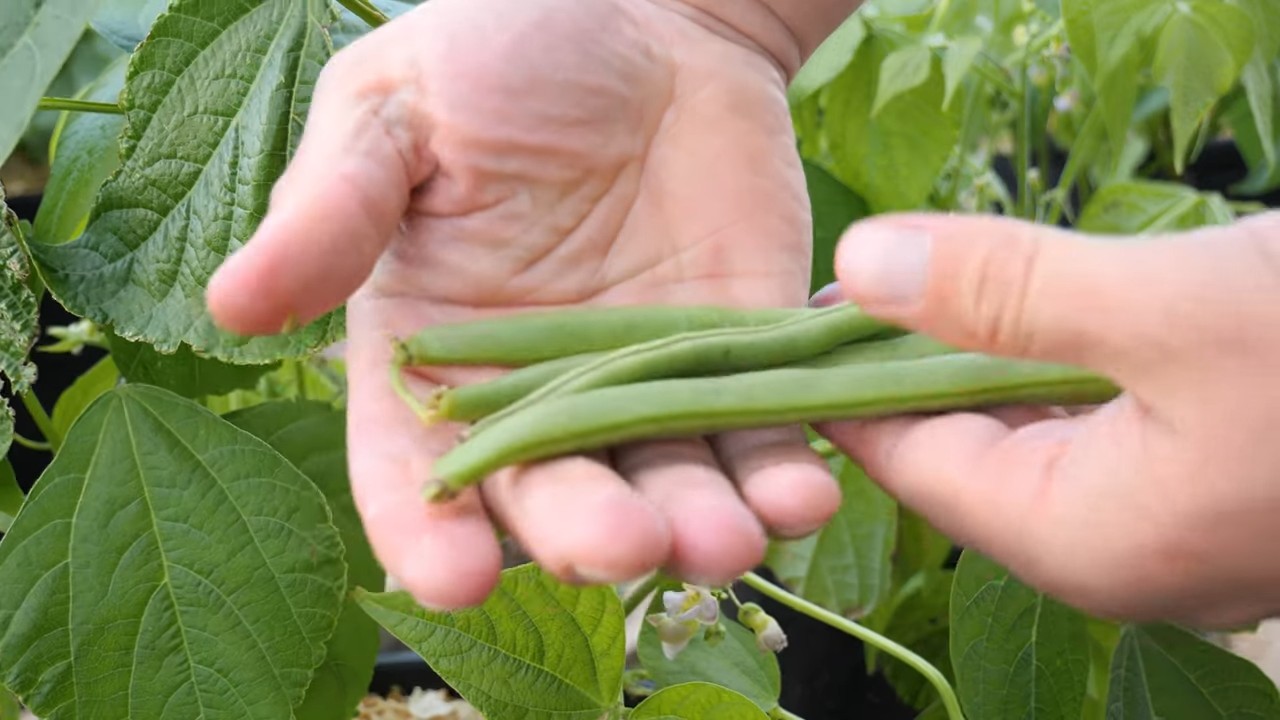
Harvesting Your Bush Beans
The moment we’ve all been waiting for – harvesting! Bush beans are usually ready to harvest about 50-60 days after planting, depending on the variety. Here’s how to know when to harvest and how to do it:
1. Check for Maturity: The bean pods should be firm, plump, and snap easily when bent. They should also be the right size for the variety you’re growing.
2. Harvest Regularly: Harvest your beans regularly, every few days, to encourage continued production. The more you harvest, the more beans the plants will produce.
3. Pick Carefully: Gently snap the bean pods off the plant, being careful not to damage the stems or leaves.
4. Enjoy Your Harvest: Freshly harvested bush beans are incredibly delicious! You can eat them raw, steamed, sautéed, or added to soups and stews.
Troubleshooting Common Problems
Even with the best care, you might encounter a few problems along the way. Here are some common issues and how to address them:
* Yellowing Leaves: This could be a sign of overwatering, underwatering, or nutrient deficiency. Check the soil moisture and adjust your watering accordingly. If the soil is consistently moist, it could be a sign of root rot. Make sure your containers have good drainage. If you suspect a nutrient deficiency, fertilize with a balanced fertilizer.
* Lack of Flowers or Beans: This could be due to insufficient sunlight, poor pollination, or nutrient deficiency. Make sure your plants are getting enough sunlight. You can also try hand-pollinating the flowers by gently shaking the plants or using a small paintbrush to transfer pollen from one flower to another. If you suspect a nutrient deficiency, fertilize with a fertilizer that is higher in phosphorus.
* Pest Infestations: As mentioned earlier, keep an eye out for common bean pests and take action as soon as you spot them.
* Fungal Diseases: Overcrowding and poor air circulation can lead to fungal diseases like powdery mildew. Space your plants properly and avoid overhead watering. You can also use a fungicide if necessary.
Tips for Maximizing Your Bean Harvest
Want to get the most out of your container bean garden? Here are a few extra tips:
* Succession Planting: Plant a new batch of seeds every 2-3 weeks to extend your harvest season.
* Choose the Right Container Size: I can’t stress this enough! Bigger is better when it comes to container size. A larger container will provide more room for the roots to grow and will hold more moisture.
* Use a Self-Watering Container: If you’re prone to forgetting to water, a self-watering container can be a lifesaver.
* Rotate Your Crops: If you’re growing beans in the same containers year after year, rotate your crops to prevent soilborne diseases and nutrient depletion.
* Have Fun!: Gardening should be enjoyable! Don’t be afraid to experiment and try new things.
Dealing with Extreme Weather
Sometimes, Mother Nature throws us a curveball. Here’s how to protect your container bean plants from extreme weather:
* Heat Waves: During heat waves, move your containers to a shadier location or provide shade with a shade cloth. Water more frequently to prevent the soil from drying out.
* Cold Snaps: If a frost is predicted, cover your plants with a blanket or move them indoors.
* Heavy Rain: Heavy rain can waterlog the soil and damage the plants. Move your containers to a sheltered location or provide drainage by poking holes in the bottom of the containers.
* Strong Winds: Strong winds can damage the plants and blow over the containers. Move your containers to a sheltered location or weigh them down with rocks.
Saving Bean Seeds for Next Year
If you want to save seeds from your bush bean plants for next year, here’s how:
1. Allow Some Pods to Mature Fully: Let a few bean pods on the plant dry
Conclusion
So, there you have it! Growing your own container bush beans is not only achievable, but it’s also incredibly rewarding. We’ve walked you through the simple steps, highlighted the benefits, and hopefully, inspired you to give it a try. But why is this DIY trick a must-try? It boils down to a few key factors: freshness, flavor, and control.
Imagine plucking perfectly ripe bush beans straight from your container, moments before adding them to your dinner plate. The difference in taste compared to store-bought beans is undeniable. You’ll experience a crispness and sweetness that you simply can’t find anywhere else. Plus, you have complete control over the growing process. You can choose organic methods, avoid harmful pesticides, and ensure your beans are grown in the healthiest possible environment.
Beyond the basic method we’ve outlined, there are plenty of ways to customize your container bush bean growing experience. Consider experimenting with different varieties of bush beans. Some popular choices include Blue Lake Bush, Contender, and Provider. Each variety offers a slightly different flavor profile and texture, so you can find the perfect bean to suit your taste.
Another variation to consider is companion planting. Certain herbs and flowers can actually benefit your bush beans by deterring pests or attracting beneficial insects. Marigolds, nasturtiums, and basil are all excellent choices to plant alongside your beans. They not only add beauty to your container garden but also contribute to a healthier and more productive harvest.
For those with limited space, consider vertical gardening techniques. You can train your bush beans to climb a small trellis or support structure within the container. This not only saves space but also adds visual interest to your garden. Just be sure to choose a variety that is naturally compact and doesn’t require extensive support.
Don’t be afraid to experiment with different soil mixes and fertilizers. While the basic potting mix we recommended is a good starting point, you can tailor it to your specific needs. Adding compost or other organic matter can improve drainage and nutrient retention. Just be sure to avoid over-fertilizing, as this can lead to excessive foliage growth and fewer beans.
Ultimately, the best way to learn is by doing. So, we strongly encourage you to take the plunge and try growing your own container bush beans. It’s a fun, educational, and rewarding experience that will provide you with fresh, delicious produce all season long.
Once you’ve harvested your first crop, we’d love to hear about your experience! Share your tips, tricks, and photos with us in the comments section below. Let’s create a community of container bush bean enthusiasts and learn from each other. What variety did you choose? What challenges did you face? What successes did you celebrate? Your feedback is invaluable and will help other gardeners succeed.
Remember, gardening is a journey, not a destination. There will be ups and downs, successes and failures. But with a little patience, persistence, and a willingness to learn, you can enjoy the satisfaction of growing your own food and connecting with nature. So, grab a container, some soil, and a packet of bush bean seeds, and get ready to experience the joy of homegrown goodness!
Frequently Asked Questions (FAQ)
What size container is best for growing bush beans?
The ideal container size for growing bush beans is at least 12 inches in diameter and 12 inches deep. This provides enough space for the roots to develop and allows for adequate drainage. You can use larger containers if you prefer, but avoid using containers that are too small, as this can restrict root growth and reduce yields. A five-gallon bucket or a large planter pot works well. Remember that drainage is key, so ensure your container has drainage holes.
How often should I water my container bush beans?
Bush beans need consistent moisture, especially during hot weather. Water deeply whenever the top inch of soil feels dry to the touch. Avoid overwatering, as this can lead to root rot. A good rule of thumb is to water every 2-3 days, but adjust the frequency based on the weather conditions and the moisture level of the soil. Check the soil moisture regularly by sticking your finger into the soil. If it feels dry, it’s time to water.
What kind of fertilizer should I use for my bush beans?
Bush beans benefit from a balanced fertilizer with a slightly higher phosphorus content. Look for a fertilizer with an N-P-K ratio of 5-10-5 or similar. You can use a liquid fertilizer or a slow-release granular fertilizer. Apply the fertilizer according to the package instructions, being careful not to over-fertilize. Over-fertilizing can lead to excessive foliage growth and fewer beans. Organic options like compost tea or fish emulsion are also excellent choices.
How much sunlight do bush beans need?
Bush beans need at least 6-8 hours of direct sunlight per day to thrive. Choose a location for your container garden that receives plenty of sunlight throughout the day. If you live in a particularly hot climate, you may want to provide some afternoon shade to prevent the plants from getting scorched. Insufficient sunlight can lead to leggy growth and reduced yields.
When is the best time to plant bush beans in containers?
The best time to plant bush beans is after the last frost in your area. Bush beans are sensitive to cold temperatures, so it’s important to wait until the soil has warmed up. You can start seeds indoors 2-3 weeks before the last frost and transplant them into containers once the weather is warm enough. Alternatively, you can direct sow seeds directly into the containers. Check your local planting calendar for specific dates.
How do I deal with pests and diseases on my bush beans?
Regularly inspect your bush beans for pests and diseases. Common pests include aphids, bean beetles, and spider mites. You can control these pests with insecticidal soap, neem oil, or by handpicking them off the plants. Diseases like powdery mildew and bean rust can be prevented by providing good air circulation and avoiding overhead watering. If you notice any signs of disease, remove the affected leaves immediately. Companion planting with marigolds or basil can also help deter pests.
How long does it take for bush beans to mature?
Bush beans typically mature in 50-60 days from planting. The exact time will depend on the variety and the growing conditions. You can start harvesting beans once they are about 4-6 inches long and the pods are firm and crisp. Harvest regularly to encourage continued production. Overripe beans will become tough and stringy.
Can I grow bush beans in containers indoors?
While it’s possible to grow bush beans indoors, it can be challenging. Bush beans require a lot of sunlight, so you’ll need to provide supplemental lighting with grow lights. You’ll also need to ensure good air circulation and humidity levels. It’s generally easier to grow bush beans outdoors in containers, but if you have the right conditions, you can certainly give it a try indoors.
What are some good companion plants for bush beans in containers?
Good companion plants for bush beans include marigolds, nasturtiums, basil, rosemary, and thyme. These plants can help deter pests, attract beneficial insects, and improve the overall health of your bush beans. Avoid planting bush beans near onions or garlic, as these plants can inhibit their growth.
How do I store my harvested bush beans?
Freshly harvested bush beans can be stored in the refrigerator for up to a week. To store them, place them in a plastic bag or container and keep them in the crisper drawer. You can also freeze bush beans for longer storage. To freeze them, blanch them in boiling water for 2-3 minutes, then plunge them into ice water to stop the cooking process. Drain them well and then freeze them in a single layer on a baking sheet. Once they are frozen, transfer them to a freezer bag or container.
Leave a Comment