

Marigold Growing Guide: Unlock the secrets to a vibrant and pest-free garden with these simple DIY tricks! Have you ever admired those cheerful bursts of orange and yellow in a neighbor’s garden and wondered how they achieve such stunning results? Well, wonder no more! This article is your comprehensive guide to cultivating thriving marigolds, even if you’re a complete beginner.
Marigolds have a rich history, dating back to the Aztecs who used them for medicinal and ceremonial purposes. These sunny flowers eventually made their way to Europe and beyond, becoming a beloved staple in gardens worldwide. But beyond their beauty, marigolds offer incredible benefits. They’re natural pest repellents, attracting beneficial insects and deterring unwanted critters from munching on your precious plants.
Let’s face it, gardening can sometimes feel like a battle against bugs and diseases. That’s where this marigold growing guide comes in! I’m going to share easy-to-follow DIY tricks and hacks that will help you grow healthy, vibrant marigolds, naturally protecting your garden and adding a splash of color to your outdoor space. Get ready to transform your garden into a thriving oasis with these simple, yet effective techniques. Let’s get started!
Growing Gorgeous Marigolds: A DIY Guide for Beginners
Hey there, fellow gardening enthusiasts! I’m so excited to share my tried-and-true method for growing vibrant, healthy marigolds. These cheerful flowers are not only beautiful but also incredibly beneficial for your garden, acting as natural pest repellents and attracting pollinators. Whether you’re a seasoned gardener or just starting out, this guide will walk you through every step of the process, from seed to bloom. Let’s get our hands dirty!
Choosing Your Marigold Variety
Before we dive into the nitty-gritty, let’s talk about choosing the right marigold for your garden. There are two main types: African marigolds (Tagetes erecta) and French marigolds (Tagetes patula).
* **African Marigolds:** These are the giants of the marigold world, growing up to 3 feet tall with large, pom-pom-like blooms. They’re perfect for adding height and drama to your flower beds.
* **French Marigolds:** These are smaller and bushier, typically reaching 6-12 inches in height. They have smaller, often double, flowers and come in a wider range of colors, including bi-colors and stripes.
* Signet Marigolds (Tagetes tenuifolia): These are less common but offer a delightful citrusy scent and edible petals! They have a delicate, lacy foliage and smaller, single flowers.
Consider your garden’s size, sunlight conditions, and desired aesthetic when making your choice. I personally love planting a mix of French and African marigolds for a diverse and colorful display.
Starting Marigolds from Seed: Indoor vs. Outdoor
You can start marigolds from seed either indoors or directly in your garden. Starting them indoors gives you a head start, especially if you live in a cooler climate with a shorter growing season.
Starting Seeds Indoors
Here’s what you’ll need:
* Marigold seeds
* Seed starting trays or small pots
* Seed starting mix (a light, well-draining mix is crucial)
* Spray bottle with water
* Warm, sunny location or grow lights
**Step-by-Step Instructions:**
1. **Prepare your seed starting trays:** Fill each cell of your seed starting tray or your small pots with seed starting mix. Gently tap the tray to settle the mix.
2. **Sow the seeds:** Make a small indentation (about ¼ inch deep) in the center of each cell. Place 1-2 marigold seeds in each indentation.
3. Cover the seeds:** Gently cover the seeds with a thin layer of seed starting mix.
4. Water gently:** Use a spray bottle to mist the soil thoroughly. Avoid overwatering, which can lead to damping off (a fungal disease that kills seedlings).
5. Provide warmth and light:** Place the seed starting tray in a warm location (around 70-75°F) with plenty of sunlight. If you don’t have a sunny spot, use grow lights. Keep the lights on for about 14-16 hours per day.
6. Keep the soil moist:** Check the soil daily and mist with water as needed to keep it consistently moist but not soggy.
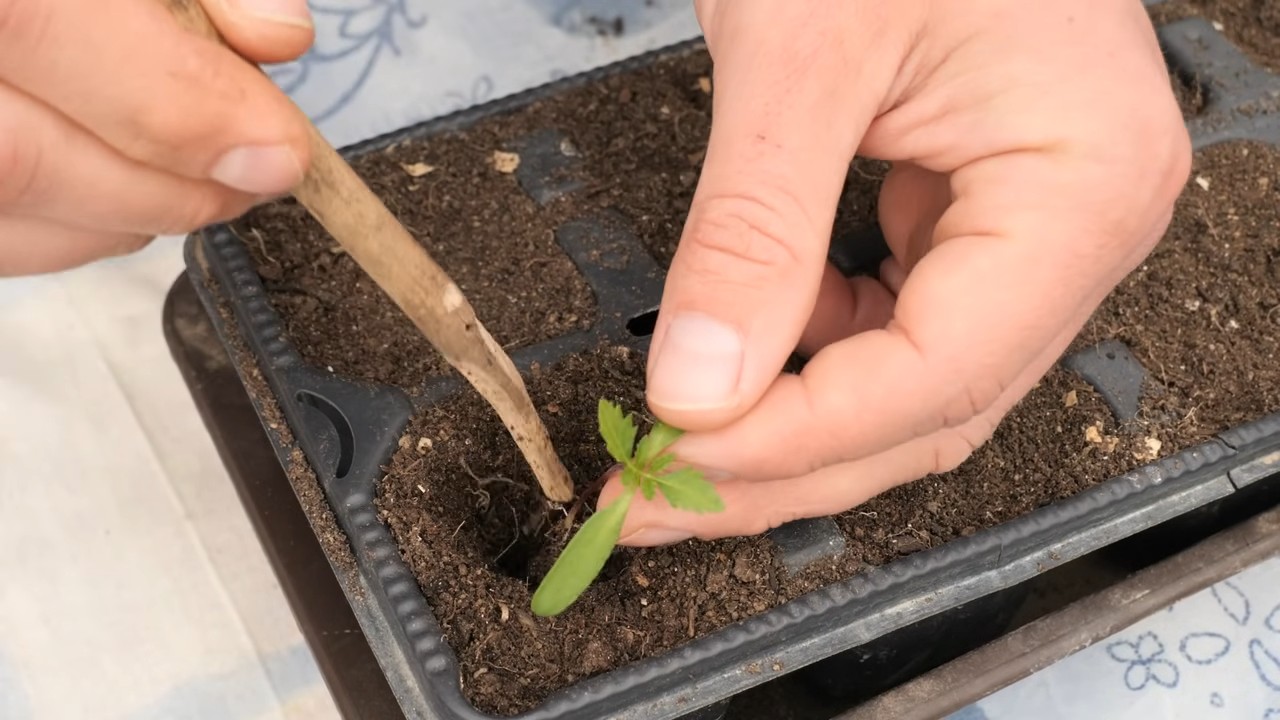
7. Thin the seedlings:** Once the seedlings emerge (usually within 5-10 days) and have their first true leaves (the second set of leaves), thin them out, leaving only the strongest seedling in each cell. To thin, gently snip off the weaker seedlings at the soil line with scissors.
8. Harden off the seedlings:** Before transplanting the seedlings outdoors, you need to “harden them off.” This process gradually acclimates them to outdoor conditions. Start by placing the seedlings outdoors in a sheltered location for a few hours each day, gradually increasing the amount of time they spend outside over the course of a week. Protect them from direct sunlight and strong winds during this process.
Direct Sowing Outdoors
If you live in a warmer climate with a longer growing season, you can sow marigold seeds directly in your garden.
Here’s what you’ll need:
* Marigold seeds
* Garden soil
* Hand trowel
* Watering can
**Step-by-Step Instructions:**
1. **Prepare the soil:** Choose a sunny location with well-drained soil. Loosen the soil with a hand trowel and remove any weeds or debris.
2. **Sow the seeds:** Make shallow furrows (about ¼ inch deep) in the soil. Sow the marigold seeds thinly along the furrows, spacing them about 1-2 inches apart.
3. Cover the seeds:** Gently cover the seeds with a thin layer of soil.
4. Water gently:** Water the soil thoroughly with a watering can.
5. Keep the soil moist:** Keep the soil consistently moist until the seedlings emerge.
6. Thin the seedlings:** Once the seedlings emerge and have their first true leaves, thin them out, spacing them about 8-12 inches apart for French marigolds and 12-18 inches apart for African marigolds.
Transplanting Marigold Seedlings
Once your marigold seedlings have been hardened off (if started indoors) or have grown large enough (if direct sown), it’s time to transplant them into their permanent location in your garden.
Here’s what you’ll need:
* Marigold seedlings
* Garden soil
* Hand trowel
* Watering can
* Optional: Compost or other organic matter
**Step-by-Step Instructions:**
1. **Prepare the planting site:** Choose a sunny location with well-drained soil. Dig holes that are slightly larger than the root balls of your marigold seedlings. Space the holes according to the mature size of the marigold variety you’re planting (8-12 inches apart for French marigolds and 12-18 inches apart for African marigolds).
2. **Amend the soil (optional):** If your soil is poor, amend it with compost or other organic matter to improve drainage and fertility.
3. **Remove the seedlings from their containers:** Gently remove the marigold seedlings from their seed starting trays or pots. Be careful not to damage the roots. If the seedlings are root-bound (the roots are tightly circling the bottom of the pot), gently loosen the roots before planting.
4. **Plant the seedlings:** Place the marigold seedlings in the holes, making sure the top of the root ball is level with the surrounding soil.
5. **Fill in the holes:** Fill in the holes with soil, gently firming the soil around the seedlings.
6. Water thoroughly:** Water the seedlings thoroughly with a watering can.
Caring for Your Marigolds
Now that your marigolds are planted, it’s time to provide them with the care they need to thrive.
* **Sunlight:** Marigolds need at least 6 hours of sunlight per day to bloom profusely.
* **Watering:** Water your marigolds regularly, especially during hot, dry weather. Avoid overwatering, which can lead to root rot. Allow the soil to dry out slightly between waterings.
* **Fertilizing:** Marigolds are not heavy feeders, but they will benefit from occasional fertilization. Use a balanced fertilizer (such as 10-10-10) every 4-6 weeks during the growing season.
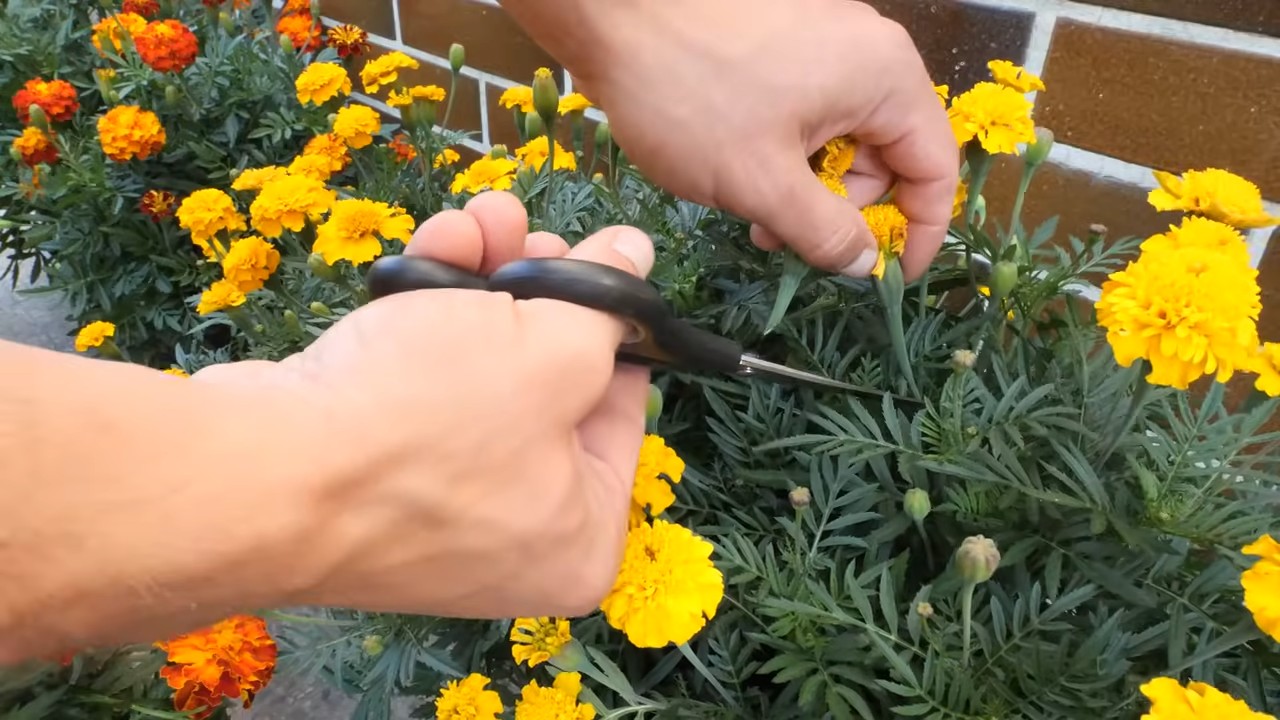
* **Deadheading:** Deadheading (removing spent flowers) encourages marigolds to produce more blooms. Simply pinch or snip off the faded flowers just below the flower head.
* **Pest Control:** Marigolds are relatively pest-resistant, but they can occasionally be bothered by aphids, spider mites, or slugs. If you notice any pests, treat them with insecticidal soap or neem oil.
* **Disease Control:** Marigolds can be susceptible to fungal diseases, such as powdery mildew and botrytis blight, especially in humid conditions. To prevent these diseases, provide good air circulation around the plants and avoid overhead watering. If you notice any signs of disease, treat the plants with a fungicide.
Harvesting Marigold Seeds
If you want to save seeds from your marigolds to plant next year, here’s how:
1. **Allow the flowers to dry on the plant:** Let the flower heads dry completely on the plant. The petals will turn brown and crispy.
2. **Collect the seeds:** Once the flower heads are dry, carefully remove them from the plant.
3. **Separate the seeds:** Gently break apart the flower heads and separate the seeds. Marigold seeds are long and thin, with a papery husk.
4. **Dry the seeds:** Spread the seeds out on a paper towel and let them dry completely for a few days.
5. **Store the seeds:** Store the dried seeds in an airtight container in a cool, dark, and dry place. They should remain viable for several years.
Troubleshooting Common Marigold Problems
Even with the best care, you might encounter some problems with your marigolds. Here are some common issues and how to address them:
*
Conclusion
So, there you have it! Transforming your garden with vibrant, thriving marigolds is not only achievable but also incredibly rewarding. This DIY marigold growing guide has armed you with the knowledge to cultivate these cheerful blooms from seed to stunning display. We’ve explored everything from selecting the perfect variety for your space to nurturing them with the right soil, sunlight, and care.
But why is this DIY approach a must-try? Because it empowers you to take control of your garden’s beauty and health. You’re not just buying flowers; you’re nurturing life, fostering a deeper connection with nature, and creating a personalized oasis that reflects your unique style. Plus, growing your own marigolds is often more cost-effective than purchasing them from a nursery, especially if you plan on using them extensively for companion planting or natural pest control.
Beyond the basics, consider these exciting variations to elevate your marigold game:
* Edible Marigolds: Explore the world of culinary marigolds! Some varieties, like ‘Lemon Gem’ and ‘Tangerine Gem,’ have petals with a citrusy flavor that can add a delightful twist to salads, desserts, and even cocktails. Just be sure to only consume petals from plants grown without pesticides or herbicides.
* Companion Planting Powerhouse: Experiment with different companion planting combinations. Marigolds are known to deter nematodes, aphids, and other pests, making them excellent companions for tomatoes, peppers, basil, and roses. Observe how different pairings affect the health and yield of your plants.
* Marigold Tea: Dry the petals of your organically grown marigolds and steep them in hot water for a soothing and potentially beneficial tea. Marigold tea is believed to have anti-inflammatory and antioxidant properties.
* Natural Dye: Use marigold flowers to create a natural dye for fabrics or yarn. The vibrant yellow and orange pigments can add a unique touch to your crafting projects.
The possibilities are endless! The key is to embrace the learning process, experiment with different techniques, and adapt your approach based on your local climate and growing conditions.
We wholeheartedly encourage you to embark on this DIY marigold growing adventure. It’s a journey filled with beauty, learning, and the satisfaction of creating something truly special with your own hands. Don’t be afraid to get your hands dirty, make mistakes, and celebrate your successes.
And most importantly, we want to hear about your experiences! Share your photos, tips, and challenges in the comments section below. Let’s build a community of passionate marigold growers and inspire each other to create even more vibrant and thriving gardens. What varieties did you choose? What companion planting combinations did you try? What challenges did you face, and how did you overcome them? Your insights can help other gardeners succeed and contribute to our collective knowledge. So, go forth, plant your seeds, and let the marigold magic begin!
Frequently Asked Questions (FAQ)
What is the best time to start marigold seeds indoors?
Starting marigold seeds indoors typically begins 6-8 weeks before the last expected frost in your area. This allows the seedlings to develop a strong root system before being transplanted outdoors. Check your local frost dates to determine the optimal time for sowing. You can also directly sow marigold seeds outdoors after the danger of frost has passed, but starting them indoors gives them a head start and extends the blooming season.
How much sunlight do marigolds need?
Marigolds thrive in full sun, requiring at least 6-8 hours of direct sunlight per day. Insufficient sunlight can lead to leggy growth, fewer blooms, and increased susceptibility to diseases. Choose a planting location that receives ample sunlight throughout the day. If you’re growing marigolds indoors, provide supplemental lighting if necessary.
What type of soil is best for growing marigolds?
Marigolds prefer well-draining soil that is rich in organic matter. Amend heavy clay soil with compost or other organic amendments to improve drainage and aeration. A slightly acidic to neutral soil pH (around 6.0-7.0) is ideal. You can test your soil pH using a soil testing kit and adjust it accordingly. Avoid overly fertile soil, as this can promote excessive foliage growth at the expense of blooms.
How often should I water my marigolds?
Water marigolds deeply but infrequently, allowing the soil to dry out slightly between waterings. Overwatering can lead to root rot and other fungal diseases. Water at the base of the plants to avoid wetting the foliage, which can also contribute to disease problems. During hot, dry weather, you may need to water more frequently.
Do marigolds need fertilizer?
Marigolds are not heavy feeders and generally do not require frequent fertilization. However, a light feeding with a balanced fertilizer (e.g., 10-10-10) at planting time can help promote healthy growth and abundant blooms. Avoid over-fertilizing, as this can lead to excessive foliage growth and fewer flowers. You can also amend the soil with compost or other organic matter to provide slow-release nutrients.
How do I deadhead marigolds?
Deadheading is the process of removing spent or faded flowers to encourage continued blooming. To deadhead marigolds, simply pinch or cut off the flower heads just below the flower, at the next set of leaves. Regular deadheading will prevent the plants from putting energy into seed production and will encourage them to produce more flowers.
Are marigolds susceptible to any pests or diseases?
Marigolds are generally pest-resistant, but they can occasionally be affected by aphids, spider mites, or powdery mildew. Inspect your plants regularly for signs of pests or diseases and take action promptly. Aphids and spider mites can be controlled with insecticidal soap or neem oil. Powdery mildew can be prevented by providing good air circulation and avoiding overhead watering.
Can I save marigold seeds for next year?
Yes, you can save marigold seeds for planting next year. Allow the flower heads to dry completely on the plant. Once they are dry and brown, carefully remove the seeds from the flower heads. Store the seeds in a cool, dry place in an airtight container. Be aware that hybrid marigolds may not produce true-to-type seeds, meaning the offspring may not have the same characteristics as the parent plant.
Are all marigolds edible?
Not all marigolds are edible. Only certain varieties, such as ‘Lemon Gem’ and ‘Tangerine Gem,’ have petals with a citrusy flavor that can be used in culinary applications. It’s crucial to only consume petals from plants grown without pesticides or herbicides. If you’re unsure about the edibility of a particular variety, it’s best to err on the side of caution and avoid consuming it.
How can I use marigolds for companion planting?
Marigolds are excellent companion plants for a variety of vegetables and flowers. They are known to deter nematodes, aphids, and other pests, making them beneficial for tomatoes, peppers, basil, roses, and other plants. Plant marigolds around the perimeter of your garden or interplant them with other crops to provide natural pest control. The strong scent of marigolds also helps to mask the scent of other plants, making them less attractive to pests.


Leave a Comment