

Bell pepper growing tips are what every home gardener craves, especially when staring at those sad, stunted peppers in their garden! Let’s be honest, there’s nothing quite as satisfying as biting into a crisp, juicy bell pepper you’ve nurtured from seed to harvest. But sometimes, getting those vibrant, flavorful peppers can feel like an uphill battle.
For centuries, bell peppers have been a staple in cuisines worldwide, adding color and zest to dishes from the Americas to Europe and Asia. Their journey from the New World to global culinary icon is a testament to their adaptability and deliciousness. But even with their long history, mastering bell pepper cultivation can be tricky. That’s where these DIY tricks and hacks come in!
I’ve been there, trust me! I’ve battled blossom-end rot, wrestled with pests, and wondered why my peppers were stubbornly refusing to ripen. That’s why I’ve compiled this collection of tried-and-true bell pepper growing tips and DIY solutions to help you achieve a bountiful harvest. Whether you’re a seasoned gardener or just starting out, these simple yet effective techniques will empower you to grow the best bell peppers you’ve ever tasted. Get ready to transform your garden into a pepper paradise!

Growing Bell Peppers Like a Pro: My DIY Guide to a Bountiful Harvest
Okay, so you want to grow bell peppers? Awesome! They’re delicious, versatile, and surprisingly rewarding to cultivate yourself. I’ve been tinkering with pepper plants for years, and I’ve learned a few tricks along the way. This guide is all about sharing those secrets so you can enjoy a bumper crop of colorful, crunchy bell peppers right from your own garden (or even your patio!).
Choosing the Right Bell Pepper Variety
First things first, let’s talk varieties. Not all bell peppers are created equal! Some are better suited for certain climates, and some mature faster than others. Here’s a quick rundown of some popular choices:
* California Wonder: This is your classic, all-purpose bell pepper. It’s reliable, produces large, blocky fruits, and is relatively easy to grow.
* Yolo Wonder: Similar to California Wonder, but often more disease-resistant. A great choice if you’ve had problems with pepper diseases in the past.
* Ace: A fast-maturing variety, perfect for shorter growing seasons. The fruits are a bit smaller than California Wonder, but still delicious.
* Golden Bell: A beautiful yellow bell pepper that adds a splash of color to your garden and your plate.
* Purple Beauty: Another visually stunning option. The peppers start out green and turn a deep purple as they mature.
* Mini Bell Peppers: These are adorable and perfect for snacking! They come in a variety of colors and are great for container gardening.
Consider your climate and growing space when making your selection. If you live in a cooler region, opt for a faster-maturing variety like Ace. If you have plenty of space, go for a larger variety like California Wonder.
Starting Your Bell Pepper Plants
You have two main options here: starting from seed or buying transplants. I usually start from seed because it gives me more control over the process and allows me to choose from a wider variety of peppers. But buying transplants is perfectly fine, especially if you’re short on time or space.
Starting from Seed (My Preferred Method!)
1. Gather Your Supplies: You’ll need bell pepper seeds, seed starting trays or small pots, seed starting mix (a light, sterile potting mix), a heat mat (optional, but helpful), and a grow light (also optional, but highly recommended).
2. Sow the Seeds: Fill your seed starting trays or pots with seed starting mix. Moisten the mix thoroughly. Plant the seeds about 1/4 inch deep, placing 2-3 seeds per cell or pot.
3. Provide Warmth and Light: Bell pepper seeds need warmth to germinate. Place the trays or pots on a heat mat if you have one. Cover them with a clear plastic dome or plastic wrap to create a humid environment. Place the trays or pots under a grow light or in a very sunny window.
4. Keep the Soil Moist: Check the soil moisture daily and water gently when the top inch feels dry. Avoid overwatering, which can lead to damping off (a fungal disease that kills seedlings).
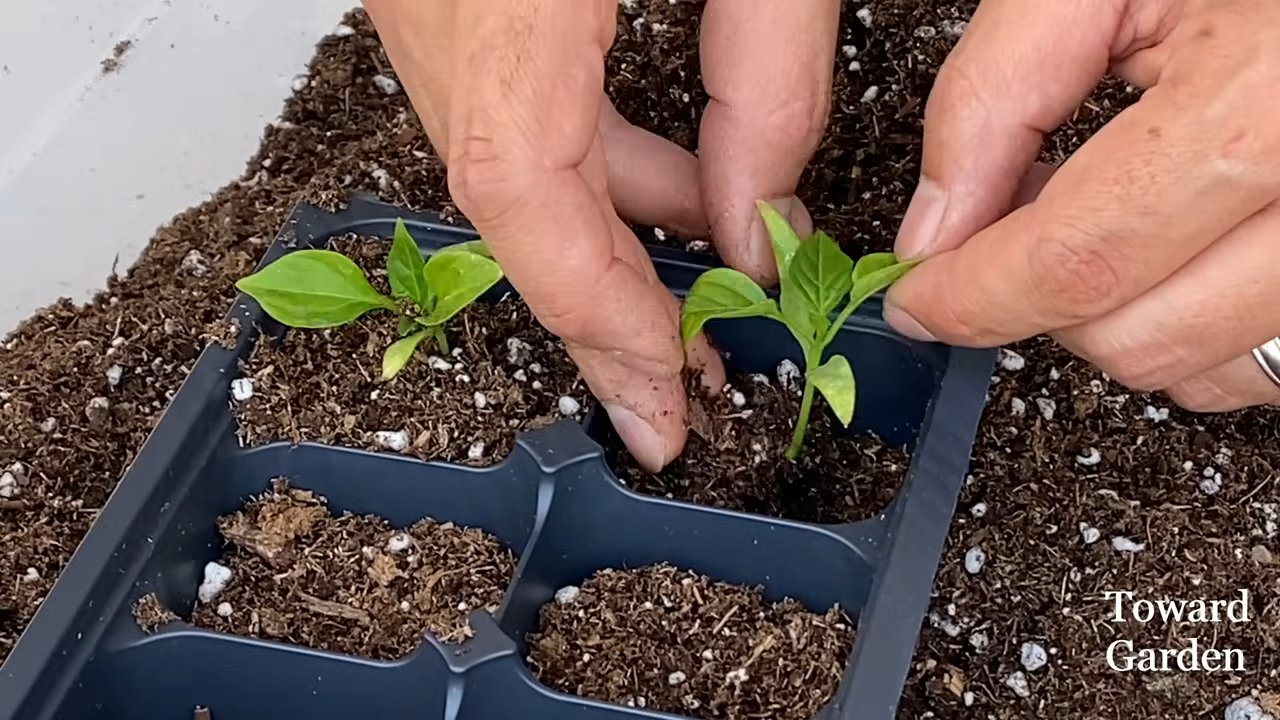
5. Thin the Seedlings: Once the seedlings have their first true leaves (the second set of leaves), thin them to one plant per cell or pot. Choose the strongest, healthiest-looking seedling and snip off the others at the soil line.
6. Harden Off the Seedlings: About a week before you plan to transplant the seedlings outdoors, you need to “harden them off.” This means gradually exposing them to outdoor conditions to acclimate them to the sun, wind, and temperature changes. Start by placing them outdoors in a sheltered location for an hour or two each day, gradually increasing the amount of time they spend outside.
Buying Transplants
1. Choose Healthy Plants: Look for plants that are about 6-8 inches tall, with sturdy stems and healthy green leaves. Avoid plants that are leggy (tall and spindly), yellowed, or have any signs of pests or diseases.
2. Check the Roots: Gently remove a plant from its container and inspect the roots. They should be white or light brown and well-developed, but not root-bound (tightly circling the pot).
Transplanting Your Bell Pepper Plants
Whether you started from seed or bought transplants, the transplanting process is the same.
1. Choose a Sunny Location: Bell peppers need at least 6-8 hours of sunlight per day. Choose a location in your garden that gets plenty of sun.
2. Prepare the Soil: Bell peppers prefer well-drained soil that is rich in organic matter. Amend the soil with compost or well-rotted manure before planting.
3. Space the Plants Properly: Space the plants about 18-24 inches apart in rows that are 24-36 inches apart. This will give them enough room to grow and prevent overcrowding.
4. Dig the Holes: Dig holes that are slightly larger than the root balls of the plants.
5. Transplant the Plants: Gently remove the plants from their containers and loosen the roots slightly. Place the plants in the holes and backfill with soil. Water thoroughly.
6. Mulch Around the Plants: Apply a layer of mulch around the plants to help retain moisture, suppress weeds, and regulate soil temperature. I like to use straw or shredded leaves.
Caring for Your Bell Pepper Plants
Once your bell pepper plants are in the ground, it’s time to give them the TLC they need to thrive.
1. Water Regularly: Bell peppers need consistent moisture, especially during hot, dry weather. Water deeply whenever the top inch of soil feels dry. Avoid overhead watering, which can promote fungal diseases. Drip irrigation or soaker hoses are ideal.
2. Fertilize Regularly: Bell peppers are heavy feeders, so they need regular fertilization. Use a balanced fertilizer (e.g., 10-10-10) every 2-3 weeks. You can also use organic fertilizers like compost tea or fish emulsion.
3. Provide Support: As the plants grow and the peppers get heavier, they may need support to prevent them from falling over. Use stakes or cages to support the plants.
4. Prune Your Plants (Optional): Some gardeners like to prune their bell pepper plants to encourage bushier growth and more fruit production. You can remove suckers (small shoots that grow from the base of the plant) and any yellowed or diseased leaves. I usually don’t prune too heavily, as the leaves help protect the peppers from sunburn.
5. Watch Out for Pests and Diseases: Bell peppers can be susceptible to a variety of pests and diseases, including aphids, flea beetles, blossom-end rot, and fungal diseases. Inspect your plants regularly and take action if you see any problems. Insecticidal soap or neem oil can be used to control many common pests. For fungal diseases, use a copper-based fungicide. Blossom-end rot is caused by a calcium deficiency, so make sure your soil has enough calcium and water consistently.
Harvesting Your Bell Peppers
The moment you’ve been waiting for! Harvesting your own homegrown bell peppers is incredibly satisfying.
1. Know When to Harvest: Bell peppers can be harvested at any stage of maturity, but they are sweetest and most flavorful when they are fully ripe. Green bell peppers are unripe, while red, yellow, and orange bell peppers are fully ripe.
2. Use Pruning Shears or a Knife: Cut the peppers from the plant using pruning shears or a sharp knife. Leave a short stem attached to the pepper.
3. Store Properly: Bell peppers can be stored in the refrigerator for up to a week.
Troubleshooting Common Bell Pepper Problems
Even with the best care, you might encounter some problems along the way. Here are a few common issues and how to address them:
* Blossom-End Rot: This is a common problem that causes the bottom of the pepper to rot. It’s usually caused by a calcium deficiency or inconsistent watering. Make sure your soil has enough calcium and water consistently. You can also use a calcium spray.
* Sunscald: This occurs when the peppers are exposed to too much direct sunlight, causing them to develop white or brown patches. Provide shade for the peppers during the hottest part of the day.
* Aphids: These tiny insects can suck the sap from your plants, causing them to weaken and become distorted. Spray the plants with insecticidal soap or neem oil.
* Flea Beetles: These small beetles can chew holes in the leaves of your plants. Cover the plants with row covers or spray them with insecticidal soap or neem oil.
* Fungal Diseases: These can cause spots on the leaves and fruit. Improve air circulation around the plants and use a copper-based fungicide.
My Secret Weapon: Epsom Salts!
Okay, this is my little secret weapon for supercharging my bell pepper plants. I like to give them a boost with Epsom salts (magnesium sulfate). Magnesium is essential for
Conclusion
So, there you have it – a simple, effective, and incredibly rewarding way to boost your bell pepper harvest. Growing bell peppers can sometimes feel like a waiting game, but with these targeted tips, you’re equipping yourself with the knowledge to nurture thriving plants and enjoy a bountiful yield. This isn’t just about growing bell peppers; it’s about connecting with the process, understanding the needs of your plants, and reaping the delicious rewards of your labor.
Why is this a must-try? Because it addresses the most common challenges faced by bell pepper growers: slow growth, blossom drop, and small, lackluster fruits. By implementing these strategies, you’re actively tackling these issues head-on, creating an environment where your bell pepper plants can flourish. Imagine the satisfaction of harvesting vibrant, juicy bell peppers from your own garden, knowing that you played an active role in their success.
But don’t stop there! Experiment with different variations to find what works best for your specific climate and soil conditions. For example, if you live in a particularly hot climate, consider providing your bell pepper plants with some afternoon shade to prevent sunscald. You could also try companion planting with basil or marigolds, which are known to deter pests and attract beneficial insects. Another variation is to experiment with different types of fertilizers. While a balanced fertilizer is generally recommended, you might find that your plants respond particularly well to a fertilizer higher in phosphorus, which promotes flowering and fruit development.
Remember, gardening is a journey of learning and discovery. Don’t be afraid to try new things, observe your plants closely, and adjust your approach as needed. The key is to be patient, persistent, and passionate about the process.
We wholeheartedly encourage you to try these bell pepper growing tips and witness the difference they can make in your garden. Whether you’re a seasoned gardener or a complete beginner, these techniques are accessible and easy to implement. The reward of fresh, homegrown bell peppers is well worth the effort.
And most importantly, we want to hear about your experience! Share your successes, your challenges, and any variations you’ve tried in the comments below. Let’s create a community of bell pepper enthusiasts, sharing our knowledge and helping each other grow the best bell peppers possible. Your insights could be invaluable to other gardeners, and together, we can all achieve bell pepper growing success. So, get out there, get your hands dirty, and start growing those amazing bell peppers! Let us know how these **bell pepper growing tips** worked for you!
Frequently Asked Questions (FAQ)
Why are my bell pepper plants not producing any peppers?
This is a common concern! Several factors can contribute to a lack of pepper production. First, ensure your plants are getting enough sunlight – at least 6-8 hours of direct sunlight per day is crucial. Insufficient sunlight can significantly hinder fruit development. Second, check your soil. Bell peppers need well-draining soil that is rich in organic matter. A soil test can help you determine if your soil is lacking any essential nutrients. Third, consider the temperature. Bell peppers thrive in warm temperatures (70-85°F during the day and 60-70°F at night). If temperatures are consistently too hot or too cold, it can affect fruit set. Finally, make sure you’re providing adequate water and fertilizer. Overwatering or underwatering can stress the plants and prevent them from producing peppers. Use a balanced fertilizer specifically formulated for vegetables, following the instructions on the label.
How often should I water my bell pepper plants?
Watering frequency depends on several factors, including the weather, soil type, and the size of your plants. As a general rule, water deeply and thoroughly when the top inch of soil feels dry to the touch. Avoid overwatering, as this can lead to root rot. During hot, dry weather, you may need to water daily. In cooler, wetter weather, you may only need to water every few days. A good way to check is to stick your finger into the soil near the base of the plant. If it feels dry, it’s time to water. Consider using a soaker hose or drip irrigation system to deliver water directly to the roots, minimizing water loss through evaporation.
What kind of fertilizer should I use for bell pepper plants?
Bell peppers benefit from a balanced fertilizer with a slightly higher phosphorus content. Look for a fertilizer with an NPK ratio (nitrogen, phosphorus, potassium) of something like 5-10-5 or 10-20-10. Phosphorus is essential for flowering and fruit development. Avoid fertilizers that are too high in nitrogen, as this can promote excessive foliage growth at the expense of fruit production. You can also amend your soil with compost or other organic matter to provide a slow-release source of nutrients. Apply fertilizer according to the instructions on the label, typically every 2-3 weeks during the growing season.
How do I prevent blossom drop in bell pepper plants?
Blossom drop, where the flowers fall off the plant before setting fruit, is a frustrating problem. Several factors can cause blossom drop, including temperature extremes, insufficient pollination, and nutrient deficiencies. To prevent blossom drop, ensure your plants are getting adequate sunlight, water, and fertilizer. Avoid overwatering or underwatering. If temperatures are consistently above 90°F or below 55°F, provide shade or protection to your plants. You can also try gently shaking the plants to encourage pollination. In some cases, blossom drop can be caused by a lack of calcium. Consider adding calcium to the soil by incorporating bone meal or crushed eggshells.
Are there any common pests or diseases that affect bell pepper plants?
Yes, bell pepper plants can be susceptible to various pests and diseases. Common pests include aphids, whiteflies, spider mites, and pepper weevils. These pests can damage the leaves and fruits of your plants. To control pests, you can use insecticidal soap, neem oil, or other organic pesticides. Regularly inspect your plants for signs of infestation. Common diseases include blossom-end rot, fungal leaf spots, and viral diseases. Blossom-end rot is caused by a calcium deficiency and can be prevented by ensuring adequate calcium in the soil. Fungal leaf spots can be treated with fungicides. Viral diseases are often spread by insects, so controlling pests is essential for preventing these diseases. Choose disease-resistant varieties of bell peppers whenever possible.
Can I grow bell peppers in containers?
Absolutely! Bell peppers grow well in containers, making them a great option for gardeners with limited space. Choose a container that is at least 12 inches in diameter and has good drainage holes. Use a high-quality potting mix that is well-draining and rich in organic matter. Provide your container-grown bell peppers with plenty of sunlight, water, and fertilizer. You may need to water more frequently than you would for plants grown in the ground, as containers tend to dry out more quickly. Consider using a self-watering container to help maintain consistent moisture levels.
How long does it take for bell peppers to mature?
The time it takes for bell peppers to mature depends on the variety and growing conditions. Generally, it takes about 60-80 days from transplanting to harvest. Green bell peppers can be harvested when they are firm and fully sized, even if they haven’t fully changed color. Colored bell peppers (red, yellow, orange) will take longer to mature and will develop their color as they ripen. Allow the peppers to ripen fully on the plant for the best flavor and sweetness.
What are some good companion plants for bell peppers?
Companion planting can be a great way to improve the health and productivity of your bell pepper plants. Some good companion plants for bell peppers include basil, marigolds, carrots, onions, and garlic. Basil repels pests and attracts beneficial insects. Marigolds deter nematodes and other soil pests. Carrots and onions can help to loosen the soil and improve drainage. Garlic can repel aphids and other pests. Avoid planting bell peppers near fennel, as it can inhibit their growth.
How do I save seeds from my bell peppers?
Saving seeds from your bell peppers is a great way to preserve your favorite varieties and save money. To save seeds, allow the peppers to ripen fully on the plant until they are soft and slightly wrinkled. Cut the pepper open and remove the seeds. Rinse the seeds thoroughly to remove any pulp. Spread the seeds out on a paper towel to dry completely. Once the seeds are dry, store them in an airtight container in a cool, dark, and dry place. Be aware that if you are growing hybrid varieties, the seeds may not produce plants that are true to type.

Leave a Comment