

Grow Angled Luffa Easily and transform your garden into a source of natural sponges! Have you ever imagined growing your own bath scrubbies right in your backyard? It sounds like something out of a fairytale, doesn’t it? But trust me, it’s totally achievable, and I’m here to show you how with some simple DIY tricks and hacks.
The Luffa, also known as the sponge gourd, has a fascinating history. Originating in Asia and Africa, it’s been used for centuries not just for bathing, but also for cleaning, crafting, and even as a food source when young! Imagine, a plant that provides both a delicious vegetable and a sustainable cleaning tool. How cool is that?
But why should you bother learning to grow angled luffa easily? Well, for starters, you’ll be reducing your reliance on synthetic sponges, which are often made from harmful plastics. Plus, growing your own luffa is incredibly rewarding. There’s nothing quite like the satisfaction of harvesting a sponge you nurtured from a tiny seed. And let’s be honest, who wouldn’t want to impress their friends with their gardening prowess? I know I would!
This article is packed with easy-to-follow DIY tips and tricks that will help you cultivate a thriving luffa crop, even if you’re a complete beginner. So, grab your gardening gloves, and let’s get started on this exciting journey to homegrown sponges!
Grow Angled Luffa (Chinese Okra) Easily: A DIY Guide
Hey there, fellow gardening enthusiasts! I’m so excited to share my experience and tips on growing angled luffa, also known as Chinese okra, in your own backyard. It’s a rewarding experience, and you’ll be amazed at how easy it is to cultivate these delicious and versatile vegetables. Plus, you get a natural sponge at the end! Let’s dive in!
What You’ll Need
Before we get started, let’s gather all the necessary materials. Trust me, having everything ready beforehand will make the process much smoother.
* Angled Luffa Seeds: You can find these online or at your local garden center. Make sure they are from a reputable source for better germination rates.
* Seed Starting Trays or Small Pots: These are essential for starting your seeds indoors.
* Seed Starting Mix: A light and airy mix specifically designed for seed germination.
* Grow Lights (Optional but Recommended): If you’re starting seeds indoors, grow lights will provide the necessary light for healthy seedlings.
* Trowel or Small Shovel: For transplanting seedlings.
* Garden Gloves: To protect your hands.
* Well-Draining Soil: Luffa plants thrive in rich, well-draining soil. Amend your garden soil with compost or aged manure if needed.
* Compost or Aged Manure: To enrich the soil and provide essential nutrients.
* Trellis or Sturdy Support Structure: Luffa vines are vigorous climbers and need strong support.
* Watering Can or Hose: For regular watering.
* Fertilizer (Optional): A balanced fertilizer can help boost growth and fruit production.
* Pruning Shears or Scissors: For pruning and harvesting.
Starting Your Luffa Seeds
Luffa seeds have a tough outer shell, so scarification and pre-soaking are crucial for successful germination. I’ve found these steps make a huge difference!
1. Scarify the Seeds: Gently rub the seeds with sandpaper or nick them with a knife. This helps water penetrate the seed coat. Be careful not to damage the inner seed.
2. Soak the Seeds: Place the scarified seeds in a glass of warm water for 24-48 hours. This will further soften the seed coat and encourage germination. Change the water every 12 hours.
3. Prepare Seed Starting Trays: Fill your seed starting trays or small pots with seed starting mix. Moisten the mix thoroughly.
4. Sow the Seeds: Plant the soaked seeds about 1 inch deep in the prepared trays or pots.
5. Provide Warmth and Light: Luffa seeds need warmth to germinate. Place the trays in a warm location, such as on top of a refrigerator or using a heat mat. If you’re using grow lights, position them a few inches above the trays.
6. Maintain Moisture: Keep the seed starting mix consistently moist but not waterlogged. Use a spray bottle to gently mist the soil.
7. Wait for Germination: Germination usually takes 7-14 days. Be patient and keep an eye on your trays.
Transplanting Your Luffa Seedlings
Once your seedlings have developed a few sets of true leaves (the leaves that look like miniature versions of the adult plant’s leaves), it’s time to transplant them into your garden.
1. Harden Off the Seedlings: Before transplanting, gradually acclimate your seedlings to outdoor conditions. Start by placing them outside for a few hours each day, increasing the time each day for about a week. This process is called “hardening off” and helps prevent transplant shock.
2. Prepare the Garden Bed: Choose a sunny location with well-draining soil. Amend the soil with compost or aged manure to improve fertility.
3. Install the Trellis: Luffa vines need a strong trellis or support structure to climb. Make sure it’s securely in place before transplanting. I’ve used everything from cattle panels to sturdy fences.
4. Transplant the Seedlings: Dig holes slightly larger than the root balls of your seedlings. Gently remove the seedlings from their trays or pots and place them in the holes. Backfill with soil and water thoroughly. Space the seedlings about 2-3 feet apart.
5. Mulch Around the Plants: Apply a layer of mulch around the base of the plants to help retain moisture and suppress weeds.
Caring for Your Luffa Plants
Luffa plants are relatively easy to care for, but they do require regular watering, fertilizing, and pruning.
1. Watering: Water your luffa plants deeply and regularly, especially during hot, dry weather. Aim to keep the soil consistently moist but not waterlogged.
2. Fertilizing: Fertilize your luffa plants every 2-3 weeks with a balanced fertilizer. Follow the instructions on the fertilizer package. You can also side-dress with compost or aged manure.
3. Pruning: Prune your luffa vines to encourage branching and fruit production. Remove any yellowing or dead leaves. You can also pinch off the tips of the vines to promote lateral growth.
4. Pollination: Luffa plants produce both male and female flowers. The female flowers have a small luffa fruit behind them. If you’re not seeing fruit develop, you may need to hand-pollinate the flowers. To do this, use a small paintbrush to transfer pollen from the male flowers to the female flowers. The best time to hand-pollinate is in the morning.
5. Pest and Disease Control: Luffa plants are generally pest and disease resistant, but they can be susceptible to aphids, squash bugs, and powdery mildew. Inspect your plants regularly and take action if you notice any problems. You can use insecticidal soap or neem oil to control pests. For powdery mildew, improve air circulation and apply a fungicide if necessary.
Harvesting Your Luffa
Harvesting luffa is the most rewarding part of the process! You can harvest luffa at different stages depending on how you want to use it.
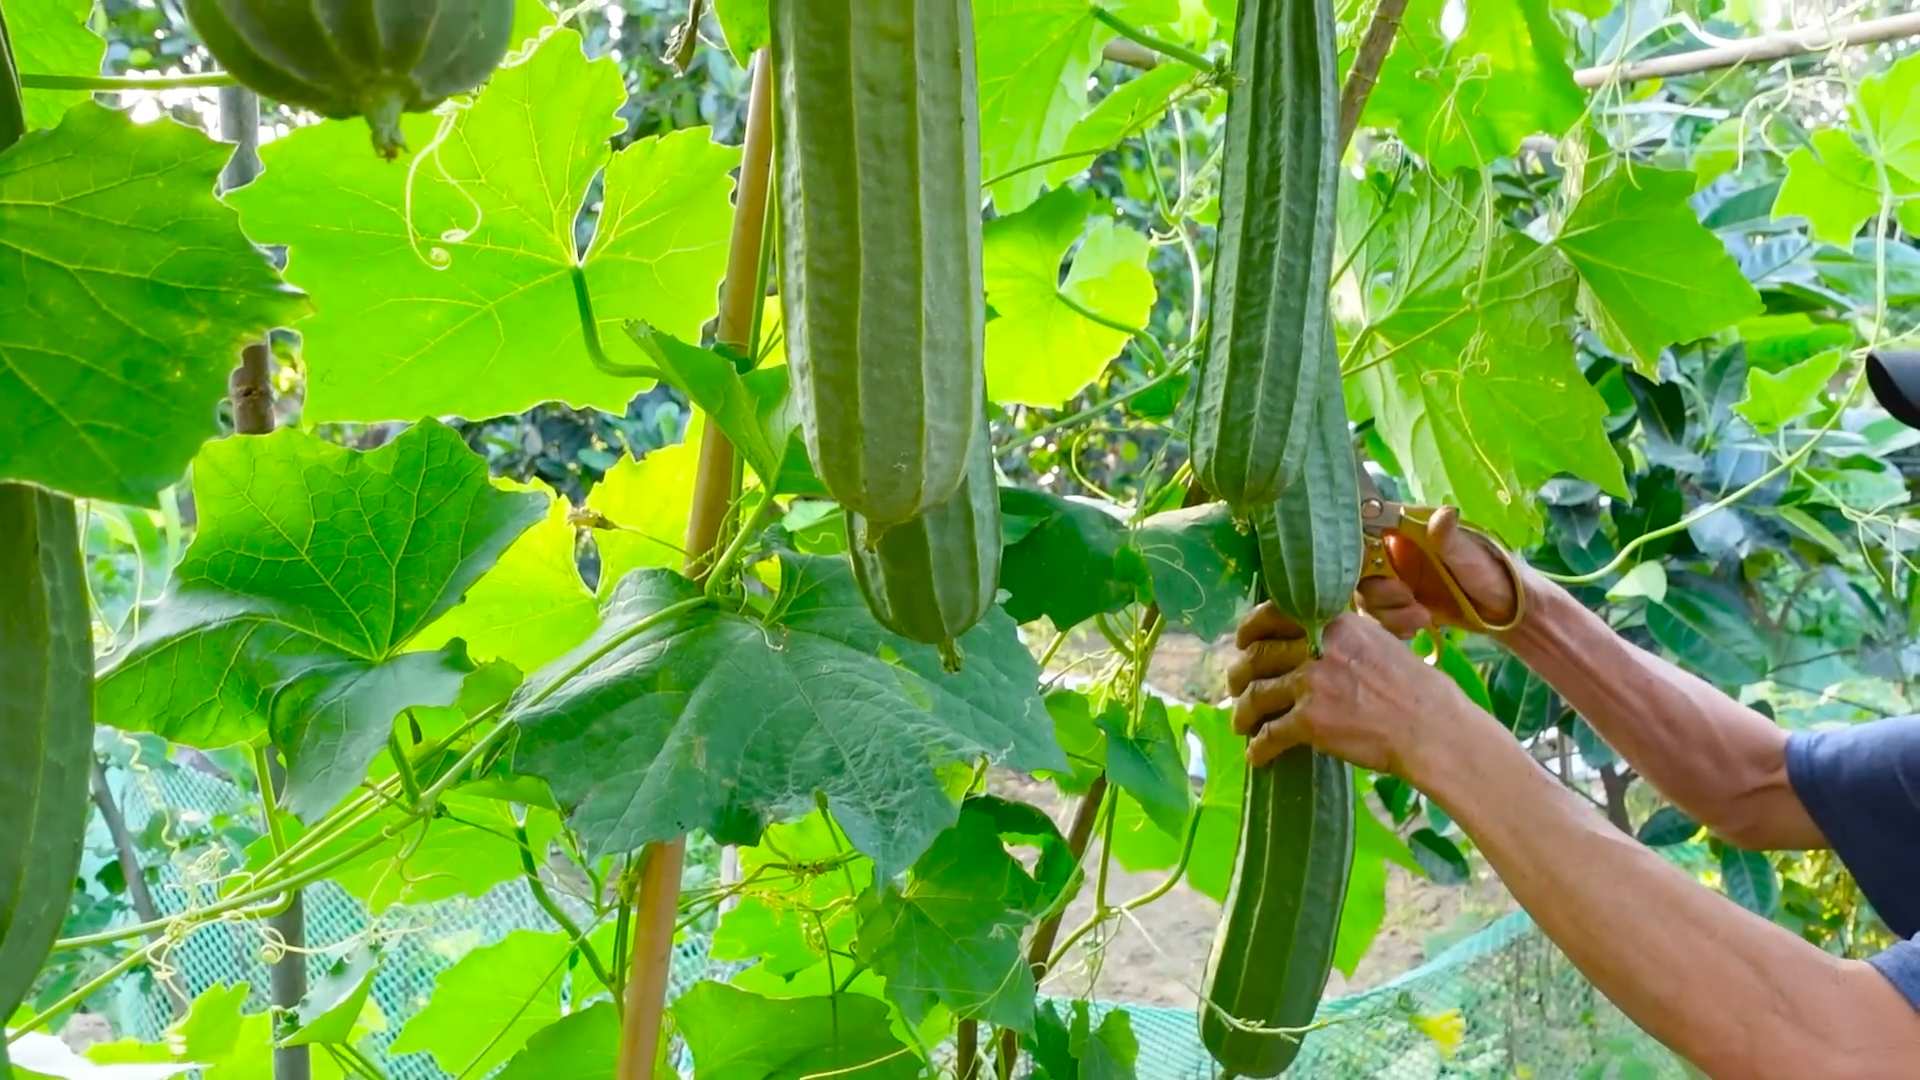
1. Harvesting for Eating: For eating, harvest the luffa when it’s young and tender, about 6-8 inches long. The skin should be smooth and green. You can use a knife or pruning shears to cut the luffa from the vine.
2. Harvesting for Sponges: For sponges, allow the luffa to mature on the vine until the skin turns brown and dry. The luffa will feel light and hollow.
3. Processing Luffa Sponges: Once the luffa is dry, cut it from the vine. Soak it in water for a few days to loosen the skin. Then, peel off the skin and shake out the seeds. Rinse the luffa thoroughly and allow it to dry completely. You can bleach the luffa if you want a lighter color.
Using Your Angled Luffa
Angled luffa is incredibly versatile! You can use it in a variety of ways, both in the kitchen and around the house.
* Culinary Uses: Young luffa can be used in stir-fries, soups, stews, and curries. It has a mild, slightly sweet flavor.
* Natural Sponges: Mature luffa can be used as a natural sponge for bathing, washing dishes, or scrubbing surfaces.
* Craft Projects: Luffa can be used in a variety of craft projects, such as soaps, bath bombs, and exfoliating scrubs.
* Composting: Luffa scraps and seeds can be added to your compost pile.
Troubleshooting
Even with the best care, you might encounter some challenges when growing luffa. Here are a few common problems and how to address them:
* Poor Germination: If your seeds aren’t germinating, make sure they are warm enough and have enough moisture. You can also try scarifying and soaking the seeds for a longer period.
* Slow Growth: If your plants are growing slowly, make sure they are getting enough sunlight, water, and fertilizer.
* Lack of Fruit: If your plants aren’t producing fruit, you may need to hand-pollinate the flowers.
* Pest Problems: If you’re dealing with pests, use insecticidal soap or neem oil to control them.
* Disease Problems: If you’re dealing with diseases, improve air circulation and apply a fungicide if necessary.
Final Thoughts
Growing angled luffa is a fun and rewarding experience. With a little bit of care and attention, you can enjoy fresh, delicious vegetables and natural sponges from your own backyard. So, get out there and start planting! Happy gardening!

Conclusion
So, there you have it! Growing angled luffa, while it might seem daunting at first, is a remarkably rewarding experience, especially when you embrace this simple yet effective DIY trick. We’ve walked you through a method that not only simplifies the germination process but also significantly increases your chances of a bountiful harvest. Forget struggling with inconsistent sprouting and embrace the joy of watching your luffa seeds transform into thriving seedlings, ready to climb and produce those amazing, naturally exfoliating sponges.
Why is this DIY trick a must-try? Because it addresses the most common challenges faced by luffa growers: slow and uneven germination. By pre-soaking and providing a warm, humid environment, you’re essentially giving your seeds the perfect head start. This translates to faster growth, healthier plants, and ultimately, more luffa sponges for you to enjoy. Think of it as a little boost of confidence for your seeds, ensuring they have the best possible chance of success.
But the beauty of gardening lies in experimentation! Feel free to adapt this method to suit your specific needs and environment. For instance, if you live in a particularly dry climate, you might consider using a slightly thicker paper towel or even adding a humidity dome over your seed tray to retain moisture. Alternatively, if you’re short on space, you can start your seeds in individual peat pots, eliminating the need for transplanting later on.
Consider these variations to further enhance your angled luffa growing experience:
* Compost Tea Boost: Once your seedlings have developed their first true leaves, give them a gentle boost with diluted compost tea. This will provide them with essential nutrients and promote strong, healthy growth.
* Vertical Support System: Angled luffa vines are vigorous climbers, so make sure you have a sturdy trellis or support system in place. A strong fence, pergola, or even a custom-built trellis will work wonders.
* Companion Planting: Plant companion plants like marigolds or basil near your luffa vines to deter pests and attract beneficial insects. This is a natural and effective way to protect your crop.
* Succession Planting: To extend your harvest season, consider succession planting. Sow new seeds every few weeks to ensure a continuous supply of luffa sponges.
We are incredibly confident that this DIY trick will revolutionize your angled luffa growing journey. It’s a game-changer that simplifies the process and maximizes your chances of success. Don’t just take our word for it, though! We wholeheartedly encourage you to try this method for yourself and witness the difference it makes.
And most importantly, we want to hear about your experiences! Share your successes, challenges, and any variations you’ve tried in the comments below. Let’s create a community of luffa enthusiasts, sharing knowledge and helping each other grow the best possible crop. Your insights could be invaluable to other gardeners embarking on their own luffa-growing adventures. So, grab your seeds, gather your supplies, and get ready to experience the joy of growing your own angled luffa sponges! Happy gardening!
Frequently Asked Questions (FAQ)
What exactly is angled luffa, and why should I grow it?
Angled luffa (Luffa acutangula), also known as Chinese okra or ridged gourd, is a vining plant that produces edible fruits when young and fibrous sponges when mature. Growing your own angled luffa offers several benefits: you get fresh, delicious vegetables, sustainable and eco-friendly sponges, and the satisfaction of cultivating your own natural products. Plus, it’s a fun and rewarding gardening project!
How long does it take for angled luffa to germinate using this DIY trick?
Typically, with this method, you should see germination within 3-7 days. However, factors like seed quality, temperature, and humidity can influence the germination time. If you don’t see any sprouts after a week, consider trying a new batch of seeds or adjusting the temperature and humidity levels.
What is the ideal temperature for germinating angled luffa seeds?
Angled luffa seeds prefer warm temperatures for optimal germination. Aim for a consistent temperature range of 75-85°F (24-29°C). You can use a heat mat to provide bottom heat if your ambient temperature is cooler.
Can I use regular tap water for soaking the seeds?
Yes, you can use regular tap water for soaking the seeds. However, if your tap water is heavily chlorinated, it’s best to use filtered or dechlorinated water.
How often should I check the paper towels to ensure they stay moist?
Check the paper towels at least once a day, and more frequently if you live in a dry climate. The paper towels should be consistently moist but not soaking wet. If they start to dry out, gently mist them with water.
What type of soil is best for growing angled luffa?
Angled luffa thrives in well-drained, fertile soil that is rich in organic matter. Amend your soil with compost or well-rotted manure before planting to improve its fertility and drainage. A slightly acidic to neutral pH (6.0-7.0) is ideal.
How much sunlight does angled luffa need?
Angled luffa requires at least 6-8 hours of direct sunlight per day to thrive. Choose a sunny location in your garden where the plants will receive ample sunlight.
When is the best time to plant angled luffa seedlings outdoors?
Transplant your angled luffa seedlings outdoors after the last frost has passed and the soil has warmed up. Make sure the seedlings have developed several true leaves before transplanting.
How do I know when the angled luffa is ready to harvest for sponges?
The luffa is ready to harvest for sponges when the skin turns brown and dry, and the fruit feels lightweight. You should be able to hear the seeds rattling inside.
How do I process the luffa to get the sponge?
To process the luffa, first, remove the outer skin. This can be done by soaking the luffa in water for a few days to soften the skin, then peeling it off. Once the skin is removed, shake out the seeds and rinse the sponge thoroughly. Allow the sponge to dry completely before using it.
Can I save the seeds from my angled luffa for future planting?
Yes, you can save the seeds from your angled luffa for future planting. Choose seeds from mature, healthy fruits. Allow the seeds to dry completely before storing them in an airtight container in a cool, dark place.
What are some common pests and diseases that affect angled luffa, and how can I prevent them?
Common pests that affect angled luffa include aphids, squash bugs, and vine borers. Diseases include powdery mildew and fungal infections. To prevent these problems, practice good garden hygiene, such as removing plant debris and weeds. Use organic pest control methods like insecticidal soap or neem oil to control pests. Ensure good air circulation to prevent fungal diseases.
Is angled luffa edible? How do I cook it?
Yes, young angled luffa fruits are edible and can be cooked like zucchini or squash. They can be stir-fried, steamed, added to soups and stews, or even grilled. Harvest the fruits when they are young and tender, before the fibers develop.
What if I don’t have a greenhouse or heat mat? Can I still use this DIY trick?
Absolutely! While a greenhouse or heat mat can be helpful, they are not essential. You can still use this DIY trick by placing your seed tray in a warm location, such as near a sunny window or on top of your refrigerator. Just make sure the temperature remains relatively consistent.
How can I support the heavy vines of angled luffa?
Angled luffa vines are vigorous and can become quite heavy, so it’s crucial to provide adequate support. A sturdy trellis, fence, or pergola are all excellent options. Make sure the support structure is strong enough to handle the weight of the mature vines and fruits. You can also use strong twine or rope to help train the vines to climb.
Leave a Comment