

Growing wheatgrass without soil might sound like something out of a sci-fi movie, but trust me, it’s totally achievable and incredibly rewarding! Forget messy soil and complicated setups; we’re diving into a clean, efficient, and surprisingly simple method to cultivate this nutritional powerhouse right in your home. Are you tired of spending a fortune on pre-packaged wheatgrass shots? Or maybe you’re just looking for a fun and eco-friendly DIY project?
Wheatgrass has a rich history, dating back to ancient Egypt and Mesopotamia, where it was revered for its healing properties. Today, it’s celebrated as a superfood packed with vitamins, minerals, and antioxidants. But let’s be honest, buying it can be expensive and sometimes the quality is questionable. That’s where this DIY trick comes in!
Imagine having a constant supply of fresh, vibrant wheatgrass at your fingertips, ready to be juiced, blended into smoothies, or even used as a natural remedy. This method of growing wheatgrass without soil not only saves you money but also gives you complete control over the growing process, ensuring you’re getting the purest, most potent wheatgrass possible. Plus, it’s a fantastic way to connect with nature, even if you don’t have a garden. So, let’s get started and unlock the secrets to effortless wheatgrass cultivation!
Growing Wheatgrass Without Soil: A Simple Hydroponic Guide
Hey there, fellow green thumbs! Ever wanted to grow your own wheatgrass but dreaded the mess of soil? Well, I’ve got fantastic news for you: you can absolutely grow wheatgrass without soil, using a simple hydroponic method! It’s cleaner, often faster, and surprisingly easy. I’m going to walk you through the whole process, step-by-step, so you can enjoy fresh, vibrant wheatgrass in no time.
What You’ll Need
Before we dive in, let’s gather our supplies. This is a pretty low-cost project, which is always a bonus!
* Wheatgrass Seeds: Make sure you get seeds specifically for sprouting or growing wheatgrass. You can find these at most health food stores, garden centers, or online. I usually buy organic to avoid any unwanted chemicals.
* Sprouting Tray or Container: You’ll need a tray or container with drainage holes. A standard sprouting tray works perfectly, but you can also repurpose a plastic container as long as you can create drainage.
* Another Tray (Without Holes): This will act as a reservoir to hold water for your wheatgrass. It should be slightly larger than your sprouting tray so it can sit inside.
* Water: Filtered water is best, but tap water that’s been left out for 24 hours to allow chlorine to dissipate will also work.
* Spray Bottle: For misting the seeds and seedlings.
* Clean Towel or Cloth: To cover the seeds during the initial sprouting phase.
* Optional: Hydrogen Peroxide (3%): A little hydrogen peroxide can help prevent mold growth, but it’s not essential.
Phase 1: Preparing the Seeds
This is a crucial step to ensure good germination. We need to wake those little seeds up!
1. Rinsing the Seeds: Start by rinsing your wheatgrass seeds thoroughly under cool, running water. This removes any debris and helps to hydrate them. I usually use a fine-mesh sieve for this.
2. Soaking the Seeds: Place the rinsed seeds in a clean bowl and cover them with plenty of cool water. I usually use about 2-3 times the volume of water to seeds. Add a tablespoon of 3% hydrogen peroxide to the soaking water to help prevent mold. This is optional, but I find it helps, especially in humid environments.
3. Soaking Time: Let the seeds soak for 8-12 hours. This allows them to absorb enough water to initiate the sprouting process. I usually soak them overnight. You’ll notice they’ll swell up considerably.
4. Draining and Rinsing Again: After soaking, drain the seeds completely and rinse them again with cool water. This is important to remove any residual hydrogen peroxide and prevent them from becoming waterlogged.
Phase 2: Sprouting the Seeds
Now, let’s get those seeds sprouting! This is where the magic happens.
1. Preparing the Sprouting Tray: Make sure your sprouting tray is clean. I usually give it a quick rinse with hot water.
2. Spreading the Seeds: Spread the soaked and rinsed seeds evenly across the bottom of the sprouting tray. You want a fairly dense layer, but not so thick that the seeds are piled on top of each other. This can lead to mold growth.
3. Covering the Seeds: Moisten a clean towel or cloth with water and gently place it over the seeds. This will help to keep them moist and dark, which is ideal for germination.
4. Misting Regularly: Mist the seeds with water 2-3 times a day to keep them consistently moist. You don’t want them to dry out, but you also don’t want them to be soaking wet. Lift the towel to mist and then replace it carefully.
5. Maintaining Darkness: Keep the sprouting tray in a dark, cool place. A cupboard or a corner of your kitchen that doesn’t get direct sunlight works well.
6. Checking for Sprouts: After 2-3 days, you should start to see little white sprouts emerging from the seeds. Once you see sprouts, it’s time to move on to the next phase.
Phase 3: Growing the Wheatgrass
Time to let the sunshine in (indirectly, of course)!
1. Removing the Towel: Once the seeds have sprouted, remove the towel or cloth.
2. Adding Water to the Reservoir Tray: Pour about an inch of water into the reservoir tray (the one without holes).
3. Placing the Sprouting Tray in the Reservoir: Place the sprouting tray (with the sprouted seeds) inside the reservoir tray. The water should just touch the bottom of the sprouting tray, allowing the roots to access the water.
4. Providing Indirect Light: Move the tray to a location with bright, indirect sunlight. Direct sunlight can scorch the delicate seedlings. A windowsill that gets morning sun or a spot near a window with filtered light is perfect.
5. Watering Regularly: Check the water level in the reservoir tray daily and add more water as needed to keep the bottom of the sprouting tray moist. You may also need to mist the wheatgrass seedlings once or twice a day, especially if the air is dry.
6. Rotating the Tray: Rotate the tray every day or two to ensure that all sides of the wheatgrass receive equal light. This will help it grow evenly.
7. Monitoring for Mold: Keep an eye out for any signs of mold growth. If you see any, you can try spraying the affected area with a diluted hydrogen peroxide solution (1 part hydrogen peroxide to 10 parts water). Good air circulation also helps prevent mold.
Phase 4: Harvesting and Enjoying Your Wheatgrass
The best part! Time to reap the rewards of your labor.
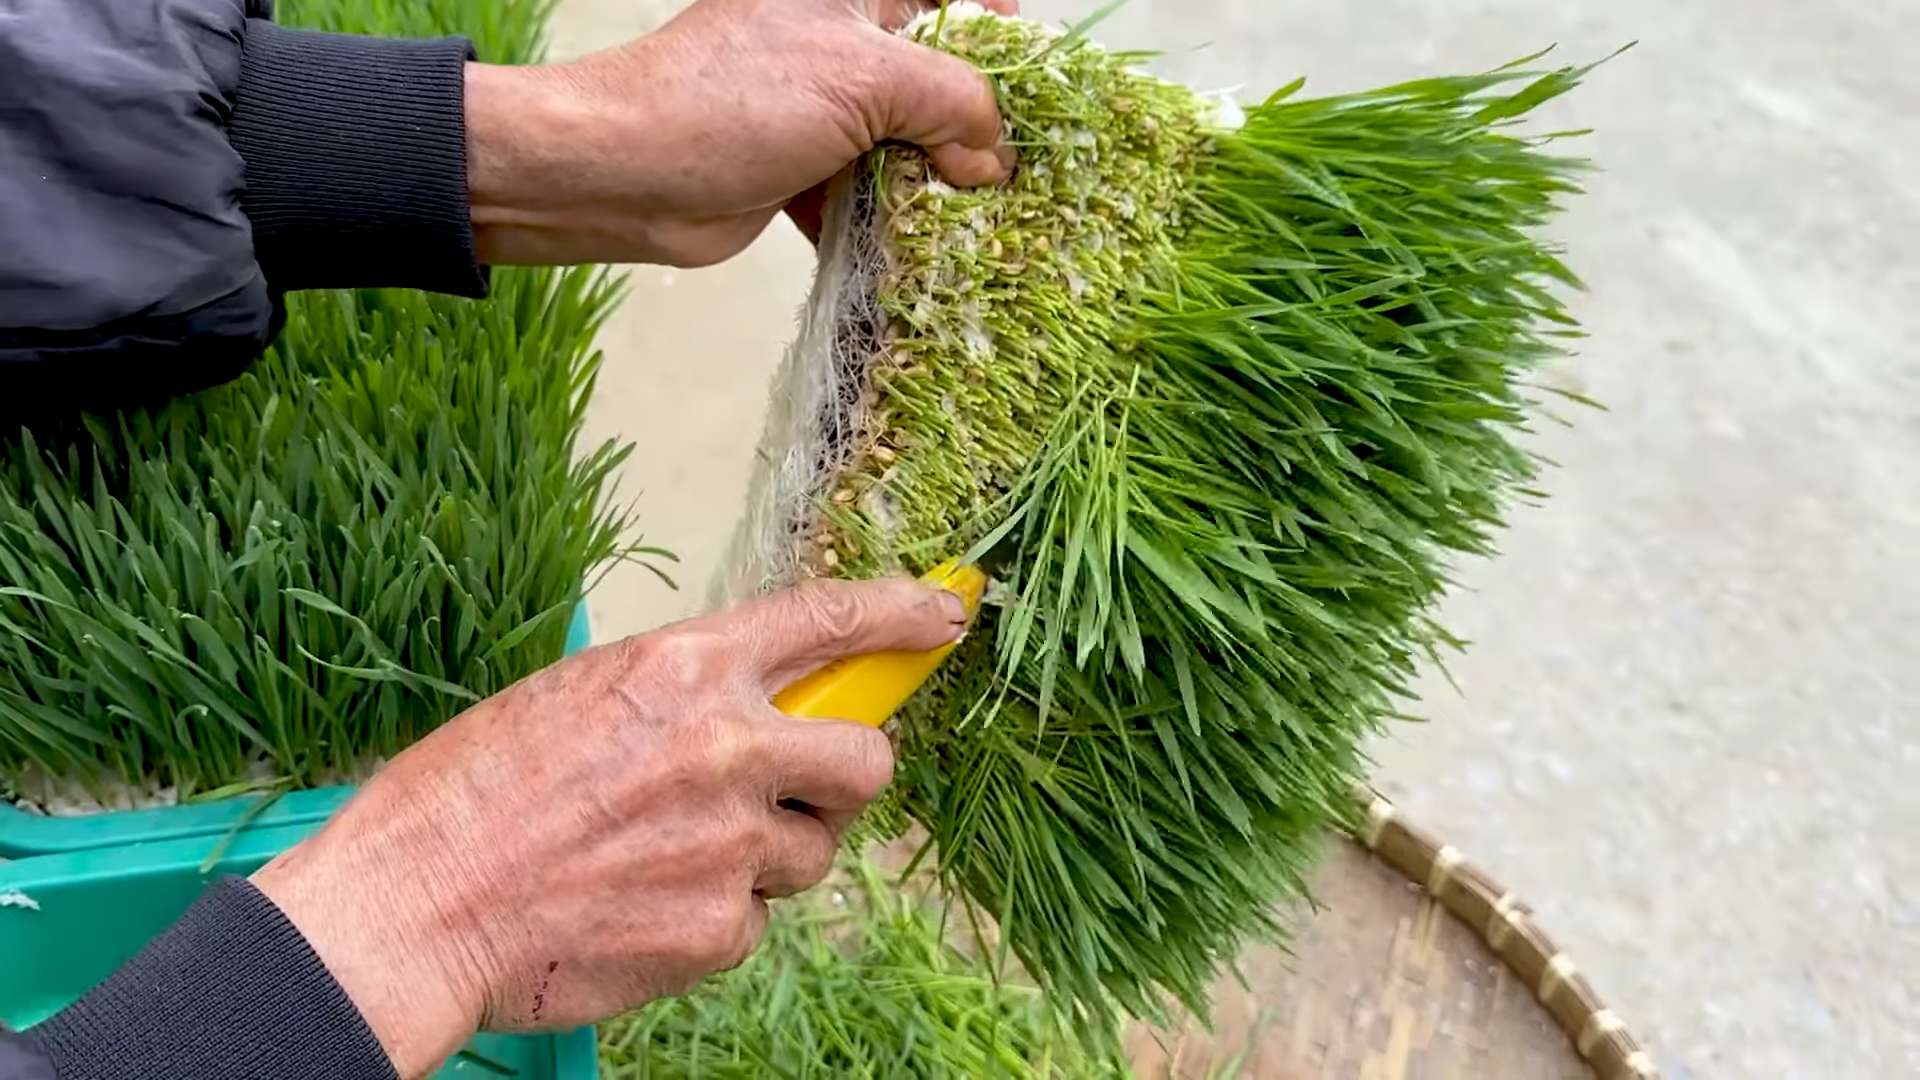
1. Harvest Time: Your wheatgrass will be ready to harvest in about 7-10 days, when it’s about 4-7 inches tall. It should be a vibrant green color.
2. Harvesting Technique: Use clean scissors or a sharp knife to cut the wheatgrass just above the seed level.
3. Using Your Wheatgrass: You can juice your wheatgrass using a wheatgrass juicer or a masticating juicer. You can also blend it into smoothies. Start with small amounts, as wheatgrass can be quite potent. Some people also use wheatgrass in salads or as a garnish.
4. Storing Wheatgrass: Freshly harvested wheatgrass is best used immediately. However, you can store it in the refrigerator for a few days. Wrap it in a damp paper towel and place it in a plastic bag.
5. Replanting: After harvesting, you can try to get a second harvest from the same seeds, but the yield will usually be much smaller. I usually start a new batch of seeds for each harvest.
Troubleshooting Tips
Even with the best intentions, sometimes things don’t go exactly as planned. Here are a few common issues and how to address them:
* Mold Growth: Mold is a common problem, especially in humid environments. To prevent mold, ensure good air circulation, avoid overwatering, and consider using a diluted hydrogen peroxide solution. If you see mold, remove the affected areas immediately.
* Slow Germination: If your seeds are taking longer than expected to germinate, make sure they are being kept consistently moist and in a dark, cool place. The temperature can also affect germination; aim for a temperature between 60-70°F (15-21°C).
* Uneven Growth: Uneven growth can be caused by uneven light exposure. Rotate the tray regularly to ensure that all sides of the wheatgrass receive equal light.
* Yellowing Wheatgrass: Yellowing wheatgrass can be a sign of overwatering or underwatering. Make sure the water level in the reservoir tray is appropriate and that the wheatgrass is not drying out. It can also be a sign of nutrient deficiency, but this is less common when growing hydroponically.
Why I Love Growing Wheatgrass This Way
I’ve tried growing wheatgrass in soil before, and honestly, I found it to be a bit of a hassle. The soil was messy, and I always seemed to have problems with gnats. Growing wheatgrass hydroponically is so much cleaner and easier. Plus, I find that the wheatgrass grows faster and is just as nutritious. It’s a win-win!
So, there you have it! A complete guide to growing wheatgrass without soil. I hope you found this helpful and that you’re inspired to give it a try. Happy growing!

Conclusion
So, there you have it! Growing wheatgrass without soil is not just a trendy health fad; it’s a remarkably simple, cost-effective, and environmentally conscious way to bring the benefits of this nutritional powerhouse into your daily life. We’ve walked you through the process, highlighting the ease and accessibility of this method. Forget about messy soil, potential pests, and the complexities of traditional gardening. This soil-free approach opens the door for anyone, regardless of their gardening experience or living space, to cultivate their own fresh wheatgrass.
Why is this DIY trick a must-try? Because it empowers you to take control of your health and well-being. You’re not relying on store-bought options, which can be expensive and may have been sitting on shelves for who knows how long. You’re getting the freshest, most vibrant wheatgrass possible, packed with vitamins, minerals, and antioxidants, all grown by your own hand. Plus, the satisfaction of nurturing something from seed to sprout is incredibly rewarding.
But the beauty of this method lies in its adaptability. Feel free to experiment with different containers. While we’ve suggested trays, you could use repurposed plastic containers, glass jars, or even ceramic dishes. Just ensure they have adequate drainage or that you’re diligent about preventing water from pooling.
Consider exploring different sprouting mediums as well. While the paper towels or hemp mats work wonderfully, you might want to try using a thin layer of coconut coir for added moisture retention. Just be sure to rinse it thoroughly before use.
For those looking to add a touch of flavor, try incorporating a small amount of organic fertilizer diluted in the water after the initial sprouting phase. This can give your wheatgrass an extra boost and potentially enhance its taste. However, be very cautious with fertilization, as too much can harm the delicate sprouts.
And don’t forget about the power of sunlight! While indirect sunlight is ideal, experiment with different locations in your home to see where your wheatgrass thrives best. You might be surprised at the difference a little extra light can make.
Ultimately, the key to successful soil-free wheatgrass cultivation is observation and adaptation. Pay attention to your sprouts, adjust your watering schedule as needed, and don’t be afraid to experiment.
We are confident that you’ll find this DIY project both enjoyable and beneficial. So, go ahead, give it a try! We encourage you to embark on this journey of growing your own wheatgrass without soil. We are eager to hear about your experiences. Share your tips, tricks, and photos with us in the comments below. Let’s create a community of wheatgrass enthusiasts and inspire others to embrace this simple and sustainable way to enhance their health. What worked for you? What challenges did you face? Your insights will be invaluable to others who are just starting out. Let’s grow together!
Frequently Asked Questions (FAQ)
What exactly are the benefits of consuming wheatgrass?
Wheatgrass is a nutritional powerhouse, packed with vitamins, minerals, antioxidants, and enzymes. It’s a good source of vitamins A, C, and E, as well as iron, calcium, magnesium, and amino acids. Many people consume wheatgrass for its potential detoxifying properties, immune-boosting effects, and energy-enhancing qualities. It’s also believed to aid in digestion and promote healthy skin. However, it’s important to note that scientific research on all the purported benefits of wheatgrass is still ongoing.
How often should I water my wheatgrass when growing it without soil?
Watering frequency depends on the humidity and temperature of your environment. Generally, you should mist or spray your wheatgrass at least twice a day, ensuring that the paper towels or sprouting medium remain consistently moist but not waterlogged. Overwatering can lead to mold growth, while underwatering can cause the sprouts to dry out and die. Check the moisture level regularly and adjust your watering schedule accordingly. If you live in a dry climate, you may need to water more frequently.
How long does it take for wheatgrass to grow to a harvestable height using this method?
Typically, wheatgrass grown without soil will be ready to harvest in about 7-10 days. You’ll know it’s ready when the blades are about 4-6 inches tall and have a vibrant green color. The exact timeframe can vary depending on factors such as temperature, humidity, and the quality of the seeds.
What’s the best way to harvest wheatgrass?
The best way to harvest wheatgrass is to use clean scissors or a sharp knife to cut the blades just above the seed level. Avoid pulling the blades, as this can damage the roots and prevent further growth. Harvest only what you need at the time, as freshly cut wheatgrass is the most nutritious.
Can I regrow wheatgrass after harvesting it once?
Yes, you can usually get a second harvest from your wheatgrass. After the first harvest, continue to water and care for the sprouts as before. You may notice a slightly reduced yield in the second harvest, but it’s still worth the effort. After the second harvest, the sprouts will likely be depleted of nutrients and should be discarded.
What if I see mold growing on my wheatgrass?
Mold growth is a common problem when growing wheatgrass, especially in humid environments. If you see mold, immediately remove the affected areas. Ensure that your wheatgrass has adequate ventilation and that you’re not overwatering. You can also try spraying the sprouts with a diluted solution of hydrogen peroxide (1 part hydrogen peroxide to 10 parts water) to kill the mold. If the mold is widespread, it’s best to discard the entire batch and start over.
Where can I buy wheatgrass seeds?
Wheatgrass seeds are readily available at most health food stores, garden centers, and online retailers. Look for organic, high-quality seeds to ensure the best results. Sprouting seeds are preferable, as they are specifically tested for germination rates and are free from harmful bacteria.
How should I store wheatgrass seeds?
Store wheatgrass seeds in a cool, dry, and dark place. An airtight container is ideal to protect them from moisture and pests. Properly stored seeds can remain viable for several years.
Can I use tap water to grow wheatgrass?
While tap water is generally safe to use, it’s best to use filtered or purified water to avoid exposing your wheatgrass to chlorine and other chemicals that may be present in tap water. These chemicals can inhibit growth and affect the taste of the wheatgrass.
Is it safe to consume wheatgrass if I’m pregnant or breastfeeding?
If you are pregnant or breastfeeding, it’s always best to consult with your doctor or a qualified healthcare professional before consuming wheatgrass. While wheatgrass is generally considered safe, it’s important to be aware of any potential risks or interactions with medications you may be taking.
What is the best way to consume wheatgrass?
Wheatgrass can be consumed in various ways. The most common method is to juice it using a wheatgrass juicer or a masticating juicer. You can also blend it into smoothies or add it to salads. Some people even chew on the blades directly, although this can be quite fibrous and bitter. Start with a small amount (about 1-2 ounces) and gradually increase your intake as tolerated.
Can I freeze wheatgrass juice for later use?
Yes, you can freeze wheatgrass juice to preserve it for later use. Pour the juice into ice cube trays or small freezer-safe containers and freeze until solid. Once frozen, transfer the cubes or containers to a freezer bag or airtight container. Frozen wheatgrass juice can be stored for up to 3 months.
What are some common mistakes to avoid when growing wheatgrass without soil?
Some common mistakes to avoid include overwatering, underwatering, using low-quality seeds, not providing adequate ventilation, and exposing the sprouts to direct sunlight. Pay close attention to the needs of your wheatgrass and adjust your growing conditions accordingly.
How can I make my wheatgrass taste better?
Wheatgrass has a strong, earthy flavor that some people find unpleasant. To improve the taste, try mixing it with other fruits and vegetables in smoothies or juices. Adding a squeeze of lemon or lime juice can also help to mask the bitterness. Experiment with different combinations to find what works best for you.
Can I grow wheatgrass outdoors without soil?
While it’s possible to grow wheatgrass outdoors without soil, it’s more challenging due to the increased risk of pests, diseases, and environmental fluctuations. If you choose to grow it outdoors, be sure to provide adequate protection from the elements and monitor the sprouts closely.
Leave a Comment