

Grow Radishes Indoors? Absolutely! Imagine plucking crisp, peppery radishes fresh from your own indoor garden, even when the snow is falling outside. Forget those bland, store-bought radishes – we’re talking about vibrant, flavorful roots bursting with homegrown goodness.
For centuries, cultures around the world have cultivated radishes, valuing them not only for their taste but also for their medicinal properties. From ancient Egypt to modern-day Japan, radishes have held a special place in culinary traditions. But who says you need a sprawling farm to enjoy these delightful veggies?
In today’s busy world, finding time for a traditional garden can be a challenge. That’s where the magic of indoor gardening comes in! Learning how to grow radishes indoors is a game-changer for anyone craving fresh, healthy produce without the hassle of extensive outdoor space or unpredictable weather. Plus, it’s incredibly rewarding to nurture something from seed to table. I’m excited to share some simple DIY tricks and hacks that will have you harvesting your own radishes in no time. Let’s get started and bring a little bit of the garden indoors!

Grow Your Own Radishes Indoors: A Beginner’s Guide
Hey there, fellow gardening enthusiasts! Ever thought about growing radishes indoors? It’s surprisingly easy and rewarding, especially when you’re craving that peppery crunch in the middle of winter. I’m going to walk you through everything you need to know to cultivate your own little radish patch right inside your home. Let’s get started!
What You’ll Need
Before we dive into the nitty-gritty, let’s gather our supplies. Here’s a checklist of everything you’ll need to successfully grow radishes indoors:
- Radish Seeds: Choose varieties specifically suited for container gardening, like ‘Cherry Belle,’ ‘French Breakfast,’ or ‘Easter Egg.’ These tend to mature quickly and stay relatively compact.
- Containers: Opt for containers that are at least 6 inches deep. Radishes need room to grow downwards. I prefer using plastic pots with drainage holes, but you can also use repurposed containers like yogurt tubs or milk cartons (just make sure to poke some holes in the bottom!).
- Potting Mix: Use a high-quality, well-draining potting mix. Avoid using garden soil, as it can become compacted and hinder root development. A mix of peat moss, perlite, and vermiculite works wonders.
- Grow Lights (Optional but Recommended): While radishes can technically grow indoors with natural light, they’ll thrive with supplemental grow lights, especially during the darker months. Fluorescent or LED grow lights are excellent choices.
- Watering Can or Spray Bottle: For gentle and even watering.
- Small Trowel or Spoon: For planting seeds.
- Fertilizer (Optional): A balanced liquid fertilizer can give your radishes an extra boost, but it’s not strictly necessary.
Step-by-Step Planting Guide
Okay, now that we have everything ready, let’s get our hands dirty!
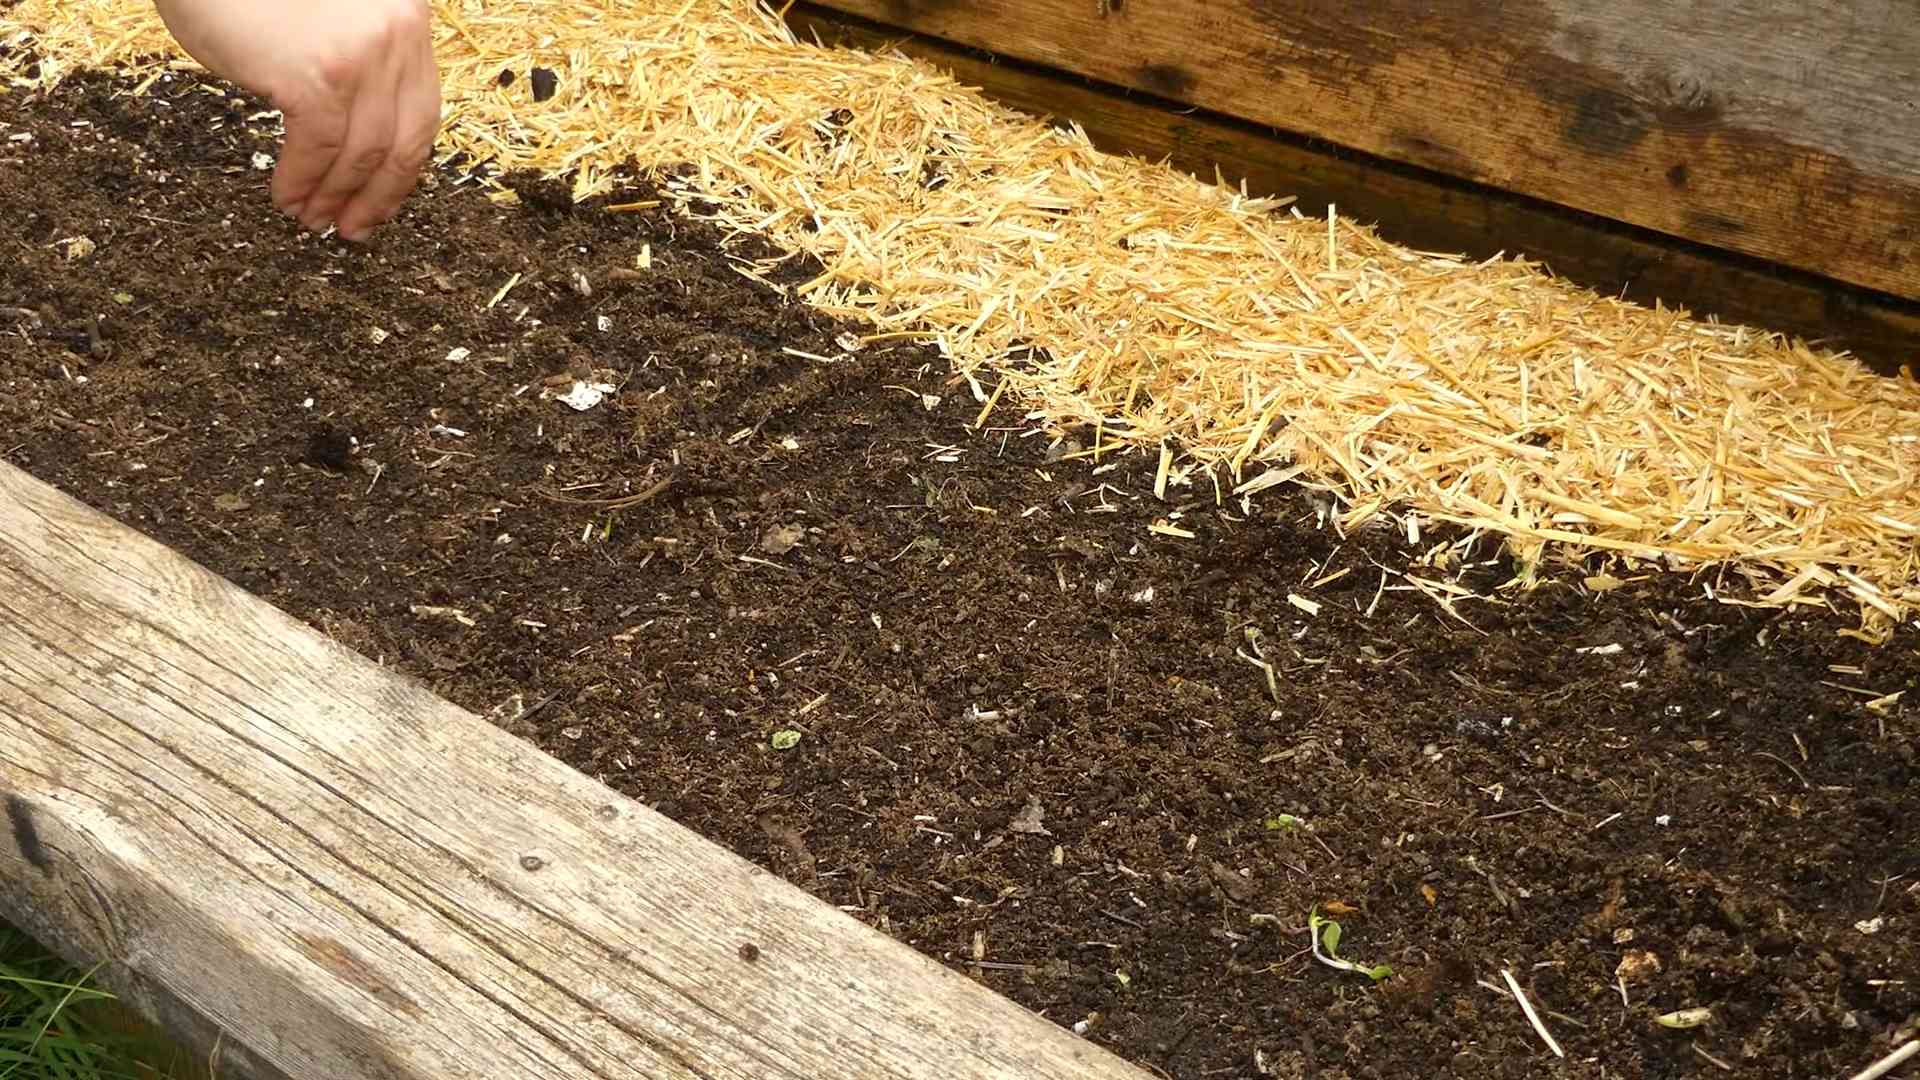
- Prepare Your Containers: Fill your containers with the potting mix, leaving about an inch of space at the top. Gently pat down the soil to create a firm, even surface.
- Sow the Seeds: Radish seeds are relatively small, so you don’t need to plant them too deep. Sow the seeds about ½ inch deep and 1 inch apart. I like to use a small spoon to make little indentations in the soil for each seed.
- Cover the Seeds: Gently cover the seeds with a thin layer of potting mix.
- Water Thoroughly: Water the soil gently but thoroughly until it’s evenly moist. Avoid overwatering, which can lead to seed rot. A spray bottle is great for this step.
- Provide Light: Place your containers in a location that receives at least 6 hours of direct sunlight per day. If you’re using grow lights, position them about 6-12 inches above the soil surface and keep them on for 12-14 hours per day.
Caring for Your Radishes
Now that your radishes are planted, it’s time to nurture them and watch them grow!
- Watering: Keep the soil consistently moist, but not soggy. Water when the top inch of soil feels dry to the touch. Overwatering can lead to root rot, while underwatering can stunt growth.
- Thinning: Once your seedlings emerge (usually within 3-7 days), you’ll need to thin them out. This means removing some of the seedlings to give the remaining ones enough space to grow. Aim for about 1-2 inches between each plant. Don’t be afraid to snip off the weaker seedlings at the soil line.
- Fertilizing (Optional): If you choose to fertilize, use a balanced liquid fertilizer diluted to half strength. Apply it every 2-3 weeks.
- Temperature: Radishes prefer cooler temperatures, ideally between 60-70°F (15-21°C). Avoid placing them near heat sources, such as radiators or vents.
- Air Circulation: Good air circulation helps prevent fungal diseases. Make sure your radishes have enough space around them and avoid overcrowding. A small fan can also help improve air circulation.
Dealing with Pests and Diseases
Thankfully, radishes are relatively pest-resistant, especially when grown indoors. However, here are a few potential problems to watch out for:
- Aphids: These tiny pests can suck the sap from your radish leaves. If you spot aphids, you can try washing them off with a strong stream of water or using insecticidal soap.
- Flea Beetles: These small beetles can chew tiny holes in the leaves. Row covers can help prevent flea beetle infestations.
- Root Rot: This is usually caused by overwatering. Make sure your containers have good drainage and avoid letting the soil stay soggy.
Harvesting Your Radishes
The best part! Radishes are fast growers, and you can usually start harvesting them within 3-4 weeks of planting.
- Check for Maturity: Gently brush away some of the soil around the base of the radish to check its size. Most radish varieties are ready to harvest when they’re about 1 inch in diameter.
- Harvest Carefully: Gently pull the radishes from the soil, being careful not to damage the roots. If they’re difficult to pull, you can loosen the soil around them with a trowel.
- Succession Planting: To enjoy a continuous harvest of radishes, sow a new batch of seeds every 1-2 weeks. This is called succession planting.
Troubleshooting Tips
Sometimes, things don’t go exactly as planned. Here are a few common problems you might encounter and how to fix them:
Long, Leggy Plants
This usually indicates that your radishes aren’t getting enough light. Move them to a sunnier location or provide supplemental grow lights.
Small Radishes
Several factors can contribute to small radishes, including overcrowding, poor soil, and lack of water. Make sure you’re thinning your seedlings properly, using a good-quality potting mix, and watering consistently.
Bitter Radishes
Bitter radishes are often caused by hot weather or inconsistent watering. Try to keep your radishes cool and water them regularly.
Radishes Splitting
This can happen if the soil dries out completely and then is suddenly flooded with water. Try to maintain consistent soil moisture.
Choosing the Right Radish Variety
Selecting the right radish variety is crucial for successful indoor gardening. Here are a few of my favorites:
- Cherry Belle: A classic, round, red radish that’s known for its mild flavor and quick maturity.
- French Breakfast: An elongated, red and white radish with a slightly peppery taste.
- Easter Egg: A colorful mix of red, pink, purple, and white radishes.
- Sparkler: A round, red radish with a white tip.
- White Icicle: A long, white radish with a mild, sweet flavor.
Maximizing Your Indoor Radish Harvest
Want to get the most out of your indoor radish garden? Here are a few extra tips:
- Rotate Your Crops: After harvesting a batch of radishes, consider rotating your crops. This means planting a different type of vegetable in the same container. Crop rotation can help prevent soil depletion and pest problems.
- Amend Your Soil: Before replanting, amend your soil with compost or other organic matter to replenish nutrients.
- Monitor Your Plants Regularly: Keep a close eye on your radishes for any signs of pests, diseases, or nutrient deficiencies. The sooner you catch a problem, the easier it will be to fix.
- Experiment with Different Varieties: Don’t be afraid to try different radish varieties to see which ones grow best in your indoor environment.
Enjoying Your Homegrown Radishes
Now that you’ve successfully grown your own radishes indoors, it’s time to enjoy the fruits (or rather, roots!) of your labor. Here are a few ideas:
- Eat them raw: Radishes are delicious eaten raw, either on their own or in salads.
- Add them to sandwiches: Thinly sliced radishes add a peppery crunch to sandwiches and wraps.
- Roast them: Roasted radishes are surprisingly sweet and tender.
- Pickle them: Pickled radishes are a tangy and flavorful condiment.
- Use the greens: Don’t throw away the radish greens! They’re edible and can be used in salads, soups, or stir-fries.
Growing radishes indoors is a fun and rewarding experience. With a little bit of care and attention, you
Conclusion
So, there you have it! Growing radishes indoors is not only possible, but it’s surprisingly simple and incredibly rewarding. Forget those bland, store-bought radishes that lack that peppery punch. With this DIY trick, you can cultivate a continuous supply of crisp, flavorful radishes right in your own home, regardless of the season. Imagine adding freshly harvested radishes to your salads, sandwiches, or even enjoying them as a crunchy, healthy snack. The vibrant color and zesty taste will elevate your meals and impress your friends and family.
This method is a must-try for several reasons. First, it’s incredibly convenient. No more trips to the grocery store for subpar radishes. Second, it’s cost-effective. Once you have your initial setup, the ongoing costs are minimal. Third, it’s environmentally friendly. You’re reducing your carbon footprint by growing your own food locally. And finally, it’s just plain fun! There’s something deeply satisfying about nurturing a plant from seed to harvest.
But don’t stop there! Experiment with different varieties of radishes. French Breakfast radishes are known for their mild flavor and elongated shape, while Cherry Belle radishes are a classic choice for their round shape and bright red color. You can also try growing daikon radishes indoors, although they will require a larger container. Consider adding companion plants like lettuce or spinach to your indoor garden to maximize space and create a diverse ecosystem. You can also experiment with different types of growing mediums. While soil works perfectly well, you might want to try coco coir or perlite for improved drainage and aeration.
Don’t be afraid to get creative and adapt this DIY trick to your own preferences and resources. The key is to provide your radishes with adequate light, water, and drainage. With a little bit of care and attention, you’ll be enjoying a bountiful harvest of homegrown radishes in no time.
We wholeheartedly encourage you to give this indoor radish growing method a try. It’s a fantastic way to add fresh, healthy produce to your diet, connect with nature, and learn a new skill. And most importantly, we want to hear about your experience! Share your photos, tips, and challenges in the comments below. Let’s create a community of indoor radish growers and learn from each other. What varieties did you try? What growing medium did you use? What challenges did you encounter, and how did you overcome them? Your feedback will help others succeed and inspire even more people to grow their own radishes indoors. So, grab your seeds, get your hands dirty, and let the radish-growing adventure begin!
Frequently Asked Questions (FAQ)
What kind of container should I use to grow radishes indoors?
The ideal container for growing radishes indoors should be at least 6 inches deep to accommodate the root growth. A wider container is preferable to allow for more radishes to be grown simultaneously. You can use plastic pots, terracotta pots, or even repurposed containers like plastic tubs or buckets. Ensure that the container has drainage holes to prevent waterlogging, which can lead to root rot. The size of the container will depend on how many radishes you want to grow at once. A container that is 12 inches in diameter can comfortably accommodate about 10-12 radish plants.
How much light do radishes need when grown indoors?
Radishes require at least 6 hours of direct sunlight per day to thrive. If you don’t have a sunny windowsill, you can supplement with artificial grow lights. Fluorescent or LED grow lights are excellent options. Position the lights a few inches above the seedlings and adjust the height as the plants grow. A timer can be used to ensure consistent light exposure. Insufficient light can result in leggy plants with weak roots. If you notice your radish plants stretching towards the light source, it’s a sign that they need more light.
What type of soil is best for growing radishes indoors?
Radishes prefer well-draining soil that is rich in organic matter. A good potting mix will typically consist of peat moss, perlite, and vermiculite. You can also amend the soil with compost or aged manure to improve its fertility. Avoid using heavy clay soil, as it can compact and restrict root growth. The ideal pH level for radishes is between 6.0 and 7.0. You can test the pH of your soil using a soil testing kit and adjust it accordingly.
How often should I water my indoor radish plants?
Water your radish plants regularly, keeping the soil consistently moist but not waterlogged. Check the soil moisture level daily by sticking your finger into the soil. If the top inch of soil feels dry, it’s time to water. Water deeply, allowing the excess water to drain out of the drainage holes. Avoid overhead watering, as it can promote fungal diseases. Instead, water at the base of the plants. The frequency of watering will depend on the temperature, humidity, and type of container you are using.
How long does it take for radishes to mature when grown indoors?
Radishes are one of the fastest-growing vegetables, and they typically mature in 20-30 days. The exact time will depend on the variety of radish and the growing conditions. Check the seed packet for specific information on the maturity time. You can start harvesting radishes when the roots are about 1 inch in diameter. To harvest, gently pull the radishes from the soil.
What are some common problems when growing radishes indoors, and how can I prevent them?
Some common problems when growing radishes indoors include pests, diseases, and nutrient deficiencies. Pests such as aphids and flea beetles can be controlled with insecticidal soap or neem oil. Fungal diseases can be prevented by providing good air circulation and avoiding overhead watering. Nutrient deficiencies can be addressed by fertilizing the plants with a balanced fertilizer. Yellowing leaves can indicate a nitrogen deficiency, while stunted growth can indicate a phosphorus deficiency.
Can I grow radishes indoors year-round?
Yes, you can grow radishes indoors year-round, as long as you provide them with adequate light, water, and nutrients. Indoor growing allows you to control the growing environment and avoid the challenges of outdoor gardening, such as pests, diseases, and weather fluctuations.
Do I need to fertilize my indoor radish plants?
Yes, radishes benefit from regular fertilization. Use a balanced fertilizer, such as a 10-10-10 or 5-5-5, diluted to half strength. Fertilize every two weeks, starting when the plants are about 2 inches tall. Avoid over-fertilizing, as it can lead to excessive foliage growth and small roots.
How do I know when my radishes are ready to harvest?
Radishes are ready to harvest when the roots are about 1 inch in diameter. You can gently push aside the soil to check the size of the roots. The tops of the radishes should be visible above the soil line. Harvest radishes promptly, as they can become woody and bitter if left in the ground for too long.
Can I regrow radish tops?
While you can’t regrow the radish root itself, you can regrow the radish greens. Place the radish tops in a shallow dish of water, ensuring that the cut end is submerged. Place the dish in a sunny location and change the water every day. The radish tops will start to sprout new leaves in a few days. You can then transplant the radish tops into soil and grow them for their greens.
Leave a Comment