

Indoor Garlic Growing: Ever dreamt of having fresh, pungent garlic readily available, right in your kitchen? Imagine skipping those last-minute grocery runs and adding a burst of flavor to your meals with garlic you’ve nurtured yourself. Well, dream no more! This DIY guide unlocks the secrets to successfully growing garlic indoors, transforming your windowsill into a mini-farm.
Garlic, a culinary staple for centuries, boasts a rich history intertwined with various cultures. From ancient Egyptians who revered it for its medicinal properties to Romans who believed it boosted courage, garlic has always held a special place in human history. Today, while readily available in stores, the joy of cultivating your own garlic connects you to this ancient tradition in a uniquely personal way.
Why should you embark on this indoor garlic growing adventure? Because it’s incredibly rewarding! Not only will you have a constant supply of fresh garlic, but you’ll also enjoy the process of nurturing a plant from clove to bulb. Plus, it’s a fantastic way to add a touch of green to your indoor space, especially during the colder months when outdoor gardening is limited. I’m excited to share these simple yet effective tricks and hacks that will empower you to grow your own thriving indoor garlic garden, regardless of your experience level. Let’s get started!
Growing Garlic Indoors: A Step-by-Step Guide
Hey there, fellow plant enthusiasts! Ever thought about growing your own garlic indoors? It’s easier than you might think, and the satisfaction of using homegrown garlic in your cooking is unbeatable. Plus, it adds a lovely green touch to your indoor space. Let’s dive into how you can cultivate your own little garlic garden right inside your home.
Choosing the Right Garlic and Potting Mix
Before we get our hands dirty, we need to make a few crucial decisions. Selecting the right garlic variety and preparing the perfect potting mix are key to a successful indoor garlic growing experience.
* Garlic Variety: Softneck garlic varieties are generally better suited for indoor growing. They tend to be more tolerant of warmer temperatures and less demanding in terms of cold stratification (a period of cold needed for proper bulb formation). Look for varieties like ‘California Early’ or ‘Silverskin’. Hardneck varieties can also be grown, but they might require a bit more attention to temperature and light.
* Potting Mix: Avoid using garden soil directly in your pots. It compacts easily and doesn’t provide adequate drainage. Instead, opt for a well-draining potting mix specifically formulated for containers. You can also create your own mix by combining equal parts of:
* Peat moss or coco coir (for moisture retention)
* Perlite or vermiculite (for drainage and aeration)
* Compost (for nutrients)
Planting Your Garlic Cloves
Now for the fun part – planting! This is where we transform individual garlic cloves into potential garlic plants.
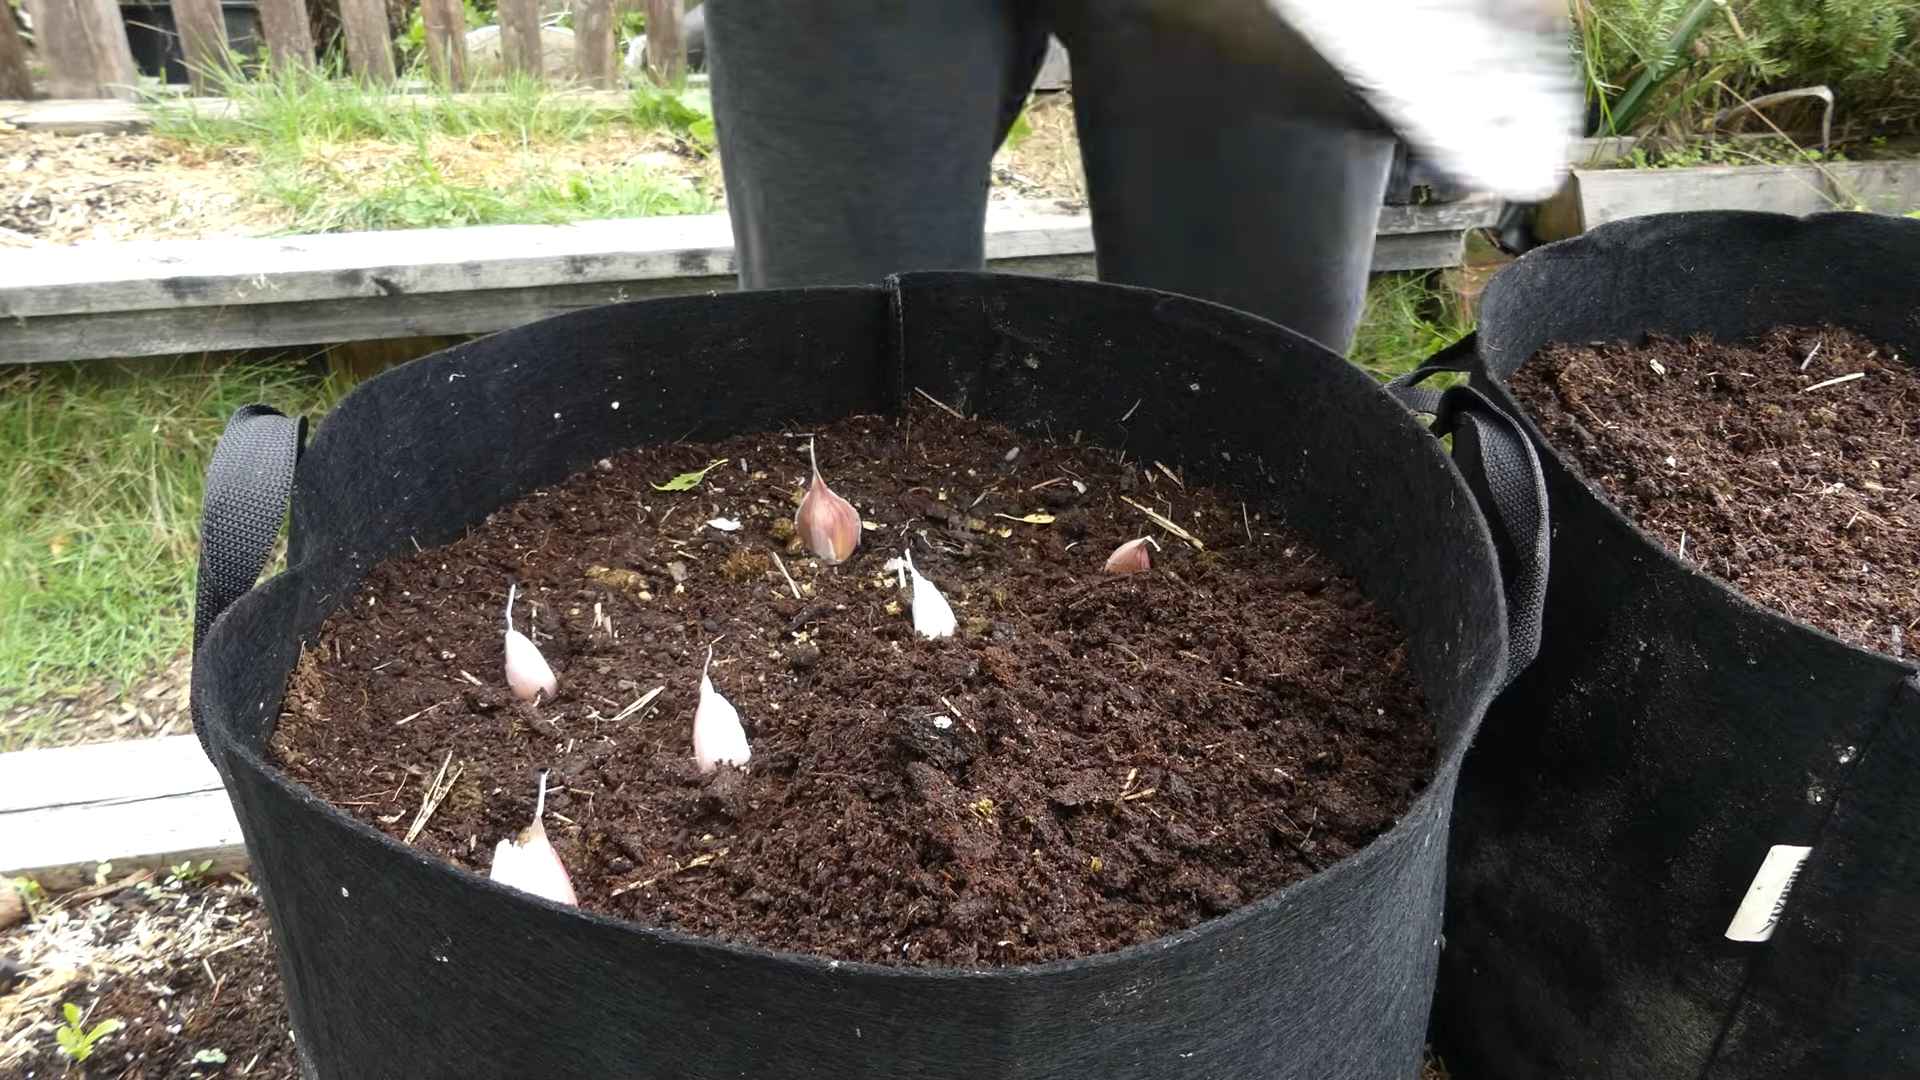
1. Prepare the Pot: Choose a pot that is at least 6 inches deep and has drainage holes. Fill the pot with your chosen potting mix, leaving about an inch of space at the top.
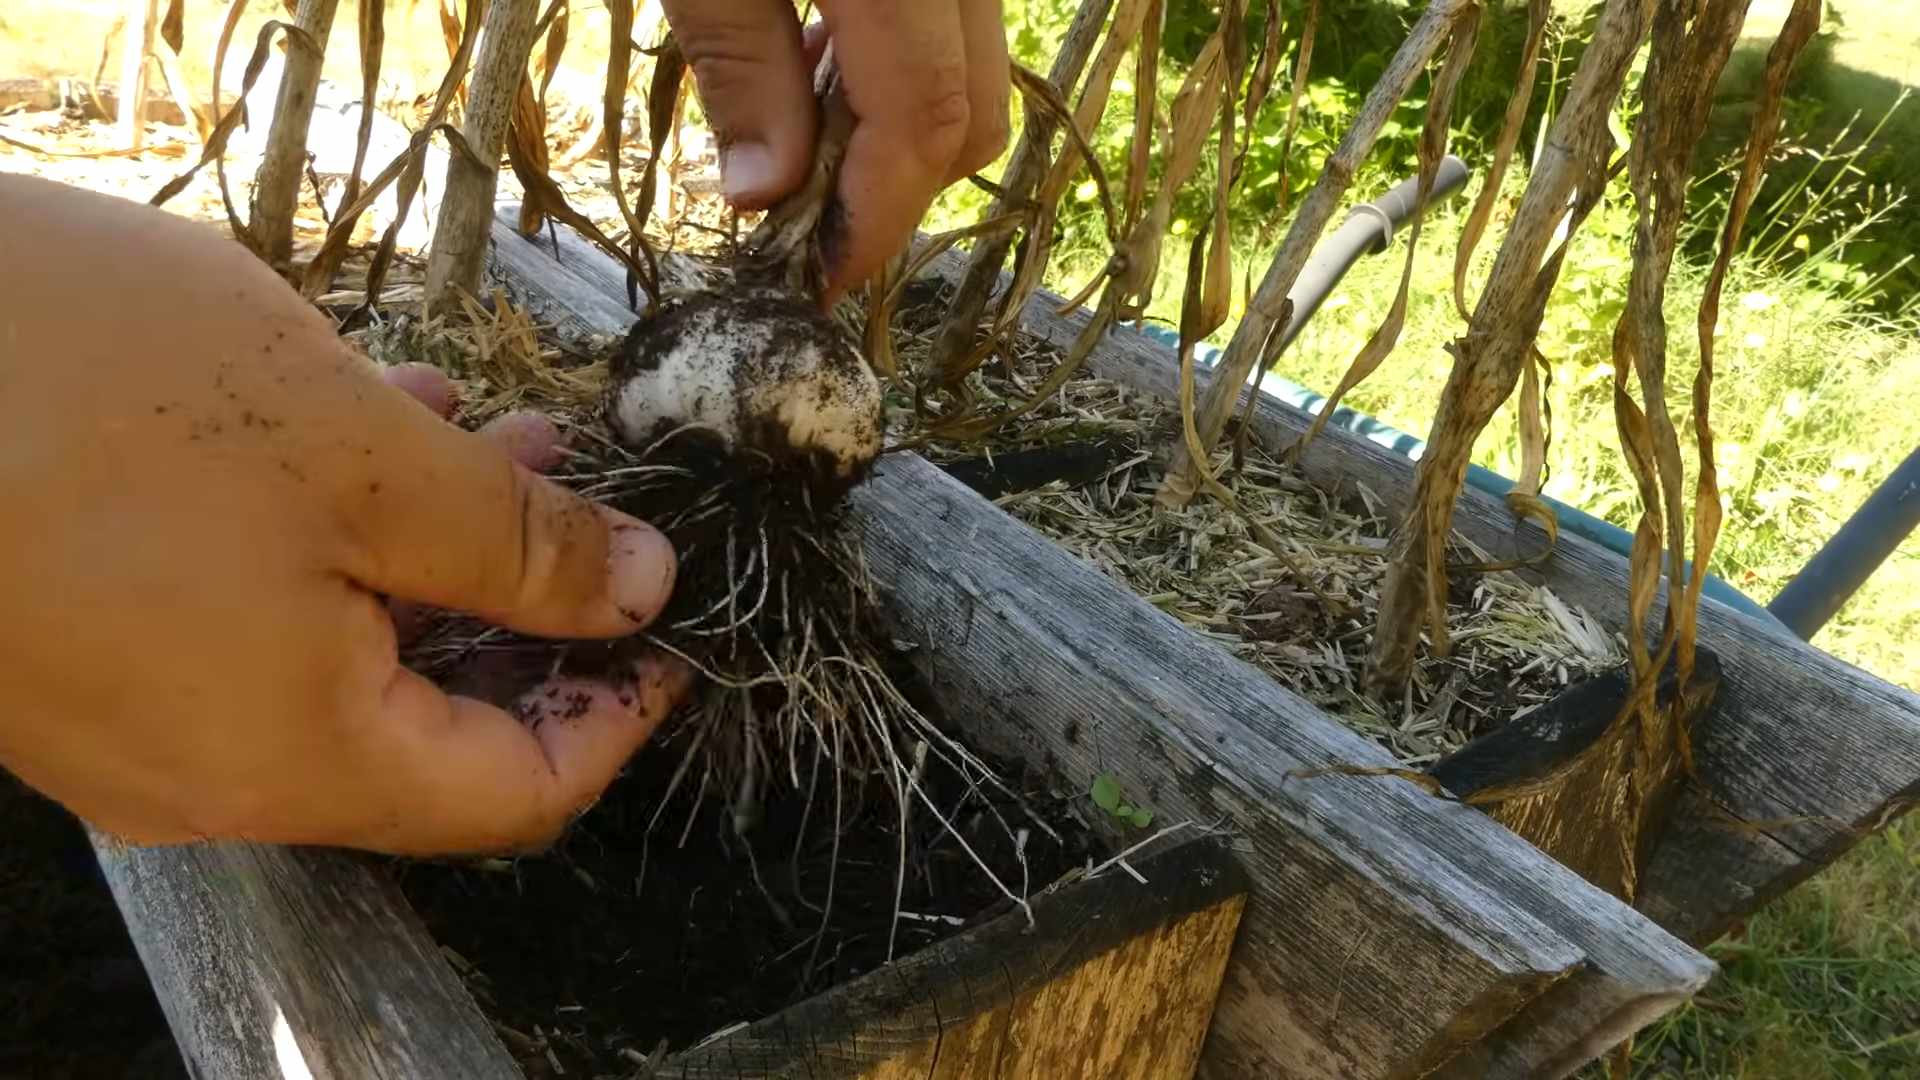
2. Select Healthy Cloves: Separate the cloves from the garlic bulb carefully, making sure not to damage them. Choose the largest and healthiest-looking cloves for planting. These will have the best chance of success.
3. Plant the Cloves: Plant the cloves pointy-side up, about 2 inches deep and 4 inches apart. This spacing allows for adequate growth. Gently press the cloves into the soil and cover them with the potting mix.
4. Water Thoroughly: After planting, water the soil thoroughly until water drains out of the bottom of the pot. This helps settle the soil and provides the cloves with the initial moisture they need.
Caring for Your Indoor Garlic Plants
Consistent care is essential for healthy garlic growth. This includes proper watering, lighting, and fertilization.
1. Watering: Keep the soil consistently moist, but not waterlogged. Water when the top inch of soil feels dry to the touch. Overwatering can lead to root rot, so be mindful of drainage.
2. Lighting: Garlic needs at least 6 hours of sunlight per day. Place your pot near a sunny window, preferably a south-facing one. If you don’t have enough natural light, you can supplement with a grow light. Position the grow light about 6-12 inches above the plants.
3. Fertilizing: Garlic is a heavy feeder, so regular fertilization is important. Start fertilizing about 2-3 weeks after planting, once the plants have started to sprout. Use a balanced liquid fertilizer (e.g., 10-10-10) diluted to half strength. Fertilize every 2-3 weeks during the growing season.
4. Temperature: Garlic prefers cooler temperatures, ideally between 60-70°F (15-21°C). Avoid placing your plants near heat sources like radiators or vents.
5. Pest Control: Keep an eye out for common indoor plant pests like aphids or spider mites. If you notice any pests, treat them with insecticidal soap or neem oil.
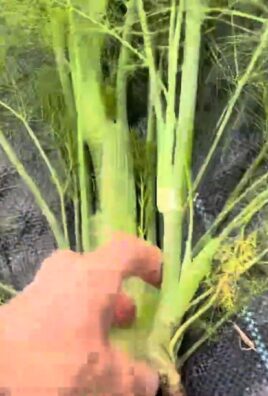
Harvesting Garlic Greens (Scapes)
While you might not get full-sized garlic bulbs indoors, you can definitely harvest the delicious garlic greens, also known as scapes.
* When to Harvest: You can start harvesting garlic greens when they are about 6-8 inches tall.
* How to Harvest: Use scissors or a sharp knife to cut the greens near the base of the plant, leaving about 2 inches of growth. This allows the plant to continue growing.
* Using Garlic Greens: Garlic greens have a mild garlic flavor and can be used in a variety of dishes. Chop them up and add them to salads, soups, stir-fries, or use them as a garnish.
Encouraging Bulb Formation (Optional)
Hey there, fellow plant enthusiasts! Ever thought about growing your own garlic indoors? It’s easier than you might think, and the satisfaction of using homegrown garlic in your cooking is unbeatable. Plus, it adds a lovely green touch to your indoor space. Let’s dive into how you can cultivate your own little garlic garden right inside your home.
Choosing the Right Garlic and Potting Mix
Before we get our hands dirty, we need to make a few crucial decisions. Selecting the right garlic variety and preparing the perfect potting mix are key to a successful indoor garlic growing experience.
* Garlic Variety: Softneck garlic varieties are generally better suited for indoor growing. They tend to be more tolerant of warmer temperatures and less demanding in terms of cold stratification (a period of cold needed for proper bulb formation). Look for varieties like ‘California Early’ or ‘Silverskin’. Hardneck varieties can also be grown, but they might require a bit more attention to temperature and light.
* Potting Mix: Avoid using garden soil directly in your pots. It compacts easily and doesn’t provide adequate drainage. Instead, opt for a well-draining potting mix specifically formulated for containers. You can also create your own mix by combining equal parts of:
* Peat moss or coco coir (for moisture retention)
* Perlite or vermiculite (for drainage and aeration)
* Compost (for nutrients)
Planting Your Garlic Cloves
Now for the fun part – planting! This is where we transform individual garlic cloves into potential garlic plants.
1. Prepare the Pot: Choose a pot that is at least 6 inches deep and has drainage holes. Fill the pot with your chosen potting mix, leaving about an inch of space at the top.
2. Select Healthy Cloves: Separate the cloves from the garlic bulb carefully, making sure not to damage them. Choose the largest and healthiest-looking cloves for planting. These will have the best chance of success.
3. Plant the Cloves: Plant the cloves pointy-side up, about 2 inches deep and 4 inches apart. This spacing allows for adequate growth. Gently press the cloves into the soil and cover them with the potting mix.
4. Water Thoroughly: After planting, water the soil thoroughly until water drains out of the bottom of the pot. This helps settle the soil and provides the cloves with the initial moisture they need.
Caring for Your Indoor Garlic Plants
Consistent care is essential for healthy garlic growth. This includes proper watering, lighting, and fertilization.
1. Watering: Keep the soil consistently moist, but not waterlogged. Water when the top inch of soil feels dry to the touch. Overwatering can lead to root rot, so be mindful of drainage.
2. Lighting: Garlic needs at least 6 hours of sunlight per day. Place your pot near a sunny window, preferably a south-facing one. If you don’t have enough natural light, you can supplement with a grow light. Position the grow light about 6-12 inches above the plants.
3. Fertilizing: Garlic is a heavy feeder, so regular fertilization is important. Start fertilizing about 2-3 weeks after planting, once the plants have started to sprout. Use a balanced liquid fertilizer (e.g., 10-10-10) diluted to half strength. Fertilize every 2-3 weeks during the growing season.
4. Temperature: Garlic prefers cooler temperatures, ideally between 60-70°F (15-21°C). Avoid placing your plants near heat sources like radiators or vents.
5. Pest Control: Keep an eye out for common indoor plant pests like aphids or spider mites. If you notice any pests, treat them with insecticidal soap or neem oil.
Harvesting Garlic Greens (Scapes)
While you might not get full-sized garlic bulbs indoors, you can definitely harvest the delicious garlic greens, also known as scapes.
* When to Harvest: You can start harvesting garlic greens when they are about 6-8 inches tall.
* How to Harvest: Use scissors or a sharp knife to cut the greens near the base of the plant, leaving about 2 inches of growth. This allows the plant to continue growing.
* Using Garlic Greens: Garlic greens have a mild garlic flavor and can be used in a variety of dishes. Chop them up and add them to salads, soups, stir-fries, or use them as a garnish.
Encouraging Bulb Formation (Optional)
While indoor garlic growing is primarily for the greens, you can try to encourage bulb formation, although the bulbs will likely be smaller than those grown outdoors.
1. Cold Stratification (Simulated): To mimic the cold stratification process, you can place your pot in a cool (but not freezing) location for a few weeks. A garage or unheated porch can work well. This helps trigger bulb formation.
2. Reduce Watering: As the plants mature, gradually reduce watering to encourage the bulbs to dry out.
3. Harvesting Bulbs: If you decide to harvest the bulbs, wait until the leaves start to turn yellow and brown. Gently dig up the bulbs and let them cure in a dry, well-ventilated place for a few weeks.
Troubleshooting Common Issues
Even with the best care, you might encounter a few challenges along the way. Here are some common issues and how to address them:
* Yellowing Leaves: This can be caused by overwatering, underwatering, nutrient deficiencies, or pests. Check the soil moisture, fertilize if needed, and inspect for pests.
* Slow Growth: This can be due to insufficient light, poor soil, or lack of nutrients. Ensure your plants are getting enough light, use a good quality potting mix, and fertilize regularly.
* Root Rot: This is caused by overwatering and poor drainage. Make sure your pot has drainage holes and avoid overwatering. If you suspect root rot, repot the plant with fresh potting mix.
* Pests: Regularly inspect your plants for pests and treat them promptly with insecticidal soap or neem oil.
Enjoying Your Homegrown Garlic
Growing garlic indoors is a rewarding experience that allows you to enjoy fresh, flavorful garlic greens year-round. With a little care and attention, you can have a thriving indoor garlic garden that adds a touch of green to your home and enhances your culinary creations. Don’t be discouraged if your first attempt isn’t perfect. Gardening is all about learning and experimenting. So, get your hands dirty, have fun, and enjoy the fruits (or rather, the greens!) of your labor!
Conclusion
So, there you have it! Growing your own garlic indoors is not only achievable, but it’s also incredibly rewarding. Imagine the satisfaction of snipping fresh, pungent garlic greens to add a burst of flavor to your dishes, all from the comfort of your own home. This simple DIY trick transforms discarded garlic cloves into a continuous supply of deliciousness, minimizing waste and maximizing flavor.
Why is this a must-try? Because it’s easy, economical, and environmentally friendly. You’re repurposing something you’d normally throw away, reducing your grocery bill, and enjoying the freshest possible ingredients. Plus, it’s a fantastic way to add a touch of green to your indoor space, especially during the colder months when outdoor gardening is limited.
But don’t stop there! Experiment with different varieties of garlic to discover your favorite flavor profiles. Try planting multiple cloves in the same container for a fuller, more abundant harvest of greens. You can even use different types of containers – from repurposed yogurt cups to decorative planters – to match your personal style. Consider adding a small amount of organic fertilizer to the soil every few weeks to boost growth and enhance the flavor of the garlic greens.
This indoor garlic growing method is a game-changer for any home cook or gardening enthusiast. It’s a simple yet effective way to bring the garden indoors and enjoy the unparalleled taste of freshly grown garlic.
We encourage you to give this DIY trick a try. It’s a fun and fulfilling project that will add a touch of freshness to your kitchen and a burst of flavor to your meals. Don’t be afraid to experiment and adapt the method to suit your own needs and preferences.
Once you’ve experienced the joy of growing your own garlic indoors, we’d love to hear about your experience! Share your tips, tricks, and photos in the comments below. Let’s create a community of indoor garlic growers and inspire others to embrace this simple and sustainable practice. What variety of garlic did you use? What container worked best for you? What dishes did you enhance with your homegrown garlic greens? Your insights will be invaluable to others who are just starting out. So, get planting and let the garlic growing adventures begin!
Frequently Asked Questions (FAQs)
What kind of garlic should I use for indoor growing?
You can use any type of garlic clove for indoor growing, but some varieties tend to sprout more readily than others. Softneck garlic varieties, like California White or Silverskin, are generally considered easier to grow indoors because they don’t require a cold period to initiate sprouting. However, hardneck varieties, like Rocambole or Porcelain, can also be grown indoors, although they may take a bit longer to sprout. Experiment with different varieties to see which ones thrive best in your indoor environment. Remember that organic garlic is always a good choice to avoid any potential pesticide residue.
How much sunlight does indoor garlic need?
Garlic greens need at least 4-6 hours of sunlight per day to thrive. Place your container near a sunny window, preferably a south-facing one. If you don’t have access to enough natural light, you can supplement with a grow light. LED grow lights are energy-efficient and provide the full spectrum of light that plants need for healthy growth. Position the grow light a few inches above the garlic greens and keep it on for 12-14 hours per day.
What kind of soil should I use?
Use a well-draining potting mix that is rich in organic matter. A mixture of potting soil, compost, and perlite or vermiculite is ideal. Avoid using garden soil, as it can be too heavy and may contain pests or diseases. The soil should be moist but not soggy. Overwatering can lead to root rot, so make sure the container has drainage holes.
How often should I water my indoor garlic?
Water your garlic when the top inch of soil feels dry to the touch. Avoid overwatering, as this can lead to root rot. Water thoroughly until water drains out of the drainage holes. Reduce watering during the winter months when the garlic is not actively growing.
How long does it take for garlic to sprout indoors?
Garlic cloves typically sprout within 1-2 weeks of planting. The exact time will depend on the variety of garlic, the temperature, and the amount of light it receives. Keep the soil consistently moist and provide adequate sunlight to encourage sprouting.
Can I grow a full garlic bulb indoors?
While you can technically grow a full garlic bulb indoors, it’s more challenging than growing garlic greens. Growing a full bulb requires a larger container, more sunlight, and a longer growing season. It’s also important to provide a cold period (vernalization) to encourage bulb formation. For most home gardeners, growing garlic greens is a more practical and rewarding option.
How do I harvest garlic greens?
You can start harvesting garlic greens when they are about 6-8 inches tall. Use scissors or a sharp knife to snip off the greens near the base of the plant, leaving about an inch or two of growth. This will allow the plant to continue producing new greens. Harvest the greens as needed, and use them fresh in your favorite dishes.
What can I do with garlic greens?
Garlic greens have a mild, garlicky flavor that is perfect for adding to salads, soups, stir-fries, and other dishes. They can also be used to make pesto, garlic butter, or infused oil. Garlic greens are a versatile ingredient that can be used in a variety of ways.
Are there any pests or diseases that affect indoor garlic?
Indoor garlic is generally less susceptible to pests and diseases than outdoor garlic. However, aphids, spider mites, and fungus gnats can sometimes be a problem. Inspect your plants regularly for signs of infestation and take action promptly if you notice any pests. You can control aphids and spider mites with insecticidal soap or neem oil. Fungus gnats can be controlled by allowing the soil to dry out slightly between waterings.
Can I replant the garlic clove after harvesting the greens?
Yes, you can replant the garlic clove after harvesting the greens. However, the clove may be depleted of nutrients and may not produce as many greens as it did initially. It’s generally best to start with a fresh garlic clove for each planting.
How long will my indoor garlic plant last?
With proper care, your indoor garlic plant can last for several months, providing you with a continuous supply of fresh garlic greens. However, the plant will eventually become less productive and may need to be replaced. Start a new batch of garlic cloves every few weeks to ensure a continuous supply of greens.
Can I use this method to grow other herbs indoors?
Yes, the same principles can be applied to growing other herbs indoors, such as chives, scallions, and onions. These herbs also have edible greens that can be harvested and used in cooking. Experiment with different herbs to create your own indoor herb garden.
Leave a Comment