

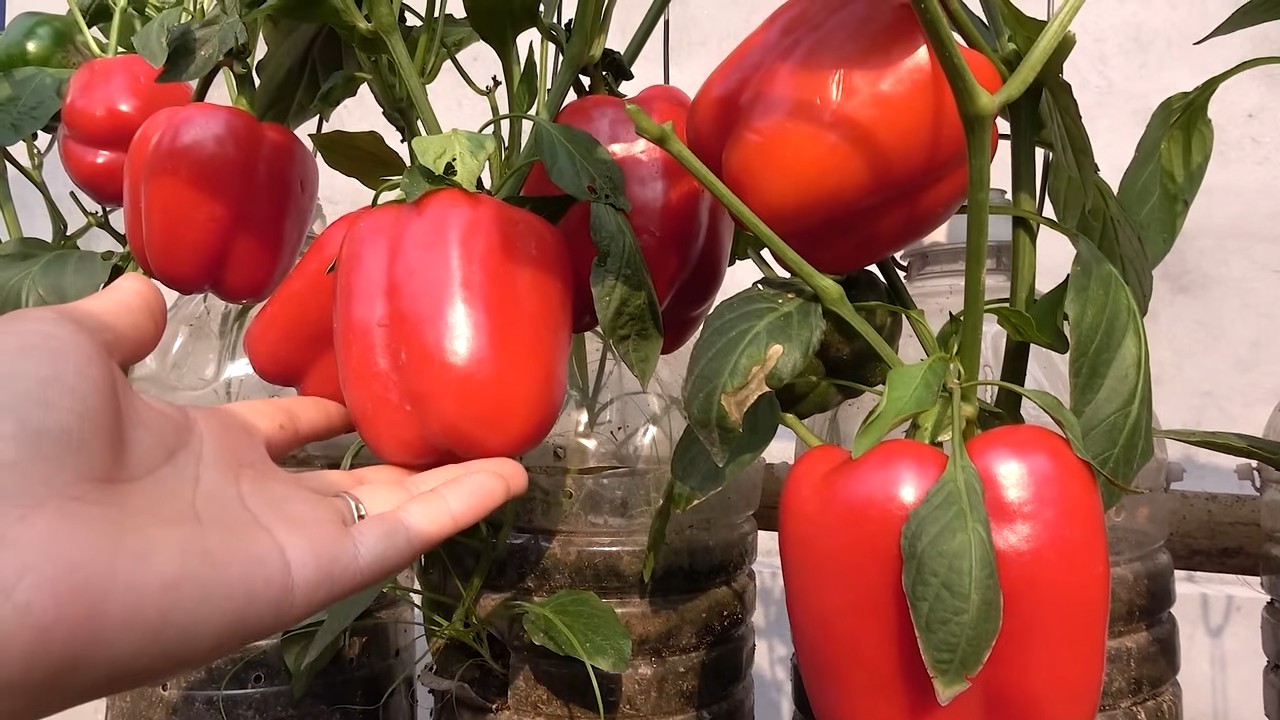
Bell Peppers and Recycled Bottles: Who knew these two seemingly unrelated things could be the secret to a thriving garden? I’m so excited to share some amazing home gardening tricks with you, focusing on how to use recycled bottles to boost your bell pepper harvest! For centuries, resourceful gardeners have been finding innovative ways to maximize their yields, often relying on simple, readily available materials. Think about it – our grandparents didn’t have fancy garden centers, yet they grew incredible produce!
But why should you bother with this DIY project? Well, growing bell peppers can be tricky. They need consistent warmth and protection, especially in cooler climates. That’s where our recycled bottle hack comes in! Using recycled bottles creates a mini-greenhouse effect, warming the soil and shielding your precious bell pepper plants from harsh winds and unexpected frosts. Plus, it’s a fantastic way to reduce waste and give those plastic bottles a new lease on life.
This isn’t just about saving money; it’s about connecting with nature, reducing our environmental impact, and enjoying the satisfaction of growing your own delicious, vibrant bell peppers. So, grab those empty bottles, and let’s dive into some easy and effective DIY tricks that will transform your garden and have you harvesting a bumper crop of bell peppers in no time!
DIY: Paprika-Pflanzgefäße aus PET-Flaschen – Upcycling für den Garten!
Hallo liebe Gartenfreunde! Habt ihr auch immer so viele PET-Flaschen rumstehen? Anstatt sie wegzuwerfen, zeige ich euch heute, wie ihr daraus super praktische und stylische Pflanzgefäße für eure Paprika machen könnt. Das ist nicht nur gut für die Umwelt, sondern auch eine tolle Möglichkeit, euren Garten oder Balkon aufzupeppen. Und das Beste: Es ist super einfach und kostengünstig!
Was ihr braucht:
* PET-Flaschen (am besten 1,5 oder 2 Liter)
* Ein scharfes Messer oder eine Schere
* Einen wasserfesten Stift
* Erde (am besten spezielle Gemüseerde)
* Paprika-Setzlinge (oder Samen, wenn ihr etwas mehr Geduld habt)
* Optional: Sprühfarbe (für ein individuelles Design)
* Optional: Kleine Steine oder Tonscherben (für die Drainage)
* Optional: Handschuhe (um eure Hände sauber zu halten)
Vorbereitung der PET-Flaschen
Bevor wir loslegen, müssen wir die PET-Flaschen vorbereiten. Das ist aber wirklich kein Hexenwerk!
1. Reinigung: Zuerst solltet ihr die Flaschen gründlich reinigen. Entfernt alle Etiketten und spült sie mit warmem Wasser und Spülmittel aus. Achtet darauf, dass keine Rückstände mehr vorhanden sind. Lasst sie anschließend gut trocknen.
2. Markierung: Jetzt kommt der Stift zum Einsatz. Markiert mit dem wasserfesten Stift, wo ihr die Flasche schneiden wollt. Ich empfehle, die Flasche etwa 15-20 cm vom Boden entfernt zu schneiden. So habt ihr genug Platz für die Erde und die Paprika-Pflanze. Ihr könnt die Höhe aber auch an die Größe eurer Setzlinge anpassen.
3. Schneiden: Nehmt nun das scharfe Messer oder die Schere und schneidet die Flasche entlang der Markierung durch. Seid dabei vorsichtig, damit ihr euch nicht verletzt! Am besten geht das, indem ihr mit dem Messer vorsichtig anritzt und dann mit der Schere den Rest schneidet.
4. Kanten glätten: Die Schnittkanten können manchmal etwas scharf sein. Um Verletzungen zu vermeiden und das Ganze optisch ansprechender zu gestalten, könnt ihr die Kanten mit Schleifpapier oder einem Feuerzeug (vorsichtig!) glätten.
Gestaltung der Pflanzgefäße (Optional)
Wenn ihr eure Pflanzgefäße etwas individueller gestalten wollt, könnt ihr sie jetzt bemalen oder besprühen.
1. Grundierung (Optional): Wenn ihr dunkle Flaschen verwendet und helle Farben auftragen wollt, empfiehlt es sich, zuerst eine Grundierung aufzutragen. So decken die Farben besser.
2. Bemalen/Besprühen: Lasst eurer Kreativität freien Lauf! Ihr könnt die Flaschen mit Sprühfarbe in euren Lieblingsfarben besprühen oder mit Acrylfarben bemalen. Wie wäre es mit bunten Mustern, lustigen Gesichtern oder einfach nur einem schlichten Farbton? Achtet darauf, dass die Farben wasserfest sind, damit sie auch bei Regenwetter halten.
3. Trocknen lassen: Lasst die Farbe gut trocknen, bevor ihr mit dem nächsten Schritt fortfahrt.
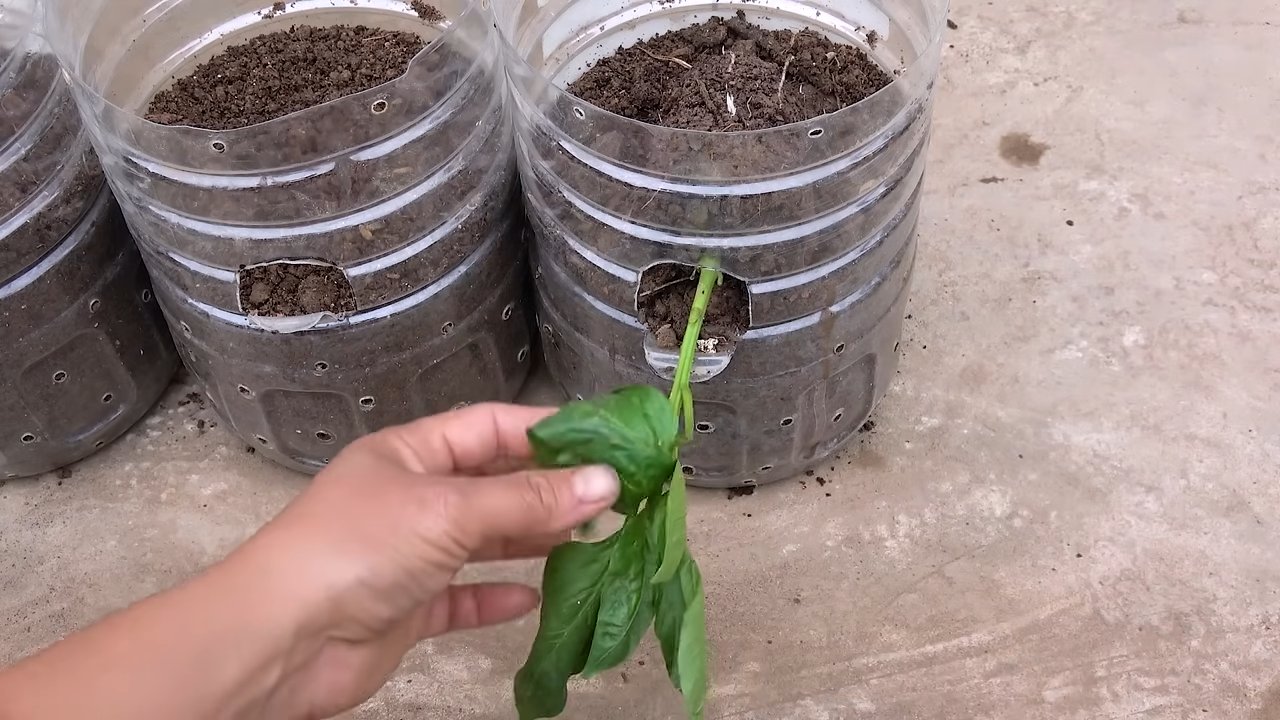
Bepflanzung der PET-Flaschen
Jetzt kommt der spannende Teil: Wir bepflanzen die vorbereiteten Flaschen mit unseren Paprika-Setzlingen!
1. Drainage (Optional): Um Staunässe zu vermeiden, könnt ihr eine Drainageschicht am Boden der Flasche anlegen. Gebt dazu eine Schicht kleine Steine oder Tonscherben in die Flasche.
2. Erde einfüllen: Füllt die Flasche mit Erde. Ich empfehle spezielle Gemüseerde, da diese die optimalen Nährstoffe für eure Paprika-Pflanzen enthält. Lasst oben etwa 2-3 cm Platz, damit ihr beim Gießen nicht gleich alles überschwemmt.
3. Pflanzloch vorbereiten: Macht mit den Fingern ein kleines Loch in die Erde, das groß genug für den Wurzelballen des Paprika-Setzlings ist.
4. Setzling einsetzen: Nehmt den Paprika-Setzling vorsichtig aus dem Topf und setzt ihn in das vorbereitete Loch. Achtet darauf, dass die Wurzeln nicht beschädigt werden.
5. Mit Erde auffüllen: Füllt das Loch mit Erde auf und drückt sie leicht an.
6. Angießen: Gießt die Paprika-Pflanze vorsichtig an. Achtet darauf, dass die Erde gut durchfeuchtet ist, aber nicht zu nass ist.
Pflege der Paprika-Pflanzen
Damit eure Paprika-Pflanzen gut gedeihen und euch mit einer reichen Ernte belohnen, solltet ihr sie regelmäßig pflegen.
* Standort: Paprika-Pflanzen lieben die Sonne! Stellt eure Pflanzgefäße an einen sonnigen und warmen Ort. Ideal sind mindestens 6 Stunden Sonne pro Tag.
* Gießen: Gießt eure Paprika-Pflanzen regelmäßig, aber vermeidet Staunässe. Die Erde sollte immer leicht feucht sein. An heißen Tagen müsst ihr möglicherweise täglich gießen.
* Düngen: Paprika-Pflanzen sind Starkzehrer und benötigen regelmäßig Dünger. Verwendet am besten einen speziellen Gemüsedünger oder Kompost.
* Ausgeizen: Entfernt regelmäßig die Seitentriebe (Geiztriebe) zwischen Haupttrieb und Blattachseln. Das fördert das Wachstum der Früchte.
* Stützen: Wenn die Paprika-Pflanzen größer werden und Früchte tragen, kann es sinnvoll sein, sie mit einem Stab zu stützen, damit sie nicht umknicken.
* Schutz vor Schädlingen: Achtet auf Schädlinge wie Blattläuse oder Spinnmilben. Bei Bedarf könnt ihr biologische Schädlingsbekämpfungsmittel einsetzen.
Tipps und Tricks
* Verschiedene Flaschengrößen: Verwendet verschiedene Flaschengrößen für unterschiedliche Paprika-Sorten. Kleinere Flaschen eignen sich gut für kleinere Sorten, größere Flaschen für größere Sorten.
* Mehrere Pflanzen pro Flasche: In größere Flaschen könnt ihr auch mehrere Paprika-Pflanzen setzen. Achtet aber darauf, dass sie genügend Platz haben, um sich zu entwickeln.
* Hängende Pflanzgefäße: Mit etwas Geschick könnt ihr die PET-Flaschen auch in hängende Pflanzgefäße verwandeln. Bohrt dazu einfach Löcher in die Flaschen und zieht eine Schnur oder Kette hindurch.
* Beschriftung: Beschriftet die Flaschen mit den Namen der Paprika-Sorten, damit ihr den Überblick behaltet.
* Upcycling-Projekt für Kinder: Dieses DIY-Projekt ist auch eine tolle Möglichkeit, Kinder für das Gärtnern und Upcycling zu begeistern.
Ich hoffe, diese Anleitung hat euch gefallen und inspiriert, eure eigenen Paprika-Pflanzgefäße aus PET-Flaschen zu basteln. Es ist eine einfache, kostengünstige und umweltfreundliche Möglichkeit, euren Garten oder Balkon zu verschönern und gleichzeitig etwas für die Umwelt zu tun. Viel Spaß beim Gärtnern!
Conclusion
So, there you have it! Transforming discarded plastic bottles into self-watering planters for your bell peppers isn’t just a clever upcycling project; it’s a game-changer for your gardening efforts. This simple DIY trick addresses several common gardening challenges, from inconsistent watering to space constraints, all while giving you a rewarding sense of accomplishment and reducing plastic waste.
Why is this a must-try? Because it’s efficient, economical, and environmentally friendly. You’re providing your bell peppers with a consistent water supply, promoting healthier growth and potentially larger, more flavorful yields. You’re saving money by repurposing materials that would otherwise end up in the landfill. And you’re contributing to a more sustainable lifestyle by reducing your reliance on commercially produced planters.
But the beauty of this DIY project lies in its adaptability. Feel free to experiment with different bottle sizes to accommodate various bell pepper varieties and growth stages. Consider adding a layer of pebbles or gravel at the bottom of the bottle to improve drainage and prevent root rot. You can also customize the appearance of your planters by painting them with vibrant colors or adding decorative elements. For those with limited sunlight, consider using grow lights to supplement natural light and ensure optimal bell pepper growth. You can even adapt this method for other plants that thrive in similar conditions, such as tomatoes, herbs, or even strawberries.
Don’t be afraid to get creative and personalize your self-watering planters to suit your specific needs and preferences. The key is to ensure proper drainage and a consistent water supply to keep your bell peppers happy and healthy.
We wholeheartedly encourage you to try this DIY trick and experience the benefits firsthand. It’s a fun, rewarding project that will not only enhance your gardening skills but also contribute to a more sustainable future. Once you’ve created your own self-watering bell pepper planters, we’d love to hear about your experience! Share your photos, tips, and variations in the comments below. Let’s build a community of resourceful gardeners who are passionate about growing their own food and reducing their environmental impact. Let us know how this **bell peppers recycled bottles** project worked for you! Happy gardening!
Frequently Asked Questions (FAQ)
What type of plastic bottles are best for this project?
Ideally, you should use PET (Polyethylene Terephthalate) plastic bottles, which are commonly used for water and soda. These bottles are durable, lightweight, and readily available. Avoid using bottles made from other types of plastic, especially those that are not food-grade, as they may leach harmful chemicals into the soil. Make sure the bottles are clean and free of any residue before using them. Thoroughly wash them with soap and water, and rinse them well.
How often do I need to refill the water reservoir?
The frequency of refilling the water reservoir depends on several factors, including the size of the bottle, the weather conditions, and the size of your bell pepper plant. In general, you should check the water level every few days and refill it when it’s about halfway empty. During hot, sunny weather, you may need to refill it more frequently. Conversely, during cooler, cloudy weather, you may need to refill it less often. Observe your plants closely and adjust the watering schedule accordingly. Wilting leaves are a sign that the plant needs more water, while soggy soil indicates overwatering.
What type of soil should I use for my bell pepper plants in these self-watering planters?
Use a well-draining potting mix specifically formulated for vegetables. Avoid using garden soil, as it can become compacted and impede drainage. A good potting mix will provide adequate aeration and drainage, allowing the roots to thrive. You can also amend the potting mix with compost or other organic matter to improve its fertility and water-holding capacity.
Can I use this method for other plants besides bell peppers?
Yes, this method can be adapted for other plants that thrive in similar conditions, such as tomatoes, herbs, strawberries, and even some flowers. The key is to choose plants that prefer consistent moisture and well-draining soil. You may need to adjust the size of the bottle and the watering frequency depending on the specific needs of the plant. For example, plants with shallow roots may require smaller bottles and more frequent watering, while plants with deep roots may benefit from larger bottles and less frequent watering.
How do I prevent algae growth in the water reservoir?
Algae growth can be a common problem in self-watering planters, especially if they are exposed to direct sunlight. To prevent algae growth, you can paint the outside of the bottle with a dark color or wrap it with opaque tape to block out light. You can also add a small amount of hydrogen peroxide to the water reservoir to kill algae spores. However, be careful not to add too much hydrogen peroxide, as it can harm the plants. A concentration of 1 teaspoon per gallon of water is generally safe.
What if my bell pepper plant outgrows the bottle?
If your bell pepper plant outgrows the bottle, you can either transplant it into a larger container or create a larger self-watering planter using a bigger bottle or a different type of container. When transplanting, be careful not to damage the roots. Gently loosen the soil around the roots and carefully lift the plant out of the bottle. Plant it in the new container at the same depth as it was in the bottle. Water thoroughly after transplanting.
How do I fertilize my bell pepper plants in these self-watering planters?
You can fertilize your bell pepper plants by adding a liquid fertilizer to the water reservoir. Choose a fertilizer specifically formulated for vegetables and follow the instructions on the label. Avoid over-fertilizing, as this can harm the plants. It’s generally best to fertilize every few weeks during the growing season. You can also add slow-release fertilizer granules to the potting mix when you plant the bell peppers.
What are some common problems I might encounter, and how do I fix them?
Some common problems you might encounter include root rot, nutrient deficiencies, and pest infestations. Root rot can occur if the soil is too wet or if the drainage is poor. To prevent root rot, ensure that the soil is well-draining and avoid overwatering. Nutrient deficiencies can occur if the soil is lacking essential nutrients. To prevent nutrient deficiencies, fertilize your plants regularly with a balanced fertilizer. Pest infestations can occur if the plants are not properly cared for. To prevent pest infestations, inspect your plants regularly for signs of pests and take appropriate action if you find any. You can use organic pest control methods, such as insecticidal soap or neem oil, to control pests.
Can I use this method indoors?
Yes, you can use this method indoors, but you’ll need to provide adequate light for your bell pepper plants. Bell peppers need at least 6-8 hours of direct sunlight per day. If you don’t have enough natural light, you can use grow lights to supplement the light. Place the grow lights close to the plants and adjust the height as the plants grow. You’ll also need to ensure that the plants have adequate ventilation to prevent fungal diseases.
How does this DIY trick help with water conservation?
This DIY self-watering system significantly reduces water waste. The water is delivered directly to the roots of the bell pepper plant, minimizing evaporation and runoff. This targeted watering approach ensures that the plant receives the precise amount of water it needs, preventing overwatering and conserving precious water resources. By using recycled bottles, you are also contributing to a more sustainable environment by reducing plastic waste and promoting resourcefulness.
Leave a Comment