

Bottle gardening eggplants might sound like something out of a sci-fi movie, but trust me, it’s a surprisingly simple and rewarding way to grow your own delicious, glossy eggplants, even if you’re short on space! Have you ever dreamed of harvesting your own fresh vegetables but felt limited by a tiny balcony or lack of a traditional garden? Well, dream no more! This DIY guide will unlock the secrets to successful eggplant cultivation using recycled bottles – a method that’s not only eco-friendly but also incredibly effective.
The concept of container gardening, in general, has roots stretching back centuries, with evidence of early civilizations utilizing pots and vessels to cultivate plants in controlled environments. While bottle gardening is a more modern adaptation, it taps into that same resourceful spirit. It’s about making the most of what you have and connecting with nature, regardless of your living situation.
Why should you embrace this bottle gardening eggplants trick? Because it’s a game-changer! It allows you to control the soil quality, protect your plants from ground-dwelling pests, and even move them around to optimize sunlight exposure. Plus, it’s a fantastic way to reduce waste and give those plastic bottles a new lease on life. I’m excited to share these simple steps that will have you harvesting your own homegrown eggplants in no time. Let’s get started!

DIY Bottle Gardening: Growing Eggplants in Recycled Plastic
Hey there, fellow gardening enthusiasts! Ever thought about turning those empty plastic bottles into thriving mini-gardens? I’m here to show you how to grow delicious eggplants right in them! It’s a fantastic way to recycle, save space, and enjoy fresh, homegrown produce. Let’s dive in!
What You’ll Need
Before we get started, let’s gather our supplies. This is a pretty straightforward project, so you probably have most of these things lying around already.
* Plastic Bottles: The bigger, the better! Think 2-liter soda bottles, juice containers, or even larger water bottles. Make sure they’re clean and free of any residue. You’ll need at least one bottle per eggplant plant.
* Eggplant Seeds or Seedlings: You can start from seeds or buy small seedlings from your local nursery. Seedlings will give you a head start.
* Potting Soil: Use a good quality potting mix that drains well. Avoid garden soil, as it can compact in containers.
* Scissors or a Utility Knife: For cutting the plastic bottles. Be careful!
* Drill or Nail: To create drainage holes.
* Watering Can or Spray Bottle: For watering your plants.
* Optional: Gravel or Small Stones: To improve drainage at the bottom of the bottle.
* Optional: Plant Markers: To label your eggplant varieties.
* Optional: Fertilizer: A balanced liquid fertilizer to feed your plants.
Preparing the Bottles
Okay, let’s get those bottles ready for their new life as eggplant homes!
1. Clean the Bottles: Wash the bottles thoroughly with soap and water to remove any dirt or sticky residue. Rinse them well and let them dry completely. This is super important to prevent any mold or bacteria growth later on.
2. Cut the Bottles: This is where the scissors or utility knife come in. There are a couple of ways you can do this:
* Method 1: Vertical Cut (for Larger Plants): Cut the bottle vertically, almost in half, leaving a small section connected at the bottom. This creates a clamshell-like container. This is great if you want to eventually transplant the eggplant into a larger pot.
* Method 2: Horizontal Cut (for Smaller Plants or Seedlings): Cut the bottle horizontally, about one-third of the way down from the top. You’ll end up with two pieces: the top part (which we’ll use as a mini-greenhouse later) and the bottom part (which will be our planting container). This is my preferred method for starting seedlings.
* Method 3: Hanging Planter: Cut a large rectangular window out of the side of the bottle, leaving the top and bottom intact. This creates a hanging planter. You’ll need to add drainage holes to the bottom.
Safety First! Be extremely careful when using sharp objects. Always cut away from yourself and use a stable surface.
3. Create Drainage Holes: This is crucial! Eggplants don’t like soggy roots. Use a drill or a heated nail to create several drainage holes in the bottom of the bottle. I usually make about 5-6 holes, depending on the size of the bottle. If you’re using the vertical cut method, make sure to add holes to both halves of the bottle.
4. Optional: Add Gravel: Place a layer of gravel or small stones at the bottom of the bottle to further improve drainage. This helps prevent the soil from becoming waterlogged.
Planting Your Eggplants
Now for the fun part – planting!
1. Fill with Potting Soil: Fill the bottle with potting soil, leaving about an inch of space at the top. Gently pat down the soil to remove any air pockets.
2. Plant Your Seeds or Seedlings:
* From Seeds: Sow the eggplant seeds according to the instructions on the seed packet. Usually, this means planting them about ¼ inch deep. Water gently after planting.
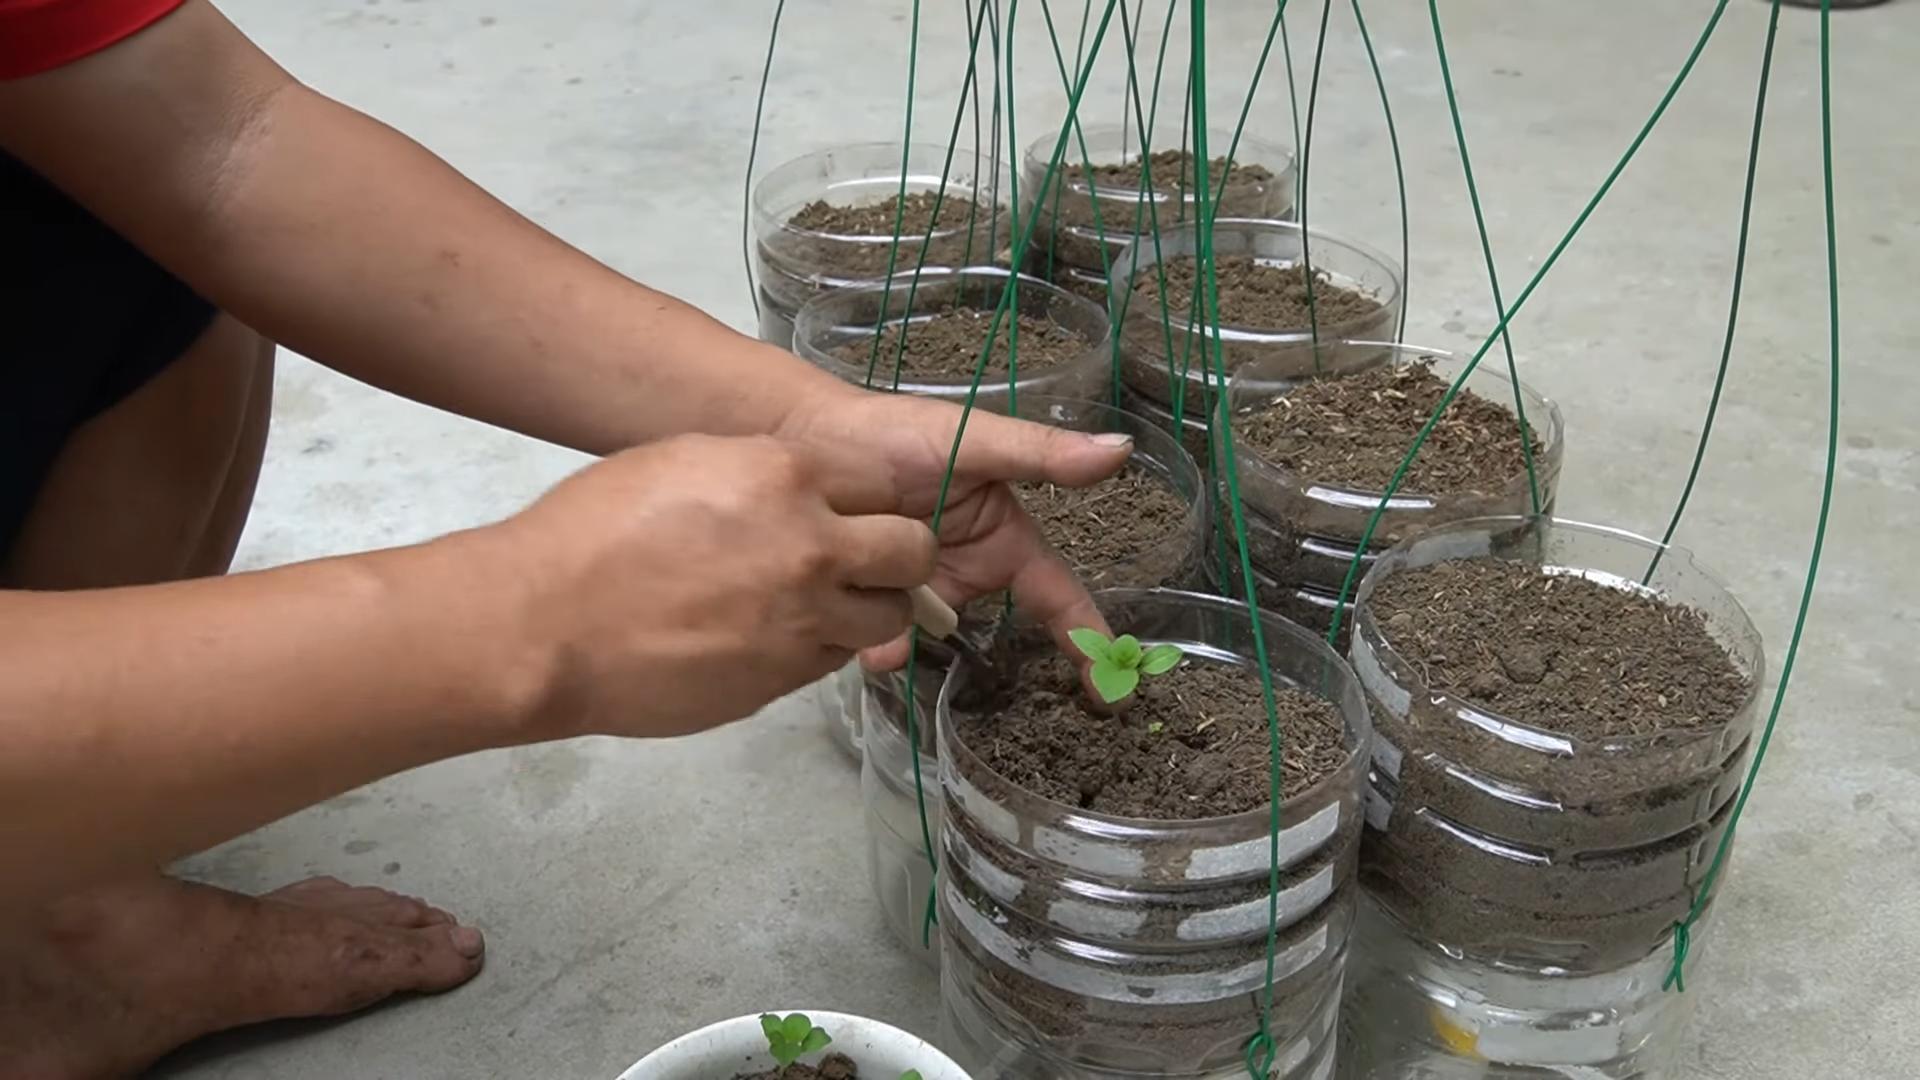
* From Seedlings: Gently remove the seedling from its container. Loosen the roots slightly. Dig a small hole in the potting soil and place the seedling in the hole. Backfill with soil and gently pat it down. Water thoroughly.
3. Water Thoroughly: Water the soil until it’s evenly moist, but not soggy.
4. Optional: Mini-Greenhouse (for Seedlings): If you used the horizontal cut method, place the top part of the bottle over the bottom part to create a mini-greenhouse. This will help keep the seedlings warm and humid, promoting faster growth. Remove the top once the seedlings have sprouted and are starting to outgrow it.
5. Label Your Plants: Use plant markers to label your eggplant varieties. This will help you keep track of which plants are which.
Caring for Your Eggplants
Okay, you’ve planted your eggplants! Now it’s time to give them the TLC they need to thrive.
1. Sunlight: Eggplants need at least 6-8 hours of sunlight per day. Place your bottle gardens in a sunny location, such as a windowsill, balcony, or patio. If you don’t have enough natural sunlight, you can supplement with grow lights.
2. Watering: Water your eggplants regularly, especially during hot weather. Check the soil moisture by sticking your finger into the soil. If the top inch of soil feels dry, it’s time to water. Avoid overwatering, as this can lead to root rot.
3. Fertilizing: Feed your eggplants with a balanced liquid fertilizer every 2-3 weeks. Follow the instructions on the fertilizer label. Eggplants are heavy feeders, so regular fertilization is important for healthy growth and fruit production.
4. Support: As your eggplant plants grow, they may need support. You can use stakes or trellises to keep the plants upright and prevent the branches from breaking under the weight of the fruit.
5. Pest Control: Keep an eye out for pests, such as aphids, spider mites, and flea beetles. If you notice any pests, you can try spraying the plants with insecticidal soap or neem oil. You can also handpick the pests off the plants.
6. Pollination: Eggplants are self-pollinating, but they benefit from insect pollination. You can attract pollinators to your garden by planting flowers nearby. You can also hand-pollinate the flowers by gently shaking the plants or using a small paintbrush to transfer pollen from one flower to another.
Harvesting Your Eggplants
The moment you’ve been waiting for – harvesting your delicious, homegrown eggplants!
1. When to Harvest: Eggplants are typically ready to harvest about 60-80 days after transplanting. The fruit should be firm, glossy, and have a deep, rich color. The skin should be smooth and unblemished.
2. How to Harvest: Use a sharp knife or pruning shears to cut the eggplant from the plant. Leave about an inch of stem attached to the fruit.
3. Enjoy Your Harvest: Eggplants can be used in a variety of dishes, such as eggplant parmesan, ratatouille, and baba ghanoush. They can also be grilled, roasted, or stir-fried.
Troubleshooting
Even with the best care, you might encounter a few challenges along the way. Here are some common problems and how to fix them:
* Yellowing Leaves: This could be a sign of overwatering, underwatering, or nutrient deficiency. Check the soil moisture and adjust your watering schedule accordingly. Fertilize the plants with a balanced fertilizer.
* Drooping Leaves: This could be a sign of underwatering or heat stress. Water the plants thoroughly and provide shade during the hottest part of the day.
* Lack of Fruit: This could be due to poor pollination, lack of sunlight, or nutrient deficiency. Hand-pollinate the flowers, move the plants to a sunnier location, and fertilize them with a balanced fertilizer.
* Pests: Inspect your plants regularly for pests and take action immediately if you find any. Use insecticidal soap, neem oil, or handpick the pests off the plants.
Tips for Success
Here are a few extra tips to help you succeed with your bottle gardening project:
* Choose the Right Eggplant Variety: Some eggplant varieties are better suited for container gardening than others. Look for compact or dwarf varieties.
* Use High-Quality Potting Soil: Don’t skimp on the potting soil. Use a good quality potting mix that drains well.
* Provide Adequate Drainage: Drainage is crucial for healthy eggplant growth. Make sure your bottles have plenty of drainage holes.
* Water Regularly: Eggplants need consistent moisture, especially during hot weather.
* Fertilize Regularly: Eggplants are heavy feeders and need regular fertilization.
* Protect from Frost: Eggplants are sensitive to frost. If you
Conclusion
So, there you have it! Transforming a simple plastic bottle into a thriving eggplant haven is not just a quirky gardening experiment; it’s a sustainable, space-saving, and surprisingly effective way to cultivate your own delicious produce. We’ve walked you through the process, highlighting the key steps and offering insights to ensure your success. But why is this DIY bottle gardening trick a must-try?
Firstly, it’s incredibly accessible. You likely already have the primary ingredient – a plastic bottle – readily available, reducing waste and promoting upcycling. Secondly, it’s perfect for urban dwellers or anyone with limited garden space. Balconies, patios, even sunny windowsills can become mini-eggplant farms. Thirdly, it’s a fantastic learning experience, connecting you more deeply with the food you eat and fostering a greater appreciation for the natural world.
Beyond the basic method, there’s ample room for personalization and experimentation. Consider these variations to tailor your bottle gardening experience:
* Vertical Gardening: Create a stunning vertical garden by hanging multiple bottle planters from a wall or fence. This maximizes space and adds a visually appealing element to your outdoor area.
* Companion Planting: Introduce companion plants like marigolds or basil to your bottle garden. These plants can deter pests and attract beneficial insects, creating a healthier environment for your eggplants.
* Nutrient Boost: Experiment with different organic fertilizers or compost teas to provide your eggplants with the nutrients they need to thrive. Monitor their growth and adjust your feeding schedule accordingly.
* Variety is the Spice of Life: Don’t limit yourself to just one type of eggplant! Try growing different varieties, such as Japanese eggplants, Thai eggplants, or even miniature eggplants, to add diversity to your harvest.
This DIY bottle gardening method offers a unique and rewarding way to grow your own eggplants, regardless of your gardening experience or available space. It’s a testament to the power of resourcefulness and a reminder that even the simplest materials can be transformed into something extraordinary.
We wholeheartedly encourage you to give this DIY trick a try. Embrace the challenge, get your hands dirty, and witness the magic of watching your own eggplants grow from seed to harvest. And most importantly, share your experience with us! We’d love to hear about your successes, your challenges, and any creative variations you come up with. Post photos of your bottle gardens on social media using #BottleEggplantGardening and tag us so we can celebrate your green thumb achievements. Let’s build a community of bottle gardeners and inspire others to embrace sustainable and rewarding gardening practices. Happy gardening!
Frequently Asked Questions (FAQ)
What type of plastic bottle is best for bottle gardening eggplants?
Ideally, you should use a sturdy, food-grade plastic bottle that is at least 2 liters in size. Clear or translucent bottles are preferable as they allow sunlight to reach the soil. Avoid using bottles that have contained harmful chemicals or pesticides. Thoroughly wash and rinse the bottle before using it for planting.
How often should I water my bottle garden eggplants?
The frequency of watering depends on several factors, including the size of the bottle, the type of soil, the weather conditions, and the size of the eggplant plant. Generally, you should water your bottle garden eggplants when the top inch of soil feels dry to the touch. Avoid overwatering, as this can lead to root rot. During hot and dry weather, you may need to water more frequently. A good rule of thumb is to check the soil moisture level daily and water as needed.
What kind of soil should I use for bottle gardening eggplants?
A well-draining potting mix is essential for bottle gardening eggplants. Avoid using garden soil, as it can be too heavy and compact, leading to poor drainage and root problems. A good potting mix should contain a blend of peat moss, perlite, and vermiculite. You can also add compost or other organic matter to improve the soil’s fertility and water retention.
How much sunlight do bottle garden eggplants need?
Eggplants require at least 6-8 hours of direct sunlight per day to thrive. Choose a location for your bottle garden that receives ample sunlight. If you live in a climate with intense sunlight, you may need to provide some shade during the hottest part of the day to prevent the plants from getting scorched.
How do I fertilize my bottle garden eggplants?
Eggplants are heavy feeders and require regular fertilization to produce a good harvest. You can use a balanced liquid fertilizer or a slow-release granular fertilizer. Follow the instructions on the fertilizer package carefully. Fertilize your bottle garden eggplants every 2-3 weeks during the growing season. You can also supplement with compost tea or other organic fertilizers.
How do I protect my bottle garden eggplants from pests and diseases?
Regularly inspect your bottle garden eggplants for signs of pests or diseases. Common pests that affect eggplants include aphids, spider mites, and flea beetles. You can control these pests with insecticidal soap, neem oil, or other organic pesticides. Common diseases that affect eggplants include fungal diseases like powdery mildew and blight. You can prevent these diseases by providing good air circulation, avoiding overwatering, and using a fungicide if necessary.
Can I grow eggplants in bottles indoors?
Yes, you can grow eggplants in bottles indoors, but you will need to provide them with adequate light. A sunny windowsill may not be sufficient, especially during the winter months. You may need to supplement with artificial lighting, such as grow lights. Also, ensure good air circulation to prevent fungal diseases.
How long does it take for eggplants to grow in bottles?
The time it takes for eggplants to grow in bottles depends on several factors, including the variety of eggplant, the growing conditions, and the size of the bottle. Generally, it takes about 60-80 days from transplanting seedlings to harvesting the first eggplants.
What are some common problems I might encounter when bottle gardening eggplants?
Some common problems you might encounter include:
* Yellowing leaves: This can be caused by overwatering, underwatering, nutrient deficiencies, or pests.
* Stunted growth: This can be caused by poor soil, lack of sunlight, or pests.
* Blossom drop: This can be caused by temperature fluctuations, lack of pollination, or nutrient deficiencies.
* Pest infestations: Regularly inspect your plants for pests and take action promptly.
* Root rot: Avoid overwatering and ensure good drainage.
Can I reuse the soil from my bottle garden for other plants?
It’s generally not recommended to reuse the soil from your bottle garden for other plants, especially if the eggplants experienced any diseases or pest infestations. The soil may contain pathogens or pests that could harm other plants. If you do choose to reuse the soil, sterilize it first by baking it in the oven at 200°F (93°C) for 30 minutes. However, it’s always best to start with fresh potting mix for each planting.
How do I know when my eggplants are ready to harvest?
Eggplants are typically ready to harvest when they are firm, glossy, and have reached their mature size and color. The skin should be smooth and unblemished. Gently press the eggplant with your thumb; if it gives slightly, it’s ready to harvest. Use a sharp knife or pruners to cut the eggplant from the plant, leaving a short stem attached.
Leave a Comment