

Brussel sprouts container gardening might sound intimidating, but trust me, it’s a rewarding and surprisingly simple way to enjoy fresh, homegrown sprouts, even if you don’t have a sprawling backyard! For centuries, these miniature cabbages have been a staple in European cuisine, with evidence suggesting their cultivation dates back to 13th-century Belgium – hence the name. Imagine, you can connect with that rich history right on your patio!
Are you tired of bland, store-bought Brussel sprouts? Do you dream of serving up a side dish bursting with flavor and freshness? Then this DIY guide is for you! I’m going to share my favorite tricks and hacks for successfully growing Brussel sprouts container gardening. We’ll cover everything from choosing the right container and soil to pest control and harvesting.
Many people shy away from growing Brussel sprouts because they think it requires a lot of space and expertise. But the truth is, with the right techniques, you can cultivate a thriving Brussel sprout crop in a container, making it perfect for apartment dwellers, balcony gardeners, or anyone looking to add a touch of homegrown goodness to their meals. So, let’s ditch the grocery store sprouts and embark on this exciting gardening adventure together!
Growing Brussels Sprouts in Containers: A Complete DIY Guide
Hey there, fellow gardening enthusiasts! Ever thought about growing Brussels sprouts but felt limited by space? Well, I’m here to tell you that you absolutely can cultivate these mini cabbages in containers! It’s a rewarding experience, and I’m excited to share my step-by-step guide to help you succeed. Let’s dive in!
Choosing the Right Container and Soil
Before we even think about seeds, let’s get the foundation right. The container and soil are crucial for healthy Brussels sprouts.
* Container Size: Brussels sprouts need room to grow, both above and below ground. I recommend a container that’s at least 12 inches in diameter and 12 inches deep. A 5-gallon bucket works great, but bigger is always better! Think about a half-barrel planter if you’re feeling ambitious.
* Drainage: This is non-negotiable! Make sure your container has plenty of drainage holes. Brussels sprouts hate sitting in soggy soil. If your container doesn’t have enough holes, drill a few more.
* Material: Plastic, terracotta, or even fabric pots will work. I personally prefer plastic because they retain moisture better, which is important for these thirsty plants.
* Soil: Forget garden soil! It’s too heavy and compacts easily in containers. Instead, opt for a high-quality potting mix. Look for a mix that’s well-draining and contains ingredients like peat moss, perlite, or vermiculite. You can also amend your potting mix with compost for added nutrients. I usually add about 25% compost to my potting mix.
Starting Your Brussels Sprouts: Seeds or Seedlings?
You have two options here: starting from seeds or buying seedlings. Both have their pros and cons.
* Seeds: Starting from seeds is cheaper and gives you more variety to choose from. However, it requires more time and effort. You’ll need to start the seeds indoors about 6-8 weeks before the last expected frost.
* Seedlings: Buying seedlings is more convenient and faster. You can skip the indoor starting process and transplant them directly into your container. However, you’ll have fewer variety options and it’s generally more expensive.
I’ve done both, and honestly, I prefer starting from seeds. It’s just more satisfying to watch them grow from tiny sprouts!
Starting from Seeds (My Preferred Method!)
If you’re going the seed route, here’s what you need to do:
1. Sow the Seeds: Fill a seed starting tray or small pots with seed starting mix. Moisten the mix thoroughly. Sow the seeds about 1/4 inch deep and gently cover them with soil. I usually sow 2-3 seeds per cell or pot, just in case some don’t germinate.
2. Provide Warmth and Light: Brussels sprouts seeds need warmth to germinate. Keep the soil temperature around 65-75°F (18-24°C). You can use a heat mat to speed up germination. Also, provide plenty of light. A sunny windowsill might work, but I highly recommend using grow lights. They provide consistent light and prevent leggy seedlings.
3. Keep the Soil Moist: Don’t let the soil dry out! Water gently whenever the top inch of soil feels dry. I use a spray bottle to avoid disturbing the seeds.
4. Thin the Seedlings: Once the seedlings have their first true leaves (the second set of leaves), thin them to one seedling per cell or pot. Choose the strongest, healthiest-looking seedling and snip off the others at the soil line. Don’t pull them out, as this can disturb the roots of the remaining seedling.
5. Harden Off the Seedlings: Before transplanting the seedlings outdoors, you need to harden them off. This means gradually exposing them to outdoor conditions. Start by placing them outside for an hour or two each day, gradually increasing the time over a week or two. Protect them from direct sunlight and strong winds at first.
Transplanting Seedlings (Whether You Started Them or Bought Them)
Okay, whether you grew your own seedlings or bought them from a nursery, it’s time to transplant them into your container.
1. Prepare the Container: Fill your container with the potting mix, leaving a few inches of space at the top.
2. Dig a Hole: Dig a hole in the center of the container that’s large enough to accommodate the root ball of the seedling.
3. Gently Remove the Seedling: Carefully remove the seedling from its pot. If it’s root-bound (the roots are tightly circling the pot), gently loosen the roots before planting.
4. Plant the Seedling: Place the seedling in the hole and backfill with soil. Make sure the top of the root ball is level with the soil surface.
5. Water Thoroughly: Water the seedling thoroughly after planting. This will help settle the soil and encourage root growth.
Caring for Your Brussels Sprouts Plants
Now comes the ongoing care. Brussels sprouts need consistent attention to thrive.
* Sunlight: Brussels sprouts need at least 6 hours of sunlight per day. Place your container in a sunny location. If you don’t have a sunny spot, you can supplement with grow lights.
* Watering: Water regularly, especially during hot, dry weather. The soil should be consistently moist, but not soggy. Check the soil moisture by sticking your finger into the soil. If the top inch feels dry, it’s time to water.
* Fertilizing: Brussels sprouts are heavy feeders, meaning they need a lot of nutrients. Fertilize them every 2-3 weeks with a balanced fertilizer. I like to use a liquid fertilizer diluted to half strength. You can also amend the soil with compost or aged manure.
* Support: As the plants grow taller, they may need support to prevent them from falling over. You can use stakes or a tomato cage to provide support. I find that bamboo stakes work well.
* Pest Control: Brussels sprouts are susceptible to several pests, including aphids, cabbage worms, and flea beetles. Inspect your plants regularly for signs of pests. If you find any, you can try hand-picking them off or using insecticidal soap or neem oil. I prefer organic pest control methods whenever possible.
* Remove Yellowing Leaves: As the plant matures, the lower leaves will start to yellow and die. Remove these leaves to improve air circulation and prevent disease.
Harvesting Your Brussels Sprouts
The moment you’ve been waiting for! Harvesting Brussels sprouts is a gradual process.
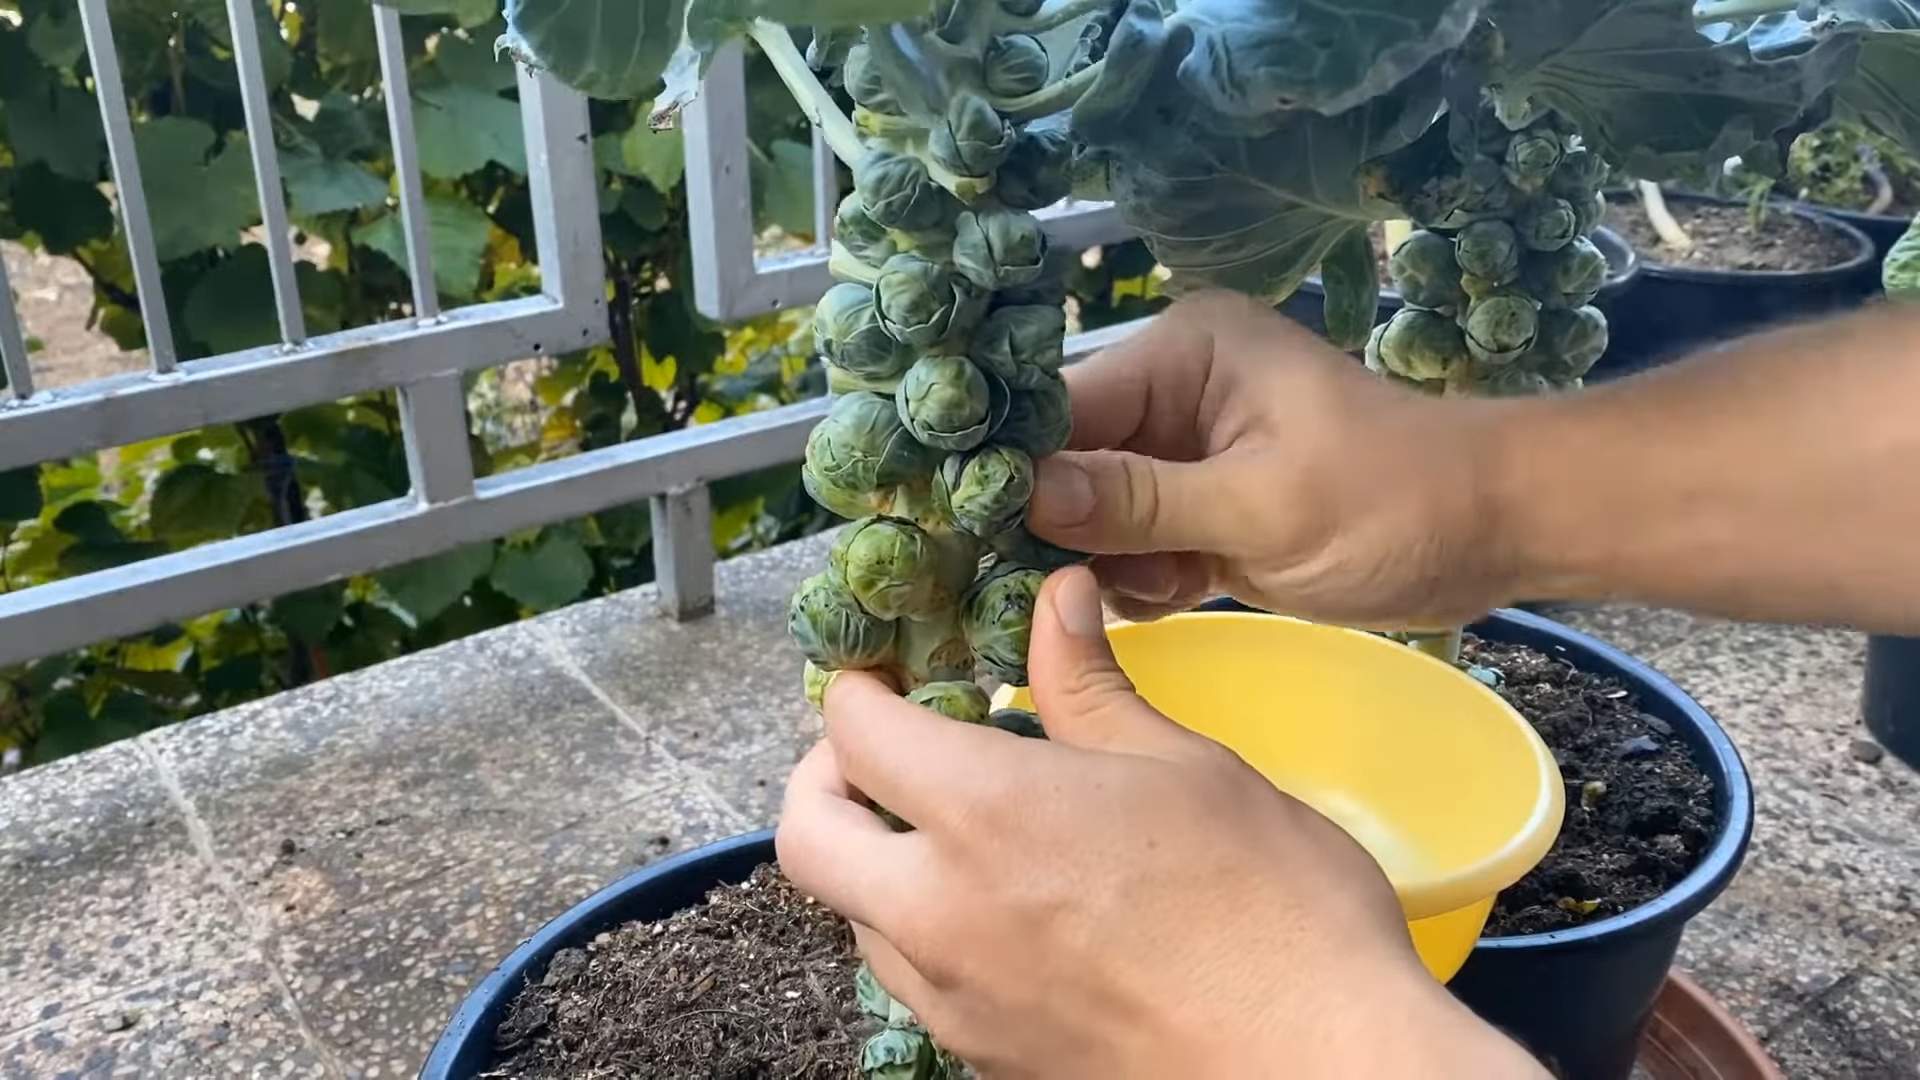
1. Timing: Brussels sprouts are typically ready to harvest about 90-100 days after planting. The sprouts should be firm, green, and about 1-2 inches in diameter.
2. Harvesting Technique: Start harvesting from the bottom of the plant and work your way up. Twist the sprouts off the stem. The lower sprouts will mature first.
3. Continued Production: After harvesting the lower sprouts, you can remove the top of the plant to encourage the remaining sprouts to mature more quickly.
4. Storage: Brussels sprouts are best eaten fresh, but they can be stored in the refrigerator for up to a week.
Troubleshooting Common Problems
Even with the best care, you might encounter some problems. Here are a few common issues and how to address them:
* Yellowing Leaves: This could be a sign of overwatering, underwatering, nutrient deficiency, or disease. Check the soil moisture and adjust your watering accordingly. Fertilize the plants if they’re lacking nutrients. If you suspect disease, remove the affected leaves and treat the plant with a fungicide.
* Sprouts Not Forming: This could be due to insufficient sunlight, poor soil, or lack of nutrients. Make sure the plants are getting enough sunlight and fertilize them regularly.
* Pest Infestation: As mentioned earlier, Brussels sprouts are susceptible to several pests. Inspect your plants regularly and take action as soon as you notice any pests.
Choosing the Right Brussels Sprouts Variety
Not all Brussels sprouts are created equal! Some varieties are better suited for container gardening than others. Here are a few of my favorites:
* ‘Jade Cross’: This is a classic variety that produces high yields of uniform sprouts. It’s a reliable choice for beginners.
* ‘Long Island Improved’: This heirloom variety is known for its excellent flavor and cold hardiness.
* ‘Redarling’: This variety produces beautiful red sprouts that add a pop of color to your garden.
* ‘Roodnerf’: Another red variety, ‘Roodnerf’ is known for its nutty flavor and disease resistance.
Extending the Growing Season
If you live in a colder climate, you can extend the growing season by using row covers or a cold frame. These structures will protect your plants from frost and allow you to harvest Brussels sprouts for a longer period. I’ve had

Conclusion
So, there you have it! Growing your own Brussel sprouts in containers is not just a possibility; it’s a rewarding and surprisingly simple endeavor. We’ve walked through the steps, from selecting the right container and soil to nurturing your plants and anticipating that delicious harvest. But why should you take the plunge and embrace this DIY project?
First and foremost, consider the unparalleled freshness. Store-bought Brussel sprouts simply can’t compare to the vibrant, crisp flavor of those you’ve nurtured yourself. Imagine plucking them straight from the plant, knowing exactly where they came from and what went into their growth. This level of control allows you to avoid pesticides and herbicides, ensuring a healthier and more natural product for you and your family.
Beyond the taste, container gardening offers incredible flexibility. Whether you have a sprawling backyard or a tiny balcony, you can enjoy the benefits of homegrown Brussel sprouts. This accessibility makes it a must-try for urban dwellers and gardening enthusiasts alike. Plus, the aesthetic appeal of healthy, thriving Brussel sprout plants adds a touch of green beauty to any space.
But the benefits don’t stop there. Growing your own food is an incredibly empowering experience. It connects you to the natural world, fosters a sense of accomplishment, and provides a sustainable source of fresh produce. And let’s be honest, there’s something deeply satisfying about serving a meal featuring ingredients you’ve cultivated with your own hands.
Now, let’s talk about variations and suggestions. Feel free to experiment with different Brussel sprout varieties. ‘Long Island Improved’ is a classic choice, but ‘Redarling’ offers a beautiful reddish-purple hue and a slightly sweeter flavor. You can also try companion planting. Marigolds, for example, can help deter pests, while herbs like rosemary and thyme can enhance the flavor of your Brussel sprouts.
Consider the placement of your containers. Brussel sprouts need plenty of sunlight, so choose a spot that receives at least six hours of direct sunlight per day. However, during the hottest part of the summer, you might need to provide some afternoon shade to prevent the plants from overheating.
Don’t be afraid to get creative with your container design. Use repurposed materials like old buckets or wooden crates to add a rustic touch to your garden. Just make sure the containers have adequate drainage holes to prevent waterlogging.
And finally, remember that gardening is a learning process. Don’t be discouraged if you encounter challenges along the way. Every mistake is an opportunity to learn and improve.
So, what are you waiting for? Grab a container, some soil, and a few Brussel sprout seedlings, and embark on this exciting gardening adventure. We’re confident that you’ll be amazed by the results. We highly encourage you to try this method of Brussel sprouts container gardening.
We’d love to hear about your experience! Share your photos, tips, and challenges in the comments below. Let’s create a community of container gardening enthusiasts and inspire others to grow their own food. Happy gardening!
Frequently Asked Questions (FAQ)
What is the ideal container size for growing Brussel sprouts?
The ideal container size for growing Brussel sprouts is at least 12 inches in diameter and 12 inches deep. However, larger is generally better, as it provides more room for the roots to grow and allows the plant to access more nutrients and water. A 5-gallon container is a good starting point, but a 10-gallon container or larger will provide even better results. Remember that Brussel sprouts can grow quite tall and top-heavy, so a sturdy and stable container is essential to prevent them from tipping over.
What type of soil is best for container-grown Brussel sprouts?
Brussel sprouts thrive in well-draining, nutrient-rich soil. A good potting mix specifically formulated for vegetables is an excellent choice. You can also create your own mix by combining equal parts of compost, peat moss (or coconut coir), and perlite or vermiculite. Compost provides essential nutrients, peat moss (or coconut coir) helps retain moisture, and perlite or vermiculite improves drainage. Avoid using garden soil in containers, as it can become compacted and doesn’t drain well, which can lead to root rot.
How often should I water my container-grown Brussel sprouts?
Water your Brussel sprouts regularly, especially during hot and dry weather. The soil should be kept consistently moist but not waterlogged. Check the soil moisture by sticking your finger about an inch into the soil. If it feels dry, it’s time to water. Water deeply, allowing the water to drain out of the bottom of the container. Avoid watering the foliage, as this can promote fungal diseases. In general, you’ll need to water more frequently during the summer months than during the cooler months.
How much sunlight do Brussel sprouts need?
Brussel sprouts need at least six hours of direct sunlight per day to thrive. Choose a location that receives plenty of sunlight throughout the day. If you live in a particularly hot climate, you may need to provide some afternoon shade to prevent the plants from overheating. Insufficient sunlight can result in leggy plants with small, poorly formed sprouts.
When is the best time to plant Brussel sprouts in containers?
The best time to plant Brussel sprouts depends on your climate. In areas with mild winters, you can plant them in the fall for a winter harvest. In areas with cold winters, you can start them indoors 6-8 weeks before the last frost and transplant them outdoors in the spring. Brussel sprouts prefer cool weather, so avoid planting them during the hottest part of the summer.
How do I fertilize my container-grown Brussel sprouts?
Brussel sprouts are heavy feeders and require regular fertilization. Use a balanced fertilizer specifically formulated for vegetables, such as a 10-10-10 or 14-14-14. Follow the instructions on the fertilizer package for application rates. You can also supplement with organic fertilizers like compost tea or fish emulsion. Fertilize every 2-3 weeks during the growing season.
How do I deal with pests and diseases on my Brussel sprout plants?
Common pests that affect Brussel sprouts include aphids, cabbage worms, and flea beetles. You can control these pests by handpicking them off the plants, using insecticidal soap, or applying Bacillus thuringiensis (Bt), a natural insecticide that is effective against cabbage worms. Common diseases include clubroot and black rot. To prevent these diseases, choose disease-resistant varieties, practice crop rotation, and avoid overwatering. Ensure good air circulation around the plants to prevent fungal diseases.
How long does it take for Brussel sprouts to mature in containers?
Brussel sprouts typically take 80-100 days to mature from transplant. The sprouts are ready to harvest when they are firm, green, and about 1-2 inches in diameter. Start harvesting from the bottom of the plant upwards, as the lower sprouts mature first.
Can I grow Brussel sprouts in containers indoors?
While it’s possible to grow Brussel sprouts indoors, it can be challenging. They require a lot of sunlight, which can be difficult to provide indoors. You’ll need to use grow lights to supplement natural sunlight. Additionally, indoor growing can increase the risk of pests and diseases. If you choose to grow Brussel sprouts indoors, make sure to provide adequate ventilation and monitor the plants closely for any signs of problems.
What are some tips for maximizing my Brussel sprout harvest in containers?
To maximize your Brussel sprout harvest, provide your plants with plenty of sunlight, water, and nutrients. Remove any yellowing or damaged leaves to improve air circulation and prevent disease. Pinch off the top of the plant when the sprouts start to form to encourage them to develop more fully. Harvest the sprouts regularly as they mature to encourage the plant to produce more. And most importantly, be patient and enjoy the process!
Leave a Comment