

Calendula Planting Easy Routine: Unlock the secrets to a vibrant and thriving garden with this simple, yet effective guide! Have you ever admired those picture-perfect gardens bursting with color and wished you could create one yourself? Well, you absolutely can! This isn’t just another gardening article; it’s your personal roadmap to mastering the art of calendula cultivation, even if you think you have a “brown thumb.”
Calendula, also known as pot marigold, boasts a rich history, dating back to ancient civilizations where it was prized for its medicinal properties and vibrant beauty. From Roman gardens to medieval apothecaries, calendula has been a trusted companion to humans for centuries. But beyond its historical significance, calendula offers a multitude of benefits for the modern gardener.
I know what you’re thinking: “Gardening is hard!” And yes, it can be intimidating. But with the right knowledge and a few clever DIY tricks, you can transform your outdoor space into a flourishing oasis. This article will break down the calendula planting easy routine into manageable steps, ensuring success even for beginners. We’ll cover everything from seed selection and soil preparation to watering techniques and pest control.
Why do you need this DIY trick? Because growing your own calendula isn’t just about aesthetics; it’s about connecting with nature, enjoying fresh, homegrown beauty, and even harnessing the plant’s medicinal properties for homemade remedies. Plus, it’s incredibly rewarding to watch your efforts blossom into a stunning display of color. So, let’s dive in and discover the joy of calendula gardening together!
Planting Calendula: A Beginner-Friendly Guide to Sunshine in Your Garden
Hey there, fellow garden enthusiasts! I’m so excited to share my simple and effective method for planting calendula. These cheerful, bright flowers are not only beautiful but also incredibly useful in the garden. They attract beneficial insects, deter pests, and even have medicinal properties! Trust me, adding calendula to your garden is a win-win. Let’s dive in!
Choosing Your Calendula Variety
Before we get our hands dirty, let’s talk about the different types of calendula you can grow. While *Calendula officinalis* is the most common and widely used, there are several cultivars with varying colors, sizes, and petal arrangements.
* Single-Petaled Varieties: These have a single row of petals surrounding a prominent center disk. They’re great for attracting pollinators.
* Double-Petaled Varieties: These have multiple rows of petals, creating a fuller, more showy flower.
* Dwarf Varieties: Perfect for containers or small gardens, these stay compact and bushy.
* Tall Varieties: These can reach up to two feet tall and make a statement in the garden.
I personally love the ‘Pacific Beauty’ mix for its vibrant colors and the ‘Bronzed Beauty’ for its unique rusty-orange hues. Choose a variety that appeals to you and fits your garden space.
Preparing for Planting
Okay, now that we’ve chosen our calendula, let’s get ready for planting! This involves selecting the right location, preparing the soil, and deciding whether to start from seeds or seedlings.
* Sunlight: Calendula thrives in full sun (6-8 hours of direct sunlight per day), but it can tolerate partial shade, especially in hotter climates.
* Soil: Calendula prefers well-drained soil that is rich in organic matter. It’s not too picky about soil pH, but a slightly acidic to neutral pH (6.0-7.0) is ideal.
* Starting from Seeds vs. Seedlings: You can start calendula from seeds directly in the garden or start them indoors 4-6 weeks before the last frost. Seedlings are a great option if you want a head start or live in an area with a short growing season.
Planting Calendula from Seeds (Direct Sowing)
This is my preferred method because it’s so easy and natural!
1. Choose Your Planting Time: Calendula can be directly sown in the garden in early spring, after the last frost, or in late summer for a fall bloom. I usually aim for early spring so I can enjoy their cheerful blooms all summer long.
2. Prepare the Soil: Clear the planting area of any weeds, rocks, or debris. Loosen the soil with a garden fork or tiller to a depth of about 6-8 inches. Amend the soil with compost or well-rotted manure to improve drainage and fertility.
3. Sow the Seeds: Sprinkle the seeds evenly over the prepared soil. You can also sow them in rows, spacing them about 6-8 inches apart. Gently press the seeds into the soil, ensuring they are in good contact.
4. Cover the Seeds: Cover the seeds with a thin layer of soil (about ¼ inch). You don’t want to bury them too deep, as they need light to germinate.
5. Water Gently: Water the planting area gently with a watering can or hose fitted with a gentle spray nozzle. Keep the soil consistently moist but not waterlogged until the seeds germinate.
6. Thin Seedlings (If Necessary): Once the seedlings emerge (usually in 5-10 days), thin them out so that they are spaced about 12-18 inches apart. This will give them enough room to grow and prevent overcrowding.
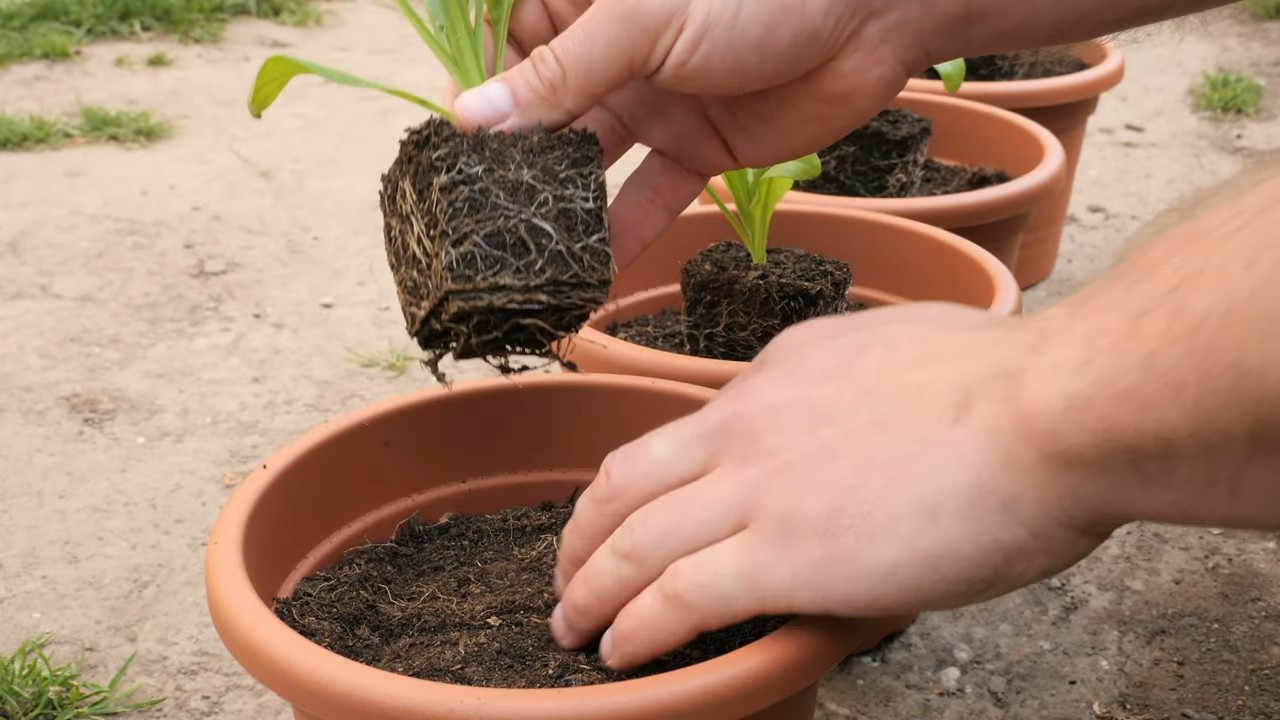
Planting Calendula Seedlings
If you’re using seedlings, the process is slightly different, but still super manageable!
1. Harden Off Seedlings: Before transplanting your seedlings into the garden, you’ll need to harden them off. This means gradually exposing them to outdoor conditions over a period of 7-10 days. Start by placing them in a sheltered location for a few hours each day, gradually increasing the amount of time they spend outdoors.
2. Prepare the Planting Holes: Dig holes in the prepared soil that are slightly larger than the root balls of the seedlings. Space the holes about 12-18 inches apart.
3. Remove Seedlings from Pots: Gently remove the seedlings from their pots, being careful not to damage the roots. If the roots are pot-bound (tightly circling the pot), gently loosen them with your fingers.
4. Plant the Seedlings: Place the seedlings in the planting holes, ensuring that the top of the root ball is level with the surrounding soil. Backfill the holes with soil and gently firm the soil around the base of the plants.
5. Water Thoroughly: Water the newly planted seedlings thoroughly to help them settle in.
Caring for Your Calendula Plants
Once your calendula plants are established, they’re relatively low-maintenance. Here’s what you need to do to keep them happy and healthy:
* Watering: Water regularly, especially during dry periods. Calendula prefers consistently moist soil, but avoid overwatering, which can lead to root rot. I usually check the soil moisture level by sticking my finger into the soil. If the top inch feels dry, it’s time to water.
* Fertilizing: Calendula doesn’t require heavy fertilization. However, you can give them a boost by applying a balanced organic fertilizer every few weeks during the growing season. I like to use compost tea or fish emulsion.
* Deadheading: Deadheading (removing spent flowers) encourages the plants to produce more blooms. Simply pinch or cut off the faded flowers just below the flower head.
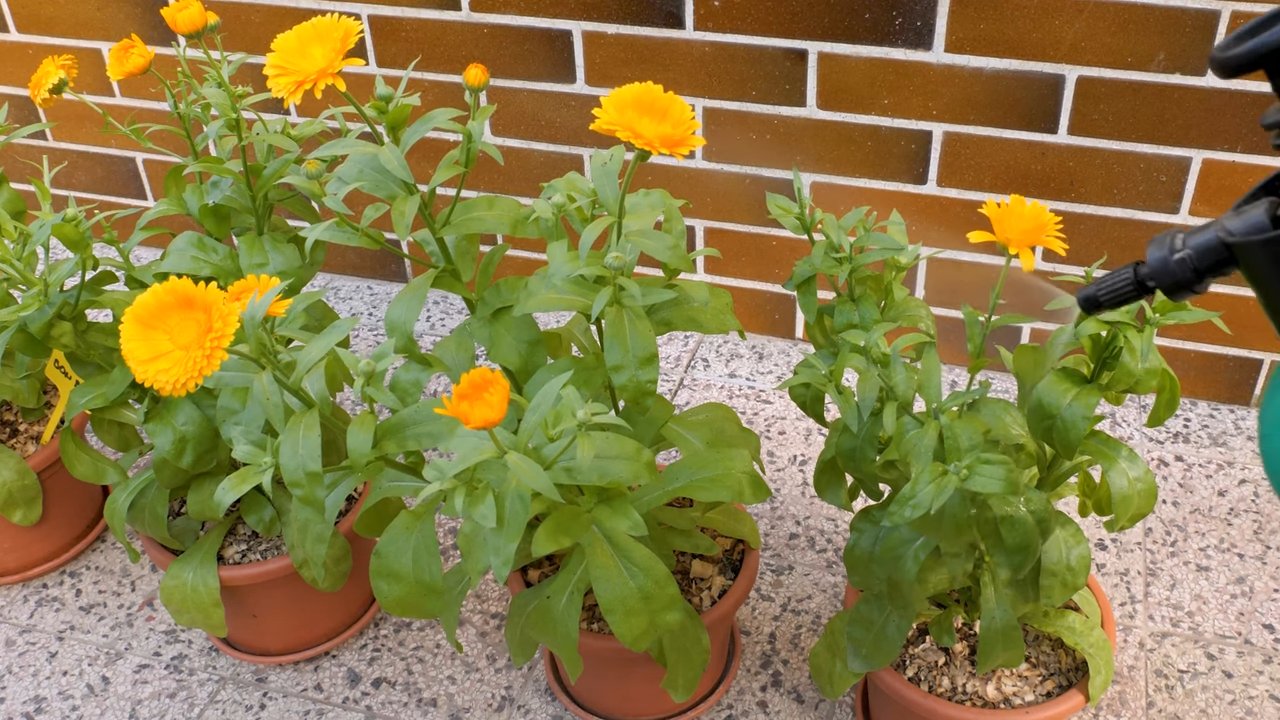
* Pest and Disease Control: Calendula is generally pest-resistant, but it can occasionally be affected by aphids or powdery mildew. To control aphids, you can spray the plants with a strong stream of water or use insecticidal soap. To prevent powdery mildew, ensure good air circulation and avoid overhead watering.
* Mulching: Applying a layer of mulch around the base of the plants helps to retain moisture, suppress weeds, and regulate soil temperature. I like to use straw, wood chips, or shredded leaves.
Harvesting Calendula Flowers
One of the best things about growing calendula is harvesting the flowers! You can use them fresh or dried for a variety of purposes.
* When to Harvest: Harvest the flowers in the morning, after the dew has dried, when they are fully open.
* How to Harvest: Simply pinch or cut off the flower heads just below the flower.
* Using Fresh Flowers: Fresh calendula flowers can be used in salads, teas, and other culinary creations. They can also be used to make infused oils, salves, and other skincare products.
* Drying Flowers: To dry calendula flowers, spread them out in a single layer on a screen or tray in a cool, dark, and well-ventilated place. Allow them to dry completely, which usually takes about 1-2 weeks. Once they are dry, store them in an airtight container in a cool, dark place.
Troubleshooting Common Problems
Even with the best care, you might encounter a few problems along the way. Here are some common issues and how to address them:
* Lack of Blooms: If your calendula plants aren’t blooming, it could be due to insufficient sunlight, poor soil, or lack of deadheading. Make sure they are getting enough sun, amend the soil with compost, and regularly remove spent flowers.
* Leggy Growth: Leggy growth (long, spindly stems) is usually caused by insufficient sunlight. Move the plants to a sunnier location or provide supplemental lighting.
* Yellowing Leaves: Yellowing leaves can be a sign of overwatering, nutrient deficiency, or pest infestation. Check the soil moisture level, fertilize the plants, and inspect them for pests.
* Powdery Mildew: Powdery mildew is a fungal disease that appears as a white, powdery coating on the leaves. To prevent it, ensure good air circulation and avoid overhead watering. If your plants are affected, you can spray them with a fungicide.
Calendula’s Benefits Beyond Beauty
Beyond their visual appeal, calendula flowers offer a range of benefits that make them a valuable addition to any garden.
* Attracting Beneficial Insects: Calendula attracts beneficial insects like ladybugs, lacewings, and hoverflies, which prey on aphids and other garden pests.
* Deterring Pests: Calendula also deters certain pests, such as nematodes and cabbage moths.
* Medicinal Properties: Calendula has anti-inflammatory, antiseptic, and wound-healing properties. It can be used to treat minor cuts, burns, and skin irritations.
* Soil Health: Calendula can improve soil health by adding organic matter and suppressing weeds.
I
Conclusion
So, there you have it! Transforming your garden with the vibrant, healing power of calendula is not only achievable but surprisingly simple with this easy planting routine. We’ve walked you through the steps, highlighting the ease and accessibility of cultivating these sunny blooms. But why is this DIY calendula planting routine a must-try?
Firstly, it’s about control. You’re not relying on commercially grown plants that may have been treated with pesticides or herbicides. You’re nurturing your calendula from the very beginning, ensuring a healthy, organic source for all your future needs, whether it’s for culinary delights, soothing skincare, or simply adding a splash of color to your garden.
Secondly, it’s incredibly rewarding. There’s a unique satisfaction in watching a tiny seed sprout and flourish into a vibrant flower, knowing you played an integral role in its growth. This connection to nature is a powerful antidote to the stresses of modern life.
Thirdly, it’s cost-effective. Starting from seed is significantly cheaper than buying established plants, especially if you plan on using calendula extensively. You can save money and have more calendula than you ever thought possible!
But the benefits don’t stop there. This routine is adaptable to your specific needs and preferences.
Variations and Suggestions:
* Companion Planting: Calendula is a fantastic companion plant! Try planting it alongside tomatoes, cucumbers, or roses to deter pests and attract beneficial insects.
* Container Gardening: Don’t have a garden? No problem! Calendula thrives in containers, making it perfect for balconies, patios, or even sunny windowsills. Just ensure your container has adequate drainage.
* Different Varieties: Explore the diverse world of calendula! From the classic orange and yellow varieties to more unique cultivars with double petals or different color combinations, there’s a calendula for every taste.
* Seed Saving: Once your calendula flowers have dried, collect the seeds to replant next year. This is a sustainable and cost-effective way to ensure a continuous supply of these wonderful blooms.
* Soil Amendments: While calendula isn’t particularly fussy, adding some compost or well-rotted manure to the soil before planting will give it a boost.
We wholeheartedly encourage you to give this DIY calendula planting routine a try. It’s a simple, rewarding, and cost-effective way to bring the beauty and benefits of calendula into your life. Don’t be afraid to experiment, adapt the routine to your specific needs, and most importantly, have fun!
Once you’ve experienced the joy of growing your own calendula, we’d love to hear about it! Share your experiences, tips, and photos in the comments below. Let’s create a community of calendula enthusiasts and inspire others to discover the magic of these amazing flowers. Your insights could be invaluable to someone just starting their calendula journey. So, get your hands dirty, plant some seeds, and watch the magic unfold! This easy planting routine is your gateway to a garden filled with sunshine and healing.
Frequently Asked Questions (FAQ)
What is the best time of year to plant calendula seeds?
Calendula is a cool-season flower, so the best time to plant seeds is in early spring or late summer/early fall. For a spring planting, start seeds indoors 6-8 weeks before the last expected frost. For a fall planting, sow seeds directly into the garden about 8-10 weeks before the first expected frost. This allows the plants to establish themselves before the cold weather arrives. In warmer climates, you can often plant calendula year-round.
How much sunlight does calendula need?
Calendula thrives in full sun, which means at least 6 hours of direct sunlight per day. However, in hotter climates, it can benefit from some afternoon shade to prevent the flowers from scorching. If you’re growing calendula indoors, place it near a sunny window or use grow lights to provide adequate illumination. Insufficient sunlight can result in leggy growth and fewer flowers.
What kind of soil is best for calendula?
Calendula prefers well-drained soil that is moderately fertile. It’s not particularly picky about soil type, but it will perform best in soil that is rich in organic matter. Before planting, amend the soil with compost or well-rotted manure to improve drainage and fertility. Avoid heavy clay soils, as they can become waterlogged and lead to root rot. A slightly acidic to neutral soil pH (around 6.0-7.0) is ideal.
How often should I water calendula?
Water calendula regularly, especially during dry periods. Keep the soil consistently moist, but avoid overwatering, which can lead to root rot. Water deeply when the top inch of soil feels dry to the touch. During hot weather, you may need to water more frequently. When watering, aim for the base of the plant to avoid wetting the foliage, which can increase the risk of fungal diseases.
Does calendula need fertilizer?
Calendula is not a heavy feeder and generally doesn’t require a lot of fertilizer. However, a light feeding of a balanced organic fertilizer at planting time can help promote healthy growth. Avoid using fertilizers that are high in nitrogen, as this can encourage excessive foliage growth at the expense of flowers. You can also side-dress the plants with compost or worm castings during the growing season to provide a slow-release source of nutrients.
How do I harvest calendula flowers?
Harvest calendula flowers in the morning, after the dew has dried. Choose flowers that are fully open and brightly colored. Simply snip the flower heads off the stem using scissors or pruning shears. Regular harvesting encourages the plant to produce more flowers. You can use the fresh flowers immediately or dry them for later use.
How do I dry calendula flowers?
There are several ways to dry calendula flowers. One method is to spread the flower heads in a single layer on a screen or tray in a cool, dry, and well-ventilated area. Turn them occasionally to ensure even drying. Another method is to hang small bunches of flowers upside down in a dark, dry place. The flowers are dry when they are brittle to the touch. Store the dried flowers in an airtight container in a cool, dark place.
What are some common pests and diseases that affect calendula?
Calendula is generally pest and disease resistant, but it can be susceptible to aphids, spider mites, and powdery mildew. Aphids and spider mites can be controlled with insecticidal soap or neem oil. Powdery mildew is a fungal disease that can be prevented by providing good air circulation and avoiding overhead watering. If powdery mildew does occur, treat it with a fungicide.
Can I eat calendula flowers?
Yes, calendula flowers are edible and have a slightly peppery taste. They can be used to add color and flavor to salads, soups, and other dishes. The petals can also be used as a natural food coloring. However, it’s important to only eat calendula flowers that have been grown organically and have not been treated with pesticides or herbicides.
Is calendula safe for pets?
Calendula is generally considered safe for pets, but it’s always a good idea to consult with your veterinarian before giving it to your animals. Some pets may be allergic to calendula.
Leave a Comment