

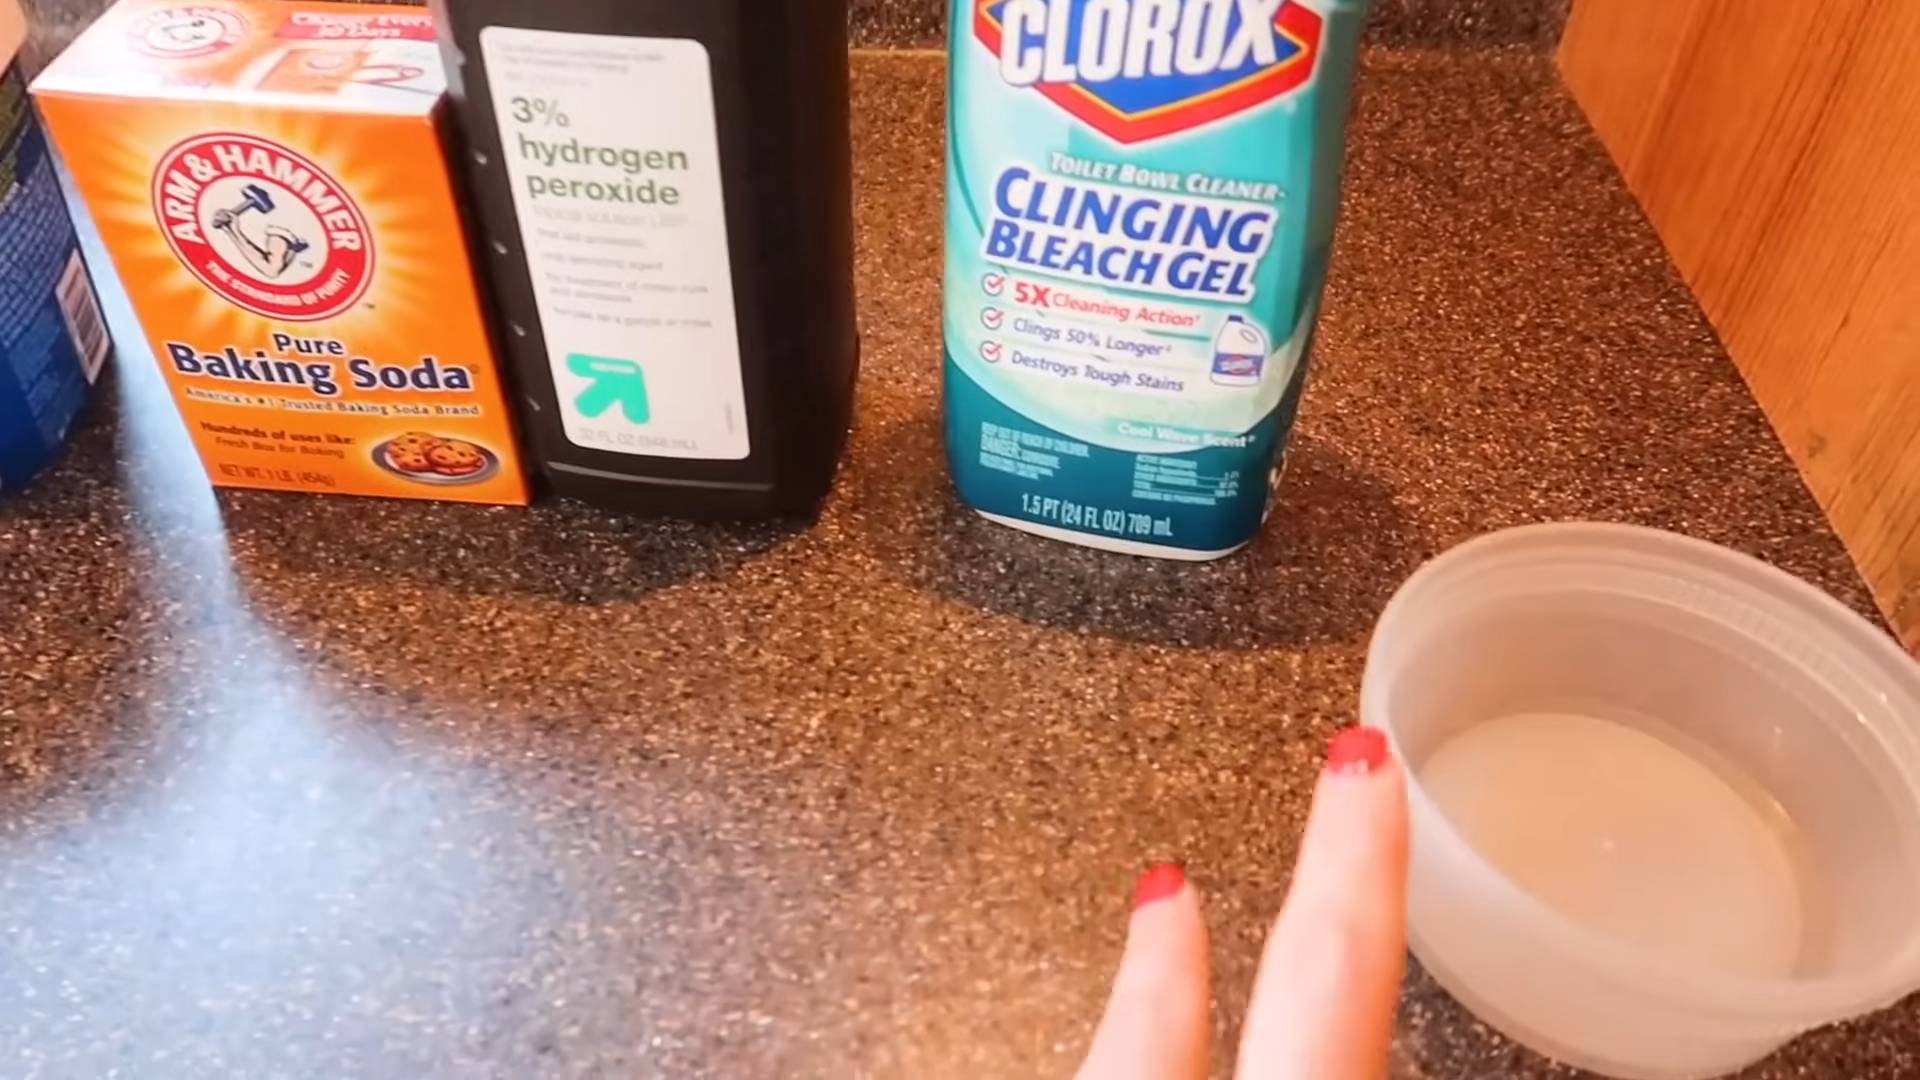
Clorox grout cleaning DIY: Are you tired of staring at dingy, stained grout lines that seem to mock your best cleaning efforts? I know I have been! It’s like no matter how much you scrub, those stubborn stains just won’t budge. But don’t despair, because I’m about to share some amazing DIY tricks that will transform your grout from grimy to gleaming!
Grout, that porous material nestled between your tiles, has been a staple in homes for centuries. From the intricate mosaics of ancient Rome to the modern kitchens of today, grout has played a vital role in creating beautiful and functional spaces. However, its very nature makes it a magnet for dirt, grime, and mildew, turning it into a breeding ground for unsightly stains.
Let’s face it, nobody enjoys spending hours on their hands and knees, scrubbing away at grout with harsh chemicals. That’s why I’ve compiled a list of effective and affordable Clorox grout cleaning DIY methods that will save you time, money, and a whole lot of elbow grease. These hacks are perfect for anyone looking to restore the sparkle to their tiled surfaces without breaking the bank or resorting to professional cleaning services. Get ready to say goodbye to dirty grout and hello to a fresh, clean home!
Grow Strawberries in 4 Months: My Foolproof DIY Guide
Hey there, fellow gardening enthusiasts! Are you dreaming of juicy, red strawberries but don’t want to wait an entire year for your first harvest? Well, you’re in luck! I’ve cracked the code to growing strawberries in just 4 months, and I’m excited to share my secrets with you. This isn’t just some theoretical guide; it’s based on my own successful experiences, and I’m confident you can achieve the same results. Let’s get started!
What You’ll Need
Before we dive into the nitty-gritty, let’s gather our supplies. Having everything ready beforehand will make the process much smoother.
* Strawberry Plants: Day-neutral or everbearing varieties are your best bet for a quicker harvest. I personally love “Albion” and “Seascape” for their consistent yields and delicious flavor. You can buy bare-root plants or established plants in small pots.
* Growing Medium: A well-draining potting mix is crucial. I recommend a mix of peat moss, perlite, and vermiculite. You can also add some compost for extra nutrients.
* Containers: Choose containers that are at least 6 inches deep and wide. Hanging baskets, pots, or even repurposed containers work great. Just make sure they have drainage holes.
* Slow-Release Fertilizer: A balanced slow-release fertilizer (10-10-10 or similar) will provide your plants with the nutrients they need throughout the growing season.
* Liquid Fertilizer: A liquid fertilizer high in potassium will encourage flowering and fruit production. I use a tomato fertilizer diluted to half strength.
* Grow Lights (Optional): If you’re starting your plants indoors, grow lights will ensure they get enough light.
* Watering Can or Hose: For regular watering.
* Pruning Shears or Scissors: For removing runners and dead leaves.
* Mulch (Optional): Straw or pine needles can help retain moisture and suppress weeds.
Phase 1: Starting Your Strawberry Plants (Weeks 1-4)
This phase is all about getting your strawberry plants off to a strong start. Whether you’re starting from bare-root plants or established plants, these steps will help you create the perfect environment for growth.
1. Prepare Your Containers: Fill your containers with the well-draining potting mix. Leave about an inch of space at the top.
2. Planting Bare-Root Strawberries: If you’re using bare-root plants, soak the roots in water for about 30 minutes before planting. This will help rehydrate them. Dig a small hole in the center of the container and gently place the plant in the hole, making sure the crown (the point where the roots meet the stem) is level with the soil surface. Backfill with soil and gently firm it around the plant.
3. Planting Established Strawberries: If you’re using established plants, gently remove them from their pots and loosen the roots. Dig a hole in the center of the container that’s slightly larger than the root ball. Place the plant in the hole and backfill with soil, making sure the top of the root ball is level with the soil surface.
4. Water Thoroughly: After planting, water your strawberry plants thoroughly until the water drains out of the bottom of the container.
5. Fertilize: Sprinkle a small amount of slow-release fertilizer around the base of each plant. Follow the instructions on the fertilizer package for the correct amount.
6. Provide Light: If you’re starting your plants indoors, place them under grow lights. Aim for 12-14 hours of light per day. If you’re starting them outdoors, choose a location that receives at least 6 hours of sunlight per day.
7. Water Regularly: Keep the soil consistently moist, but not waterlogged. Water when the top inch of soil feels dry to the touch.
8. Monitor for Pests and Diseases: Keep an eye out for common strawberry pests like aphids and spider mites. Treat any infestations promptly with insecticidal soap or neem oil. Also, watch for signs of fungal diseases like powdery mildew. Improve air circulation and avoid overwatering to prevent these problems.
Phase 2: Encouraging Growth and Flowering (Weeks 5-10)
Now that your strawberry plants are established, it’s time to focus on encouraging growth and flowering. This involves proper watering, fertilizing, and pruning.
1. Continue Watering Regularly: Maintain consistent moisture in the soil. Strawberries need plenty of water, especially during flowering and fruiting.
2. Fertilize with Liquid Fertilizer: Start fertilizing with a liquid fertilizer high in potassium every two weeks. This will encourage flowering and fruit production. Dilute the fertilizer to half strength to avoid burning the plants.
3. Remove Runners: Strawberry plants produce runners, which are long stems that grow horizontally and develop new plantlets at the end. Removing these runners will redirect the plant’s energy towards fruit production. Use pruning shears or scissors to cut the runners off close to the main plant.
4. Pollination: Strawberries are self-pollinating, but you can improve fruit set by gently shaking the plants or using a small paintbrush to transfer pollen from one flower to another. If you’re growing your plants indoors, you’ll definitely need to hand-pollinate them.
5. Monitor Temperature: Strawberries prefer temperatures between 60°F and 80°F. Protect your plants from extreme heat or cold. If you’re growing them outdoors, you may need to move them to a sheltered location during periods of extreme weather.
6. Provide Support (Optional): As the plants grow and produce fruit, they may need some support. You can use small stakes or cages to keep the plants upright and prevent the fruit from touching the soil.
Phase 3: Harvesting and Enjoying Your Strawberries (Weeks 11-16)
This is the moment you’ve been waiting for! Your strawberries are finally ripening, and it’s time to harvest and enjoy the fruits of your labor.
1. Harvest When Ripe: Strawberries are ready to harvest when they are fully red and slightly soft to the touch. Gently twist the berry off the plant, leaving a small piece of the stem attached.
2. Harvest Regularly: Harvest your strawberries every few days to encourage continued production. Overripe strawberries will attract pests and diseases.
3. Protect from Birds: Birds love strawberries just as much as we do! Protect your plants with netting or bird repellent to prevent them from eating your harvest.
4. Water After Harvesting: Water your plants after harvesting to help them recover and continue producing fruit.
5. Enjoy Your Strawberries: Eat your strawberries fresh, or use them in your favorite recipes. They’re delicious in smoothies, jams, pies, and more!
6. Continue Fertilizing: Even after you start harvesting, continue fertilizing your plants with liquid fertilizer every two weeks to keep them producing fruit.
Troubleshooting Tips
Even with the best care, you may encounter some problems along the way. Here are a few troubleshooting tips to help you overcome common strawberry growing challenges:
* Small or Misshapen Strawberries: This can be caused by poor pollination, lack of nutrients, or insufficient watering. Make sure you’re hand-pollinating your plants if necessary, fertilizing regularly, and providing adequate water.
* Yellowing Leaves: This can be a sign of nutrient deficiency, overwatering, or pest infestation. Check the soil moisture and nutrient levels, and treat any pests promptly.
* No Flowers or Fruit: This can be caused by insufficient light, lack of nutrients, or improper temperature. Make sure your plants are getting enough light, fertilize regularly, and maintain a temperature between 60°F and 80°F.
* Pests and Diseases: Regularly inspect your plants for pests and diseases. Treat any problems promptly with appropriate organic or chemical controls.
Extending Your Strawberry Season
Want to keep your strawberry plants producing fruit for even longer? Here are a few tips for extending your strawberry season:
* Succession Planting: Plant new strawberry plants every few weeks to ensure a continuous harvest throughout the growing season.
* Overwintering: Protect your strawberry plants from frost and freezing temperatures by covering them with straw or moving them to a sheltered location.
* Refrigerate Bare-Root Plants: If you can’t plant your bare-root plants immediately, store them in the refrigerator to keep them dormant until you’re ready to plant.
Growing strawberries in just 4 months is definitely achievable with a little bit of planning and effort. I hope this guide has given you the confidence to try it yourself. Happy gardening, and enjoy your delicious homegrown strawberries!
Conclusion
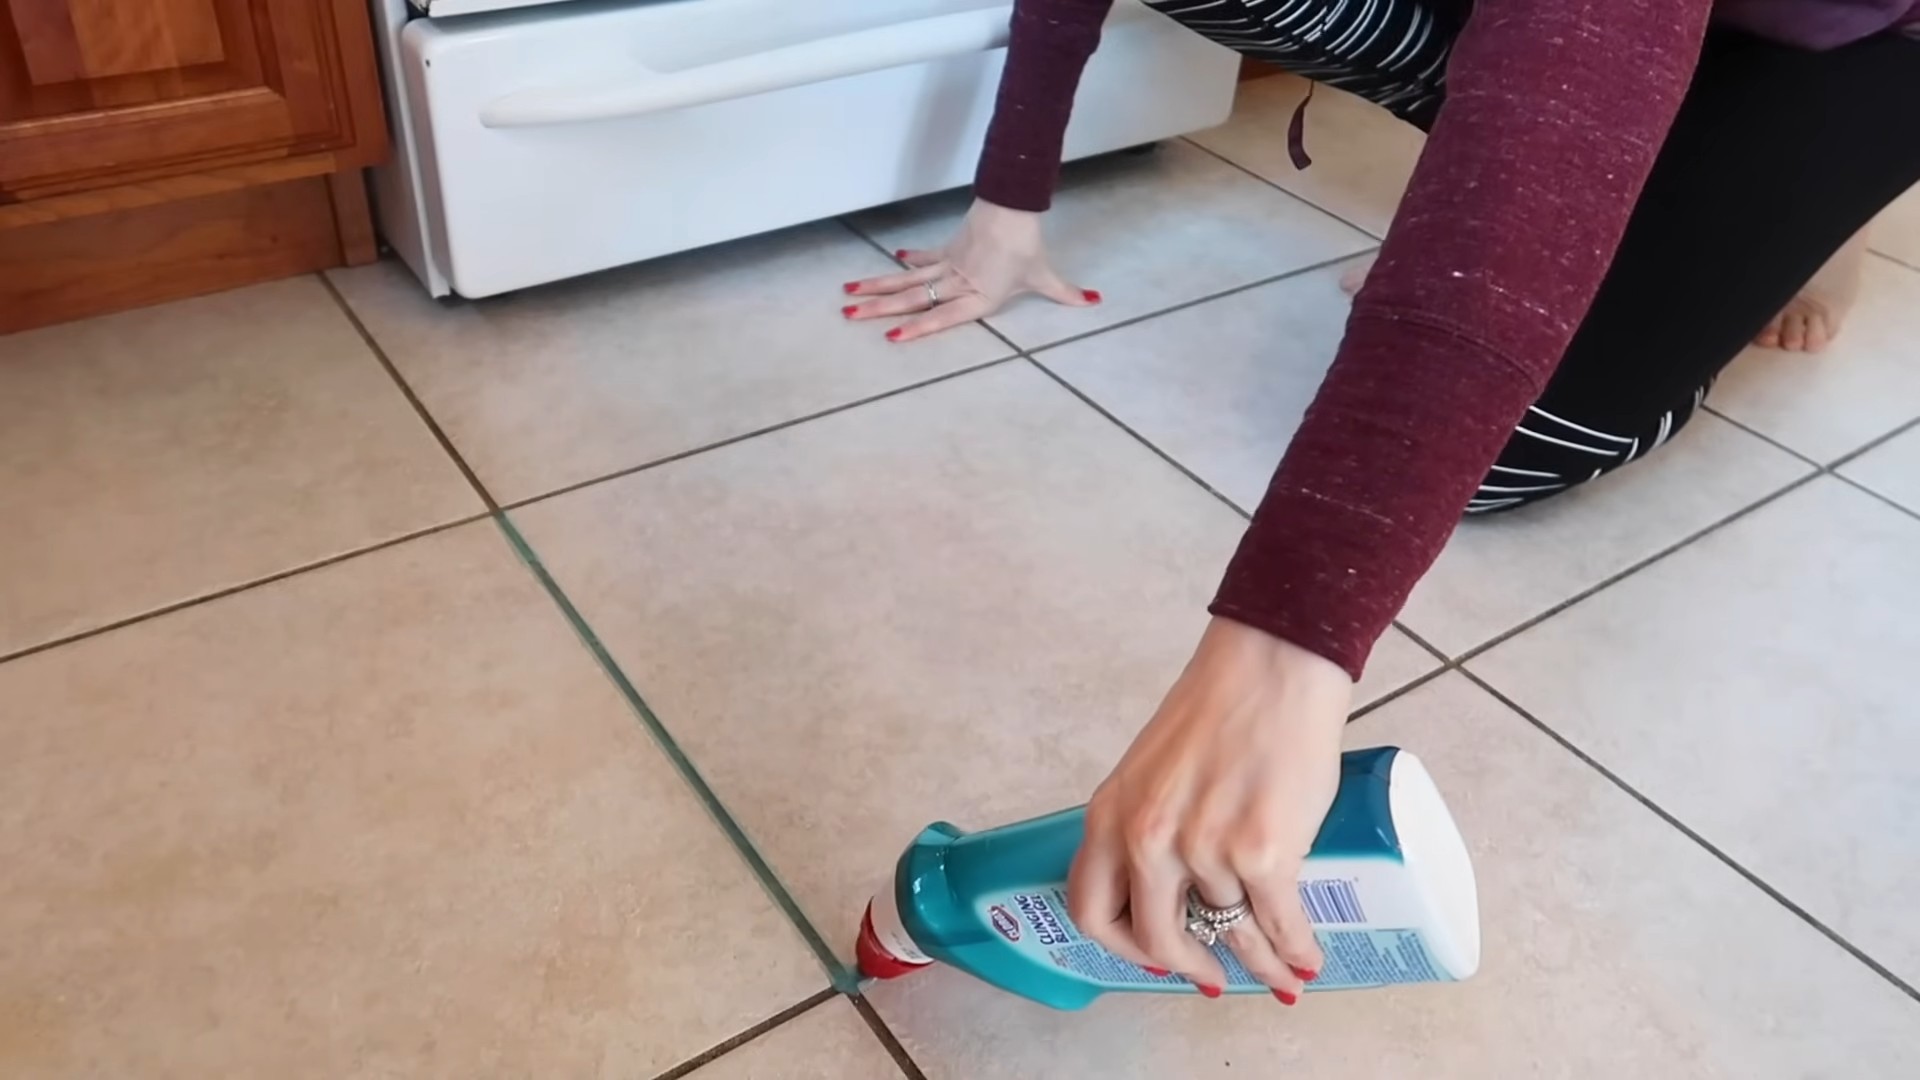
So, there you have it! This DIY Clorox grout cleaning method is more than just a quick fix; it’s a game-changer for anyone battling stubborn stains and discoloration in their tiled spaces. We’ve explored a simple, effective, and budget-friendly way to revitalize your grout, bringing back that fresh, clean look you thought was long gone.
Why is this a must-try? Because it delivers noticeable results with minimal effort and cost. Forget spending a fortune on specialized grout cleaners that promise the world but often fall short. This method leverages the power of readily available Clorox bleach, combined with a few household staples, to create a potent cleaning solution that tackles even the most entrenched grime. The visual difference after just one application can be truly remarkable, transforming dull, dingy grout into bright, sparkling lines.
But the benefits extend beyond aesthetics. Clean grout contributes to a healthier home environment. Grout, with its porous nature, can harbor mold, mildew, and bacteria, leading to unpleasant odors and potential health concerns. By effectively cleaning and disinfecting your grout, you’re not just improving the look of your tiles; you’re also creating a cleaner, safer space for you and your family.
Looking for variations or ways to customize this DIY Clorox grout cleaning method? Consider these options:
* For heavily soiled grout: Let the Clorox solution sit for a longer period, up to 30 minutes, before scrubbing. Just be sure to monitor the area and avoid prolonged exposure to colored grout, as it may cause fading.
* For a more abrasive scrub: Sprinkle a small amount of baking soda onto the grout lines before scrubbing with the Clorox solution. The baking soda will act as a gentle abrasive, helping to lift stubborn stains.
* For a natural scent boost: Add a few drops of your favorite essential oil, such as lemon or tea tree oil, to the Clorox solution. This will not only add a pleasant fragrance but also provide additional antibacterial benefits.
* Color Grout Consideration: Always test the Clorox solution on an inconspicuous area of your colored grout first to ensure it doesn’t cause discoloration. If you notice any fading, dilute the solution further or reduce the contact time.
We are confident that this DIY Clorox grout cleaning trick will become your go-to solution for maintaining sparkling clean tiles. It’s easy, effective, and affordable – what’s not to love?
Now, it’s your turn! We encourage you to give this DIY method a try and experience the difference for yourself. Don’t forget to take before-and-after photos – we’d love to see your results! Share your experiences, tips, and variations in the comments below. Let’s build a community of grout-cleaning experts and help each other achieve sparkling clean homes! We are eager to hear how this DIY Clorox grout cleaning method worked for you!
Frequently Asked Questions (FAQ)
Is Clorox safe to use on all types of grout?
While Clorox bleach is generally effective for cleaning grout, it’s essential to exercise caution, especially with colored grout. Bleach can sometimes cause fading or discoloration, particularly if the grout is old or porous. Always test the Clorox solution on an inconspicuous area of your colored grout first to assess its impact. If you notice any fading, dilute the solution further or reduce the contact time. For epoxy grout, which is more resistant to staining and chemicals, Clorox is generally safe to use, but it’s still a good idea to test a small area first. If you’re unsure about the type of grout you have, consult with a tile professional before using Clorox.
How often should I clean my grout with Clorox?
The frequency of cleaning your grout with Clorox depends on several factors, including the amount of foot traffic, the level of humidity in the area, and the presence of spills or stains. In general, it’s recommended to clean your grout with Clorox every 1-3 months to maintain its cleanliness and prevent the buildup of mold and mildew. However, if you notice stains or discoloration appearing more frequently, you may need to clean it more often. Regular cleaning will not only keep your grout looking its best but also help to prevent the growth of harmful bacteria and allergens.
What safety precautions should I take when cleaning grout with Clorox?
Clorox bleach is a powerful cleaning agent, so it’s crucial to take appropriate safety precautions when using it. Always wear gloves to protect your skin from irritation. Work in a well-ventilated area to avoid inhaling the fumes. Avoid mixing Clorox with other cleaning products, especially ammonia, as this can create dangerous and toxic gases. If you get Clorox on your skin or in your eyes, rinse immediately with plenty of water. Keep Clorox out of reach of children and pets. By following these safety precautions, you can safely and effectively clean your grout with Clorox.
Can I use a different type of brush to scrub the grout?
While a stiff-bristled brush is generally recommended for scrubbing grout, you can use other types of brushes depending on the severity of the stains and the type of grout you have. A toothbrush can be effective for cleaning small or hard-to-reach areas. An electric toothbrush with a cleaning head can also be used for more efficient scrubbing. For heavily soiled grout, a grout brush with angled bristles can help to reach deep into the grout lines. Avoid using abrasive brushes or scouring pads, as these can damage the grout surface.
What if the Clorox solution doesn’t remove all the stains?
If the Clorox solution doesn’t completely remove all the stains, there are a few things you can try. First, let the solution sit for a longer period, up to 30 minutes, before scrubbing. This will give the bleach more time to penetrate the stains. You can also try using a more concentrated Clorox solution, but be sure to test it on an inconspicuous area first to avoid discoloration. For stubborn stains, you can try making a paste of baking soda and water and applying it to the grout before scrubbing with the Clorox solution. If all else fails, you may need to consider using a specialized grout cleaner or contacting a professional cleaning service.
How can I prevent grout from getting dirty in the future?
Preventing grout from getting dirty in the first place is the best way to keep it looking its best. Seal your grout after cleaning it to create a barrier that repels water and stains. Clean up spills and stains immediately to prevent them from setting in. Use mats or rugs in high-traffic areas to protect the grout from dirt and grime. Ventilate your bathroom after showering to prevent the growth of mold and mildew. Regularly sweep or vacuum your tiled floors to remove loose dirt and debris. By following these preventive measures, you can keep your grout clean and sparkling for longer.
Is there a more eco-friendly alternative to Clorox for grout cleaning?
Yes, if you’re looking for a more eco-friendly alternative to Clorox, consider using a solution of white vinegar and water. Mix equal parts white vinegar and water in a spray bottle and spray it onto the grout. Let it sit for 5-10 minutes, then scrub with a brush and rinse with water. Baking soda paste can also be used as a natural abrasive cleaner. For tougher stains, try using a steam cleaner, which uses only water to clean and disinfect surfaces. While these alternatives may not be as powerful as Clorox, they are safer for the environment and your health.


Leave a Comment