

DIY bean sprouts towel method – sounds intriguing, right? I’m so excited to share this incredibly simple and rewarding technique with you! Forget those expensive store-bought sprouts that might be days old. Imagine having a constant supply of fresh, crunchy, and nutritious bean sprouts right from your own kitchen, grown with nothing more than a towel and a little bit of patience.
Sprouting seeds for consumption has a long and fascinating history, dating back thousands of years in various cultures, particularly in Asian cuisine. They were valued not only for their delicious flavor but also for their concentrated nutrients, especially during times of scarcity. Think of it as a miniature, indoor garden providing a burst of vitamins and minerals even in the dead of winter!
Why do you need this DIY bean sprouts towel method in your life? Well, for starters, it’s incredibly cost-effective. A bag of dried beans is far cheaper than buying pre-sprouted ones. Plus, you have complete control over the growing process, ensuring they’re free from any unwanted additives or pesticides. But more importantly, it’s just plain fun! There’s something incredibly satisfying about watching those tiny sprouts emerge and grow, knowing you created something delicious and healthy with your own two hands. So, let’s dive in and discover how easy it is to grow your own bean sprouts using this simple towel method!
Grow Your Own Bean Sprouts: The Super Easy Towel Method!
Hey there, fellow DIY enthusiasts! Are you ready to ditch the grocery store and grow your own fresh, crunchy bean sprouts right in your kitchen? Trust me, it’s way easier than you think, and the taste is unbeatable. Forget fancy sprouting kits – all you need are a few common household items and a little patience. I’m going to walk you through the towel method, which is my absolute favorite because it’s so simple and effective. Let’s get sprouting!
What You’ll Need
Before we dive in, let’s gather our supplies. This is a low-cost project, so you probably already have most of these things lying around:
* Bean Sprouts Seeds: Mung beans are the classic choice, but you can also use adzuki beans, lentils, or even chickpeas. Make sure you buy seeds specifically for sprouting, as regular dried beans might not germinate well. I usually get mine from the health food store or online.
* Clean Towel: A clean, lint-free kitchen towel or cheesecloth works perfectly. Avoid using towels with strong dyes or fragrances, as these could affect the taste of your sprouts.
* Wide-Mouthed Jar or Container: A mason jar, a plastic container, or even a bowl will do the trick. Just make sure it’s clean and large enough to hold your sprouts as they grow.
* Water: Filtered water is best, but tap water that’s been left to sit for a few hours to allow chlorine to dissipate is also fine.
* Rubber Band or String: To secure the towel over the jar or container.
* Dark Place: A cupboard, pantry, or even a covered box will provide the darkness your sprouts need to thrive.
* Spray Bottle (Optional): For misting the sprouts if the towel starts to dry out.
Step-by-Step Instructions: The Towel Method
Okay, now for the fun part! Follow these steps, and you’ll be enjoying your own homegrown bean sprouts in just a few days.
1. Soak the Seeds:
* Rinse your bean sprout seeds thoroughly under cool water to remove any debris.
* Place the rinsed seeds in a bowl or jar and cover them with plenty of water (about 3-4 times the volume of the seeds). They’ll absorb a lot of water as they soak.
* Let the seeds soak for at least 8 hours, or preferably overnight. This is crucial for activating the germination process. I usually soak mine before I go to bed, so they’re ready to go in the morning.
* You’ll notice the seeds will swell up considerably after soaking. This is a good sign!
2. Prepare Your Sprouting Container:
* Thoroughly wash and dry your jar or container. Cleanliness is key to prevent mold growth.
* Dampen your clean towel or cheesecloth with water. It should be wet but not dripping.
* Line the inside of your jar or container with the damp towel. Make sure the towel covers the entire inside surface, creating a cozy little bed for your sprouts.
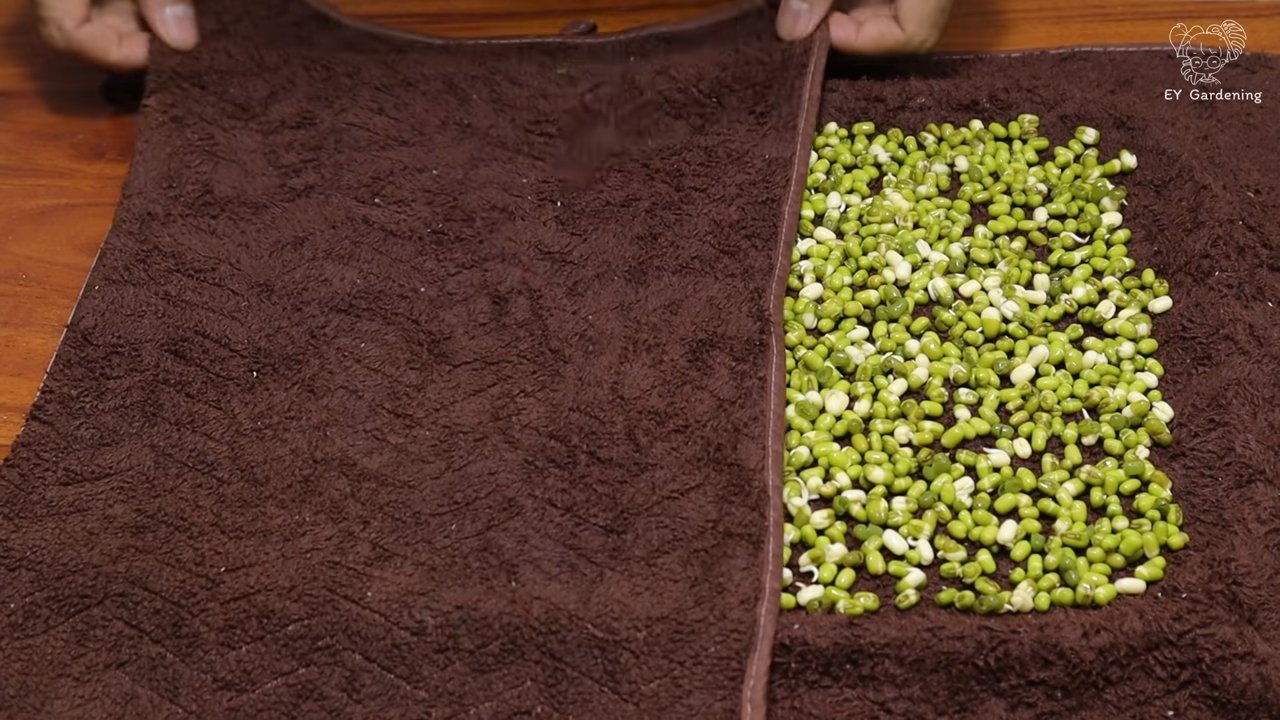
3. Transfer the Soaked Seeds:
* Drain the soaked seeds completely, discarding the soaking water.
* Gently spread the soaked seeds evenly over the damp towel lining the jar or container. Avoid overcrowding the seeds, as this can lead to mold. A single layer is ideal.
4. Cover and Secure:
* Cover the top of the jar or container with another piece of damp towel or cheesecloth. This will help keep the seeds moist and provide darkness.
* Secure the towel in place with a rubber band or string. Make sure it’s snug but not too tight, allowing for some airflow.
5. Find a Dark Place:
* Place your prepared jar or container in a dark, well-ventilated place. A cupboard or pantry is perfect. Darkness is essential for bean sprouts to grow long and white. If they get too much light, they’ll turn green and can become bitter.
6. Rinse and Repeat:
* This is the most important step! Rinse the seeds twice a day (morning and evening) with fresh, cool water.
* To rinse, carefully remove the top towel, gently pour water into the jar or container, swirl the seeds around to rinse them thoroughly, and then drain the water completely.
* Replace the top towel with a freshly dampened one and return the jar to its dark location.
* Why is rinsing so important? Rinsing removes metabolic waste products and keeps the sprouts hydrated, preventing them from drying out and becoming moldy. Don’t skip this step!
7. Monitor and Mist (If Needed):
* Check the sprouts daily to make sure the towel is still damp. If it starts to dry out, gently mist the sprouts with a spray bottle filled with water.
* Look for any signs of mold. If you see any, remove the affected sprouts immediately and rinse the remaining sprouts thoroughly. Good ventilation and proper rinsing are your best defenses against mold.
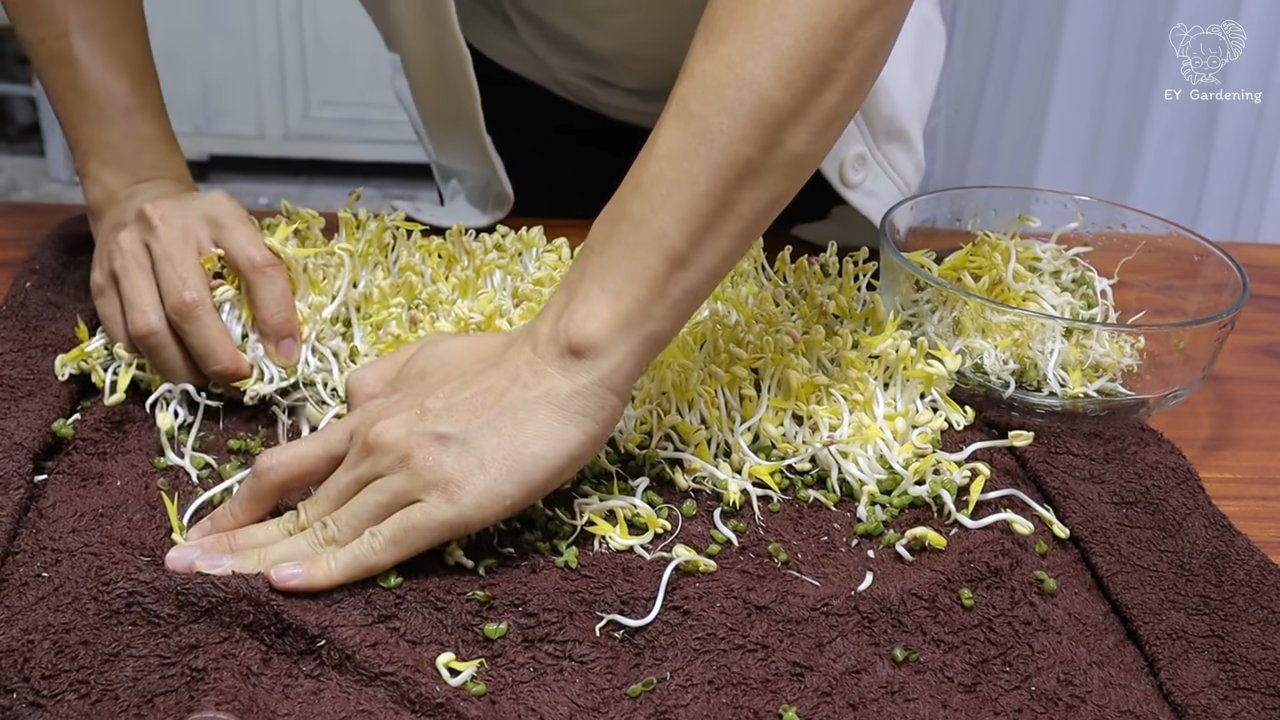
8. Harvest Your Sprouts:
* Your bean sprouts should be ready to harvest in about 3-5 days, depending on the type of bean and the temperature. They’ll be about 1-2 inches long and have a nice, crunchy texture.
* To harvest, simply remove the sprouts from the jar or container.
* Rinse them thoroughly under cool water to remove any remaining seed hulls.
9. Store Your Sprouts:
* Store your harvested bean sprouts in an airtight container in the refrigerator. They should last for about a week.
* Before storing, make sure the sprouts are as dry as possible to prevent them from becoming slimy. You can gently pat them dry with a paper towel.
Troubleshooting Tips
Even with the simplest methods, things can sometimes go awry. Here are a few common problems and how to fix them:
* Mold Growth: This is usually caused by poor ventilation, insufficient rinsing, or overcrowding of seeds. Make sure you’re rinsing the sprouts twice a day, providing good airflow, and not using too many seeds. If you see mold, discard the affected sprouts and rinse the remaining ones thoroughly. You might also want to try using a slightly diluted vinegar solution (1 tablespoon of vinegar per cup of water) to rinse the sprouts, as vinegar has antifungal properties.
* Sprouts Drying Out: If the towel is drying out too quickly, mist the sprouts more frequently or try using a thicker towel. You can also place a small dish of water near the jar to increase humidity.
* Slow Growth: This could be due to low temperatures or old seeds. Make sure the sprouts are in a warm (but not hot) location. If your seeds are old, they might not germinate as well. Try using fresh seeds.
* Bitter Taste: This is usually caused by too much light exposure. Make sure the sprouts are kept in a completely dark place.
Creative Uses for Your Homegrown Bean Sprouts
Now that you have a bounty of fresh bean sprouts, what can you do with them? The possibilities are endless! Here are a few of my favorite ways to use them:
* Salads: Add a crunchy texture and fresh flavor to your salads.
* Sandwiches and Wraps: A great way to add some extra nutrients and crunch.
* Stir-Fries: A classic addition to stir-fries, adding a satisfying crunch.
* Soups: Sprinkle them on top of soups for a fresh garnish.
* Spring Rolls: A must-have ingredient in fresh spring rolls.
* Juices and Smoothies: Add a handful of sprouts to your juices or smoothies for an extra boost of vitamins and minerals.
Why Grow Your Own Bean Sprouts?
Besides being incredibly easy and cost-effective, growing your own bean sprouts offers several benefits:
* Freshness: You can’t beat the taste of freshly grown sprouts.
* Nutritional Value: Bean sprouts are packed with vitamins, minerals, and enzymes.
* Cost Savings: Growing your own sprouts is much cheaper than buying them from the store.
* Sustainability: You’re reducing your carbon footprint by growing your own food.
* Fun and Educational: It’s a fun and educational activity for kids and adults alike.
So, there you have it! My foolproof guide to growing your own bean sprouts using the towel method. I hope you give it a try and enjoy the satisfaction of harvesting your own fresh, crunchy sprouts. Happy sprouting!
Conclusion
So, there you have it! The DIY bean sprouts towel method is not just a clever kitchen hack; it’s a gateway to fresher, healthier, and more flavorful meals. Forget those bland, pre-packaged sprouts from the grocery store. With minimal effort and readily available materials, you can cultivate a thriving batch of crisp, delicious bean sprouts right in your own kitchen.
Why is this a must-try? Because it empowers you to control the entire process, from seed selection to harvest. You know exactly what you’re eating – no hidden preservatives, no questionable origins, just pure, wholesome goodness. Plus, the satisfaction of growing your own food, even something as simple as bean sprouts, is incredibly rewarding. It connects you to the natural world and adds a touch of green to your daily routine.
But the benefits don’t stop there. This method is incredibly cost-effective. A small bag of dried beans yields a surprisingly large quantity of sprouts, making it a budget-friendly way to boost the nutritional value of your meals. And let’s not forget the taste! Homegrown bean sprouts are noticeably fresher and more flavorful than their store-bought counterparts, adding a delightful crunch and subtle sweetness to salads, stir-fries, sandwiches, and more.
Ready to experiment? Consider these variations:
* **Spice it up:** Add a pinch of chili flakes to the water during the soaking process for a subtle kick.
* **Different beans, different flavors:** Try sprouting different types of beans, such as mung beans (the most common), adzuki beans, or even lentils, to explore a range of flavors and textures.
* **Herbal infusion:** Add a sprig of fresh rosemary or thyme to the water for a fragrant and flavorful twist.
* **Sprout blends:** Combine different types of beans for a unique and nutritious sprout mix.
This DIY bean sprouts towel method is more than just a recipe; it’s an invitation to embrace a more sustainable and self-sufficient lifestyle. It’s a simple yet powerful way to connect with your food, reduce waste, and enjoy the freshest, most flavorful ingredients possible.
We wholeheartedly encourage you to give this method a try. It’s easy, affordable, and incredibly rewarding. Once you’ve experienced the joy of growing your own bean sprouts, you’ll never go back to store-bought again.
Don’t be shy! Share your experiences with us. What kind of beans did you use? What variations did you try? What dishes did you create with your homegrown sprouts? We’d love to hear your stories and see your creations. Tag us on social media and let’s inspire each other to cultivate a greener, healthier, and more delicious world, one bean sprout at a time. Embrace the simplicity and freshness of the **DIY bean sprouts towel method** and elevate your culinary creations today!
Frequently Asked Questions (FAQ)
What types of beans work best for sprouting with the towel method?
Mung beans are the most commonly used and widely recommended for sprouting, as they sprout quickly and reliably. However, you can also successfully sprout adzuki beans, lentils, chickpeas, and even some types of peas using the towel method. Just be aware that different beans may have different sprouting times and require slightly different levels of moisture. Always ensure the beans are specifically sold for sprouting or culinary use, as some beans intended for planting may be treated with chemicals.
How long does it take for bean sprouts to grow using this method?
Typically, bean sprouts will be ready to harvest in 3 to 5 days using the towel method. The exact time will depend on the type of bean, the temperature of your environment, and the amount of moisture available. Mung beans tend to sprout the fastest, often showing signs of sprouting within 24 hours. Keep a close eye on your sprouts and harvest them when they reach your desired length and crispness.
How often should I rinse the bean sprouts?
It’s crucial to rinse your bean sprouts at least twice a day, ideally in the morning and evening. Rinsing helps to remove any accumulated metabolic byproducts and prevents the growth of mold or bacteria. Use cool, clean water and gently rinse the sprouts, ensuring that all surfaces are thoroughly wetted. After rinsing, drain the sprouts well to prevent them from becoming waterlogged.
What if my bean sprouts start to smell bad?
A foul odor is a sign that bacteria or mold is growing on your bean sprouts. This can happen if the sprouts are not rinsed frequently enough, if the environment is too warm and humid, or if the beans were contaminated before sprouting. If you notice a bad smell, discard the entire batch of sprouts immediately. To prevent this from happening, ensure you are rinsing the sprouts regularly, using clean water, and maintaining a cool, well-ventilated environment.
How do I store bean sprouts after they are grown?
Once your bean sprouts have reached your desired length, you can store them in the refrigerator for up to a week. To store them properly, rinse them thoroughly and drain them well. Then, place them in a clean container lined with a paper towel. The paper towel will help to absorb excess moisture and keep the sprouts fresh. Change the paper towel every day or two to prevent the sprouts from becoming soggy.
Can I eat the bean sprout roots?
Yes, the roots of bean sprouts are perfectly edible and contain nutrients. Some people prefer to trim the roots before eating, as they can sometimes have a slightly bitter taste. However, this is a matter of personal preference. If you choose to eat the roots, make sure to rinse them thoroughly to remove any dirt or debris.
What are the nutritional benefits of eating bean sprouts?
Bean sprouts are a nutritional powerhouse, packed with vitamins, minerals, and antioxidants. They are a good source of vitamin C, vitamin K, folate, and fiber. They also contain essential minerals like manganese, copper, and potassium. Eating bean sprouts can help to boost your immune system, improve digestion, and protect against chronic diseases.
Is it safe to eat raw bean sprouts?
While bean sprouts are generally safe to eat, there is a small risk of foodborne illness associated with consuming raw sprouts. This is because the warm, moist environment required for sprouting can also be conducive to the growth of bacteria like Salmonella and E. coli. To minimize this risk, it’s important to purchase high-quality beans from a reputable source, rinse the sprouts thoroughly before eating, and store them properly. If you are pregnant, elderly, or have a weakened immune system, it’s best to cook bean sprouts before eating them.
Can I use tap water to sprout beans?
Yes, you can use tap water to sprout beans, provided that your tap water is safe to drink. If you are concerned about the quality of your tap water, you can use filtered water or bottled water instead. Avoid using water that is heavily chlorinated, as this can inhibit the sprouting process.
What do I do if my bean sprouts are not sprouting?
If your bean sprouts are not sprouting, there are a few things you can check. First, make sure that the beans are still viable. Old or damaged beans may not sprout. Second, ensure that the beans are getting enough moisture. The towel should be damp but not soaking wet. Third, check the temperature. Bean sprouts prefer a warm environment, around 70-75°F (21-24°C). Finally, make sure that the beans are not exposed to direct sunlight, as this can inhibit sprouting. If you have checked all of these factors and the beans are still not sprouting, try starting with a fresh batch of beans.


Leave a Comment