

DIY floor cleaner recipe: Who knew achieving sparkling, spotless floors could be so simple, affordable, and eco-friendly? I’m excited to share some amazing DIY floor cleaner recipes that will transform your cleaning routine! Forget those harsh chemicals and expensive store-bought solutions. We’re diving into the world of natural ingredients and creating powerful cleaners right in your own kitchen.
For centuries, people have relied on natural cleaning methods, long before the advent of commercial products. Think about it – our grandmothers used vinegar and lemon juice to keep their homes sparkling! These time-tested remedies are not only effective but also gentler on our environment and our health. Plus, there’s something incredibly satisfying about creating something useful with your own two hands.
In today’s world, where we’re increasingly conscious of the products we use and their impact, a DIY floor cleaner recipe is more relevant than ever. Many commercial floor cleaners contain harsh chemicals that can irritate skin, trigger allergies, and even harm our pets. By making your own, you control exactly what goes into the solution, ensuring a safer and healthier home for you and your loved ones. I’ll show you how to create a powerful, effective, and safe floor cleaner using simple ingredients you probably already have in your pantry. Let’s get started!
DIY Floor Cleaner: Sparkling Floors, Naturally!
Hey everyone! I’m so excited to share my go-to DIY floor cleaner recipe with you. I’ve been using this for years, and my floors have never looked better. Plus, it’s all-natural, saves money, and avoids those harsh chemicals found in store-bought cleaners. Let’s get started!
What You’ll Need
Before we dive into the recipe, let’s gather our supplies. This is a super simple list, I promise!
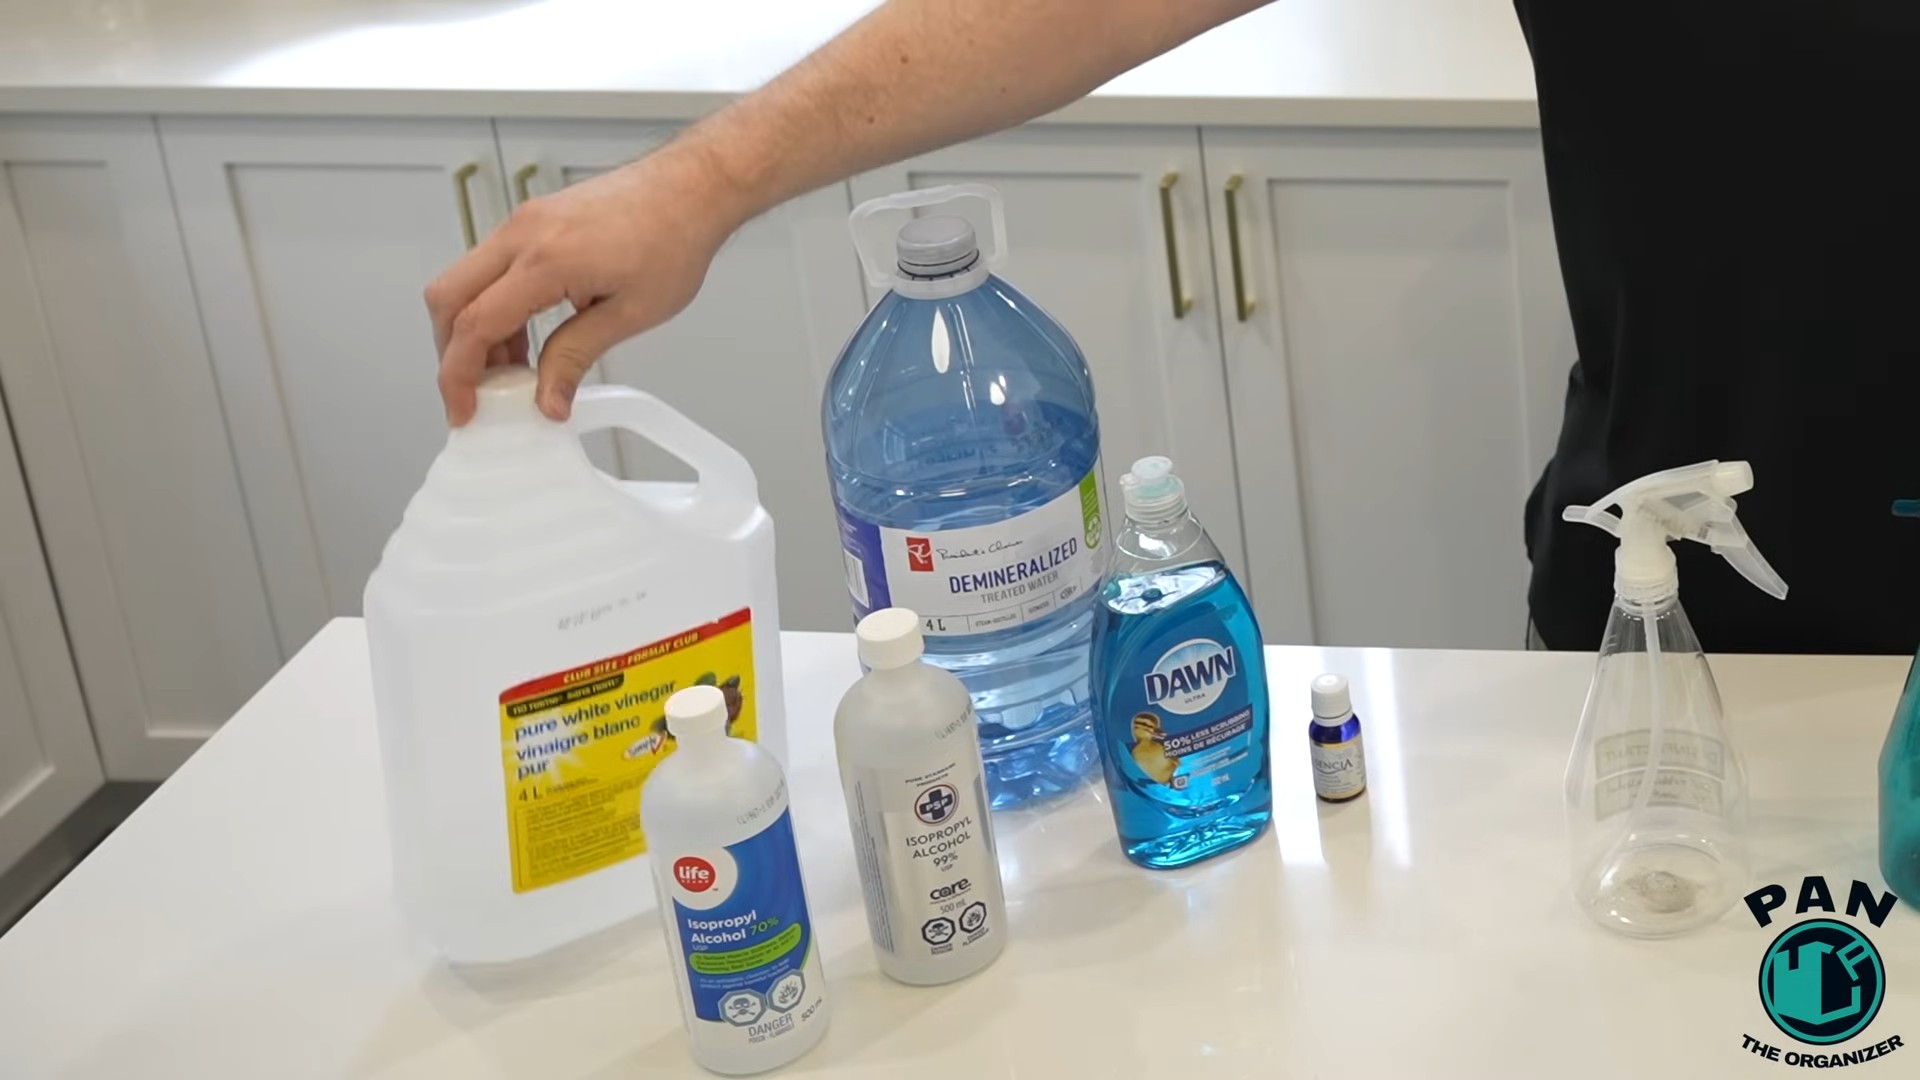
* Spray Bottle or Bucket: Depending on your floor type and cleaning preference, you’ll need either a spray bottle for spot cleaning or a bucket for mopping. I personally prefer a spray bottle for quick cleanups and a bucket for a thorough weekly clean.
* White Vinegar: This is the star of the show! Vinegar is a natural disinfectant and deodorizer. Don’t worry about the smell; it dissipates quickly.
* Hot Water: Hot water helps to dissolve the vinegar and loosen dirt and grime.
* Essential Oil (Optional): This is where you can customize your cleaner! I love using lemon, lavender, or tea tree oil for their cleaning and scent properties.
* Dish Soap (Optional, but Recommended for Greasy Floors): A small amount of dish soap can help cut through grease and grime, especially in the kitchen. Make sure to use a gentle, pH-neutral dish soap.
* Microfiber Mop or Cloths: Microfiber is the best for cleaning floors because it traps dirt and dust effectively without scratching.
* Measuring Cups and Spoons: For accurate measurements, of course!
Choosing the Right Recipe for Your Floor Type
It’s super important to choose the right recipe for your floor type to avoid any damage. Here’s a breakdown:
* Hardwood Floors: These are a bit delicate, so we need to be careful. Too much water or harsh chemicals can damage the finish.
* Tile Floors: Tile is pretty durable, so we have more flexibility.
* Laminate Floors: Similar to hardwood, laminate can be damaged by excessive water.
* Vinyl Floors: Vinyl is generally water-resistant and easy to clean.
* Stone Floors (Marble, Granite, etc.): These require pH-neutral cleaners to avoid etching.
DIY Floor Cleaner Recipes
Okay, let’s get to the good stuff! Here are my favorite recipes, tailored for different floor types:
Recipe 1: Hardwood and Laminate Floor Cleaner
This recipe is gentle and effective for hardwood and laminate floors. Remember, less is more when it comes to water!
1. Gather Your Supplies: You’ll need a spray bottle, white vinegar, hot water, and a microfiber cloth or mop.
2. Mix the Solution: In the spray bottle, combine 1/4 cup of white vinegar with 4 cups of hot water.
3. Add Essential Oil (Optional): If you’re using essential oil, add 5-10 drops of your favorite scent. I love lemon for its fresh, clean smell.
4. Shake Well: Make sure everything is mixed thoroughly.
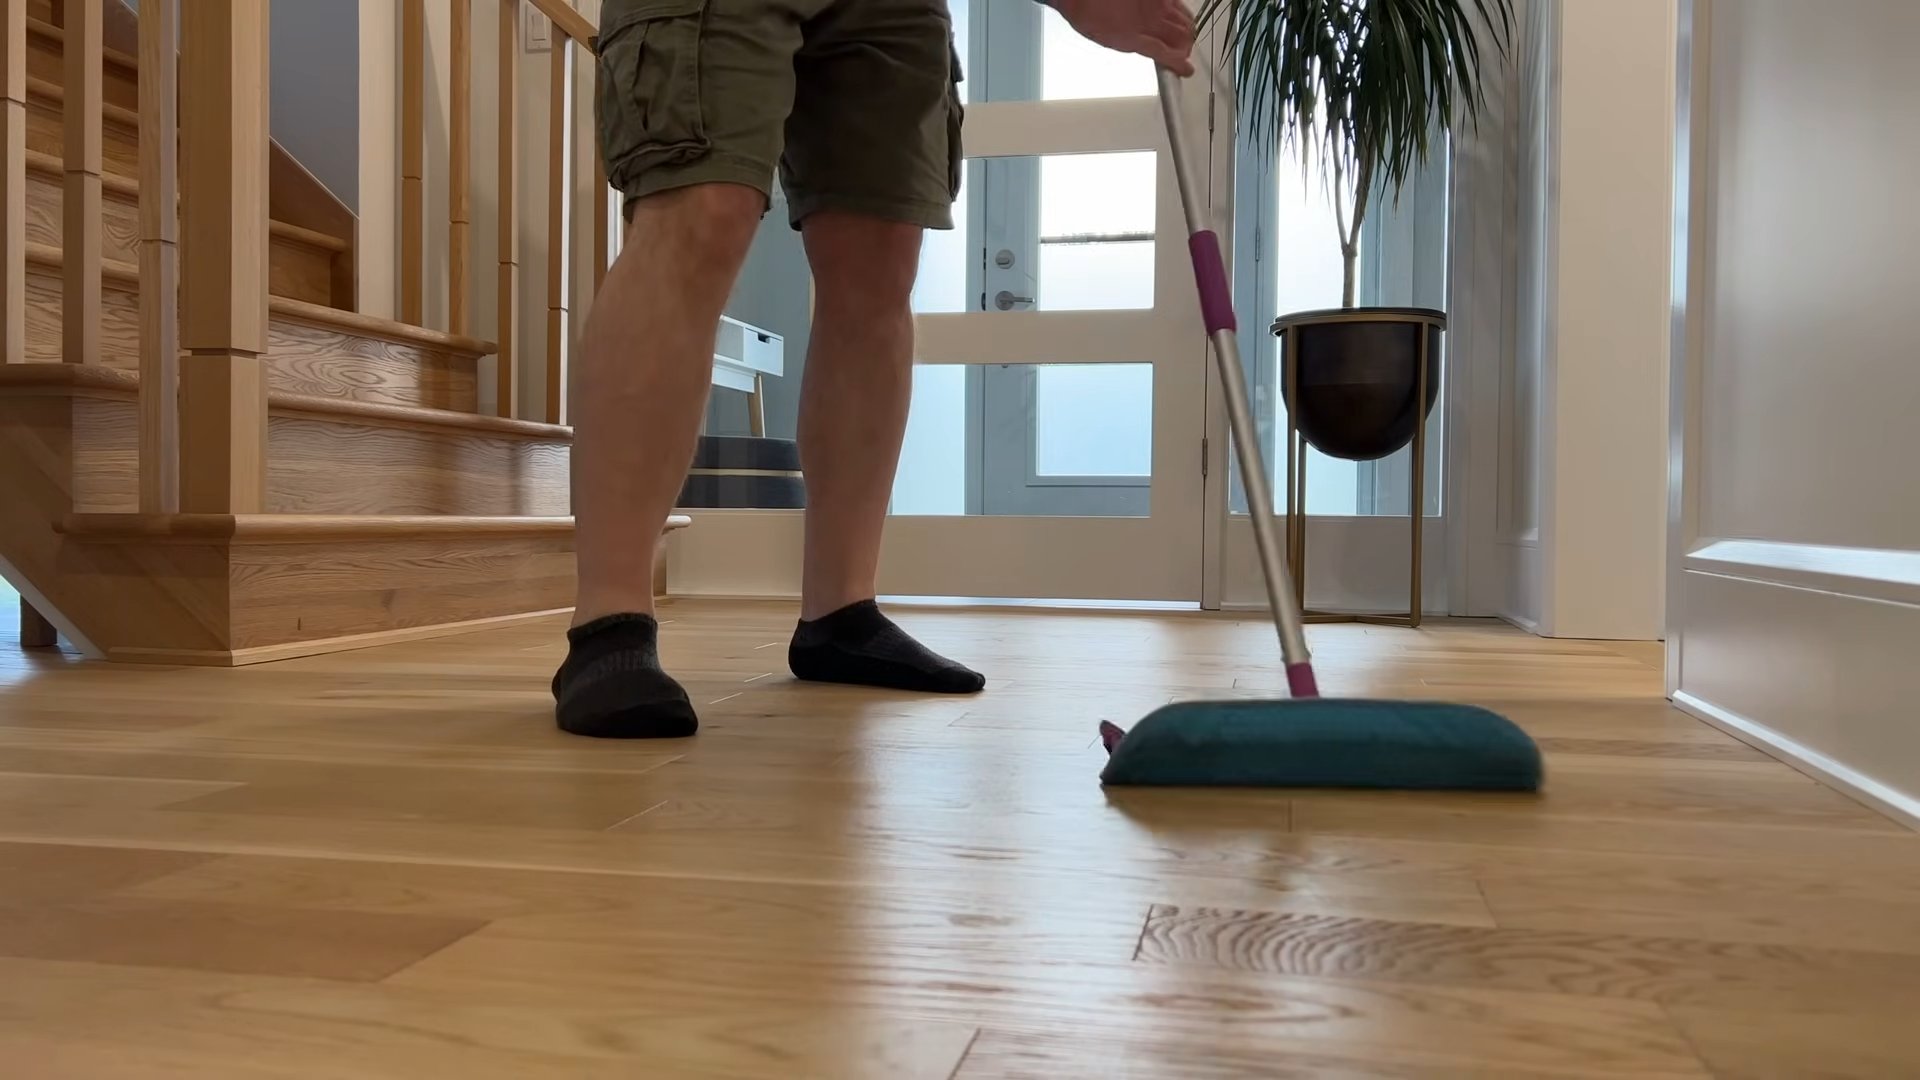
5. Spray and Wipe: Lightly spray the floor with the solution and immediately wipe it dry with a microfiber cloth or mop. Avoid soaking the floor.
6. Repeat as Needed: Continue spraying and wiping until the entire floor is clean.
Recipe 2: Tile and Vinyl Floor Cleaner
This recipe is a bit stronger and can handle more dirt and grime.
1. Gather Your Supplies: You’ll need a bucket, white vinegar, hot water, dish soap (optional), and a mop.
2. Mix the Solution: In the bucket, combine 1/2 cup of white vinegar with 1 gallon of hot water.
3. Add Dish Soap (Optional): If your floors are particularly greasy, add 1-2 teaspoons of gentle dish soap.
4. Add Essential Oil (Optional): Add 10-15 drops of your favorite essential oil for a pleasant scent.
5. Mop the Floor: Dip your mop into the solution, wring it out well (you don’t want it dripping!), and mop the floor in sections.
6. Rinse (Optional): If you used dish soap, you might want to rinse the floor with clean water after mopping. This will remove any soap residue.
7. Dry the Floor: Allow the floor to air dry or use a clean, dry mop to speed up the process.
Recipe 3: Stone Floor Cleaner (Marble, Granite, etc.)
This recipe is specifically designed for stone floors and uses a pH-neutral cleaner to avoid etching. It’s crucial to avoid vinegar on marble and other natural stone surfaces!
1. Gather Your Supplies: You’ll need a bucket, pH-neutral dish soap (like castile soap), hot water, and a mop.
2. Mix the Solution: In the bucket, combine 1 tablespoon of pH-neutral dish soap with 1 gallon of hot water.
3. Mop the Floor: Dip your mop into the solution, wring it out well, and mop the floor in sections.
4. Rinse Thoroughly: Rinse the floor with clean water to remove any soap residue. This is especially important for stone floors.
5. Dry the Floor: Allow the floor to air dry or use a clean, dry mop to speed up the process.
Step-by-Step Cleaning Guide
Now that you have your recipe, let’s walk through the cleaning process step-by-step.
1. Prepare the Area: Before you start cleaning, remove any rugs, furniture, or other obstacles from the floor. This will give you a clear space to work.
2. Sweep or Vacuum: It’s essential to remove loose dirt, dust, and debris before you start mopping or spraying. This will prevent you from just pushing the dirt around.
3. Mix Your Cleaning Solution: Follow the recipe that’s appropriate for your floor type. Make sure to mix the solution thoroughly.
4. Test in an Inconspicuous Area: Before cleaning the entire floor, test the solution in a small, hidden area to make sure it doesn’t damage the finish. This is especially important for hardwood and laminate floors.
5. Clean the Floor: Depending on your floor type and cleaning preference, either spray the floor with the solution and wipe it dry or mop the floor in sections.
6. Rinse (If Necessary): If you used dish soap, rinse the floor with clean water to remove any soap residue.
7. Dry the Floor: Allow the floor to air dry or use a clean, dry mop to speed up the process.
8. Replace Furniture and Rugs: Once the floor is completely dry, replace any furniture and rugs that you removed.
Tips and Tricks for Sparkling Floors
Here are a few extra tips and tricks to help you achieve sparkling floors:
* Clean Regularly: The more often you clean your floors, the easier it will be to keep them clean. I recommend cleaning high-traffic areas at least once a week.
* Use Doormats: Place doormats at all entrances to your home to trap dirt and debris before it gets tracked onto your floors.
* Take Off Your Shoes: Encourage family members and guests to take off their shoes when they enter your home. This will significantly reduce the amount of dirt and grime that gets tracked onto your floors.
* Spot Clean Spills Immediately: The sooner you clean up a spill, the less likely it is to stain or damage your floor.
* Avoid Abrasive Cleaners: Never use abrasive cleaners or scouring pads on your floors, as they can scratch the finish.
* Don’t Over-Wet Your Floors: Excessive water can damage hardwood and laminate floors. Always wring out your mop well and avoid soaking the floor.
* Use a Steam Mop (With Caution): Steam mops can be effective for cleaning floors, but they should be used with caution on hardwood and laminate floors. Make sure to use a low steam setting and avoid holding the steam mop in one place for too long. Always check the manufacturer’s instructions for your specific floor type.
* Consider a Floor Cleaning Machine: For larger areas or heavily soiled floors, a floor cleaning machine can be a great investment. These machines typically use a combination of water, cleaning solution, and scrubbing brushes to deep clean your floors.
* Buff Your Floors: For extra shine, you can buff your floors after cleaning them. Use a clean, dry microfiber cloth or a floor buffer with a soft pad.
Troubleshooting Common Problems
Sometimes, even with the best recipes and techniques, you might encounter some common problems. Here’s how to troubleshoot them:
* Streaky Floors: Streaky floors are often caused by using too much cleaning solution or not
Conclusion
So, there you have it! Ditching the harsh chemicals and embracing this simple, effective, and budget-friendly DIY floor cleaner recipe is more than just a cleaning hack; it’s a conscious choice for a healthier home and a happier planet. We’ve walked you through the process, highlighting the ease and affordability of creating your own cleaning solution. But why is this DIY approach a must-try?
Firstly, you’re in complete control of the ingredients. No more deciphering long lists of unpronounceable chemicals or worrying about hidden allergens. You know exactly what’s going onto your floors and into your home environment. This is especially crucial for households with children, pets, or individuals with sensitivities. Secondly, it’s incredibly cost-effective. The ingredients are likely already in your pantry, and even if you need to purchase them, they’re far cheaper than commercial cleaners. Think of all the money you’ll save in the long run! Thirdly, it’s environmentally friendly. By reducing your reliance on plastic bottles and harsh chemicals, you’re minimizing your impact on the planet.
But the benefits don’t stop there. This DIY floor cleaner recipe is surprisingly versatile. Want to boost its disinfecting power? Add a few drops of tea tree oil or eucalyptus oil. Need a little extra shine? A splash of white vinegar can do the trick (just be cautious on natural stone floors). For a refreshing scent, experiment with your favorite essential oils like lavender, lemon, or orange. Remember to always test a small, inconspicuous area first to ensure compatibility with your flooring type.
Ready to transform your cleaning routine? We wholeheartedly encourage you to give this DIY floor cleaner recipe a try. It’s simple, effective, and good for you and the environment. Don’t be afraid to experiment with different essential oils to find your perfect scent combination.
And most importantly, we want to hear about your experience! Share your results, variations, and tips in the comments below. Did you find a particular essential oil blend that worked wonders? Did you adapt the recipe for a specific type of flooring? Your feedback will not only help other readers but also inspire us to continue sharing valuable DIY solutions. Let’s create a community of conscious cleaners, one sparkling floor at a time! Embrace the power of homemade, and discover the joy of a truly clean and healthy home with this fantastic DIY floor cleaner.
Frequently Asked Questions (FAQ)
What types of floors can I use this DIY floor cleaner on?
This DIY floor cleaner is generally safe for most sealed hard floors, including tile, linoleum, vinyl, and sealed hardwood. However, it’s crucial to exercise caution and test the cleaner in an inconspicuous area first, especially on delicate surfaces like natural stone (marble, granite, slate) or waxed wood. The acidity of vinegar, even in small amounts, can etch or dull these surfaces over time. For natural stone, consider using a pH-neutral cleaner specifically designed for stone floors. For waxed wood, a cleaner formulated for wood floors is recommended to avoid stripping the wax. Always check the manufacturer’s recommendations for your specific flooring type before using any cleaning product, DIY or commercial.
Can I use this DIY floor cleaner on laminate floors?
Yes, you can generally use this DIY floor cleaner on laminate floors, but with a few precautions. Laminate floors are susceptible to water damage, so it’s essential to use a minimal amount of liquid and avoid letting the cleaner pool on the surface. Make sure your mop or cloth is damp, not soaking wet. After cleaning, dry the floor thoroughly with a clean, dry cloth to prevent water from seeping into the seams. Also, avoid using excessive amounts of vinegar, as it can potentially damage the laminate finish over time. A diluted solution is always best.
How often should I use this DIY floor cleaner?
The frequency of cleaning depends on the amount of foot traffic and the level of dirt accumulation in your home. For high-traffic areas, cleaning once or twice a week may be necessary. For less frequently used areas, cleaning every other week or once a month may suffice. Observe your floors and adjust the cleaning schedule accordingly. Regular sweeping or vacuuming is also essential to remove loose dirt and debris before cleaning with the DIY solution.
What essential oils are best to use in this DIY floor cleaner?
The best essential oils to use in your DIY floor cleaner depend on your personal preferences and desired benefits. Some popular choices include:
* **Lemon:** Provides a fresh, clean scent and has natural degreasing properties.
* **Lavender:** Offers a calming and relaxing aroma and has antibacterial properties.
* **Tea Tree:** Known for its strong antibacterial, antiviral, and antifungal properties.
* **Eucalyptus:** Has a refreshing scent and is effective at disinfecting surfaces.
* **Orange:** Provides a bright, citrusy scent and has degreasing properties.
* **Peppermint:** Offers a refreshing and invigorating scent.
When using essential oils, start with a small amount (5-10 drops per gallon of water) and adjust to your liking. Always use pure, therapeutic-grade essential oils for the best results.
Can I use dish soap instead of castile soap?
While you can technically use dish soap instead of castile soap in this DIY floor cleaner, it’s generally not recommended. Dish soap can leave a residue on your floors, which can attract dirt and make them appear dull over time. Castile soap is a natural, gentle cleanser that rinses clean and doesn’t leave a residue. If you must use dish soap, use a very small amount (a few drops) and rinse the floor thoroughly with clean water afterward.
Is vinegar safe for all types of flooring?
Vinegar is a great natural cleaner, but it’s not safe for all types of flooring. As mentioned earlier, it should be avoided on natural stone floors like marble, granite, and slate, as it can etch or dull the surface. It should also be used with caution on waxed wood floors, as it can strip the wax. For these types of floors, use a pH-neutral cleaner specifically designed for the material.
How do I store the DIY floor cleaner?
Store your DIY floor cleaner in a clean, airtight container, such as a glass jar or a plastic spray bottle. Label the container clearly with the contents and the date it was made. Store it in a cool, dark place away from direct sunlight and heat. The cleaner should last for several months if stored properly.
My floors are streaky after using the DIY floor cleaner. What am I doing wrong?
Streaky floors after cleaning can be caused by several factors:
* **Using too much cleaner:** Over-saturating your mop or cloth with the cleaning solution can leave a residue that causes streaks. Use a damp, not soaking wet, mop or cloth.
* **Dirty mop or cloth:** Make sure your mop or cloth is clean before you start cleaning. Rinse it frequently during the cleaning process to remove dirt and debris.
* **Hard water:** Hard water can leave mineral deposits on your floors, which can contribute to streaks. Try using distilled water instead of tap water to see if that makes a difference.
* **Residue from previous cleaners:** If you’ve been using commercial cleaners, they may have left a residue on your floors. Try cleaning your floors with plain water and a clean mop or cloth to remove the residue before using the DIY cleaner.
* **Not drying the floor properly:** After cleaning, dry the floor thoroughly with a clean, dry cloth to prevent streaks.
Can I add baking soda to this DIY floor cleaner?
While baking soda is a great natural cleaner, it’s generally not recommended to add it to this DIY floor cleaner. Baking soda is an abrasive cleaner and can scratch delicate surfaces. It can also react with vinegar, creating carbon dioxide and water, which can reduce the cleaning power of the solution. If you need to remove stubborn stains, try spot-cleaning them with a paste of baking soda and water, but avoid using it as an all-purpose floor cleaner.
Leave a Comment