

DIY Plastic Garden projects are a fantastic way to unleash your inner gardener without breaking the bank! Have you ever looked at your overflowing recycling bin and thought, “There has to be a better use for all this plastic?” Well, you’re in luck! For generations, resourceful gardeners have been finding innovative ways to repurpose materials, and plastic is a particularly versatile option. From ancient civilizations using terracotta pots to modern-day eco-conscious gardeners, the spirit of resourcefulness has always been at the heart of cultivation.
In today’s world, where sustainability is more important than ever, learning how to create your own DIY Plastic Garden is not just a fun hobby; it’s a responsible choice. Imagine transforming old plastic bottles into self-watering planters, or turning discarded containers into thriving herb gardens. Not only will you be reducing waste, but you’ll also be saving money and adding a unique, personalized touch to your outdoor (or indoor!) space. I’m excited to share some simple yet effective DIY tricks and hacks that will help you create a beautiful and productive garden using readily available plastic materials. Let’s get started!
DIY Plastic Bottle Garden: A Thrifty and Eco-Friendly Project
Hey there, fellow garden enthusiasts! Are you looking for a fun, budget-friendly, and eco-conscious way to add some greenery to your life? Well, look no further! I’m going to walk you through creating your very own garden using recycled plastic bottles. It’s a fantastic way to reduce waste, get creative, and enjoy the beauty of nature, all in one go. Trust me, it’s easier than you think, and the results are surprisingly charming!
What You’ll Need: The Gathering of Supplies
Before we dive in, let’s make sure we have everything we need. This is a crucial step, as having all your materials ready will make the whole process much smoother and more enjoyable.
* Plastic Bottles: This is the star of the show! Collect as many plastic bottles as you can. Different sizes and shapes will add visual interest to your garden. Think soda bottles, water bottles, juice bottles – anything goes! Just make sure they’re clean and dry.
* Scissors or a Craft Knife: For cutting the bottles. A craft knife offers more precision, but scissors work just fine, especially for larger bottles. Be careful!
* Soil: You’ll need potting soil to fill your bottle planters. Choose a good quality soil that’s appropriate for the plants you intend to grow.
* Seeds or Seedlings: Decide what you want to grow! Herbs, flowers, vegetables – the possibilities are endless. Consider the amount of sunlight your garden will receive when choosing your plants.
* Water: Essential for watering your plants, of course!
* String or Wire (Optional): If you want to create a hanging garden, you’ll need string, twine, or wire to suspend the bottles.
* Paint or Markers (Optional): For decorating your bottles and adding a personal touch.
* Gloves (Optional): To keep your hands clean while working with soil.
* Small Stones or Gravel (Optional): To improve drainage in the bottom of the bottles.
* Measuring Tape or Ruler (Optional): For precise cutting and spacing.
* Safety Glasses (Optional): To protect your eyes when cutting the plastic.
Preparing the Bottles: The Foundation of Your Garden
This is where the magic begins! We’ll transform those ordinary plastic bottles into adorable little planters.
1. Cleaning the Bottles: First things first, make sure your bottles are squeaky clean. Wash them thoroughly with soap and water to remove any residue. Rinse them well and let them dry completely. This will prevent mold and mildew from growing later on.
2. Deciding on the Cut: There are a few ways you can cut the bottles, depending on the look you’re going for.
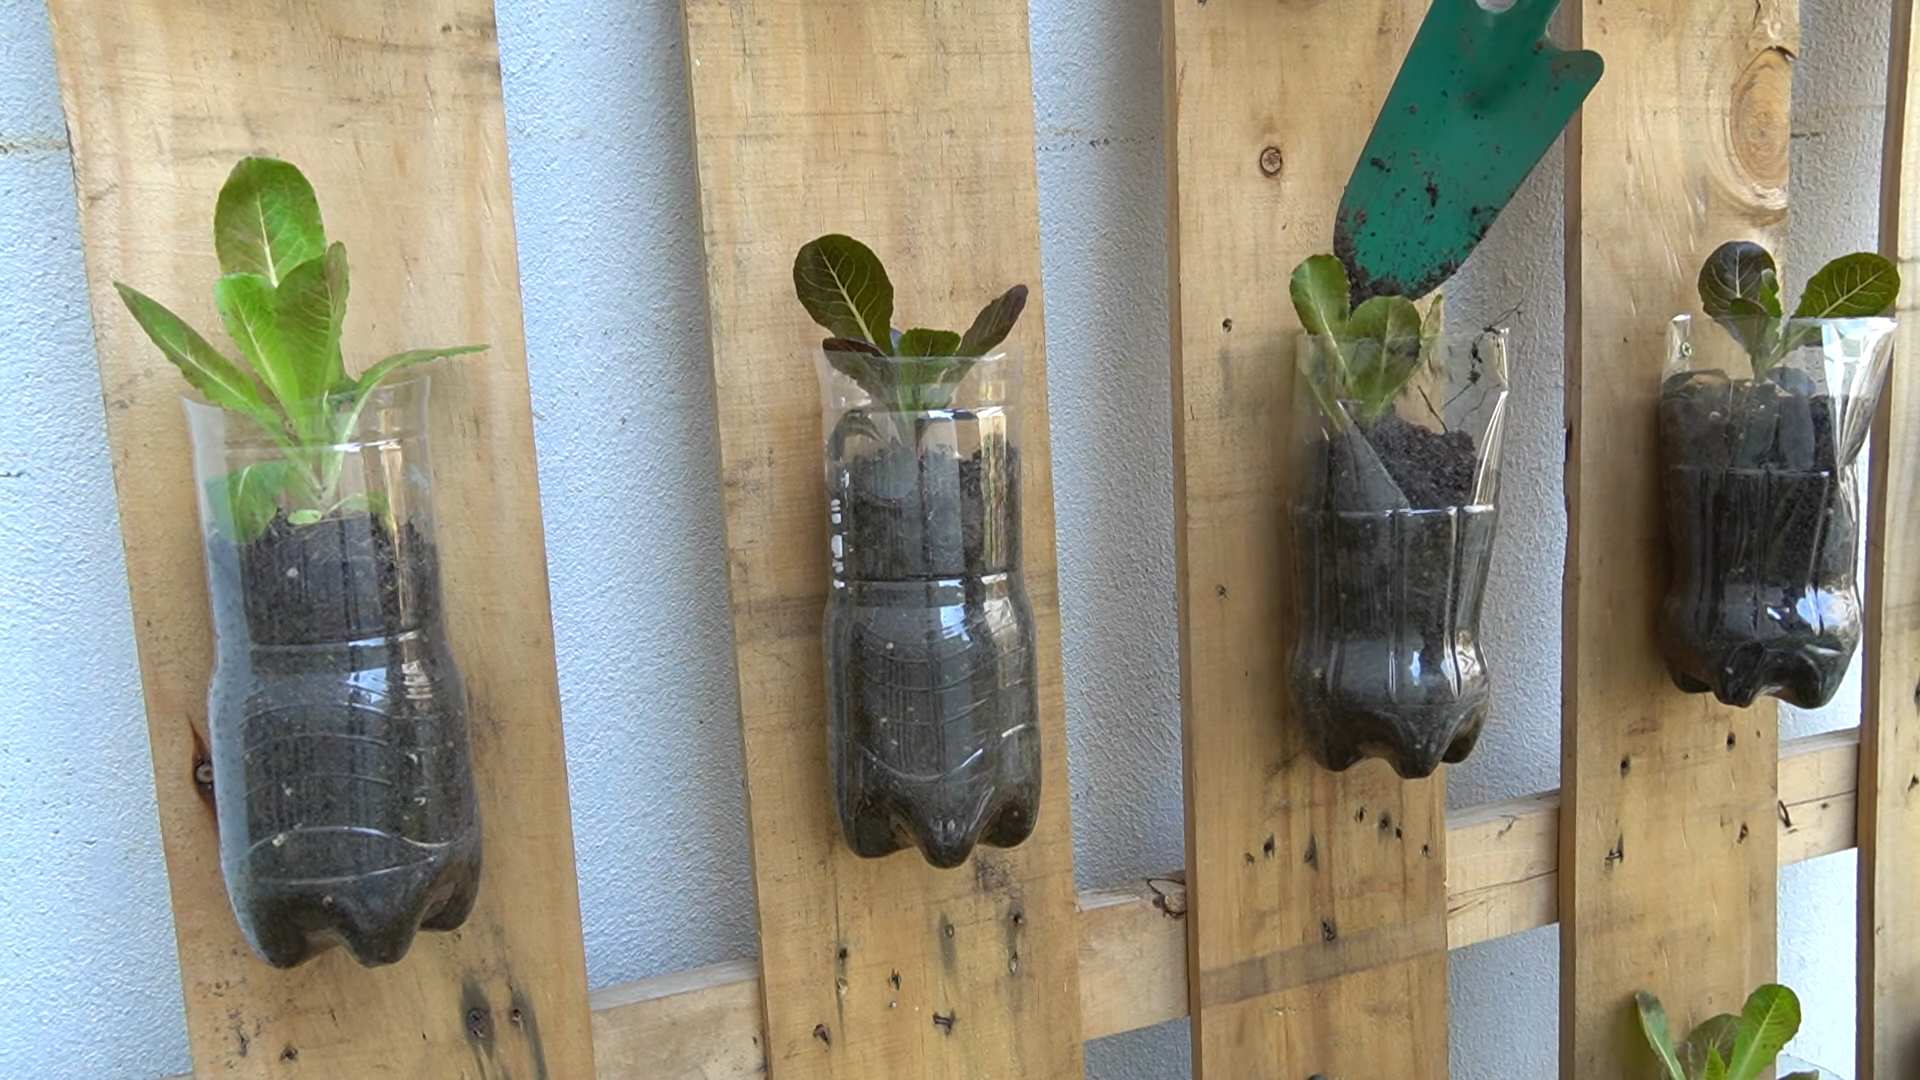
* Horizontal Cut: This is the most common method. Cut the bottle horizontally, about halfway down. You can use the top half as a funnel or discard it. The bottom half will become your planter.
* Vertical Cut: Cut the bottle vertically, starting from the top and going down to the bottom. This creates a trough-like planter, perfect for herbs or shallow-rooted plants.
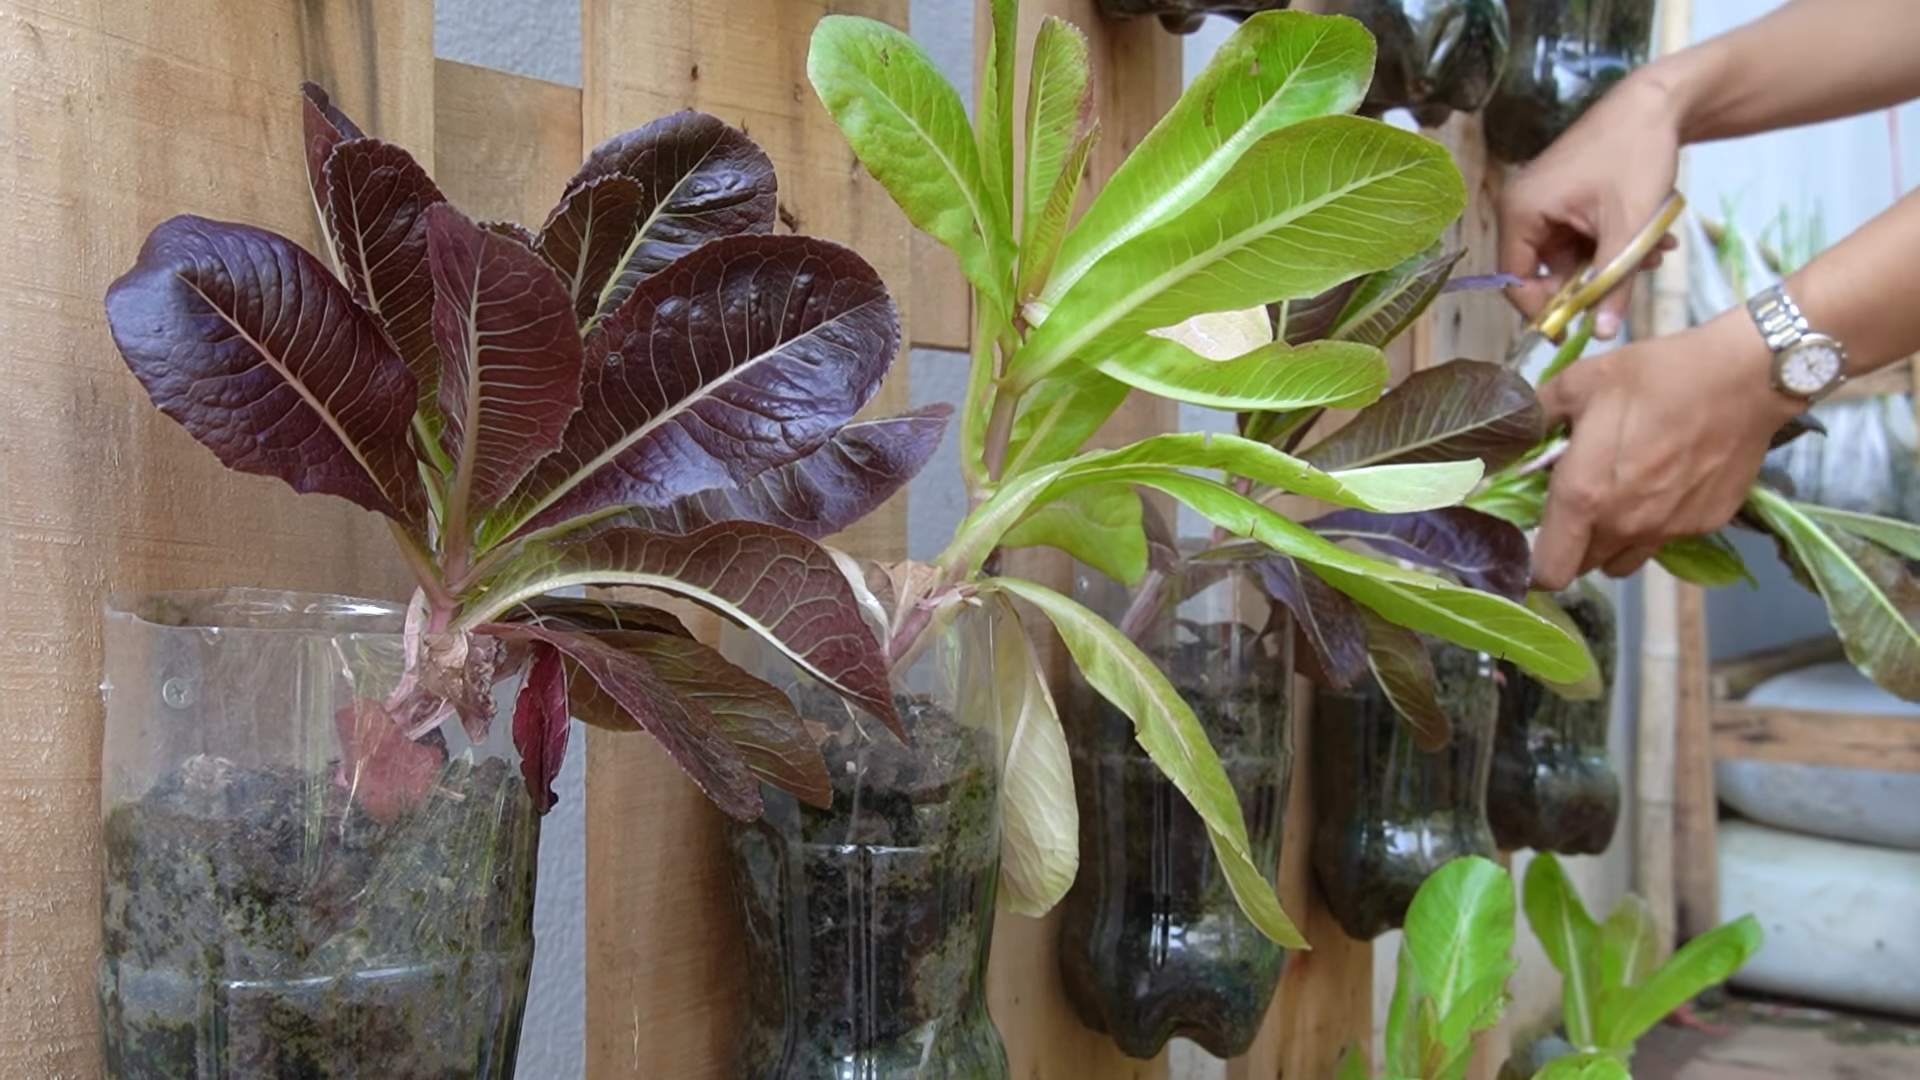
* Hanging Planters: For hanging planters, you can cut a rectangular opening in the side of the bottle, leaving the top and bottom intact. This allows you to hang the bottle horizontally.
3. Cutting the Bottles: Now, carefully cut the bottles according to your chosen method. Use scissors or a craft knife. If using a craft knife, be extra cautious and use a cutting board to protect your work surface. Remember, safety first!
4. Smoothing the Edges: Once you’ve cut the bottles, smooth out any sharp edges. You can use sandpaper or a lighter (carefully!) to melt the edges slightly. This will prevent you from accidentally cutting yourself later on.
5. Drainage Holes: This is super important! Drill or poke a few small holes in the bottom of each bottle to allow for drainage. This will prevent the soil from becoming waterlogged and rotting the roots of your plants.
Decorating the Bottles: Adding Your Personal Flair
This is where you can really let your creativity shine! Decorating the bottles is a fun way to personalize your garden and make it truly your own.
1. Painting: Use acrylic paints to decorate the bottles. You can paint them solid colors, add patterns, or even create miniature landscapes. Let your imagination run wild!
2. Markers: Permanent markers are great for adding details and designs to the bottles. You can draw flowers, leaves, or even write the names of your plants on the bottles.
3. Wrapping: Wrap the bottles with twine, yarn, or fabric scraps for a rustic look. Secure the wrapping with glue or tape.
4. Labeling: Label your bottles with the names of your plants. This will help you keep track of what you’ve planted and prevent any confusion later on. You can use labels, stickers, or even write directly on the bottles with a permanent marker.
5. Adding Embellishments: Glue on beads, buttons, or other embellishments to add some extra sparkle and personality to your garden.
Planting Your Garden: Bringing Your Vision to Life
Now for the exciting part – planting your garden! This is where you’ll finally see your hard work pay off.
1. Adding Drainage Material (Optional): If you’re concerned about drainage, add a layer of small stones or gravel to the bottom of each bottle before adding the soil. This will help prevent the soil from becoming waterlogged.
2. Filling with Soil: Fill the bottles with potting soil, leaving about an inch of space at the top.
3. Planting Your Seeds or Seedlings: Carefully plant your seeds or seedlings according to the instructions on the seed packet or plant label.
4. Watering: Water your plants gently, making sure the soil is evenly moist but not waterlogged.
5. Placement: Place your bottle garden in a sunny location that receives at least six hours of sunlight per day.
Creating a Hanging Garden (Optional): Taking Your Garden to New Heights
If you want to create a hanging garden, here’s how to do it:
1. Preparing the Bottles: Cut rectangular openings in the sides of the bottles, leaving the top and bottom intact.
2. Attaching the String or Wire: Drill small holes in the top of each bottle. Thread string, twine, or wire through the holes and tie knots to secure the bottles.
3. Hanging the Garden: Hang your bottle garden from a fence, balcony, or any other sturdy structure. Make sure the bottles are spaced evenly apart and that they are not too heavy for the structure to support.
Caring for Your Plastic Bottle Garden: Keeping Your Plants Happy and Healthy
Once your garden is planted, it’s important to take good care of it to ensure your plants thrive.
1. Watering: Water your plants regularly, especially during hot weather. Check the soil moisture by sticking your finger into the soil. If the soil feels dry, it’s time to water.
2. Fertilizing: Fertilize your plants every few weeks with a balanced fertilizer. This will provide them with the nutrients they need to grow and flourish.
3. Pruning: Prune your plants regularly to remove dead or dying leaves and stems. This will encourage new growth and keep your plants looking their best.
4. Pest Control: Keep an eye out for pests and diseases. If you notice any problems, take action immediately to prevent them from spreading. You can use organic pest control methods, such as insecticidal soap or neem oil.
5. Repotting: As your plants grow, they may need to be repotted into larger containers. Choose a pot that is slightly larger than the current one and fill it with fresh potting soil.
Troubleshooting: Addressing Common Issues
Even with the best care, you might encounter some challenges along the way. Here are a few common issues and how to address them:
* Yellowing Leaves: This could be a sign of overwatering, underwatering, or nutrient deficiency. Adjust your watering schedule and fertilize your plants regularly.
* Wilting Plants: This could be a sign of underwatering or heat stress. Water your plants more frequently and provide them with some shade during the hottest part of the day.
* Pests: Inspect your plants regularly for pests and take action immediately if you notice any problems.
* Root Rot: This is caused by overwatering and poor drainage. Make sure your bottles have drainage holes and avoid overwatering your plants.
Plant Choices: What to Grow in Your Bottle Garden
The beauty of a plastic bottle garden is its versatility. You can grow a wide variety of plants, depending on your preferences and the amount of sunlight your garden receives. Here are a few ideas:
* Herbs: Basil, mint, oregano, thyme, rosemary – these are all great choices for a bottle garden. They’
Conclusion
So, there you have it! Transforming discarded plastic into a thriving garden isn’t just a whimsical project; it’s a powerful statement about sustainability, resourcefulness, and the sheer joy of creating something beautiful and functional from what others consider trash. This DIY plastic garden project is more than just a gardening hack; it’s a gateway to a greener lifestyle.
Why is this a must-try? Because it’s incredibly accessible. You likely already have the primary ingredient – plastic bottles, containers, or even old plastic crates – accumulating in your recycling bin. It’s also budget-friendly, significantly reducing the cost of traditional gardening supplies like pots and raised beds. Beyond the practical benefits, it’s an incredibly rewarding experience to witness your creativity blossom alongside your plants. Imagine the satisfaction of harvesting fresh herbs or vibrant flowers from a garden you built with your own two hands, using materials that would otherwise contribute to landfill waste.
But the beauty of this DIY project lies in its adaptability. Feel free to experiment with different types of plastic. Sturdier containers like laundry detergent bottles or plastic storage bins can be repurposed into larger planters for vegetables like tomatoes or peppers. Softer plastics, like water bottles, can be cut and woven into hanging planters or used as cloches to protect seedlings from frost.
Consider painting your plastic planters to add a splash of color and personality to your garden. Use vibrant hues to create a cheerful display or opt for earthy tones to blend seamlessly with your natural surroundings. You can also get creative with drainage. While drilling holes is the most common method, you can also add a layer of gravel or pebbles at the bottom of your containers to improve drainage and prevent waterlogging.
For those with limited space, vertical gardening is an excellent option. Stack plastic bottles or containers to create a living wall, maximizing your growing area without sacrificing valuable floor space. You can even repurpose plastic pallets into vertical planters, adding a rustic touch to your garden.
Don’t be afraid to involve your children in this project. It’s a fantastic opportunity to teach them about recycling, gardening, and the importance of environmental stewardship. Let them decorate the planters, help with planting, and witness the magic of watching seeds sprout and grow.
We wholeheartedly encourage you to embark on this DIY adventure. It’s a simple, sustainable, and incredibly satisfying way to connect with nature and make a positive impact on the environment. Once you’ve created your own DIY plastic garden, we’d love to hear about your experience! Share your photos, tips, and challenges in the comments below. Let’s inspire each other to create a greener, more sustainable world, one plastic bottle at a time. What plants did you choose? What creative solutions did you come up with? Your insights could be invaluable to other aspiring DIY gardeners. Let’s build a community of resourceful and environmentally conscious individuals, all united by the common goal of transforming waste into wonder.
Frequently Asked Questions (FAQ)
What types of plastic are safe to use for gardening?
Ideally, you should use food-grade plastics, such as those labeled with recycling codes 1 (PET or PETE), 2 (HDPE), 4 (LDPE), and 5 (PP). These plastics are generally considered safe for contact with food and soil. Avoid using plastics labeled with recycling code 3 (PVC) or 6 (PS), as they may leach harmful chemicals into the soil. Always clean your plastic containers thoroughly before using them for gardening.
How do I ensure proper drainage in my plastic planters?
Proper drainage is crucial to prevent waterlogging and root rot. Drill drainage holes in the bottom of your plastic containers. The number and size of the holes will depend on the size of the container and the type of plants you’re growing. For smaller containers, a few small holes will suffice. For larger containers, you may need to drill several larger holes. You can also add a layer of gravel or pebbles at the bottom of the container to improve drainage. Another option is to use a layer of landscape fabric to prevent soil from clogging the drainage holes.
What kind of soil should I use in my DIY plastic garden?
The type of soil you use will depend on the plants you’re growing. In general, a well-draining potting mix is a good choice for most plants. Avoid using garden soil, as it can be too heavy and compact, leading to drainage problems. You can also amend your potting mix with compost or other organic matter to improve its fertility and water retention. Consider using a soilless mix for plants that prefer well-draining conditions.
How do I clean plastic containers before using them for gardening?
Thoroughly cleaning your plastic containers is essential to remove any residue or contaminants. Wash the containers with warm, soapy water. Use a scrub brush to remove any stubborn dirt or grime. Rinse the containers thoroughly with clean water. You can also disinfect the containers with a solution of bleach and water (1 part bleach to 9 parts water). Allow the containers to air dry completely before using them for gardening.
Will the plastic leach chemicals into the soil and affect my plants?
As mentioned earlier, it’s best to use food-grade plastics for gardening to minimize the risk of chemical leaching. While some leaching may occur over time, the amount is generally considered to be minimal and unlikely to significantly affect your plants. If you’re concerned about chemical leaching, you can line your plastic containers with a layer of landscape fabric or use a food-grade plastic liner.
How do I protect my plastic planters from the sun and heat?
Dark-colored plastic can absorb heat and potentially damage plant roots. To protect your plastic planters from the sun and heat, consider painting them with a light-colored paint or wrapping them with reflective material. You can also place your planters in a shaded area during the hottest part of the day. Mulching around your plants can also help to keep the soil cool and moist.
Can I use any type of plastic for my DIY garden?
While repurposing is the goal, some plastics are better suited than others. Avoid using plastics that are brittle or prone to cracking, as they may not be durable enough to withstand the elements. Also, avoid using plastics that have been exposed to harmful chemicals or substances. As mentioned before, prioritize food-grade plastics whenever possible.
How do I water plants in plastic containers?
Watering frequency will depend on the type of plants you’re growing, the climate, and the type of soil you’re using. In general, water your plants when the top inch of soil feels dry to the touch. Avoid overwatering, as this can lead to root rot. When watering, water deeply and evenly, allowing the water to drain out of the drainage holes.
What are some creative ideas for using plastic in my garden?
The possibilities are endless! You can use plastic bottles to create self-watering planters, plastic containers to make mini greenhouses, and plastic bags to line raised beds. You can also use plastic lids to create plant markers and plastic forks to deter pests. Get creative and experiment with different ways to repurpose plastic in your garden.
How can I make my DIY plastic garden more sustainable?
To make your DIY plastic garden even more sustainable, consider using rainwater to water your plants, composting your kitchen scraps to enrich your soil, and growing your own seeds. You can also collect plastic from your community to reduce waste and promote recycling. By making small changes, you can create a truly sustainable and eco-friendly garden.
Leave a Comment