

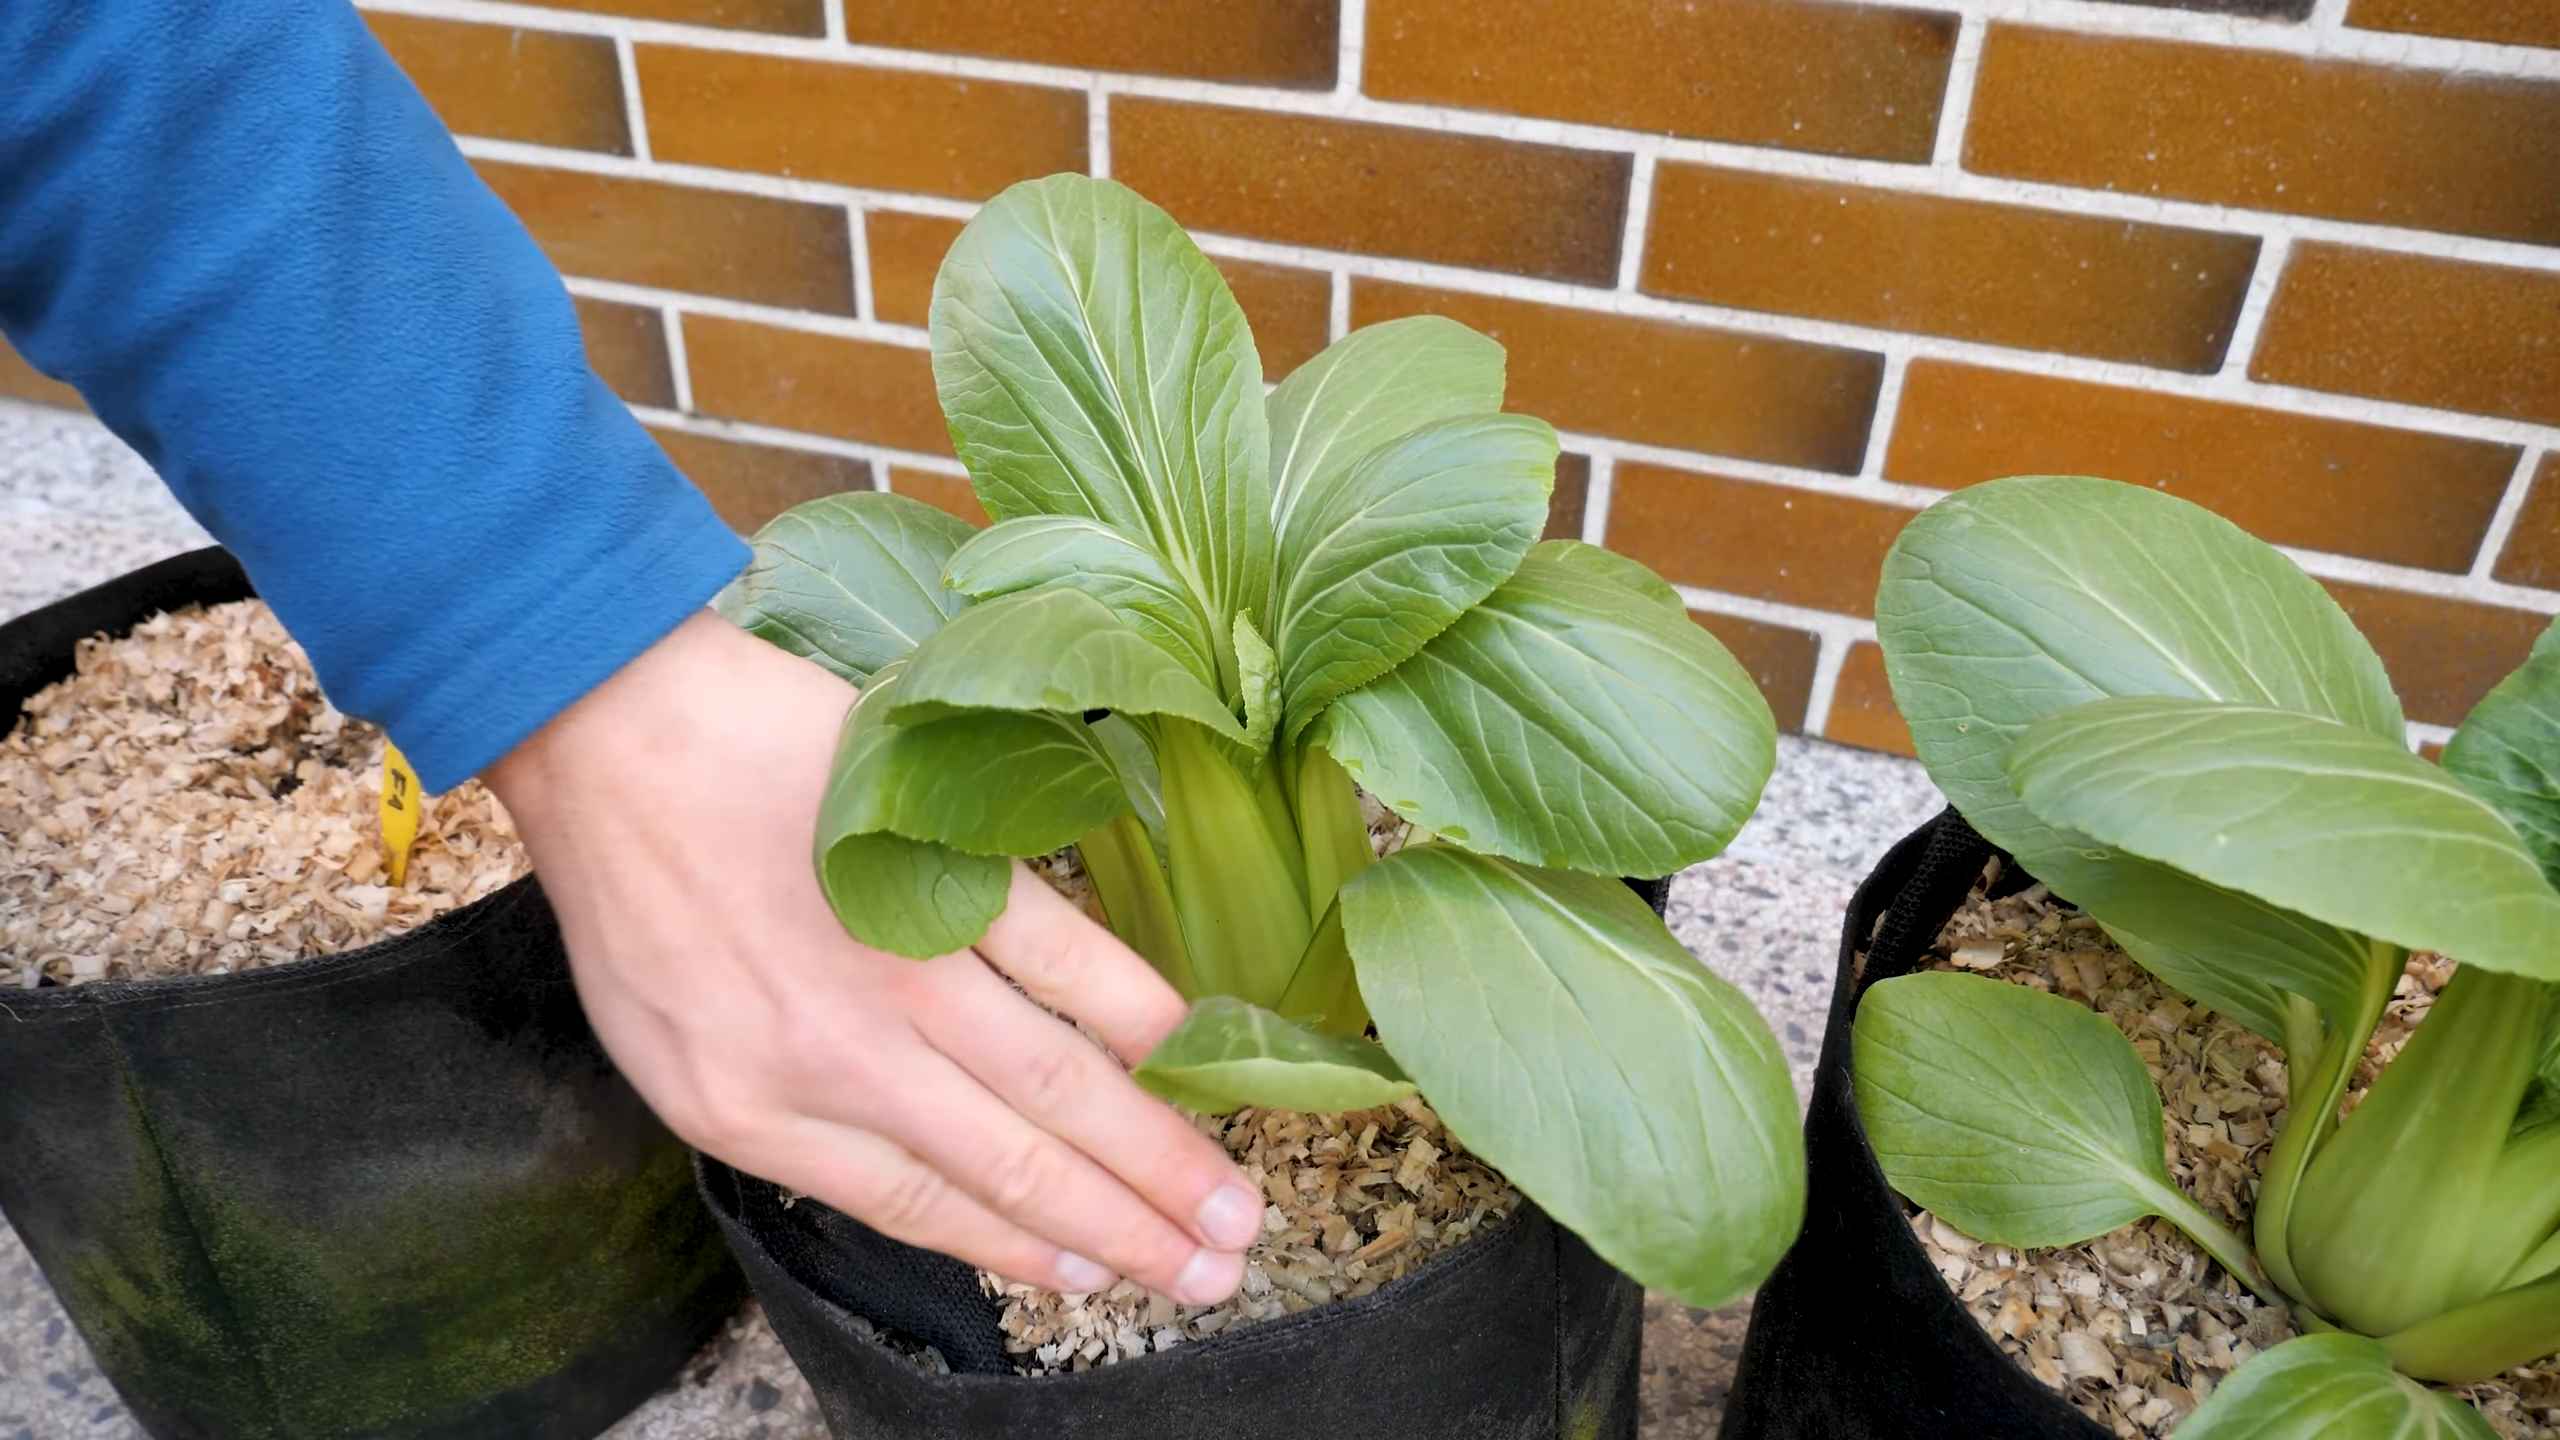
Grow Bok Choy in Bags: Imagine harvesting fresh, crisp bok choy right from your patio, even if you don’t have a sprawling garden! It’s easier than you think, and this DIY guide will show you exactly how to do it. For centuries, bok choy has been a staple in Asian cuisine, prized not only for its delicious flavor but also for its nutritional benefits. From stir-fries to soups, this versatile vegetable adds a delightful crunch and a boost of vitamins to any meal.
But why should you grow bok choy in bags? Well, let’s face it, not everyone has the space or the time for a traditional garden. Bag gardening offers a fantastic solution for urban dwellers, apartment residents, or anyone looking for a low-maintenance way to enjoy homegrown produce. Plus, it’s incredibly rewarding to nurture a plant from seed to harvest, knowing you’re providing yourself with fresh, healthy food. I’m excited to share these simple yet effective tricks that will have you enjoying your own homegrown bok choy in no time!
This DIY article will provide you with the knowledge and confidence to start your own bag garden. I’ll guide you through the entire process, from selecting the right bag and soil to planting, watering, and harvesting your delicious bok choy. So, grab your gardening gloves, and let’s get started!
Grow Your Own Bok Choy Bounty in Bags!
Hey there, fellow gardening enthusiasts! I’m so excited to share one of my favorite gardening hacks with you: growing bok choy in bags! It’s a fantastic way to enjoy fresh, crisp bok choy even if you have limited space, like a balcony, patio, or small yard. Trust me, it’s easier than you think, and the results are incredibly rewarding. Let’s dive in!
Why Grow Bok Choy in Bags?
Before we get started, let’s talk about why this method is so awesome:
* Space-Saving: Bags are perfect for small spaces. You can easily move them around to find the best sunlight.
* Easy to Manage: Controlling soil quality, watering, and pest management is much simpler in a contained environment.
* Cost-Effective: Bags are generally inexpensive, and you can even repurpose old shopping bags or burlap sacks.
* Early Harvest: Because you can control the environment better, you might get an earlier harvest compared to growing directly in the ground.
* No Digging Required: Say goodbye to back-breaking digging! This method is gentle on your body.
What You’ll Need
Okay, let’s gather our supplies. Here’s what you’ll need to successfully grow bok choy in bags:
* Bok Choy Seeds: Choose your favorite variety! I personally love ‘Shanghai Green’ for its mild flavor and quick growth.
* Growing Bags: You can use grow bags specifically designed for gardening (usually made of fabric), heavy-duty plastic shopping bags (make sure they’re clean!), or even burlap sacks. Aim for bags that are at least 12 inches in diameter and 12 inches deep.
* Potting Mix: Use a high-quality potting mix that’s well-draining. Avoid using garden soil, as it can compact and hinder drainage in bags.
* Slow-Release Fertilizer: This will provide your bok choy with a steady supply of nutrients. Look for a balanced fertilizer (e.g., 10-10-10).
* Watering Can or Hose: For watering your plants.
* Trowel or Small Shovel: For filling the bags with potting mix and planting the seeds.
* Scissors or Knife: To create drainage holes in the bags (if needed).
* Optional:
* Seedling Tray: If you prefer to start your seeds indoors.
* Plant Labels: To keep track of your bok choy varieties.
* Organic Pest Control: Such as neem oil or insecticidal soap, just in case.
Step-by-Step Guide: Planting Your Bok Choy
Alright, let’s get our hands dirty! Here’s how to plant your bok choy seeds in bags:
1. Prepare Your Bags:
* If you’re using plastic shopping bags or burlap sacks, make sure to create drainage holes at the bottom. This is crucial to prevent waterlogging, which can lead to root rot. I usually make about 4-5 holes, each about half an inch in diameter.
* If you’re using fabric grow bags, they usually have built-in drainage, so you can skip this step.
2. Fill the Bags with Potting Mix:
* Fill each bag with potting mix, leaving about 2-3 inches of space at the top. This will make watering easier and prevent the soil from spilling over.
* Gently pat down the soil to remove any air pockets.
3. Add Slow-Release Fertilizer:
* Sprinkle the slow-release fertilizer evenly over the surface of the potting mix, following the instructions on the fertilizer package.
* Gently mix the fertilizer into the top inch or two of the soil.
4. Sow the Seeds:
* Bok choy seeds are small, so you don’t need to plant them too deep. I usually sow them about ¼ to ½ inch deep.
* Space the seeds about 1-2 inches apart. If you’re planting multiple rows in a bag, space the rows about 3-4 inches apart.
* You can sow a few extra seeds in each spot to ensure germination. If all the seeds sprout, you can thin them out later, keeping the strongest seedlings.
5. Cover the Seeds:
* Gently cover the seeds with a thin layer of potting mix.
* Lightly pat down the soil to ensure good contact between the seeds and the soil.
6. Water Thoroughly:
* Water the bags gently but thoroughly until the soil is evenly moist. Avoid overwatering, which can cause the seeds to rot.
* I like to use a watering can with a gentle shower head to avoid disturbing the seeds.
7. Choose a Sunny Location:
* Bok choy needs at least 4-6 hours of sunlight per day to thrive. Place your bags in a sunny location where they’ll receive plenty of light.
* If you’re starting your seeds indoors, you can use a grow light to provide them with the necessary light.
8. Germination:
* Bok choy seeds typically germinate within 5-10 days, depending on the temperature and moisture levels.
* Keep the soil consistently moist during this time.
Caring for Your Bok Choy Plants
Now that your bok choy seeds have sprouted, it’s time to provide them with the care they need to grow into healthy, delicious plants.
1. Watering:
* Water your bok choy plants regularly, especially during hot, dry weather.
* The soil should be consistently moist but not waterlogged.
* I usually water my plants every 2-3 days, but this will depend on the weather and the drainage of your bags.
* Check the soil moisture by sticking your finger into the soil. If the top inch or two feels dry, it’s time to water.
2. Fertilizing:
* Bok choy is a heavy feeder, so it needs regular fertilization to grow well.
* In addition to the slow-release fertilizer you added at planting, you can also feed your plants with a liquid fertilizer every 2-3 weeks.
* I like to use a balanced liquid fertilizer (e.g., 10-10-10) diluted to half strength.
3. Thinning:
* If you sowed multiple seeds in each spot, you’ll need to thin out the seedlings once they’re a few inches tall.
* Remove the weaker seedlings, leaving the strongest one in each spot.
* This will give the remaining plants enough space to grow and develop.
4. Pest Control:
* Bok choy can be susceptible to pests such as aphids, cabbage worms, and flea beetles.
* Inspect your plants regularly for signs of pests.
* If you find any pests, you can treat them with organic pest control methods such as neem oil or insecticidal soap.
* I also like to use row covers to protect my plants from pests.
5. Weed Control:
* Keep your bags free of weeds, as they can compete with your bok choy plants for nutrients and water.
* Hand-pull any weeds that you see.
* You can also use mulch to suppress weed growth.
6. Sunlight:
* Ensure your bok choy plants continue to receive at least 4-6 hours of sunlight per day.
* If you’re growing your plants indoors, you may need to supplement with a grow light.
Harvesting Your Bok Choy
The moment we’ve all been waiting for! Harvesting your delicious, homegrown bok choy.
1. When to Harvest:
* Bok choy is typically ready to harvest in about 45-50 days from planting.
* You can harvest the entire plant at once, or you can harvest individual leaves as needed.
* I usually harvest the outer leaves first, allowing the inner leaves to continue growing.
2. How to Harvest:
* To harvest the entire plant, use a sharp knife to cut the stem at the base of the plant.
* To harvest individual leaves, simply snap them off at the base of the plant.
3. Storage:
* Bok choy is best used fresh, but you can store it in the refrigerator for up to a week.
* Wrap the bok choy in a damp paper towel and place it in a plastic bag.
Troubleshooting
Even with the best care, you might encounter a few challenges along the way. Here are some common problems and

Conclusion
So, there you have it! Growing your own bok choy in bags is not just a gardening trend; it’s a genuinely rewarding and accessible way to enjoy fresh, crisp greens right at your doorstep. We’ve walked through the simple steps, highlighting how even those with limited space or gardening experience can cultivate a thriving bok choy patch.
Why is this DIY trick a must-try? Because it offers a multitude of benefits. First and foremost, you gain control over the quality of your produce. You know exactly what goes into your bok choy – no harmful pesticides or questionable fertilizers. You’re nurturing a healthy, organic food source for yourself and your family. Secondly, it’s incredibly space-efficient. Bags can be placed on balconies, patios, or even sunny windowsills, making it perfect for apartment dwellers or anyone with a small yard. Thirdly, it’s cost-effective. Compared to buying bok choy regularly from the grocery store, growing your own significantly reduces your expenses, especially in the long run. Finally, and perhaps most importantly, it’s incredibly satisfying. There’s a unique joy in watching your little seedlings sprout and mature into vibrant, leafy greens, knowing you played a direct role in their growth.
But the beauty of this method lies in its adaptability. Feel free to experiment with different varieties of bok choy. Baby bok choy is a great option for quicker harvests, while Shanghai bok choy offers a slightly different flavor profile. You can also try companion planting in your bags. Herbs like cilantro or chives can deter pests and enhance the flavor of your bok choy. Consider adding a layer of mulch to the top of the soil to help retain moisture and suppress weeds. For those in colder climates, you can even bring your bags indoors during the winter months to extend your growing season.
Don’t be afraid to get your hands dirty and personalize your bok choy growing experience. The key is to provide your plants with the right amount of sunlight, water, and nutrients. Observe them closely, and adjust your care as needed. Remember, gardening is a learning process, and every mistake is an opportunity to improve.
We wholeheartedly encourage you to give this DIY trick a try. It’s a simple, affordable, and rewarding way to enjoy fresh, homegrown bok choy. Once you’ve harvested your first batch, we’d love to hear about your experience! Share your photos, tips, and challenges in the comments below. Let’s create a community of bok choy enthusiasts and inspire others to embrace the joy of growing their own food. Happy gardening! Let us know how your bok choy growing journey goes!
Frequently Asked Questions (FAQ)
What type of bag is best for growing bok choy?
The best type of bag for growing bok choy is a fabric grow bag, typically made from breathable materials like felt or non-woven fabric. These bags allow for good drainage and aeration, preventing the roots from becoming waterlogged and promoting healthy growth. A 5-10 gallon bag is generally sufficient for growing a few bok choy plants. You can also use plastic containers with drainage holes, but fabric bags are often preferred due to their breathability. Avoid using bags that are too small, as this can restrict root growth and limit the plant’s overall size and yield.
How much sunlight does bok choy need when grown in bags?
Bok choy thrives in full sun to partial shade. Ideally, aim for at least 4-6 hours of direct sunlight per day. If you live in a particularly hot climate, providing some afternoon shade can help prevent the leaves from scorching. When growing bok choy in bags, you have the flexibility to move the plants around to optimize their sun exposure. Observe your plants closely and adjust their location as needed. If the leaves appear pale or leggy, it may indicate insufficient sunlight.
What type of soil should I use for growing bok choy in bags?
Use a well-draining, nutrient-rich potting mix. Avoid using garden soil, as it can be too heavy and compact, hindering root growth. A good potting mix will retain moisture while allowing excess water to drain away. You can also amend your potting mix with compost or other organic matter to improve its fertility and drainage. A slightly acidic to neutral pH (around 6.0 to 7.0) is ideal for bok choy.
How often should I water my bok choy plants in bags?
Water your bok choy plants regularly, keeping the soil consistently moist but not waterlogged. The frequency of watering will depend on the weather conditions, the size of the bag, and the type of potting mix you’re using. Check the soil moisture level daily by sticking your finger about an inch into the soil. If it feels dry, it’s time to water. Water deeply, allowing the water to drain out of the bottom of the bag. Avoid overhead watering, as this can increase the risk of fungal diseases.
What are some common pests and diseases that affect bok choy, and how can I prevent them?
Common pests that affect bok choy include aphids, cabbage worms, and flea beetles. To prevent pest infestations, inspect your plants regularly and remove any pests you find by hand. You can also use insecticidal soap or neem oil to control pests. Row covers can also be used to protect your plants from pests. Common diseases that affect bok choy include downy mildew and clubroot. To prevent diseases, ensure good air circulation around your plants and avoid overhead watering. If you notice any signs of disease, remove the affected leaves immediately.
How long does it take for bok choy to mature when grown in bags?
Bok choy typically matures in 45-50 days from seed. Baby bok choy can be harvested even earlier, around 30-40 days. The exact time will depend on the variety of bok choy, the growing conditions, and the time of year. You can start harvesting bok choy when the leaves are large enough to eat. Cut the outer leaves first, allowing the inner leaves to continue growing.
Can I grow bok choy in bags during the winter?
Yes, you can grow bok choy in bags during the winter, especially in milder climates. In colder climates, you can bring your bags indoors and place them near a sunny window or under grow lights. Bok choy is a cool-season crop and can tolerate light frost. However, it’s important to protect your plants from freezing temperatures.
How do I harvest bok choy from bags?
You can harvest bok choy by either cutting the entire head at the base or by harvesting individual outer leaves as needed. If you harvest individual leaves, the plant will continue to produce new leaves. Harvest bok choy in the morning when the leaves are crisp and fresh.
Can I reuse the soil from my bok choy bags for other plants?
Yes, you can reuse the soil from your bok choy bags, but it’s important to amend it with fresh compost or other organic matter to replenish the nutrients. You may also want to sterilize the soil to kill any potential pests or diseases. You can do this by baking the soil in the oven at 180 degrees Fahrenheit for 30 minutes.
How can I improve the flavor of my homegrown bok choy?
The flavor of your homegrown bok choy can be influenced by several factors, including the variety you choose, the growing conditions, and the soil fertility. To improve the flavor, ensure your plants receive adequate sunlight and water. You can also fertilize your plants with a balanced fertilizer or compost tea. Harvesting your bok choy at the right time can also improve its flavor. Overripe bok choy can become bitter.
Leave a Comment