

Grow bottle gourds easily, even if you think you don’t have a green thumb! Have you ever dreamt of harvesting your own unique, homegrown bottle gourds, perfect for crafting into beautiful art pieces or even using as traditional containers? It might seem daunting, but trust me, it’s more achievable than you think! For centuries, bottle gourds have held a special place in various cultures, from being used as musical instruments in Africa to serving as water carriers in ancient civilizations. Their versatility is truly remarkable.
But why should *you* bother learning how to grow bottle gourds easily? Well, beyond the sheer satisfaction of nurturing a plant from seed to harvest, you’ll gain access to a sustainable and creative resource. Imagine crafting your own birdhouses, decorative lamps, or even unique kitchen utensils! Plus, in a world increasingly focused on sustainability, growing your own food and resources is a fantastic way to reduce your environmental footprint. This DIY guide will provide you with simple, effective tricks and hacks to ensure a bountiful harvest, regardless of your gardening experience. Let’s get started and unlock the secrets to growing these fascinating gourds!
Flaschenkürbisse einfach selbst ziehen: Mein DIY-Guide für üppige Ernten
Hallo liebe Gartenfreunde! Ich liebe es, meinen eigenen Garten zu bepflanzen und zu sehen, wie aus kleinen Samen prächtige Pflanzen werden. Eines meiner Lieblingsprojekte ist der Anbau von Flaschenkürbissen. Sie sind nicht nur wunderschön anzusehen, sondern auch unglaublich vielseitig einsetzbar. Ob als dekorative Elemente, als Behälter oder sogar als Musikinstrumente – die Möglichkeiten sind endlos! In diesem Artikel zeige ich euch, wie ihr ganz einfach eure eigenen Flaschenkürbisse ziehen könnt, auch wenn ihr noch keine Erfahrung im Gärtnern habt. Keine Sorge, es ist einfacher als ihr denkt!
Was du für den Anbau von Flaschenkürbissen brauchst
Bevor wir loslegen, lass uns sicherstellen, dass wir alles Nötige beisammen haben. Hier ist eine Liste der Dinge, die du brauchst:
* Flaschenkürbissamen: Du kannst sie in Gartencentern, online oder sogar von getrockneten Kürbissen aus dem Vorjahr bekommen. Achte darauf, dass die Samen von einer gesunden Pflanze stammen.
* Anzuchttöpfe oder -schalen: Diese brauchst du, um die Samen vorzuziehen. Kleine Töpfe mit einem Durchmesser von etwa 8-10 cm sind ideal.
* Anzuchterde: Diese ist nährstoffarm und locker, was das Keimen der Samen erleichtert.
* Gartenerde: Für das Auspflanzen der Jungpflanzen ins Freiland.
* Kompost oder organischer Dünger: Um den Boden mit Nährstoffen anzureichern.
* Gießkanne oder Sprühflasche: Zum Bewässern der Pflanzen.
* Pflanzstäbe oder Rankhilfe: Flaschenkürbisse sind Kletterpflanzen und brauchen Unterstützung.
* Gartenschere: Zum Beschneiden der Pflanzen.
* Handschuhe: Zum Schutz deiner Hände.
* Sonniger Standort: Flaschenkürbisse lieben die Sonne!
* Geduld: Der Anbau von Flaschenkürbissen braucht Zeit und Pflege.
Die Vorbereitung: Samen vorziehen
Flaschenkürbisse haben eine relativ lange Wachstumsperiode, daher ist es ratsam, die Samen vorzuziehen. Das gibt den Pflanzen einen Vorsprung und erhöht die Chancen auf eine reiche Ernte.
1. Samen vorbereiten: Um die Keimung zu beschleunigen, kannst du die Samen vor dem Einpflanzen für 24 Stunden in lauwarmes Wasser legen. Das weicht die harte Schale auf und erleichtert es dem Keimling, durchzubrechen.
2. Anzuchttöpfe befüllen: Fülle die Anzuchttöpfe mit Anzuchterde. Achte darauf, dass die Erde locker und nicht zu fest angedrückt ist.
3. Samen einpflanzen: Lege in jeden Topf 1-2 Samen, etwa 2-3 cm tief. Bedecke die Samen mit Erde und drücke sie leicht an.
4. Bewässern: Befeuchte die Erde vorsichtig mit einer Sprühflasche oder Gießkanne. Die Erde sollte feucht, aber nicht nass sein.
5. Warm und hell stellen: Stelle die Anzuchttöpfe an einen warmen und hellen Ort. Eine Fensterbank mit direkter Sonneneinstrahlung ist ideal. Die optimale Keimtemperatur liegt bei 20-25°C.
6. Feuchtigkeit halten: Halte die Erde feucht, indem du sie regelmäßig besprühst oder gießt. Vermeide Staunässe, da dies zu Fäulnis führen kann.
7. Geduld haben: Die Keimung dauert in der Regel 1-2 Wochen. Sobald die ersten Keimlinge erscheinen, kannst du die schwächeren entfernen, sodass nur die stärkste Pflanze pro Topf übrig bleibt.
Auspflanzen ins Freiland
Sobald die Jungpflanzen kräftig genug sind und das Wetter es zulässt, können sie ins Freiland ausgepflanzt werden.
1. Wetter beobachten: Warte, bis keine Frostgefahr mehr besteht. Flaschenkürbisse sind frostempfindlich und können bei niedrigen Temperaturen Schaden nehmen. Ideal ist es, wenn die Bodentemperatur mindestens 15°C beträgt.
2. Standort vorbereiten: Wähle einen sonnigen Standort mit gut durchlässigem Boden. Flaschenkürbisse brauchen viel Sonne, um optimal zu wachsen und Früchte zu tragen.
3. Boden verbessern: Grabe den Boden um und mische Kompost oder organischen Dünger unter. Das verbessert die Bodenstruktur und versorgt die Pflanzen mit wichtigen Nährstoffen.
4. Pflanzlöcher graben: Grabe Pflanzlöcher, die etwas größer sind als die Anzuchttöpfe. Der Abstand zwischen den Pflanzen sollte mindestens 1 Meter betragen, da Flaschenkürbisse viel Platz zum Wachsen brauchen.
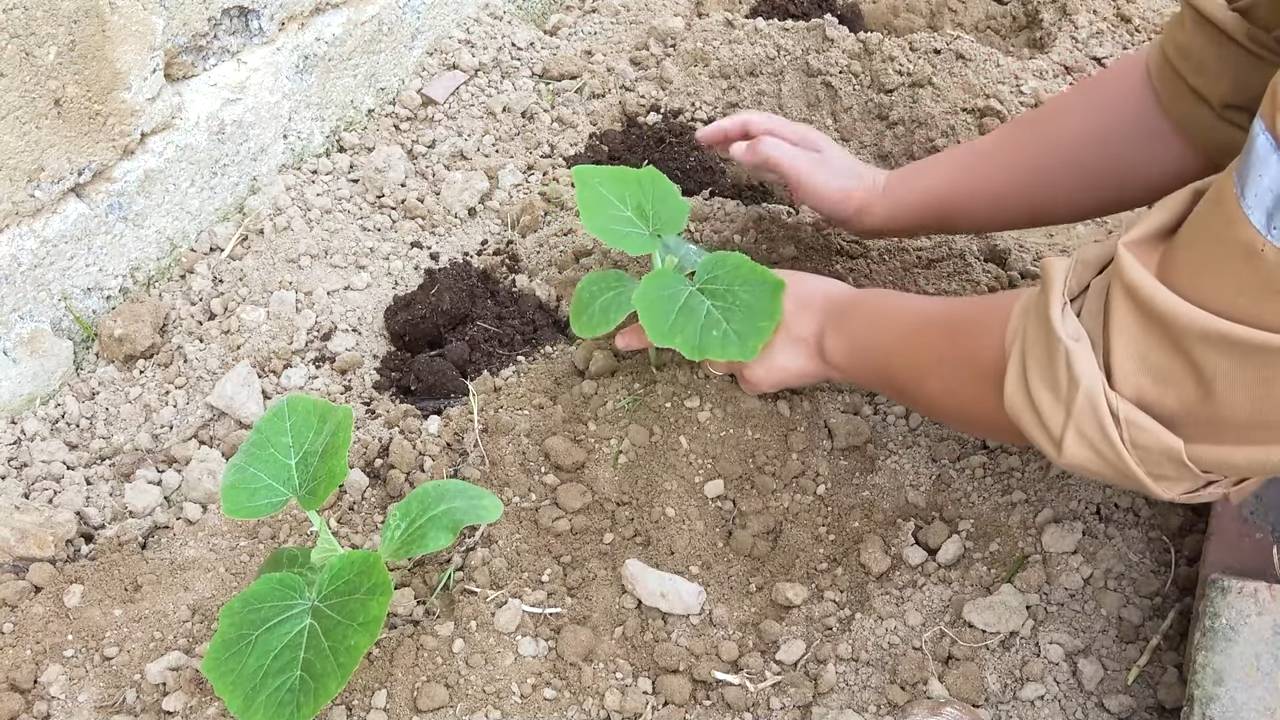
5. Pflanzen vorsichtig aussetzen: Nimm die Jungpflanzen vorsichtig aus den Anzuchttöpfen und setze sie in die Pflanzlöcher. Achte darauf, die Wurzeln nicht zu beschädigen.
6. Pflanzlöcher füllen: Fülle die Pflanzlöcher mit Erde und drücke sie leicht an.
7. Angießen: Gieße die Pflanzen gründlich an. Das hilft ihnen, sich im neuen Boden zu etablieren.
8. Rankhilfe anbringen: Flaschenkürbisse sind Kletterpflanzen und brauchen eine Rankhilfe. Du kannst einen Zaun, ein Spalier oder einen selbstgebauten Rahmen verwenden. Befestige die Triebe der Pflanzen an der Rankhilfe, damit sie sich daran hochranken können.
Die Pflege: Gießen, Düngen und Beschneiden
Damit deine Flaschenkürbisse prächtig gedeihen, ist regelmäßige Pflege wichtig.
1. Gießen: Gieße die Pflanzen regelmäßig, besonders während trockener Perioden. Achte darauf, dass der Boden immer feucht, aber nicht nass ist. Gieße am besten morgens oder abends, um Verdunstung zu vermeiden.
2. Düngen: Dünge die Pflanzen regelmäßig mit einem organischen Dünger oder Kompost. Das versorgt sie mit wichtigen Nährstoffen und fördert das Wachstum und die Fruchtbildung.
3. Beschneiden: Beschneide die Pflanzen regelmäßig, um das Wachstum zu fördern und die Fruchtbildung zu verbessern. Entferne überflüssige Triebe und Blätter, die das Licht blockieren. Du kannst auch die Spitze der Haupttriebe abschneiden, um die Bildung von Seitentrieben zu fördern.
4. Schädlinge und Krankheiten: Achte auf Schädlinge und Krankheiten. Flaschenkürbisse können von Blattläusen, Schnecken oder Mehltau befallen werden. Bekämpfe Schädlinge und Krankheiten frühzeitig mit natürlichen Mitteln oder geeigneten Pflanzenschutzmitteln.
5. Bestäubung: Flaschenkürbisse sind auf die Bestäubung durch Insekten angewiesen. Wenn du feststellst, dass die Blüten nicht bestäubt werden, kannst du die Bestäubung selbst vornehmen. Verwende dazu einen kleinen Pinsel, um den Pollen von den männlichen Blüten auf die weiblichen Blüten zu übertragen.
Die Ernte: Geduld wird belohnt
Die Erntezeit für Flaschenkürbisse ist im Herbst, wenn die Früchte reif sind.
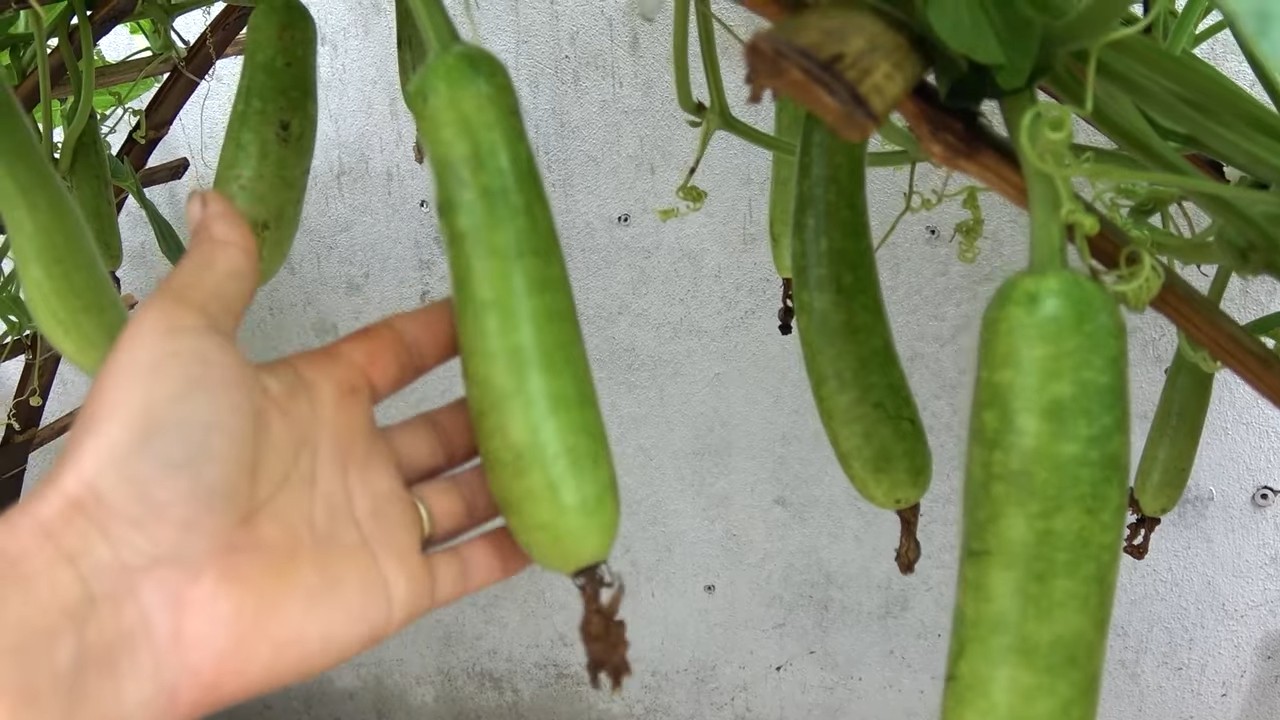
1. Reife erkennen: Die Reife der Flaschenkürbisse erkennst du daran, dass die Schale hart und trocken ist und der Stiel braun und holzig wird. Wenn du mit dem Finger auf die Schale klopfst, sollte sie hohl klingen.
2. Ernten: Schneide die reifen Kürbisse mit einer Gartenschere vom Stiel ab. Lasse dabei einen Stielansatz von etwa 5-10 cm stehen.
3. Trocknen: Lasse die geernteten Kürbisse an einem trockenen und luftigen Ort für mehrere Wochen trocknen. Das Trocknen ist wichtig, damit die Kürbisse haltbar werden und nicht schimmeln.
4. Verwendung: Nach dem Trocknen kannst du die Flaschenkürbisse für verschiedene Zwecke verwenden. Du kannst sie bemalen, schnitzen, als Behälter verwenden oder sogar zu Musikinstrumenten verarbeiten.
Zusätzliche Tipps für eine erfolgreiche Ernte
* Wäh
Conclusion
So, there you have it! Growing bottle gourds doesn’t have to be a daunting task. By implementing this simple DIY trick, you’re setting yourself up for a bountiful harvest of these versatile vegetables. We’ve shown you how to create the perfect microclimate for your young bottle gourd plants, shielding them from harsh weather and pests, and giving them the best possible start in life. This method is not only cost-effective, utilizing readily available materials, but it’s also incredibly rewarding to witness the accelerated growth and increased vigor of your plants.
This DIY approach is a must-try for several reasons. First, it significantly improves the germination rate and early growth of bottle gourds, which can be notoriously slow starters. Second, it provides a protective barrier against common garden pests that often target young seedlings. Third, it helps retain moisture in the soil, reducing the need for frequent watering, especially during hot and dry periods. Finally, it’s an environmentally friendly solution that minimizes the use of chemical pesticides and promotes sustainable gardening practices.
Don’t be afraid to experiment with variations on this technique. For instance, if you live in an area with particularly strong winds, you might consider using sturdier materials for your protective covers, such as repurposed plastic containers or even small, temporary greenhouses made from PVC pipes and plastic sheeting. You can also adjust the size and shape of the covers to accommodate different varieties of bottle gourds or to suit the specific conditions of your garden. Consider adding a layer of mulch around the base of the plants inside the covers to further retain moisture and suppress weed growth.
Another exciting variation is to incorporate companion planting within the protected area. Herbs like basil or marigolds can help deter pests and attract beneficial insects, creating a healthier and more balanced ecosystem for your bottle gourd plants. You could also try intercropping with fast-growing vegetables like radishes or lettuce, which can provide shade and ground cover while the bottle gourds are still young.
Remember, the key to successful gardening is observation and adaptation. Pay close attention to your plants and adjust your techniques as needed. If you notice signs of pests or diseases, take prompt action to address the problem. And don’t be afraid to seek advice from experienced gardeners or local agricultural extension offices.
We are confident that this DIY trick will revolutionize your bottle gourd growing experience. It’s a simple, effective, and sustainable way to ensure a healthy and abundant harvest. So, what are you waiting for? Give it a try and see the difference for yourself! We encourage you to share your experiences, tips, and photos with us and other gardeners in the comments section below. Let’s learn from each other and create a thriving community of bottle gourd enthusiasts! Your success stories will inspire others to embark on their own gardening adventures and discover the joys of growing their own food. Let’s all work together to **grow bottle gourds** easily and sustainably!
Frequently Asked Questions (FAQ)
What type of plastic bottle is best for this DIY trick?
Ideally, you should use clear or translucent plastic bottles for maximum sunlight penetration. Avoid dark-colored bottles, as they may absorb too much heat and potentially harm the seedlings. Two-liter soda bottles or gallon-sized water jugs work well, depending on the size of your bottle gourd seedlings. Make sure the bottles are clean and free of any residue before using them. You can also use other clear plastic containers, such as those from takeout food, as long as they are thoroughly cleaned.
How often should I water the bottle gourd seedlings inside the plastic bottle covers?
Watering frequency depends on the weather conditions and the type of soil you’re using. Generally, you should water the seedlings when the top inch of soil feels dry to the touch. Avoid overwatering, as this can lead to root rot. Check the moisture level regularly, especially during hot and dry periods. The plastic bottle covers will help retain moisture, so you may not need to water as frequently as you would without them. Consider using a watering can with a gentle nozzle to avoid disturbing the seedlings.
When should I remove the plastic bottle covers from the bottle gourd plants?
You should remove the plastic bottle covers when the bottle gourd plants have outgrown them or when the weather conditions are consistently warm and mild. This typically happens after a few weeks, once the plants have developed several sets of true leaves and are strong enough to withstand the elements. Gradually acclimate the plants to the outdoor environment by removing the covers for a few hours each day before completely removing them. This will help prevent transplant shock.
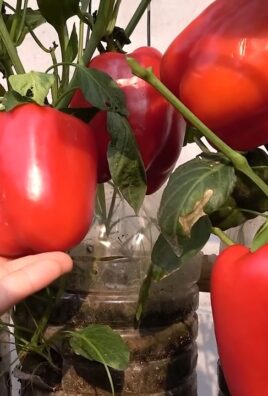
Can I use this DIY trick for other types of plants besides bottle gourds?
Yes, this DIY trick can be used for a variety of other plants, especially those that are sensitive to cold weather or pests during their early stages of growth. Some examples include tomatoes, peppers, cucumbers, and melons. The principle is the same: to create a protective microclimate that promotes faster growth and reduces the risk of damage. Just be sure to adjust the size and type of cover to suit the specific needs of the plant.
What if I don’t have plastic bottles? Are there alternative materials I can use?
Absolutely! If you don’t have plastic bottles, you can use other readily available materials to create similar protective covers. Some alternatives include:
* **Cloches:** These are bell-shaped glass or plastic covers that are specifically designed for protecting plants.
* **Row covers:** These are lightweight fabrics that can be draped over plants to provide protection from frost, pests, and wind.
* **Cold frames:** These are small, enclosed structures that provide a more permanent and robust form of protection.
* **Repurposed containers:** Consider using yogurt containers, plastic cups, or even cardboard boxes (with the bottoms cut out) as temporary covers.
How do I prevent pests from getting inside the plastic bottle covers?
While the plastic bottle covers provide a barrier against many pests, some may still find their way inside. To minimize this risk, make sure the covers are securely placed around the plants and that there are no large gaps or openings. You can also try using organic pest control methods, such as:
* **Companion planting:** Plant herbs like basil or marigolds near the bottle gourds to deter pests.
* **Neem oil:** Apply neem oil to the plants to repel insects.
* **Insecticidal soap:** Use insecticidal soap to control aphids, whiteflies, and other common pests.
* **Handpicking:** Regularly inspect the plants and remove any pests you find by hand.
What kind of soil is best for growing bottle gourds?
Bottle gourds thrive in well-drained, fertile soil that is rich in organic matter. Amend the soil with compost or well-rotted manure before planting to improve its structure and nutrient content. The ideal soil pH for bottle gourds is between 6.0 and 7.0. If your soil is heavy clay, consider adding sand or perlite to improve drainage.
How much sunlight do bottle gourds need?
Bottle gourds require at least 6-8 hours of direct sunlight per day to thrive. Choose a planting location that receives plenty of sunlight throughout the day. If you live in a particularly hot climate, you may need to provide some afternoon shade to prevent the plants from overheating.
How do I know when my bottle gourds are ready to harvest?
The harvesting time for bottle gourds depends on the variety and your intended use. Generally, bottle gourds are ready to harvest when they are mature, firm, and have a hard outer shell. The stem connecting the gourd to the vine will also start to dry out and turn brown. If you plan to use the gourds for crafting, allow them to dry completely on the vine before harvesting.
Can I save seeds from my bottle gourds to plant next year?
Yes, you can save seeds from your bottle gourds to plant next year. To do this, allow the gourds to mature completely on the vine. Once they are fully dried, cut them open and remove the seeds. Rinse the seeds thoroughly and allow them to dry completely before storing them in an airtight container in a cool, dry place. Remember that hybrid varieties may not produce true-to-type offspring, so you may want to save seeds from open-pollinated varieties instead.
Leave a Comment