

Grow Celery at Home? Absolutely! Imagine stepping into your garden and snipping fresh, crisp celery stalks whenever you need them. No more limp, store-bought celery that’s been sitting on the shelf for days! This DIY guide is your ticket to enjoying the vibrant flavor and satisfying crunch of homegrown celery, right from your own backyard (or even your balcony!).
Celery, believe it or not, has a rich history. Originating in the Mediterranean, it was initially valued more for its medicinal properties than its culinary uses. Over centuries, it transformed from a bitter, wild plant into the crunchy vegetable we know and love today. Now, you can be a part of that ongoing story by cultivating your own!
Why should you learn to grow celery at home? Well, besides the unparalleled freshness and flavor, you’ll also be saving money and reducing your environmental impact by avoiding those plastic-wrapped grocery store bundles. Plus, it’s incredibly rewarding to nurture a plant from seed (or even from a leftover celery base!) to a thriving, edible crop. I’m going to show you some simple, effective tricks and hacks that will make growing celery at home easier than you ever thought possible. Let’s get started and unlock the secrets to a bountiful celery harvest!
Growing Butternut Squash: A Beginner’s Guide to a Bountiful Harvest
Okay, so you want to grow butternut squash? Awesome! It’s totally doable, even if you’re a newbie gardener like I was. Butternut squash is delicious, versatile, and surprisingly rewarding to grow yourself. This guide will walk you through every step, from seed to table, so you can enjoy your own homegrown squash this fall. Let’s get started!
Choosing Your Butternut Squash Variety
First things first, let’s talk varieties. While the classic butternut is a great choice, there are a few others you might want to consider:
* Waltham Butternut: This is the standard, reliable choice. It produces medium-sized squash with excellent flavor and storage potential.
* Butterscotch PMR: A smaller variety, perfect if you’re short on space. It’s also powdery mildew resistant, which is a huge plus!
* Early Butternut: As the name suggests, this one matures earlier than other varieties, ideal for shorter growing seasons.
* Honey Nut: A miniature butternut squash, sweeter and more concentrated in flavor. Great for single servings.
I personally love Waltham Butternut because of its consistent yield and flavor, but feel free to experiment!
Starting Your Butternut Squash Seeds
You have two options here: direct sowing or starting indoors. Direct sowing is simpler, but starting indoors gives you a head start, especially in cooler climates. I usually start mine indoors.
Starting Seeds Indoors
1. Gather Your Supplies: You’ll need seed starting trays or small pots (I prefer peat pots because they’re biodegradable), seed starting mix (not regular potting soil!), butternut squash seeds, a spray bottle, and a warm, sunny location or grow lights.
2. Fill Your Containers: Moisten the seed starting mix and fill your trays or pots. Don’t pack it down too tightly.
3. Sow the Seeds: Plant two seeds per pot, about 1 inch deep. This increases your chances of germination.
4. Water Gently: Use a spray bottle to gently water the soil. You want it moist, not soggy.
5. Provide Warmth and Light: Butternut squash seeds need warmth to germinate. Aim for a soil temperature of 70-80°F (21-27°C). A heat mat can be really helpful. Place the trays in a sunny window or under grow lights. If using grow lights, keep them a few inches above the soil surface.
6. Keep the Soil Moist: Check the soil daily and water as needed to keep it consistently moist.
7. Thin Seedlings: Once the seedlings emerge (usually within 5-10 days), thin them to one strong seedling per pot by snipping off the weaker one at the soil line. Don’t pull it out, as this can disturb the roots of the remaining seedling.
8. Harden Off Seedlings: About a week before you plan to transplant them outdoors, you need to “harden off” the seedlings. This gradually acclimates them to outdoor conditions. Start by placing them outside in a sheltered location for an hour or two each day, gradually increasing the time and exposure to sunlight over the course of the week.
Direct Sowing Seeds Outdoors
1. Wait for Warm Weather: Butternut squash is a warm-weather crop, so wait until the soil temperature is consistently above 60°F (16°C) before direct sowing. This is usually a few weeks after the last frost.
2. Prepare the Soil: Choose a sunny location with well-drained soil. Amend the soil with compost or well-rotted manure to improve fertility and drainage.
3. Sow the Seeds: Plant the seeds about 1 inch deep and 2-3 feet apart. Plant 2-3 seeds per hill and thin to the strongest seedling once they emerge.
4. Water Gently: Water the soil gently after planting.
5. Protect from Pests: Young seedlings are vulnerable to pests like slugs and snails. Use row covers or other protective measures to keep them safe.
Preparing Your Garden Bed
Butternut squash needs a lot of space, sunlight, and nutrients. Here’s how to get your garden bed ready:
1. Choose a Sunny Location: Butternut squash needs at least 6-8 hours of direct sunlight per day.
2. Prepare the Soil: Butternut squash prefers well-drained soil that is rich in organic matter. Amend the soil with plenty of compost or well-rotted manure. I usually add a few inches of compost to my garden bed before planting.
3. Consider Raised Beds: Raised beds can improve drainage and soil temperature, which can be beneficial for butternut squash.
4. Space Plants Properly: Butternut squash vines can spread quite a bit, so give them plenty of room. Space plants 2-3 feet apart in rows that are 6-8 feet apart.
5. Add Support (Optional): While butternut squash is typically grown on the ground, you can train the vines to grow on a trellis or fence to save space and improve air circulation. However, you’ll need to support the squash fruits as they grow, as they can become quite heavy.
Transplanting Your Butternut Squash Seedlings
If you started your seeds indoors, it’s time to transplant them to your garden!
1. Choose a Cloudy Day: Transplanting on a cloudy day will reduce stress on the seedlings.
2. Dig Holes: Dig holes that are slightly larger than the root balls of the seedlings. Space the holes 2-3 feet apart.
3. Gently Remove Seedlings: Gently remove the seedlings from their pots, being careful not to damage the roots. If you used peat pots, you can plant the entire pot directly into the ground.
4. Plant Seedlings: Place the seedlings in the holes and backfill with soil. Gently firm the soil around the base of the plants.
5. Water Thoroughly: Water the seedlings thoroughly after transplanting.
6. Mulch: Apply a layer of mulch around the plants to help retain moisture, suppress weeds, and regulate soil temperature. I like to use straw or shredded leaves.
Caring for Your Butternut Squash Plants
Once your butternut squash plants are in the ground, it’s important to provide them with the care they need to thrive.
1. Watering: Butternut squash needs consistent moisture, especially during fruit development. Water deeply and regularly, especially during dry spells. Avoid overhead watering, as this can promote fungal diseases. Soaker hoses or drip irrigation are ideal.
2. Fertilizing: Butternut squash is a heavy feeder, so it benefits from regular fertilization. Use a balanced fertilizer or side-dress with compost or well-rotted manure every few weeks.
3. Weeding: Keep the garden bed free of weeds, as they can compete with the butternut squash plants for nutrients and water.
4. Pest Control: Butternut squash is susceptible to several pests, including squash bugs, squash vine borers, and aphids. Inspect your plants regularly for signs of pests and take action as needed. I’ve found that hand-picking squash bugs and using row covers can be effective. For squash vine borers, you can try injecting Bacillus thuringiensis (Bt) into the stems.
5. Disease Control: Butternut squash can also be affected by fungal diseases like powdery mildew and downy mildew. To prevent these diseases, provide good air circulation, avoid overhead watering, and apply a fungicide if necessary.
6. Pollination: Butternut squash plants have separate male and female flowers. Bees are essential for pollination. If you’re not seeing many bees in your garden, you can hand-pollinate the flowers by transferring pollen from the male flowers to the female flowers using a small brush. The female flowers have a small fruit (the future squash) at the base of the flower.
Harvesting Your Butternut Squash
The moment you’ve been waiting for! Knowing when to harvest is key to getting the best flavor and storage potential.
1. Check the Color: Butternut squash is ready to harvest when the skin is a deep tan color and the stem is dry and hard.
2. Test the Rind: The rind should be hard enough that you can’t easily pierce it with your fingernail.
3. Harvest Before Frost: Harvest your butternut squash before the first frost, as frost can damage the fruit.
4. Cut the Stem: Use a sharp knife or pruning shears to cut the stem, leaving about 2-3 inches of stem attached to the squash. This helps prevent rot.
5. Handle with Care: Handle the squash carefully to avoid bruising or damaging the skin.
Curing and Storing Your Butternut Squash
Curing your butternut squash after harvesting is essential for improving its flavor and storage life.
1. Cure the Squash: Place the harvested squash in a
Conclusion
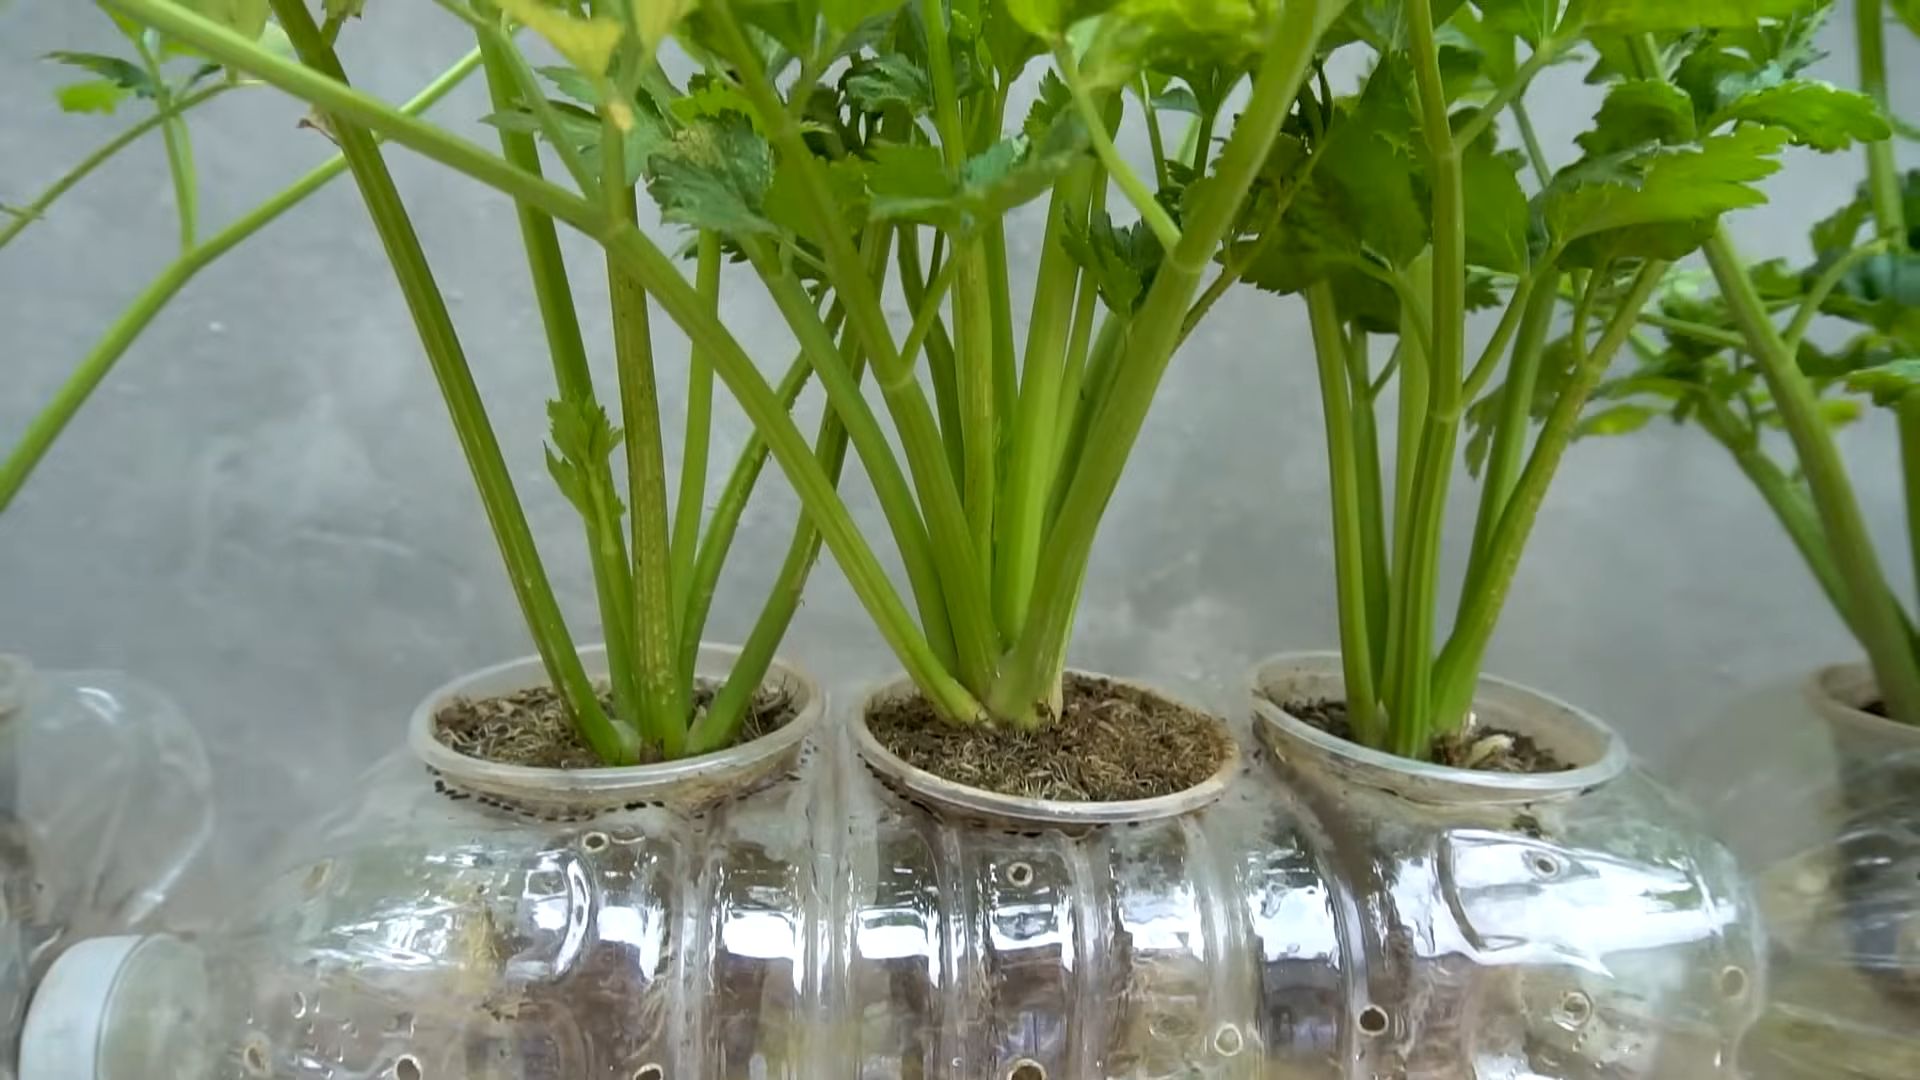
So, there you have it! Growing celery at home from kitchen scraps isn’t just a fun experiment; it’s a sustainable way to reduce food waste, enjoy fresh, flavorful celery, and connect with the natural world, even if you only have a windowsill. We’ve walked you through the simple steps, from rescuing that celery base to nurturing it into a thriving plant.
But why is this DIY trick a must-try? Beyond the obvious environmental benefits of reducing food waste and the economic advantage of saving money on groceries, growing your own celery offers a unique satisfaction. There’s something incredibly rewarding about watching a plant regenerate and flourish from what would otherwise be discarded. Plus, homegrown celery boasts a freshness and flavor that often surpasses store-bought varieties. Imagine the crisp, clean taste of your own celery stalks in salads, soups, or as a healthy snack with your favorite dip.
This isn’t just about growing celery; it’s about embracing a more sustainable and self-sufficient lifestyle.
Now, let’s talk variations. While the basic method we’ve outlined is straightforward, there’s room for experimentation. Consider trying different types of celery. While the common green celery is easiest to find, you might be able to source red or golden celery varieties for a unique twist. The growing process is essentially the same, but the flavor profiles and visual appeal will differ.
Another variation involves the growing medium. While starting in water is recommended for initial root development, you can experiment with different soil types once you transplant your celery. A well-draining potting mix enriched with compost will provide the nutrients your celery needs to thrive. You can also try adding slow-release fertilizer to the soil to ensure consistent feeding.
Furthermore, think about companion planting. Celery benefits from being planted near certain herbs and vegetables. Onions, garlic, and marigolds are known to deter pests and improve celery growth. Experiment with different companion plants to see what works best in your garden or container.
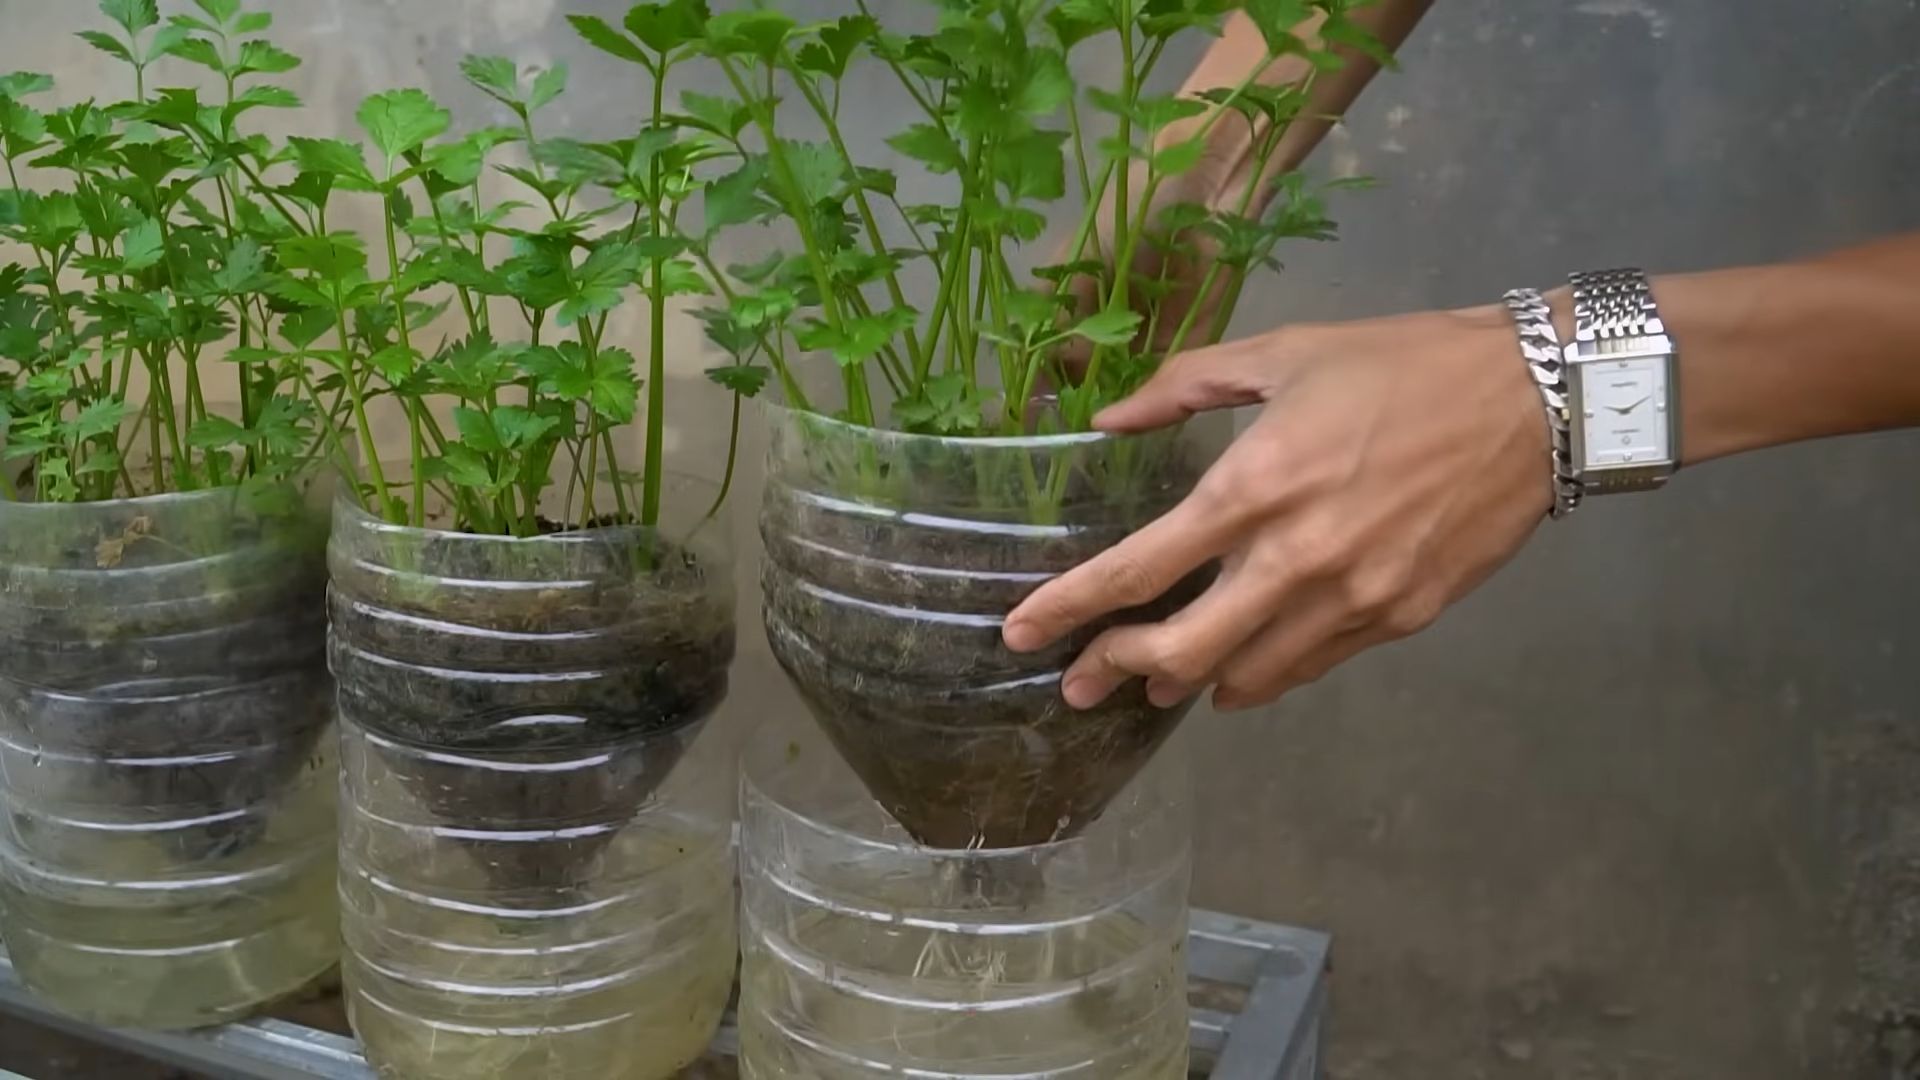
Don’t be afraid to get creative with your celery growing setup. If you don’t have a traditional garden, you can easily grow celery in containers on a balcony, patio, or even indoors with sufficient sunlight or a grow light. Just make sure the container is large enough to accommodate the celery’s root system.
We wholeheartedly encourage you to give this DIY celery growing trick a try. It’s a simple, rewarding, and sustainable way to enjoy fresh celery and connect with nature. And remember, even if your first attempt isn’t perfect, don’t give up! Gardening is a learning process, and every experience, successful or not, provides valuable insights.
Most importantly, we want to hear about your experiences! Share your photos, tips, and challenges in the comments section below. Let’s create a community of home celery growers and learn from each other. Did you try a different variety of celery? Did you find a particularly effective companion plant? Did you encounter any unexpected challenges? Your insights could help other aspiring celery growers succeed.
So, grab that celery base, follow our simple steps, and get ready to enjoy the fruits (or rather, vegetables) of your labor. Happy growing!
Frequently Asked Questions (FAQ)
Q: How long does it take to grow celery from a base?
A: The initial regrowth from the base, where you see new leaves emerging, typically takes about 1-2 weeks. Transplanting to soil and growing to a harvestable size can take anywhere from 2-4 months, depending on growing conditions like sunlight, temperature, and nutrient availability. Be patient; celery is a slow grower!
Q: What kind of sunlight does celery need?
A: Celery thrives in full sun, meaning at least 6-8 hours of direct sunlight per day. However, in hotter climates, it can benefit from some afternoon shade to prevent the leaves from scorching. If you’re growing celery indoors, supplement with a grow light if natural sunlight is insufficient.
Q: How often should I water my celery plant?
A: Celery needs consistent moisture to thrive. Water deeply whenever the top inch of soil feels dry to the touch. Avoid letting the soil dry out completely, as this can stress the plant and affect its growth. During hot weather, you may need to water more frequently. Ensure good drainage to prevent root rot.
Q: What kind of soil is best for growing celery?
A: Celery prefers rich, well-draining soil with plenty of organic matter. A good potting mix amended with compost or well-rotted manure is ideal. The soil should be slightly acidic to neutral, with a pH between 6.0 and 7.0.
Q: My celery leaves are turning yellow. What could be the problem?
A: Yellowing leaves can indicate several issues. Overwatering or poor drainage can lead to root rot, which can cause yellowing. Underwatering or nutrient deficiencies can also be culprits. Check the soil moisture and ensure it’s not waterlogged. Consider fertilizing with a balanced fertilizer to provide essential nutrients. Pests can also cause yellowing, so inspect the leaves for any signs of infestation.
Q: Are there any common pests or diseases that affect celery?
A: Yes, celery can be susceptible to pests like aphids, celery leaf miners, and slugs. Diseases like early blight and pink rot can also affect celery. Regularly inspect your plants for any signs of pests or diseases. Use organic pest control methods like insecticidal soap or neem oil to control pests. Ensure good air circulation to prevent fungal diseases. Remove any infected leaves promptly to prevent the spread of disease.
Q: Can I grow celery indoors year-round?
A: Yes, you can grow celery indoors year-round, provided you can provide adequate light and moisture. A sunny windowsill or a grow light can provide the necessary light. Maintain consistent moisture and temperature. Be aware that indoor-grown celery may not grow as large as outdoor-grown celery, but you can still enjoy fresh celery from your indoor garden.
Q: How do I harvest celery?
A: You can harvest celery stalks as needed once they reach a reasonable size. Simply cut the outer stalks near the base of the plant. The inner stalks will continue to grow. Alternatively, you can harvest the entire plant by cutting it off at the base.
Q: Can I regrow celery from the base multiple times?
A: While you can regrow celery from the base multiple times, the subsequent regrowths may not be as vigorous as the first. The plant’s energy reserves will eventually deplete. However, you can still get several harvests from a single base.
Q: Is homegrown celery more nutritious than store-bought celery?
A: Homegrown celery is often more nutritious than store-bought celery because it’s fresher and hasn’t been subjected to long-distance transportation or storage. It also allows you to control the growing conditions and avoid the use of harmful pesticides.


Leave a Comment