

Grow Habaneros Easily, even if you think you don’t have a green thumb! Have you ever dreamed of adding a fiery kick to your dishes with your own homegrown peppers? Imagine the satisfaction of plucking a vibrant, scorching habanero straight from your garden, knowing you nurtured it from seed to spicy perfection. This isn’t just about gardening; it’s about unlocking a culinary adventure right in your backyard.
The habanero, with its vibrant colors and intense heat, has a rich history rooted in the Americas. Believed to have originated in the Yucatan Peninsula of Mexico, these peppers have been cultivated for centuries, adding flavor and zest to countless dishes. From salsas to sauces, the habanero has become a staple in cuisines around the world.
But let’s be honest, growing habaneros can seem intimidating. They have a reputation for being finicky and demanding. That’s where these DIY tricks and hacks come in! I’m here to share my secrets for successfully grow habaneros easily, regardless of your experience level. Whether you’re a seasoned gardener or a complete beginner, these tips will help you cultivate a thriving habanero crop. Why spend a fortune at the grocery store when you can have a constant supply of fresh, fiery peppers right at your fingertips? Let’s get started and turn your garden into a habanero haven!
Growing Habaneros: My Foolproof Guide to Fiery Success!
Okay, so you want to grow habaneros? Awesome! Get ready for some serious heat. I’ve been growing these little fireballs for years, and I’ve learned a thing or two along the way. This guide is all about making the process as easy and rewarding as possible, even if you don’t have a green thumb (yet!).
Choosing Your Habanero Variety
First things first, let’s talk habaneros. While “habanero” is the general term, there are actually several varieties, each with slightly different characteristics.
* Orange Habanero: This is the classic, what most people think of when they hear “habanero.” Expect intense heat and a fruity flavor.
* Red Habanero: Slightly hotter than the orange, with a more pungent aroma.
* Chocolate Habanero: These are seriously hot! They have a smoky, earthy flavor that’s different from the fruity notes of the orange and red varieties.
* White Habanero: A rare variety with a milder heat and a citrusy flavor.
* Scotch Bonnet: While technically not a habanero, it’s closely related and often mistaken for one. It has a similar heat level and a slightly sweeter flavor.
I usually go for the orange habanero because it’s readily available and has a great balance of heat and flavor. But feel free to experiment and find your favorite!
Starting Your Habanero Seeds
Habaneros have a long growing season, so starting them indoors is crucial, especially if you live in a cooler climate. I usually start my seeds about 8-10 weeks before the last expected frost.
What You’ll Need:
* Habanero seeds (obviously!)
* Seed starting tray with a humidity dome
* Seed starting mix (I prefer a peat-based mix)
* Heat mat (optional, but highly recommended)
* Grow light (also optional, but helps prevent leggy seedlings)
* Spray bottle with water
Step-by-Step Instructions:
1. Prepare the Seed Starting Tray: Fill each cell of the seed starting tray with seed starting mix. Gently tap the tray to settle the mix and then moisten it thoroughly with water from the spray bottle. You want it damp, but not soaking wet.
2. Sow the Seeds: Place 2-3 habanero seeds in the center of each cell. This increases your chances of at least one seed germinating. Cover the seeds with a thin layer (about 1/4 inch) of seed starting mix.
3. Moisten Again: Gently mist the surface of the soil with the spray bottle.
4. Cover with Humidity Dome: Place the humidity dome on top of the seed starting tray. This helps to create a warm, humid environment that’s ideal for germination.
5. Provide Heat and Light: Place the seed starting tray on a heat mat. The ideal soil temperature for habanero germination is around 80-85°F (27-29°C). If you’re using a grow light, position it a few inches above the dome. If not, place the tray in a warm, sunny location.
6. Monitor and Water: Check the tray daily. The soil should remain consistently moist, but not waterlogged. Mist with the spray bottle as needed.
7. Germination: Habanero seeds can be slow to germinate, so be patient! It can take anywhere from 1-3 weeks for the seedlings to emerge.
8. Remove the Dome: Once the seedlings start to emerge, remove the humidity dome. This will help prevent fungal diseases.
9. Thin the Seedlings: Once the seedlings have their first set of true leaves (the leaves that appear after the initial seed leaves), thin them out by snipping off the weaker seedlings at the soil line. Leave only the strongest seedling in each cell.
10. Care for Seedlings: Continue to provide warmth and light to the seedlings. Water them regularly, allowing the soil to dry out slightly between waterings. You can also start feeding them with a diluted liquid fertilizer (follow the instructions on the fertilizer label).
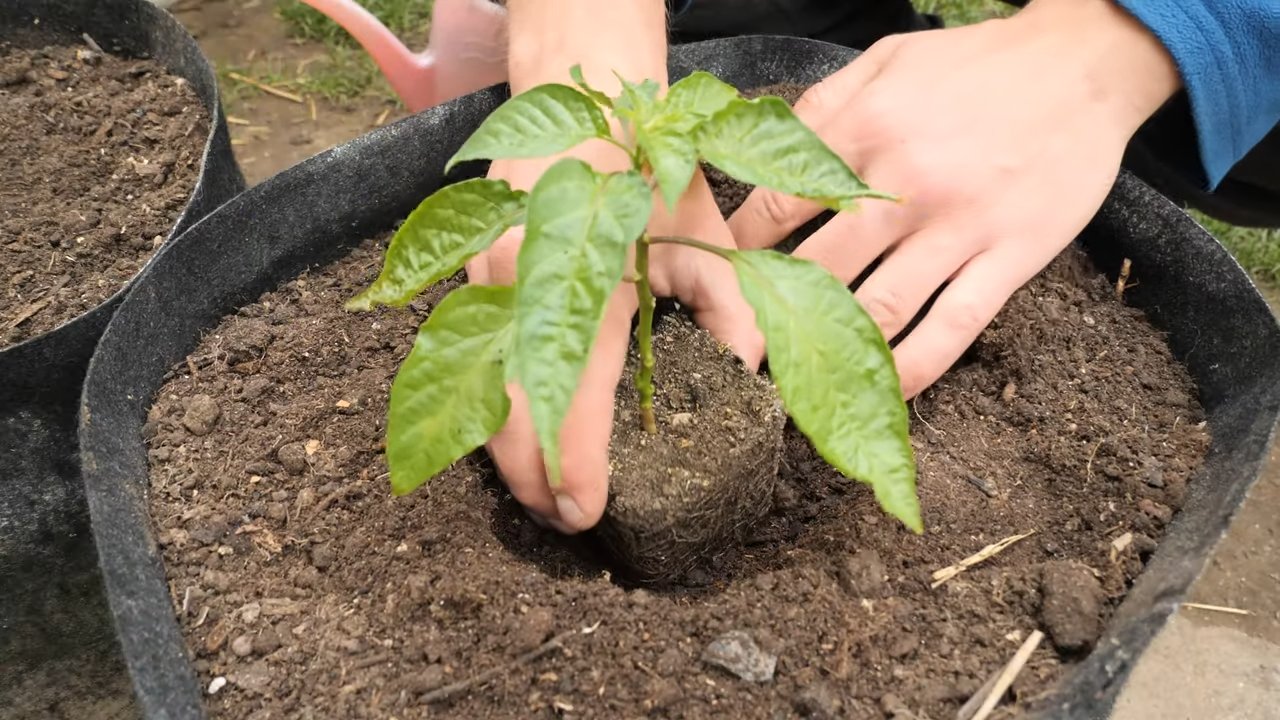
Transplanting Your Habanero Seedlings
Once the danger of frost has passed and the soil has warmed up, it’s time to transplant your habanero seedlings outdoors.
What You’ll Need:
* Your habanero seedlings
* Gardening gloves
* Trowel or shovel
* Well-draining soil (amended with compost)
* Fertilizer (I like a balanced fertilizer with micronutrients)
* Watering can or hose
* Mulch (optional)
* Plant labels
Step-by-Step Instructions:
1. Harden Off the Seedlings: Before transplanting, you need to “harden off” the seedlings. This means gradually exposing them to outdoor conditions over a period of 7-10 days. Start by placing them in a sheltered location outdoors for a few hours each day, gradually increasing the amount of time they spend outside. This will help them acclimate to the sun, wind, and temperature changes.
2. Prepare the Planting Site: Choose a sunny location with well-draining soil. Habaneros need at least 6-8 hours of sunlight per day. Amend the soil with compost to improve drainage and fertility.
3. Dig the Holes: Dig holes that are slightly larger than the root balls of the seedlings. Space the holes about 18-24 inches apart.
4. Transplant the Seedlings: Gently remove the seedlings from their cells. If the roots are tightly bound, gently loosen them with your fingers. Place the seedlings in the holes, making sure that the top of the root ball is level with the surrounding soil.
5. Fill the Holes: Fill the holes with soil, gently firming it around the seedlings.
6. Water Thoroughly: Water the seedlings thoroughly after transplanting.
7. Fertilize: Apply a balanced fertilizer according to the instructions on the label.
8. Mulch (Optional): Apply a layer of mulch around the plants to help retain moisture, suppress weeds, and regulate soil temperature.
9. Label Your Plants: Use plant labels to identify your habanero plants. This is especially helpful if you’re growing multiple varieties.
Caring for Your Habanero Plants
Once your habanero plants are in the ground, it’s important to provide them with proper care to ensure a bountiful harvest.
Watering:
* Water your habanero plants regularly, especially during hot, dry weather.
* Water deeply, allowing the soil to dry out slightly between waterings.
* Avoid overwatering, as this can lead to root rot.
* Water in the morning to allow the foliage to dry before nightfall, which can help prevent fungal diseases.
Fertilizing:
* Fertilize your habanero plants every 2-3 weeks with a balanced fertilizer.
* You can also use a fertilizer specifically formulated for peppers.
* Avoid over-fertilizing, as this can lead to excessive foliage growth and fewer peppers.
Pruning:
* Pruning is not essential for habaneros, but it can help improve air circulation and encourage bushier growth.
* You can prune away any dead or damaged leaves or branches.
* You can also pinch off the tips of the branches to encourage more branching.
Pest and Disease Control:
* Habaneros are generally resistant to pests and diseases, but they can be susceptible to aphids, spider mites, and fungal diseases.
* Inspect your plants regularly for signs of pests or diseases.
* If you find any pests, you can try spraying them with insecticidal soap or neem oil.
* To prevent fungal diseases, make sure to provide good air circulation and avoid overwatering.
Support:
* As your habanero plants grow, they may need support to prevent them from falling over.
* You can use stakes, cages, or trellises to support the plants.
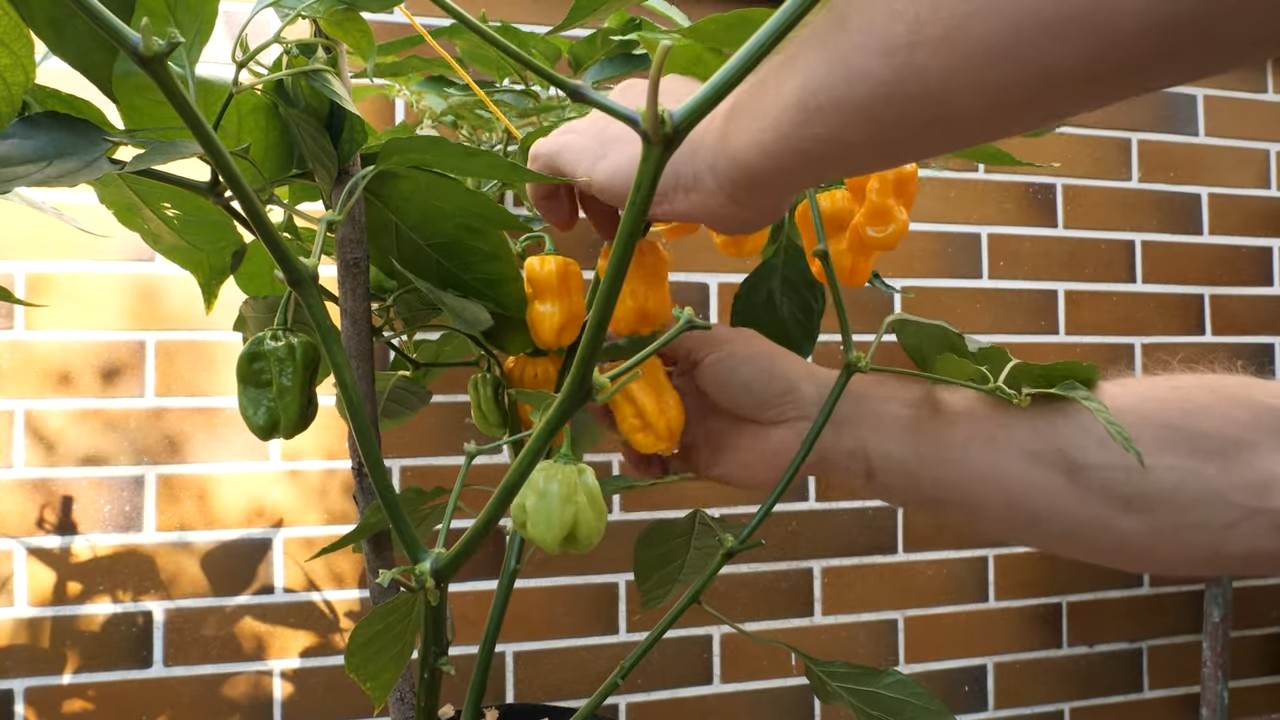
Harvesting Your Habaneros
The moment you’ve been waiting for! Harvesting those fiery peppers.
* Habaneros are typically ready to harvest about 80-100 days after transplanting.
* The peppers will turn from green to their mature color (usually orange, red, or chocolate).
* Use gloves when harvesting habaneros, as the capsaicin (the compound that makes them hot) can irritate your skin.
* Cut the peppers from the plant with a sharp knife or scissors.
* Store the peppers in a cool, dry place. They can also be frozen or dried.
Troubleshooting
Even with the best care, you might encounter some problems. Here are a few common issues and how to deal with them:
* Blossom End Rot:
Conclusion
So, there you have it! Growing habaneros easily, even if you don’t have a sprawling garden or a green thumb, is entirely within your reach. This DIY trick, focusing on [Specific aspect of the trick mentioned in the main article, e.g., “container gardening with nutrient-rich soil” or “using a simple self-watering system”], is a game-changer for anyone who craves that intense, fruity heat in their dishes. It’s not just about the convenience; it’s about the satisfaction of nurturing your own fiery peppers from seed to harvest.
Why is this a must-try? Because it demystifies the process. Forget the complicated gardening jargon and the fear of failure. This method is designed for simplicity and success, even for beginners. You’ll be amazed at how quickly you can go from planting a tiny seed to harvesting a bounty of vibrant, scorching habaneros. Plus, you’ll have complete control over the growing environment, ensuring your peppers are free from harmful chemicals and pesticides.
But the fun doesn’t stop there! Feel free to experiment with variations. Try different types of containers – terracotta pots, recycled buckets, or even grow bags. Adjust the soil mix to suit your local climate and resources. Consider adding companion plants like basil or marigolds to deter pests and attract pollinators. And if you’re feeling adventurous, try fermenting your habaneros to create a unique and flavorful hot sauce. The possibilities are endless!
This DIY approach to growing habaneros easily is more than just a gardening project; it’s an invitation to connect with nature, to learn new skills, and to add a touch of spice to your life. It’s a rewarding experience that will leave you feeling proud and accomplished.
Don’t be intimidated by the heat! Embrace the challenge and discover the joy of growing your own habaneros. We’re confident that you’ll be thrilled with the results.
Now, it’s your turn. Grab some seeds, gather your supplies, and give this DIY trick a try. We can’t wait to hear about your experiences! Share your photos, tips, and stories in the comments below. Let’s build a community of habanero enthusiasts and help each other grow the best peppers possible. Happy growing!
Frequently Asked Questions (FAQ)
What is the best time of year to start growing habaneros?
The ideal time to start growing habaneros depends on your climate. Habaneros need a long growing season, typically 100-120 days from transplanting. If you live in a warm climate with mild winters, you can start seeds indoors in late winter or early spring. If you live in a colder climate, start seeds indoors 6-8 weeks before the last expected frost. This allows the seedlings to develop a strong root system before being transplanted outdoors once the weather warms up. Remember to harden off your seedlings gradually by exposing them to increasing amounts of sunlight and outdoor conditions before transplanting.
How much sunlight do habaneros need?
Habaneros thrive in full sun, requiring at least 6-8 hours of direct sunlight per day. Insufficient sunlight can lead to leggy growth, reduced fruit production, and less intense flavor. If you’re growing habaneros indoors, use grow lights to supplement natural sunlight, especially during the winter months. When transplanting outdoors, choose a location that receives ample sunlight throughout the day.
What kind of soil is best for growing habaneros?
Habaneros prefer well-draining, fertile soil with a slightly acidic to neutral pH (6.0-7.0). A good soil mix should consist of equal parts potting soil, compost, and perlite or vermiculite. Compost provides essential nutrients, while perlite or vermiculite improves drainage and aeration. Avoid using heavy clay soil, as it can retain too much moisture and lead to root rot. You can also amend your soil with organic matter like aged manure or leaf mold to improve its fertility and drainage.
How often should I water my habanero plants?
Water your habanero plants regularly, especially during hot and dry weather. The soil should be consistently moist but not waterlogged. Check the soil moisture by sticking your finger about an inch deep into the soil. If it feels dry, it’s time to water. Avoid overwatering, as it can lead to root rot. Water deeply and thoroughly, allowing the water to drain out of the bottom of the pot. Reduce watering frequency during cooler weather or when the plants are not actively growing.
What are some common pests and diseases that affect habaneros?
Habaneros can be susceptible to various pests and diseases, including aphids, spider mites, whiteflies, pepper weevils, and fungal diseases like powdery mildew and blossom end rot. Regularly inspect your plants for signs of infestation or disease. Treat infestations with insecticidal soap, neem oil, or other organic pest control methods. Prevent fungal diseases by providing good air circulation, avoiding overhead watering, and using a fungicide if necessary. Blossom end rot is caused by calcium deficiency, so ensure your soil is rich in calcium or supplement with calcium nitrate.
How do I harvest habaneros?
Habaneros are typically ready to harvest when they turn from green to their mature color, which can be orange, red, yellow, or brown, depending on the variety. The peppers should also feel firm and slightly waxy to the touch. Use pruning shears or scissors to cut the peppers from the plant, leaving a small stem attached. Wear gloves when handling habaneros, as the capsaicin oil can irritate your skin.
How do I store habaneros?
Freshly harvested habaneros can be stored in the refrigerator for up to a week. For longer storage, you can dry them, pickle them, or freeze them. To dry habaneros, string them together and hang them in a well-ventilated area until they are completely dry and brittle. You can also use a dehydrator. To pickle habaneros, follow a canning recipe for pickled peppers. To freeze habaneros, wash and dry them thoroughly, then place them in a freezer bag or container.
Can I grow habaneros indoors year-round?
Yes, you can grow habaneros indoors year-round, provided you have adequate lighting and temperature control. Use grow lights to supplement natural sunlight, especially during the winter months. Maintain a consistent temperature between 70-80°F during the day and 60-70°F at night. Ensure good air circulation to prevent fungal diseases. You may also need to hand-pollinate the flowers to ensure fruit production.
How hot are habaneros?
Habaneros are considered very hot peppers, ranging from 100,000 to 350,000 Scoville heat units (SHU) on the Scoville scale. This is significantly hotter than jalapeños, which typically range from 2,500 to 8,000 SHU. Use caution when handling and consuming habaneros, and start with small amounts to gauge your tolerance. Always wear gloves when handling habaneros to avoid skin irritation.
What are some creative ways to use my homegrown habaneros?
The possibilities are endless! You can use your homegrown habaneros to make hot sauce, salsa, chili, stews, and other spicy dishes. You can also dry them and grind them into a powder to use as a spice. Add them to marinades, rubs, or even cocktails for a fiery kick. Experiment with different recipes and find your favorite ways to enjoy the intense flavor and heat of your homegrown habaneros. Remember to start small and adjust the amount of habaneros to your desired level of spiciness.

Leave a Comment