

Grow Radicchio Indoors? Absolutely! Imagine plucking vibrant, slightly bitter radicchio leaves fresh from your indoor garden, adding a gourmet touch to your salads and dishes all year round. Forget relying on grocery store produce; with a few simple tricks, you can cultivate this beautiful and flavorful vegetable right in the comfort of your own home.
Radicchio, with its striking red and white leaves, has a rich history, particularly in the Veneto region of Italy, where it’s been cultivated for centuries. It wasn’t always the culinary delight we know today; ancient Romans initially used it for medicinal purposes! Now, it’s a staple in Italian cuisine and gaining popularity worldwide.
But why should you bother learning how to grow radicchio indoors? Well, for starters, it gives you control over the quality and freshness of your food. Plus, growing indoors allows you to extend the growing season, bypassing the limitations of your local climate. No more waiting for the right time of year! I know I love having fresh greens available even when the snow is falling outside. This DIY guide will provide you with easy-to-follow steps and essential tips to ensure a successful and rewarding indoor radicchio harvest. Let’s get started!
Growing Radicchio Indoors: A Colorful and Bitter Delight!
So, you want to grow radicchio indoors? Awesome! It’s totally doable, and you’ll get to enjoy those beautiful, slightly bitter leaves even when the weather outside is frightful. I’ve done it myself, and I’m here to share all my secrets (well, not really secrets, just tips and tricks!). Let’s get started!
What You’ll Need
Before we dive in, let’s gather our supplies. Having everything ready beforehand will make the whole process much smoother.
* Radicchio Seeds: Choose a variety you like. Some are round, some are elongated, and the color intensity varies. I personally love the Chioggia variety for its beautiful round shape and vibrant red and white leaves.
* Seed Starting Tray or Small Pots: These are perfect for getting your seedlings going.
* Seed Starting Mix: This is a light, airy soil mix specifically designed for seedlings. Regular potting soil can be too heavy and compact.
* Potting Soil: Once your seedlings are ready to transplant, you’ll need a good quality potting soil.
* Grow Lights: Radicchio needs plenty of light, especially indoors. A good set of grow lights is essential.
* Pots: Choose pots that are at least 6 inches in diameter. Radicchio needs room to grow.
* Watering Can or Spray Bottle: For gentle watering.
* Fertilizer: A balanced liquid fertilizer will help your radicchio thrive.
* Optional: Heat Mat: Can speed up germination.
* Optional: Humidity Dome: Helps maintain moisture for seedlings.
Phase 1: Starting Your Radicchio Seeds
This is where the magic begins! We’re going to coax those tiny seeds into becoming beautiful radicchio plants.
1. Prepare Your Seed Starting Tray or Pots: Fill your seed starting tray or small pots with seed starting mix. Gently pat it down, but don’t compact it too much.
2. Sow the Seeds: Sprinkle a few seeds (2-3) into each cell or pot. Cover them with a thin layer of seed starting mix (about ¼ inch).
3. Water Gently: Use a spray bottle or watering can with a gentle nozzle to moisten the soil. You want it damp, but not soggy.
4. Provide Warmth and Light: Place your seed starting tray or pots in a warm location. A heat mat can help speed up germination. If you don’t have a heat mat, a warm spot in your house will do. Place the tray under grow lights.
5. Maintain Moisture: Cover the tray with a humidity dome or plastic wrap to help retain moisture. Check the soil daily and mist with water if it starts to dry out.
6. Wait Patiently: Radicchio seeds typically germinate in 5-10 days. Once the seedlings emerge, remove the humidity dome or plastic wrap.
Phase 2: Transplanting Your Radicchio Seedlings
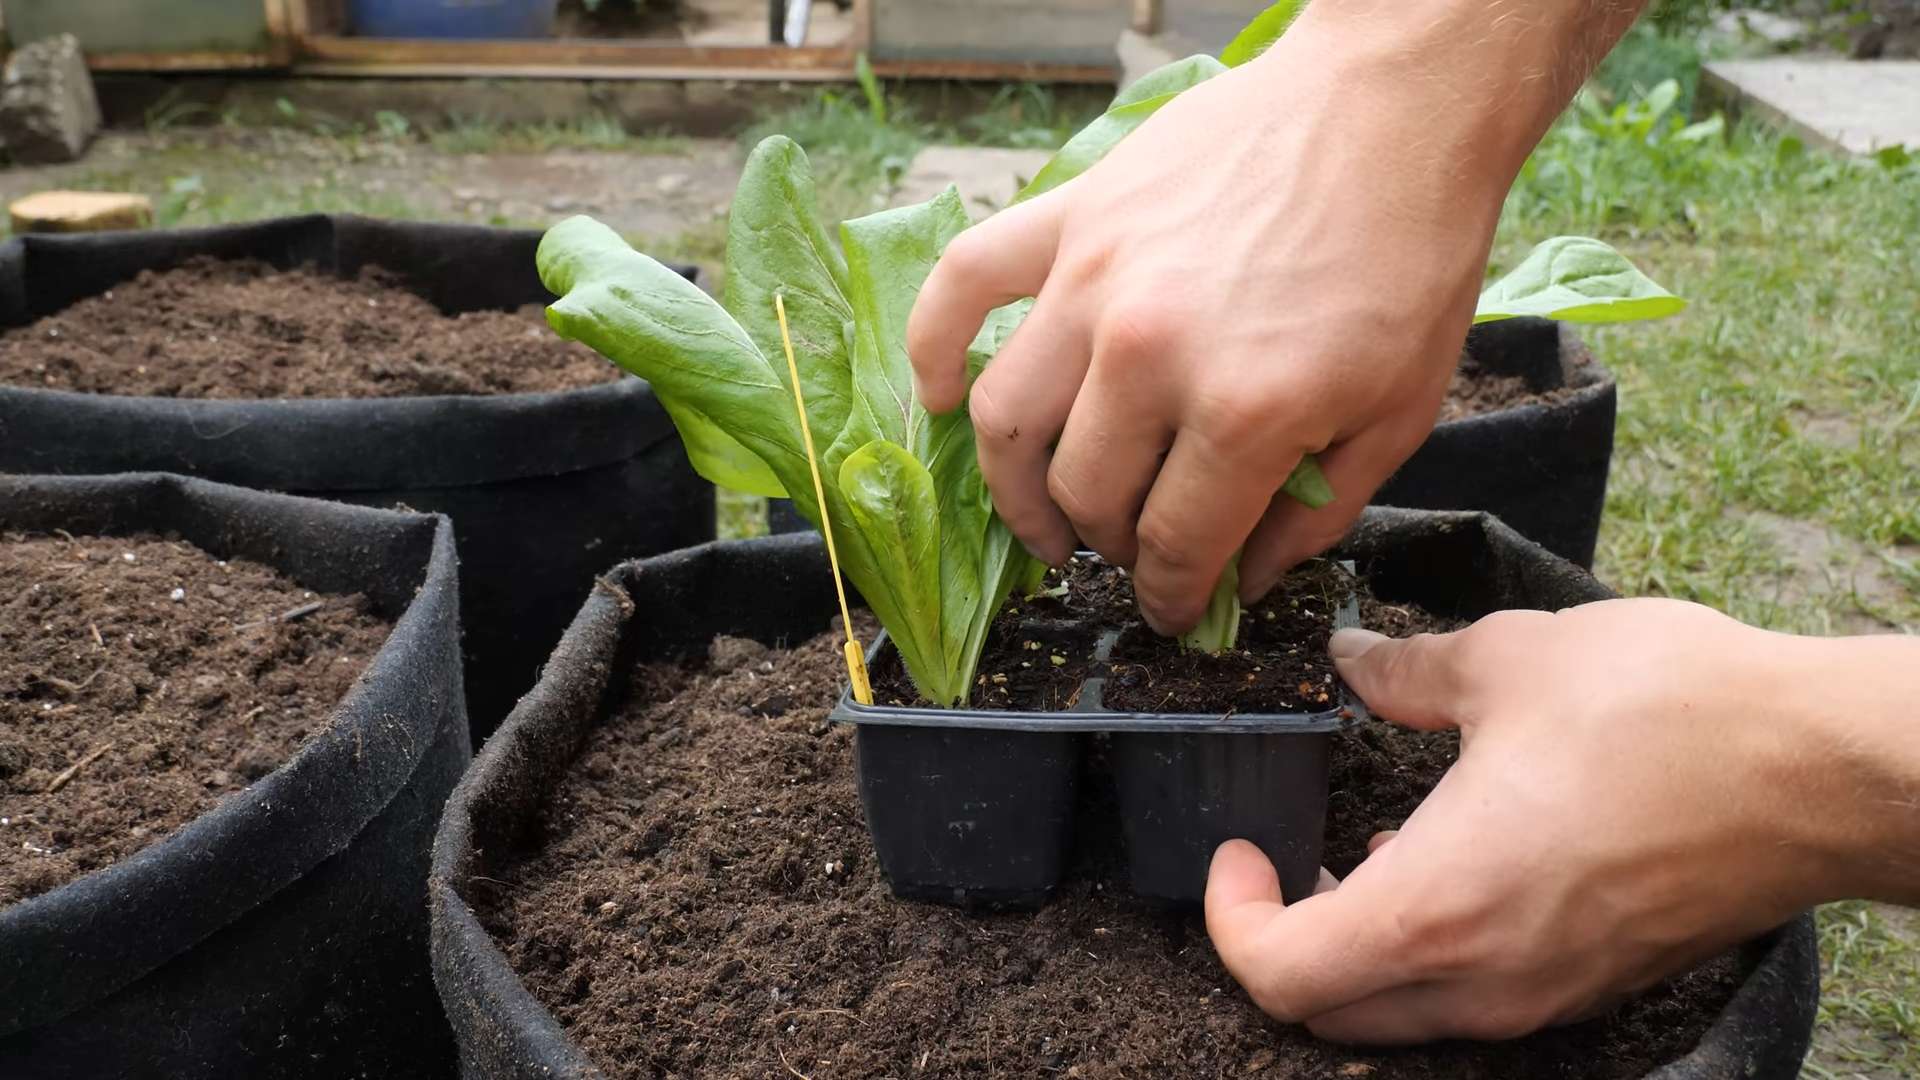
Once your seedlings have developed a few sets of true leaves (the leaves that look like miniature radicchio leaves, not just the initial seed leaves), it’s time to transplant them into larger pots.
1. Prepare Your Pots: Fill your larger pots (at least 6 inches in diameter) with potting soil.
2. Gently Remove Seedlings: Carefully remove the seedlings from the seed starting tray or small pots. Try to keep as much of the root system intact as possible. If you planted multiple seeds in one cell, gently separate the seedlings.
3. Plant the Seedlings: Make a small hole in the potting soil and place the seedling in the hole. Gently pat the soil around the seedling to secure it.
4. Water Thoroughly: Water the transplanted seedlings thoroughly.
5. Provide Light and Nutrients: Place the pots under grow lights. Fertilize with a balanced liquid fertilizer diluted to half strength. Follow the instructions on the fertilizer package.
Phase 3: Caring for Your Indoor Radicchio
Now that your radicchio is transplanted, it’s time to provide the care it needs to thrive.
1. Light: Radicchio needs at least 6-8 hours of light per day. If you’re using grow lights, keep them on for 12-14 hours per day. Adjust the height of the lights as the plants grow to keep them about 6-12 inches above the foliage.
2. Watering: Water your radicchio when the top inch of soil feels dry to the touch. Avoid overwatering, as this can lead to root rot. Make sure your pots have drainage holes.
3. Fertilizing: Fertilize your radicchio every 2-3 weeks with a balanced liquid fertilizer diluted to half strength.
4. Temperature: Radicchio prefers cooler temperatures, ideally between 60-70°F (15-21°C). Avoid placing your plants near heat sources.
5. Air Circulation: Good air circulation helps prevent fungal diseases. You can use a small fan to circulate the air around your plants.
6. Pest Control: Keep an eye out for pests like aphids or spider mites. If you spot any, you can try spraying them with insecticidal soap or neem oil.
7. Blanching (Optional): To reduce the bitterness of your radicchio, you can blanch it a week or two before harvesting. To blanch, simply cover the head of the radicchio with a pot or other opaque container to block out the light. This will cause the leaves to become paler and less bitter.
Phase 4: Harvesting Your Radicchio
The best part! You’ve nurtured your radicchio, and now it’s time to reap the rewards.
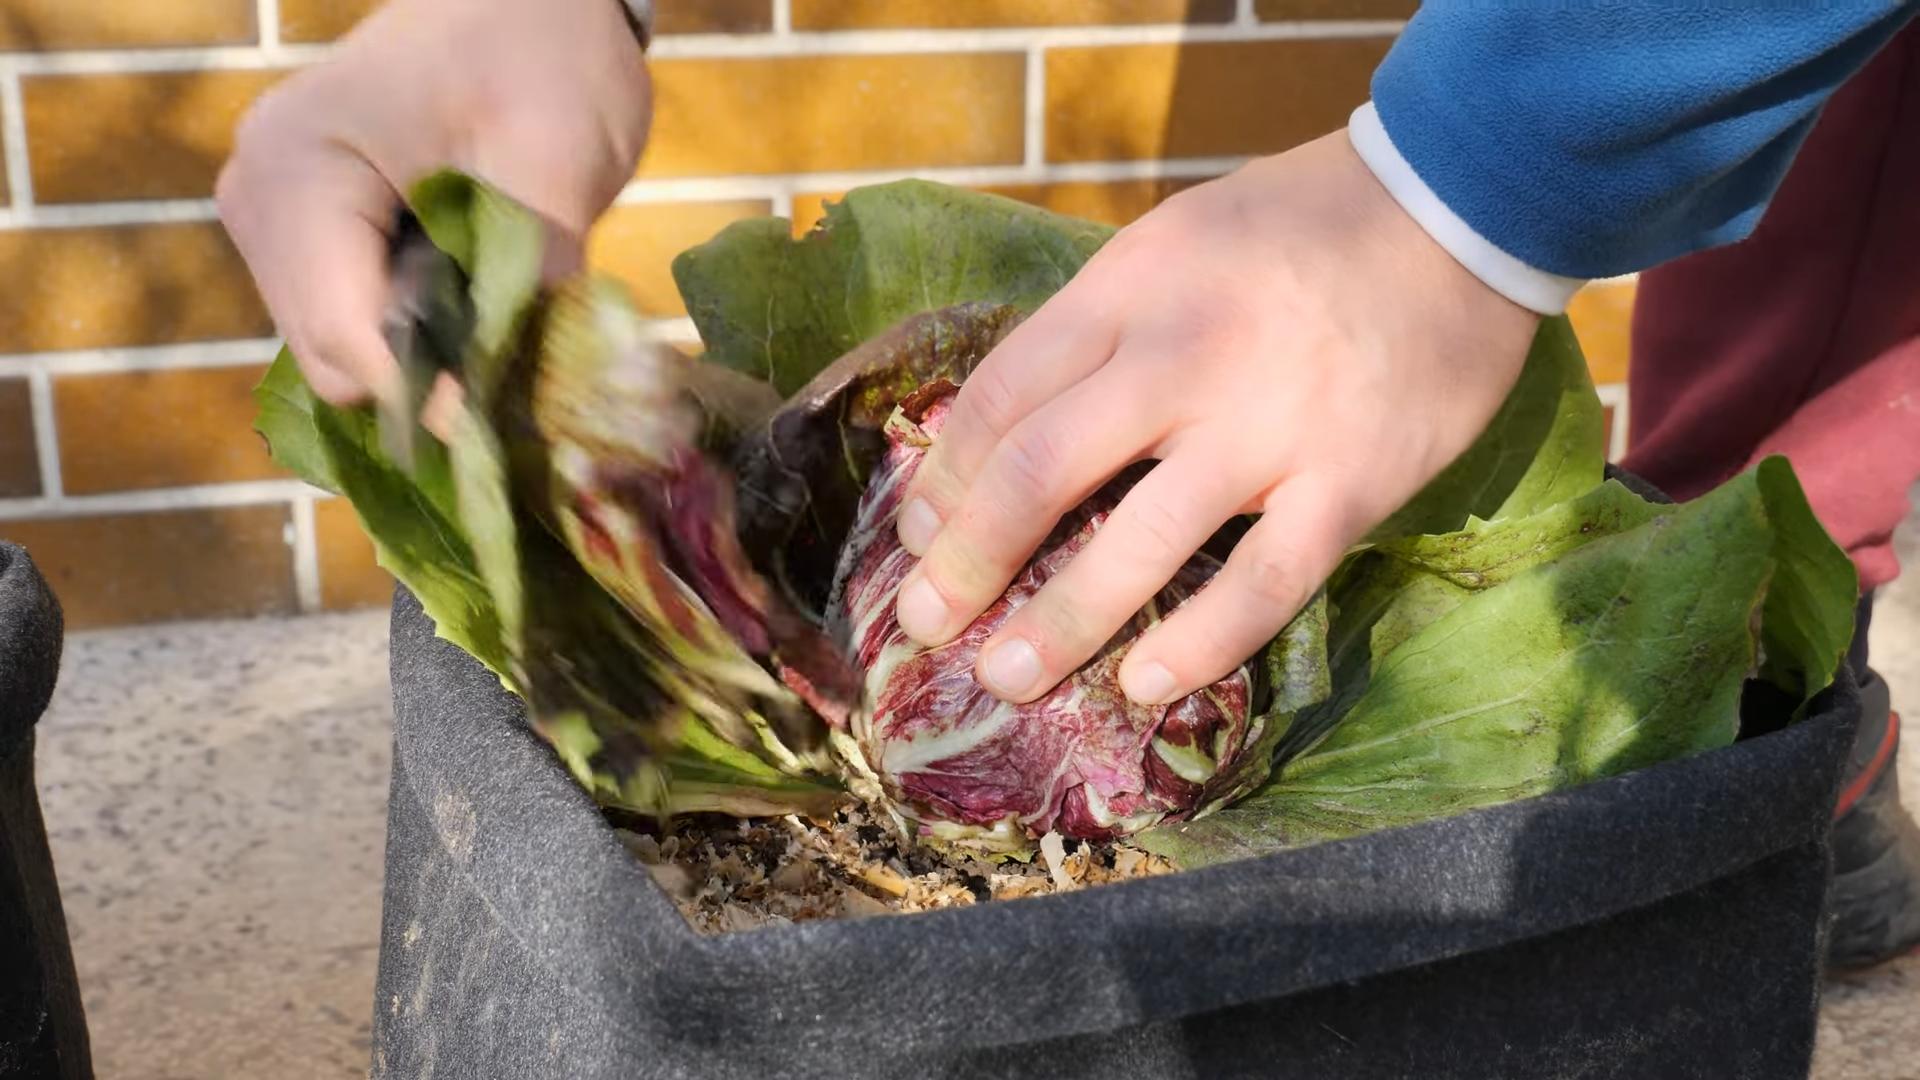
1. Harvest Time: Radicchio is typically ready to harvest in 60-80 days from sowing. The heads should be firm and well-formed.
2. Harvesting Method: Use a sharp knife to cut the head of the radicchio at the base of the plant.
3. Enjoy Your Harvest: Radicchio can be eaten raw in salads, grilled, roasted, or added to soups and stews. Its slightly bitter flavor adds a unique touch to any dish.
Troubleshooting
Even with the best care, you might encounter some challenges along the way. Here are a few common problems and how to fix them:
* Leggy Seedlings: This means your seedlings aren’t getting enough light. Move them closer to the grow lights or provide more light.
* Yellowing Leaves: This could be a sign of overwatering, underwatering, or nutrient deficiency. Check the soil moisture and adjust your watering accordingly. Fertilize your plants if they are lacking nutrients.
* Slow Growth: This could be due to a lack of light, nutrients, or warm temperatures. Make sure your plants are getting enough light and fertilizer, and that the temperature is within the ideal range.
* Pests: Inspect your plants regularly for pests. If you find any, treat them with insecticidal soap or neem oil.
Choosing the Right Radicchio Variety for Indoors
While most radicchio varieties can be grown indoors, some are better suited than others. Here are a few of my favorites:
* Chioggia: This is a classic round radicchio with beautiful red and white leaves. It’s relatively easy to grow and has a good flavor.
* Treviso: This variety has elongated leaves and a more intense bitter flavor. It can be a bit more challenging to grow than Chioggia, but it’s worth it for the unique flavor.
* Castelfranco: This variety has speckled leaves and a milder flavor than other radicchio varieties. It’s a good choice for those who don’t like the bitterness of traditional radicchio.
Tips for Success
Here are a few extra tips to help you succeed in growing radicchio indoors:
* Start with fresh seeds: Radicchio seeds have a relatively short shelf life, so it’s important to use fresh seeds for the best germination rate.
* Don’t overwater: Overwatering is one of the most common mistakes people make when growing radicchio indoors. Make sure the soil is well-draining and only water when the top inch of soil feels dry.
* Provide good air circulation: Good air circulation helps prevent fungal diseases.
* Be patient: Radicchio takes time to grow, so don’t get discouraged if you don’t see results immediately. With a little patience and care, you’ll be enjoying your own homegrown radicchio in no time!
* Succession Planting: To have a continuous harvest, sow new seeds every few weeks. This way, you’ll always have fresh radicchio on hand.
Growing radicchio indoors is a rewarding experience. You get to enjoy fresh, flavorful greens even when the weather outside is less than ideal. With a little bit of effort
Conclusion
So, there you have it! Growing radicchio indoors might seem like a challenge, but with a little patience and the right approach, you can enjoy the slightly bitter, vibrant leaves of this Italian chicory right from your own home. This DIY trick isn’t just about saving money; it’s about connecting with your food, understanding its growth cycle, and experiencing the satisfaction of nurturing something from seed to table.
Why is this a must-try? Because fresh radicchio from the grocery store often lacks the vibrancy and crispness of homegrown. Plus, controlling the growing environment allows you to minimize bitterness and maximize flavor. Imagine adding freshly harvested radicchio to your salads, risottos, or grilled dishes – the difference is truly remarkable.
But don’t stop there! Experiment with different varieties of radicchio. ‘Chioggia’ is a classic choice with its round, tightly packed heads, while ‘Treviso’ offers elongated leaves with a milder flavor. You can also play around with the lighting conditions. Slightly less light can encourage a more tender, less bitter leaf. Consider using a grow light with adjustable settings to fine-tune the growing environment. Another variation to consider is succession planting. Start new seeds every few weeks to ensure a continuous supply of fresh radicchio throughout the cooler months. This is especially helpful if you are using radicchio frequently in your cooking.
Furthermore, think about the soil composition. While a general potting mix works well, amending it with a bit of compost or worm castings can provide extra nutrients and improve drainage. Remember to monitor the moisture levels carefully. Overwatering can lead to root rot, while underwatering can cause the leaves to wilt.
This DIY trick for growing radicchio indoors is more than just a gardening project; it’s an opportunity to enhance your culinary creations and embrace a more sustainable lifestyle. We encourage you to give it a try! Don’t be afraid to experiment and adapt the techniques to suit your specific environment and preferences.
Once you’ve harvested your first batch of homegrown radicchio, we’d love to hear about your experience! Share your tips, tricks, and photos in the comments below. Let’s build a community of indoor radicchio enthusiasts and inspire others to embark on this rewarding journey. Your insights could be invaluable to someone just starting out. So, grab your seeds, potting mix, and a sunny windowsill, and get ready to enjoy the delicious rewards of growing radicchio indoors!
Frequently Asked Questions (FAQ)
What are the best varieties of radicchio to grow indoors?
While most radicchio varieties can be grown indoors, some are better suited than others due to their size and growth habits. ‘Chioggia’ is a popular choice because it forms compact, round heads that are manageable in containers. ‘Treviso’ is another good option, offering elongated leaves with a slightly milder flavor. ‘Castelfranco’ is known for its beautiful variegated leaves and delicate taste, making it a visually appealing and flavorful addition to your indoor garden. Consider the size of your growing space and your personal taste preferences when selecting a variety.
How much light does radicchio need when grown indoors?
Radicchio requires at least 6-8 hours of direct sunlight per day to thrive. If you don’t have a sufficiently sunny windowsill, you’ll need to supplement with artificial lighting. A full-spectrum LED grow light is an excellent choice, as it provides the necessary wavelengths for healthy plant growth. Position the light about 6-12 inches above the plants and adjust as they grow. Monitor the leaves for signs of insufficient light, such as legginess (long, spindly stems) or pale coloration.
What type of soil is best for growing radicchio indoors?
Radicchio prefers well-draining soil that is rich in organic matter. A good quality potting mix is a suitable base, but you can improve its fertility and drainage by amending it with compost, worm castings, or perlite. Avoid using garden soil, as it can be too heavy and may contain pests or diseases. The ideal pH range for radicchio is between 6.0 and 6.8.
How often should I water my indoor radicchio plants?
Water radicchio plants when the top inch of soil feels dry to the touch. Avoid overwatering, as this can lead to root rot. Ensure that the containers have drainage holes to allow excess water to escape. Water deeply, until water drains out of the bottom of the pot. During warmer months, you may need to water more frequently. Check the soil moisture regularly and adjust your watering schedule accordingly.
How do I prevent radicchio from becoming too bitter?
Radicchio’s characteristic bitterness can be influenced by several factors, including temperature, light, and water stress. To minimize bitterness, provide consistent moisture and avoid exposing the plants to extreme temperature fluctuations. Slightly less light can also encourage a milder flavor. Some varieties are naturally less bitter than others. Blanching the radicchio heads by covering them with a dark cloth or container for a few days before harvesting can also help to reduce bitterness.
When is the best time to harvest radicchio grown indoors?
Radicchio is typically ready to harvest about 60-80 days after sowing, depending on the variety and growing conditions. The heads should be firm and well-formed. You can harvest the entire head at once or harvest individual leaves as needed. To harvest the entire head, cut it off at the base of the plant. For individual leaves, harvest the outer leaves first, allowing the inner leaves to continue growing.
What are some common pests and diseases that affect indoor radicchio?
Common pests that can affect indoor radicchio include aphids, spider mites, and whiteflies. Regularly inspect your plants for signs of infestation and take action promptly. You can control these pests with insecticidal soap, neem oil, or by introducing beneficial insects like ladybugs. Diseases that can affect radicchio include downy mildew and root rot. Ensure good air circulation and avoid overwatering to prevent these diseases. If you notice signs of disease, remove the affected leaves and treat the plants with an appropriate fungicide.
Can I grow radicchio indoors year-round?
Yes, you can grow radicchio indoors year-round, provided you can provide the necessary light, temperature, and moisture conditions. Radicchio prefers cooler temperatures, so it may be easier to grow during the fall and winter months. During the summer, you may need to provide shade or air conditioning to keep the plants from overheating. Succession planting is a great way to ensure a continuous supply of fresh radicchio throughout the year.
How do I start radicchio seeds indoors?
Start radicchio seeds indoors about 4-6 weeks before the last expected frost. Sow the seeds in seed trays or small pots filled with seed-starting mix. Keep the soil moist and warm (around 70-75°F). Once the seedlings have developed a few sets of true leaves, transplant them into larger containers filled with potting mix. Harden off the seedlings by gradually exposing them to outdoor conditions before transplanting them into their final growing location.
What are some creative ways to use homegrown radicchio?
Homegrown radicchio can be used in a variety of culinary applications. It’s a delicious addition to salads, providing a slightly bitter and peppery flavor. You can also grill or roast radicchio to mellow its bitterness and enhance its sweetness. Add it to risottos, pasta dishes, or soups for a unique flavor profile. Radicchio can also be used as a garnish or as a base for appetizers. Experiment with different recipes and discover your favorite ways to enjoy this versatile vegetable.


Leave a Comment