

Growing Kohlrabi Tips: Unlock the secrets to a thriving garden and enjoy the unique, delicious flavor of kohlrabi right from your backyard! Have you ever looked at those alien-looking bulbs at the farmer’s market and wondered, “What *is* that, and how do I even begin to grow it?” Well, wonder no more! This DIY guide is your passport to cultivating your own kohlrabi crop, even if you’re a complete beginner.
Kohlrabi, sometimes called a German turnip, has a fascinating history. Originating in Europe, it’s been a staple in many cuisines for centuries, prized for its crisp texture and mild, slightly sweet taste. Think of it as a cross between a cabbage and a turnip, but with a milder, more approachable flavor. It’s incredibly versatile, perfect for salads, slaws, stir-fries, or even roasted as a side dish.
But why should *you* bother learning growing kohlrabi tips? Because fresh, homegrown produce simply tastes better! Plus, kohlrabi is packed with vitamins and nutrients, making it a healthy and delicious addition to your diet. More importantly, knowing how to grow your own food empowers you to be more self-sufficient and connected to nature. In this article, I’ll share my favorite DIY tricks and hacks to ensure you have a bountiful harvest of this unusual, yet rewarding, vegetable. Let’s get our hands dirty and start growing!
Growing Kohlrabi: From Seed to Table – A DIY Guide
Hey there, fellow gardening enthusiasts! I’m so excited to share my experience and tips on growing kohlrabi. This quirky vegetable, often called a “German turnip,” is surprisingly easy to grow and incredibly versatile in the kitchen. Don’t let its unusual appearance intimidate you; with a little guidance, you’ll be harvesting delicious kohlrabi in no time.
Understanding Kohlrabi
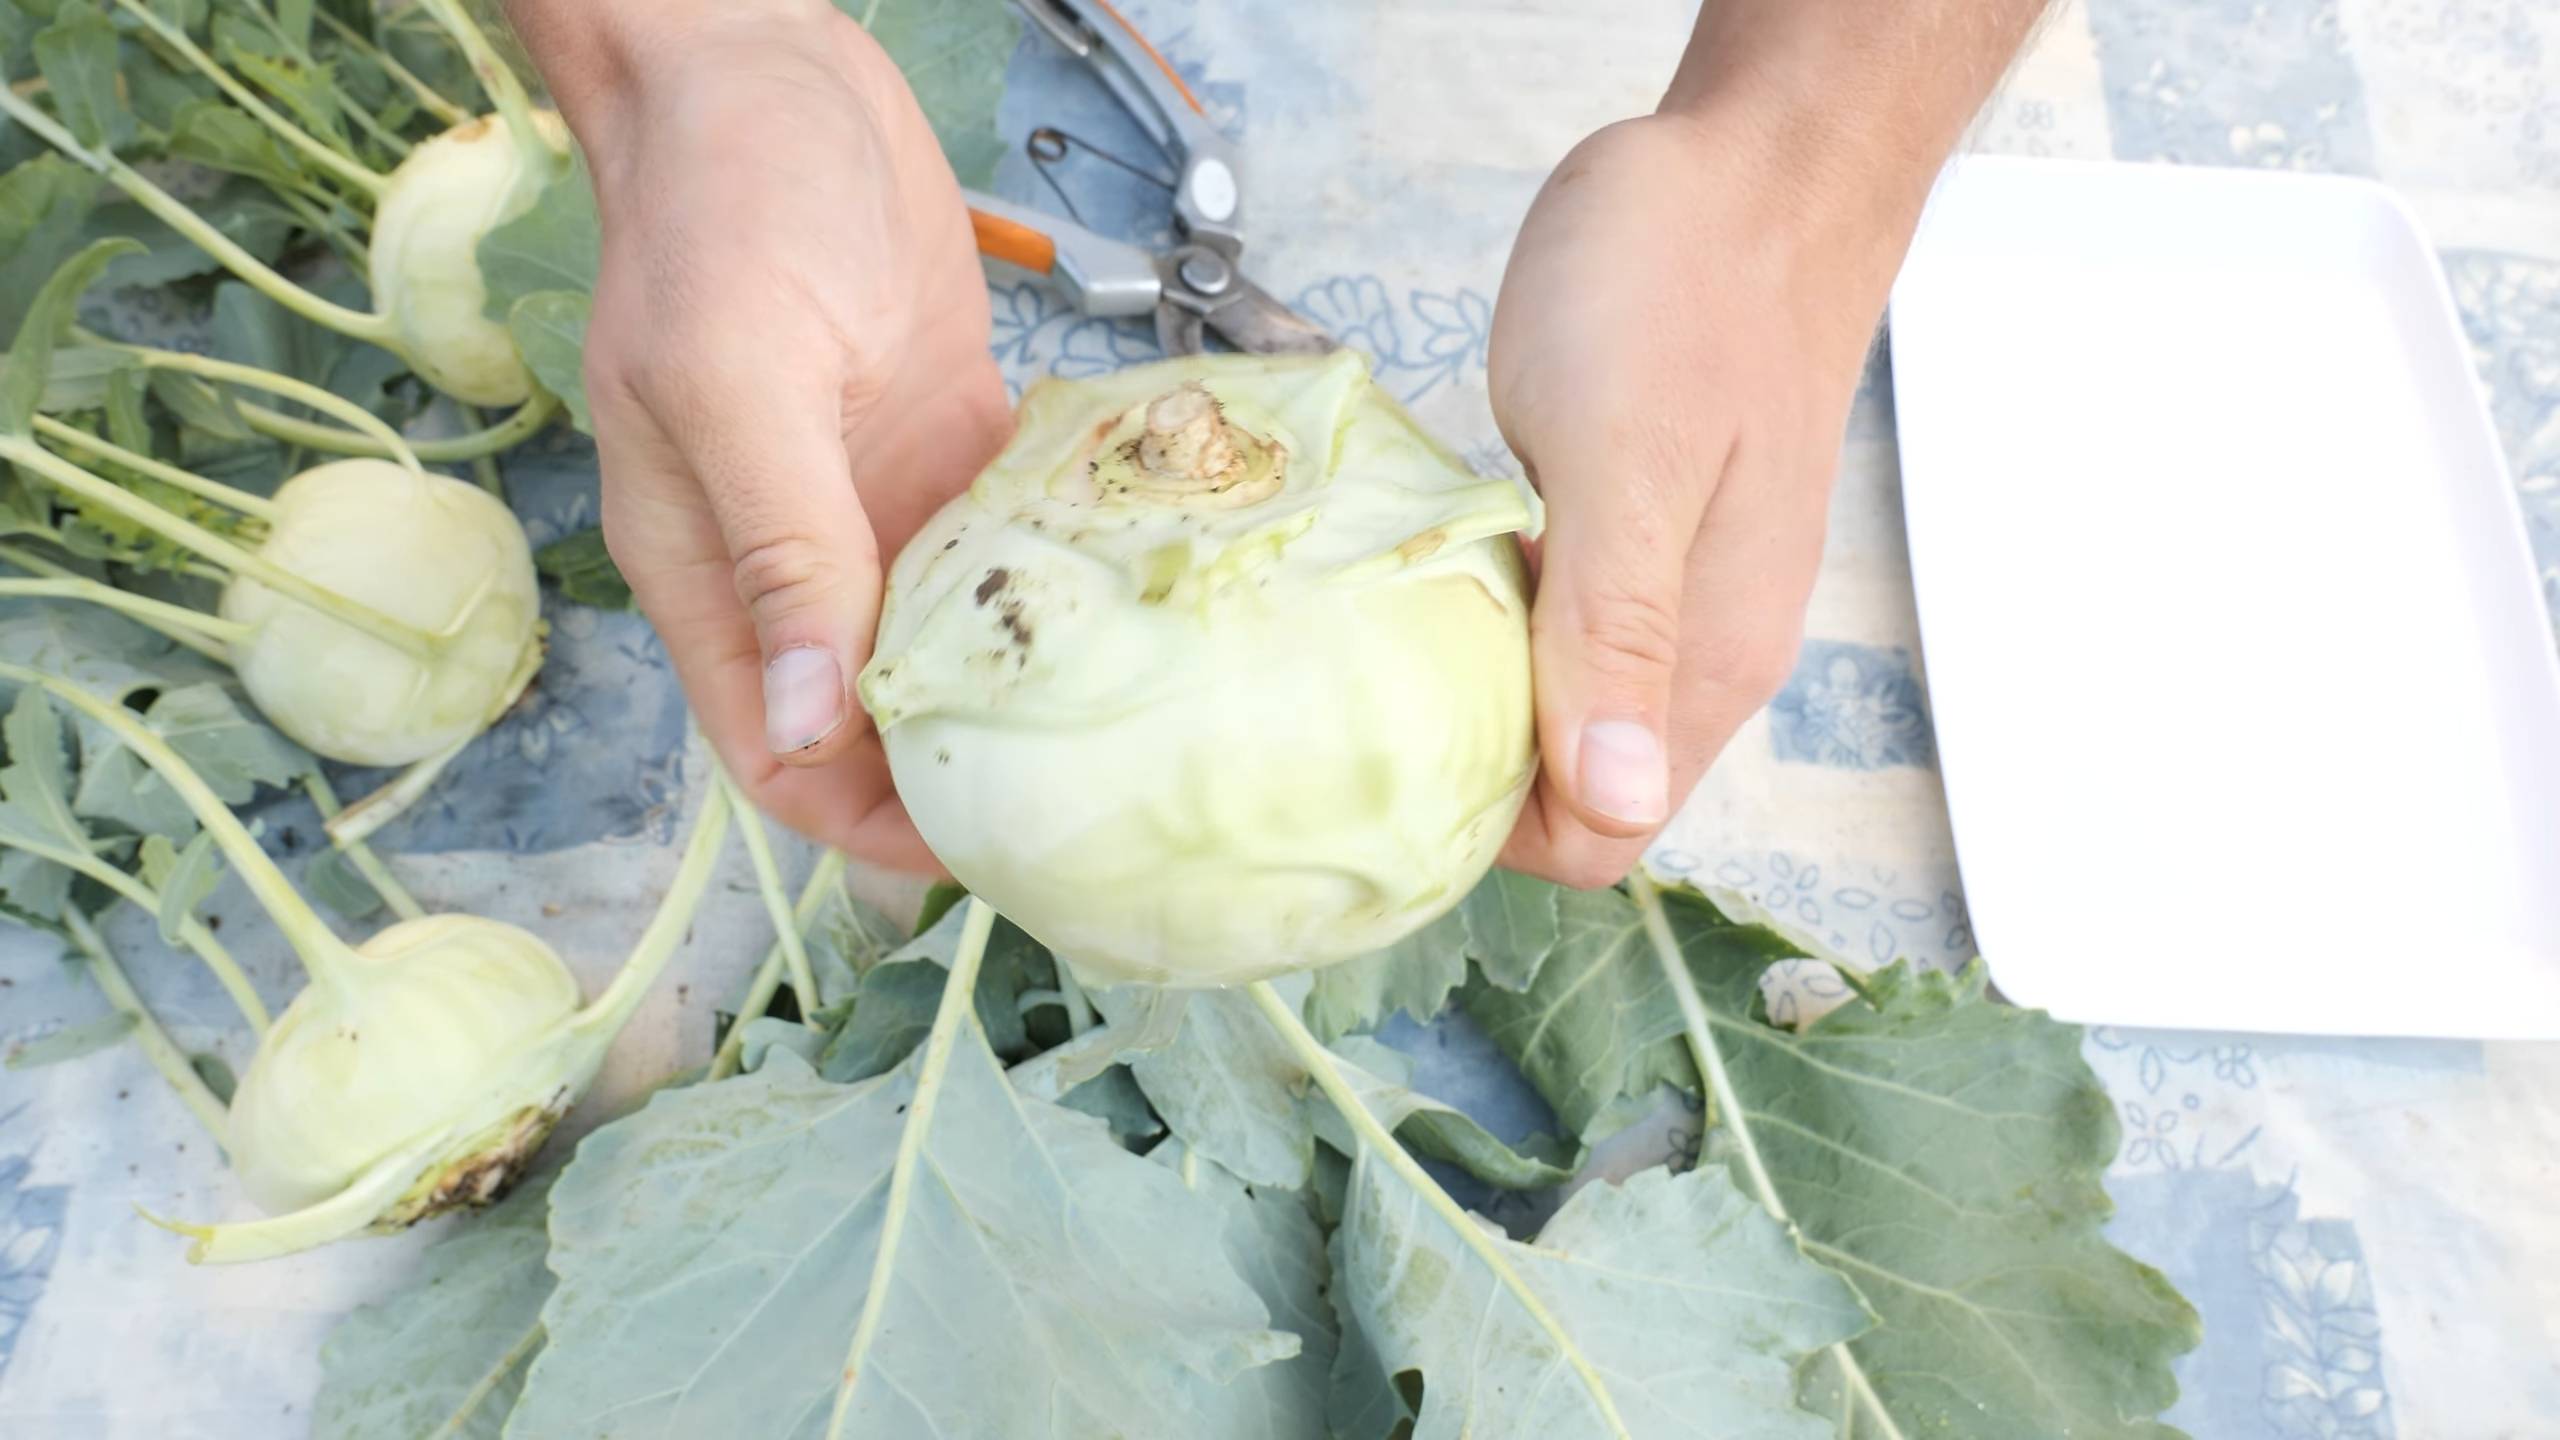
Before we dive into the nitty-gritty, let’s talk a bit about what kohlrabi actually is. It’s a member of the Brassica family, which also includes cabbage, broccoli, and kale. The part we eat is the swollen stem, which grows above ground. It comes in green, purple, and white varieties, and the taste is often described as a mild, sweet turnip or a slightly peppery cabbage.
Planning Your Kohlrabi Garden
Success with kohlrabi starts with proper planning. Here’s what you need to consider:
* Timing is Key: Kohlrabi thrives in cool weather. Plant it in early spring for a summer harvest or in late summer for a fall harvest. Avoid planting during the hottest months, as high temperatures can cause the kohlrabi to become tough and woody.
* Sunlight: Kohlrabi needs at least 6 hours of sunlight per day. Choose a location in your garden that receives plenty of sun.
* Soil: Well-drained, fertile soil is essential. Kohlrabi prefers a slightly acidic to neutral pH (6.0-7.5).
* Variety Selection: There are several kohlrabi varieties to choose from. ‘Early White Vienna’ and ‘Early Purple Vienna’ are popular choices for early harvests. ‘Grand Duke’ is a larger, later-maturing variety. I personally love the ‘Purple Vienna’ for its beautiful color and mild flavor.
* Spacing: Give your kohlrabi plants enough space to grow. Space them 6-8 inches apart in rows that are 12-18 inches apart.
Starting Kohlrabi from Seed
I usually start my kohlrabi seeds indoors about 4-6 weeks before the last expected frost. This gives them a head start and ensures a longer growing season.
1. Prepare Your Seed Starting Mix: Use a seed starting mix that is light and well-draining. I like to mix equal parts peat moss, vermiculite, and perlite.
2. Sow the Seeds: Fill your seed starting trays or pots with the mix and sow the seeds about ¼ inch deep. I usually plant 2-3 seeds per cell to increase the chances of germination.
3. Water Gently: Water the soil gently to moisten it, being careful not to dislodge the seeds.
4. Provide Warmth and Light: Place the trays in a warm location (around 70-75°F) and provide plenty of light. A heat mat can help speed up germination. If you don’t have a sunny window, use grow lights.
5. Thin Seedlings: Once the seedlings emerge (usually in 5-7 days), thin them to one plant per cell. Choose the strongest, healthiest seedling and snip off the others at the soil line.
6. Harden Off: Before transplanting the seedlings outdoors, you’ll need to harden them off. This means gradually exposing them to outdoor conditions over a period of 7-10 days. Start by placing them in a sheltered location for a few hours each day, gradually increasing the amount of time they spend outdoors.
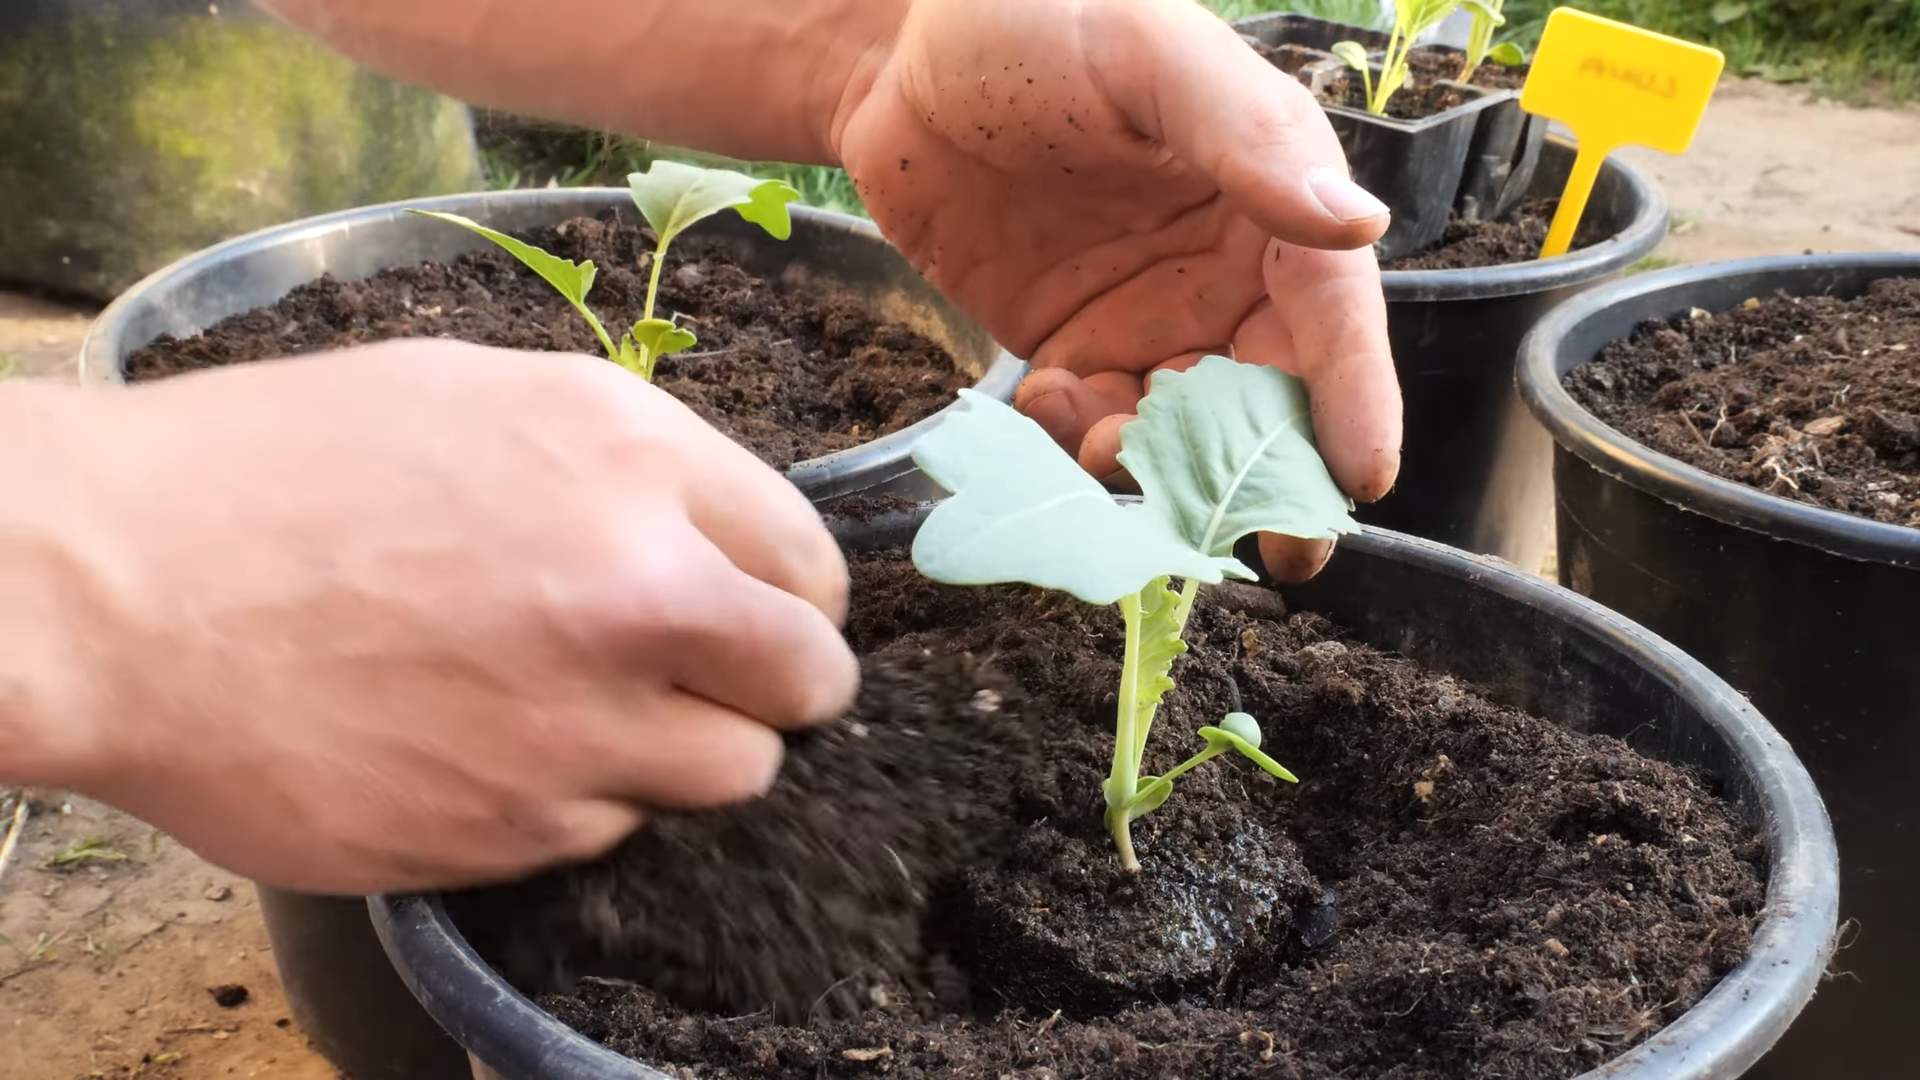
Transplanting Kohlrabi Seedlings
Once the danger of frost has passed and your seedlings are hardened off, it’s time to transplant them into your garden.
1. Prepare the Soil: Amend the soil with compost or well-rotted manure to improve its fertility and drainage.
2. Dig Holes: Dig holes that are slightly larger than the root balls of the seedlings, spacing them 6-8 inches apart.
3. Transplant Carefully: Gently remove the seedlings from their trays or pots and place them in the holes. Make sure the top of the root ball is level with the soil surface.
4. Fill and Water: Fill the holes with soil and gently firm it around the plants. Water thoroughly.
5. Mulch: Apply a layer of mulch around the plants to help retain moisture, suppress weeds, and regulate soil temperature. I like to use straw or shredded leaves.
Direct Sowing Kohlrabi Seeds
If you prefer, you can also direct sow kohlrabi seeds directly into your garden. This is a good option if you live in an area with a longer growing season.
1. Prepare the Soil: As with transplanting, amend the soil with compost or well-rotted manure.
2. Sow the Seeds: Sow the seeds about ½ inch deep, spacing them 1-2 inches apart.
3. Water Gently: Water the soil gently to moisten it.
Hey there, fellow gardening enthusiasts! I’m so excited to share my experience and tips on growing kohlrabi. This quirky vegetable, often called a “German turnip,” is surprisingly easy to grow and incredibly versatile in the kitchen. Don’t let its unusual appearance intimidate you; with a little guidance, you’ll be harvesting delicious kohlrabi in no time.
Understanding Kohlrabi
Before we dive into the nitty-gritty, let’s talk a bit about what kohlrabi actually is. It’s a member of the Brassica family, which also includes cabbage, broccoli, and kale. The part we eat is the swollen stem, which grows above ground. It comes in green, purple, and white varieties, and the taste is often described as a mild, sweet turnip or a slightly peppery cabbage.
Planning Your Kohlrabi Garden
Success with kohlrabi starts with proper planning. Here’s what you need to consider:
* Timing is Key: Kohlrabi thrives in cool weather. Plant it in early spring for a summer harvest or in late summer for a fall harvest. Avoid planting during the hottest months, as high temperatures can cause the kohlrabi to become tough and woody.
* Sunlight: Kohlrabi needs at least 6 hours of sunlight per day. Choose a location in your garden that receives plenty of sun.
* Soil: Well-drained, fertile soil is essential. Kohlrabi prefers a slightly acidic to neutral pH (6.0-7.5).
* Variety Selection: There are several kohlrabi varieties to choose from. ‘Early White Vienna’ and ‘Early Purple Vienna’ are popular choices for early harvests. ‘Grand Duke’ is a larger, later-maturing variety. I personally love the ‘Purple Vienna’ for its beautiful color and mild flavor.
* Spacing: Give your kohlrabi plants enough space to grow. Space them 6-8 inches apart in rows that are 12-18 inches apart.
Starting Kohlrabi from Seed
I usually start my kohlrabi seeds indoors about 4-6 weeks before the last expected frost. This gives them a head start and ensures a longer growing season.
1. Prepare Your Seed Starting Mix: Use a seed starting mix that is light and well-draining. I like to mix equal parts peat moss, vermiculite, and perlite.
2. Sow the Seeds: Fill your seed starting trays or pots with the mix and sow the seeds about ¼ inch deep. I usually plant 2-3 seeds per cell to increase the chances of germination.
3. Water Gently: Water the soil gently to moisten it, being careful not to dislodge the seeds.
4. Provide Warmth and Light: Place the trays in a warm location (around 70-75°F) and provide plenty of light. A heat mat can help speed up germination. If you don’t have a sunny window, use grow lights.
5. Thin Seedlings: Once the seedlings emerge (usually in 5-7 days), thin them to one plant per cell. Choose the strongest, healthiest seedling and snip off the others at the soil line.
6. Harden Off: Before transplanting the seedlings outdoors, you’ll need to harden them off. This means gradually exposing them to outdoor conditions over a period of 7-10 days. Start by placing them in a sheltered location for a few hours each day, gradually increasing the amount of time they spend outdoors.
Transplanting Kohlrabi Seedlings
Once the danger of frost has passed and your seedlings are hardened off, it’s time to transplant them into your garden.
1. Prepare the Soil: Amend the soil with compost or well-rotted manure to improve its fertility and drainage.
2. Dig Holes: Dig holes that are slightly larger than the root balls of the seedlings, spacing them 6-8 inches apart.
3. Transplant Carefully: Gently remove the seedlings from their trays or pots and place them in the holes. Make sure the top of the root ball is level with the soil surface.
4. Fill and Water: Fill the holes with soil and gently firm it around the plants. Water thoroughly.
5. Mulch: Apply a layer of mulch around the plants to help retain moisture, suppress weeds, and regulate soil temperature. I like to use straw or shredded leaves.
Direct Sowing Kohlrabi Seeds
If you prefer, you can also direct sow kohlrabi seeds directly into your garden. This is a good option if you live in an area with a longer growing season.
1. Prepare the Soil: As with transplanting, amend the soil with compost or well-rotted manure.
2. Sow the Seeds: Sow the seeds about ½ inch deep, spacing them 1-2 inches apart.
3. Water Gently: Water the soil gently to moisten it.
4. Thin Seedlings: Once the seedlings emerge, thin them to 6-8 inches apart.
Caring for Your Kohlrabi Plants
Once your kohlrabi plants are established, they’re relatively low-maintenance. Here’s what you need to do to keep them healthy and productive:
* Watering: Kohlrabi needs consistent moisture, especially during hot, dry weather. Water deeply whenever the top inch of soil feels dry.
* Fertilizing: Fertilize your kohlrabi plants every 2-3 weeks with a balanced fertilizer. I like to use a liquid fertilizer diluted to half strength.
* Weeding: Keep the area around your kohlrabi plants free of weeds. Weeds can compete with the kohlrabi for nutrients and water.
* Pest Control: Kohlrabi can be susceptible to pests such as cabbage worms, aphids, and flea beetles. Inspect your plants regularly and take action if you see any signs of infestation. I prefer to use organic pest control methods, such as insecticidal soap or neem oil.
* Bolting Prevention: Bolting (premature flowering) can occur if kohlrabi is exposed to prolonged periods of hot weather. To prevent bolting, provide shade during the hottest part of the day and ensure consistent watering.
Harvesting Kohlrabi
The key to delicious kohlrabi is harvesting it at the right time. You want to harvest the bulbs when they are about 2-3 inches in diameter. Larger bulbs can become tough and woody.
1. Check the Size: Regularly check the size of the kohlrabi bulbs.
2. Harvest Carefully: Use a sharp knife to cut the bulb from the stem, leaving about an inch of stem attached.
3. Remove Leaves: Remove the leaves from the bulb. The leaves are also edible and can be cooked like spinach or kale.
4. Store Properly: Store kohlrabi bulbs in the refrigerator for up to several weeks.
Enjoying Your Kohlrabi Harvest
Kohlrabi is incredibly versatile in the kitchen. You can eat it raw, cooked, or pickled.
* Raw: Peel the bulb and slice it thinly. It’s great in salads, slaws, or as a crunchy snack.
* Cooked: You can steam, boil, roast, or stir-fry kohlrabi. It’s delicious in soups, stews, and gratins.
* Pickled: Pickled kohlrabi is a tangy and refreshing treat.
My favorite way to enjoy kohlrabi is to roast it with olive oil, salt, pepper, and a sprinkle of parmesan cheese. It’s simple, delicious, and highlights the natural sweetness of the vegetable.
Troubleshooting Common Kohlrabi Problems
Even with the best planning, you might encounter some problems while growing kohlrabi. Here are a few common issues and how to address them:
* Splitting Bulbs: Splitting can occur if the plants experience inconsistent watering. Ensure consistent moisture levels, especially during dry periods.
* Tough or Woody Bulbs: This is usually caused by harvesting the bulbs too late or by growing them in hot weather. Harvest the bulbs when they are young and tender, and provide shade during hot weather.
* Pest Infestations: As mentioned earlier, kohlrabi can be susceptible to pests. Regularly inspect your plants and take action if you see any signs of infestation.
Advanced Kohlrabi Growing Techniques
If you’re feeling adventurous, here are a few advanced techniques to try:
* Succession Planting: Plant kohlrabi every 2-3 weeks to ensure a continuous harvest throughout the growing season.
* Companion Planting: Plant kohlrabi with companion plants such as dill, chamomile, and mint to attract beneficial insects and deter pests.
* Growing in Containers: Kohlrabi can
Conclusion
So, there you have it! Mastering the art of growing kohlrabi doesn’t require a green thumb blessed by the gardening gods. With a little planning, the right techniques, and a dash of patience, you can cultivate a bountiful harvest of this unique and delicious vegetable right in your own backyard.
Why is this DIY approach to growing kohlrabi a must-try? Because it empowers you to control the entire process, from seed to table. You’ll know exactly what goes into your food, ensuring it’s free from harmful pesticides and packed with fresh, vibrant flavor. Plus, there’s an undeniable satisfaction that comes from nurturing a plant from a tiny seed into a thriving vegetable. It’s a rewarding experience that connects you to nature and provides you with a healthy, homegrown food source.
But the journey doesn’t end with the basic techniques. Feel free to experiment! Try different varieties of kohlrabi. White Vienna is a classic choice, but Purple Vienna offers a beautiful color contrast in your garden and on your plate. For those with limited space, consider growing kohlrabi in containers. Just be sure to choose a large pot with good drainage and provide consistent watering. You can also explore companion planting. Kohlrabi thrives alongside other vegetables like beets, onions, and herbs like dill and chamomile. These companions can help deter pests and improve the overall health of your kohlrabi plants.
Don’t be afraid to tweak the growing conditions to suit your specific climate and soil type. If you live in a warmer region, provide some afternoon shade to prevent the kohlrabi bulbs from becoming tough and woody. If your soil is heavy clay, amend it with compost and other organic matter to improve drainage.
Ultimately, the best way to learn is by doing. So, grab some seeds, prepare your garden bed, and embark on your own kohlrabi-growing adventure. We’re confident that you’ll be amazed by the results. And remember, even experienced gardeners encounter challenges along the way. Don’t get discouraged if you face a few setbacks. Just learn from your mistakes and keep experimenting.
We encourage you to try these tips for growing kohlrabi and share your experiences with us! Let us know what varieties you’ve grown, what challenges you’ve faced, and what successes you’ve celebrated. Share your photos, recipes, and any other insights you’ve gained along the way. Together, we can create a community of kohlrabi enthusiasts and help each other grow the best kohlrabi possible. Happy gardening!
Frequently Asked Questions (FAQ)
What is kohlrabi, and what does it taste like?
Kohlrabi, sometimes called a German turnip, is a cruciferous vegetable related to cabbage, broccoli, and cauliflower. It features a bulbous stem that grows above ground and edible leaves. The taste is often described as a mild and slightly sweet version of broccoli stem or turnip, with a crisp and refreshing texture. The younger, smaller bulbs tend to be more tender and flavorful.
When is the best time to plant kohlrabi?
The timing depends on your climate. Kohlrabi is a cool-season crop, so it thrives in spring and fall. For a spring harvest, start seeds indoors 4-6 weeks before the last expected frost. Transplant seedlings outdoors after the danger of frost has passed. For a fall harvest, sow seeds directly into the garden in late summer, about 6-8 weeks before the first expected frost. In warmer climates, you can grow kohlrabi throughout the winter.
How much sunlight does kohlrabi need?
Kohlrabi needs at least 6 hours of sunlight per day to thrive. Choose a sunny location in your garden that receives plenty of direct sunlight. If you live in a particularly hot climate, providing some afternoon shade can help prevent the bulbs from becoming tough and woody.
What kind of soil is best for growing kohlrabi?
Kohlrabi prefers well-drained, fertile soil that is rich in organic matter. The ideal soil pH is between 6.0 and 7.5. Before planting, amend your soil with compost, aged manure, or other organic matter to improve drainage and fertility. Avoid heavy clay soils, as they can become waterlogged and hinder kohlrabi growth.
How often should I water kohlrabi?
Kohlrabi needs consistent moisture to grow properly. Water deeply and regularly, especially during dry periods. Aim to keep the soil consistently moist but not waterlogged. A good rule of thumb is to water when the top inch of soil feels dry to the touch. Mulching around the plants can help retain moisture and suppress weeds.
What are some common pests and diseases that affect kohlrabi?
Common pests that can affect kohlrabi include cabbage worms, aphids, flea beetles, and cabbage root maggots. Diseases that can affect kohlrabi include clubroot, black rot, and downy mildew. To prevent pest and disease problems, practice good garden hygiene, such as removing plant debris and rotating crops. You can also use organic pest control methods, such as insecticidal soap or neem oil, to control pests. Choose disease-resistant varieties whenever possible.
How do I know when kohlrabi is ready to harvest?
Kohlrabi is typically ready to harvest when the bulbs are about 2-3 inches in diameter. The exact size will depend on the variety. Check the seed packet or plant tag for specific harvesting instructions. The bulbs should be firm and smooth. If they become too large, they can become tough and woody.
How do I harvest kohlrabi?
To harvest kohlrabi, use a sharp knife or garden shears to cut the bulb from the stem just above the soil line. You can also harvest the leaves, which are edible and can be used in salads or cooked like spinach.
How do I store kohlrabi?
Kohlrabi can be stored in the refrigerator for several weeks. Remove the leaves before storing, as they can draw moisture from the bulb. Store the bulbs in a plastic bag or container to prevent them from drying out.
Can I eat the leaves of kohlrabi?
Yes, the leaves of kohlrabi are edible and nutritious. They can be used in salads, stir-fries, or cooked like spinach. Choose young, tender leaves for the best flavor and texture.
What are some ways to prepare and cook kohlrabi?
Kohlrabi can be eaten raw or cooked. Raw kohlrabi can be sliced, shredded, or diced and added to salads, slaws, or crudités platters. Cooked kohlrabi can be steamed, boiled, roasted, or stir-fried. It can also be used in soups, stews, and gratins. The mild flavor of kohlrabi makes it a versatile ingredient that pairs well with a variety of flavors.
Is growing kohlrabi in containers a viable option?
Yes, growing kohlrabi in containers is definitely possible, especially if you have limited garden space. Choose a container that is at least 12 inches in diameter and depth to provide enough room for the roots to grow. Use a well-draining potting mix and water regularly. Container-grown kohlrabi may need more frequent fertilization than kohlrabi grown in the ground.
What are some good companion plants for kohlrabi?
Good companion plants for kohlrabi include beets, onions, garlic, chamomile, dill, and marigolds. These plants can help deter pests, improve soil health, and enhance the growth of kohlrabi. Avoid planting kohlrabi near other members of the brassica family, such as cabbage, broccoli, and cauliflower, as they can attract the same pests and diseases.
Leave a Comment