

Growing Onions in Bottles might sound like something out of a sci-fi movie, but trust me, it’s a surprisingly simple and effective way to cultivate these flavorful bulbs, even if you’re short on space! Have you ever dreamed of having a constant supply of fresh onions right outside your kitchen door? Well, this DIY trick can make that dream a reality, and it’s easier than you think.
Onions have been a staple in cuisines around the world for centuries, dating back to ancient civilizations. From the Egyptians who revered them to the Romans who carried them as a source of sustenance, onions have a rich and fascinating history. But you don’t need a sprawling farm to enjoy the taste of homegrown onions.
In today’s world, where space is a premium, and sustainability is key, this method of growing onions in bottles offers a fantastic solution. Whether you live in an apartment with a small balcony or simply want to maximize your garden’s yield, this DIY hack is for you. Plus, it’s a great way to recycle those plastic bottles that might otherwise end up in a landfill. I’m excited to share this easy and rewarding technique with you, so let’s get started and unlock the secrets to a bountiful onion harvest, one bottle at a time!
Growing Onions in Bottles: A Fun and Space-Saving DIY Project!
Hey there, fellow gardening enthusiasts! Are you short on space but still dream of harvesting your own fresh onions? Well, I’ve got a fantastic solution for you: growing onions in bottles! It’s a surprisingly easy and rewarding project, perfect for balconies, patios, or even a sunny windowsill. Plus, it’s a great way to recycle those plastic bottles piling up. Let’s dive in!
What You’ll Need
Before we get our hands dirty, let’s gather all the necessary supplies. Trust me, having everything ready beforehand will make the process much smoother.
* Plastic Bottles: The star of the show! I recommend using 2-liter soda bottles or similar sizes. Make sure they’re clean and dry. You’ll need one bottle per onion you want to grow.
* Onion Sets: These are small, immature onions that are ready to be planted. You can find them at most garden centers in the spring and fall. Choose varieties that are known for their bulb size if you want larger onions.
* Potting Mix: A good quality potting mix is crucial for healthy onion growth. Avoid using garden soil, as it can be too heavy and compact.
* Scissors or a Utility Knife: For cutting the plastic bottles. Be careful!
* Drill or Nail (Optional): For creating drainage holes.
* Watering Can or Spray Bottle: For watering your onions.
* Fertilizer (Optional): A balanced liquid fertilizer can help boost growth.
* Gloves (Optional): To keep your hands clean.
Preparing the Bottles
This is where we transform those ordinary plastic bottles into mini onion gardens!
1. Clean the Bottles: Thoroughly wash the bottles with soap and water to remove any residue. Rinse them well and let them dry completely. This helps prevent mold and bacteria growth.
2. Cut the Bottles: Using your scissors or utility knife, carefully cut the bottle in half horizontally. You’ll be using the bottom half as the planting container. I usually cut mine about two-thirds of the way up, leaving a deeper base for the roots.
3. Create Drainage Holes: This is super important! Onions don’t like sitting in soggy soil. If your bottle doesn’t already have drainage holes, use a drill or a nail to create several holes in the bottom. I usually make about 4-5 holes, evenly spaced.
4. (Optional) Add a Water Reservoir: For a self-watering system, you can invert the top half of the bottle (the part you cut off) and place it inside the bottom half, neck down. This creates a reservoir. You’ll need to make a small hole in the bottle cap to allow water to wick up into the soil. I’ve found this helpful for keeping the soil consistently moist, especially during hot weather.
Planting the Onion Sets
Now for the fun part – planting those little onion sets!
1. Fill the Bottle with Potting Mix: Fill the bottom half of the bottle with your chosen potting mix, leaving about an inch of space at the top. Gently pat down the soil to remove any air pockets.
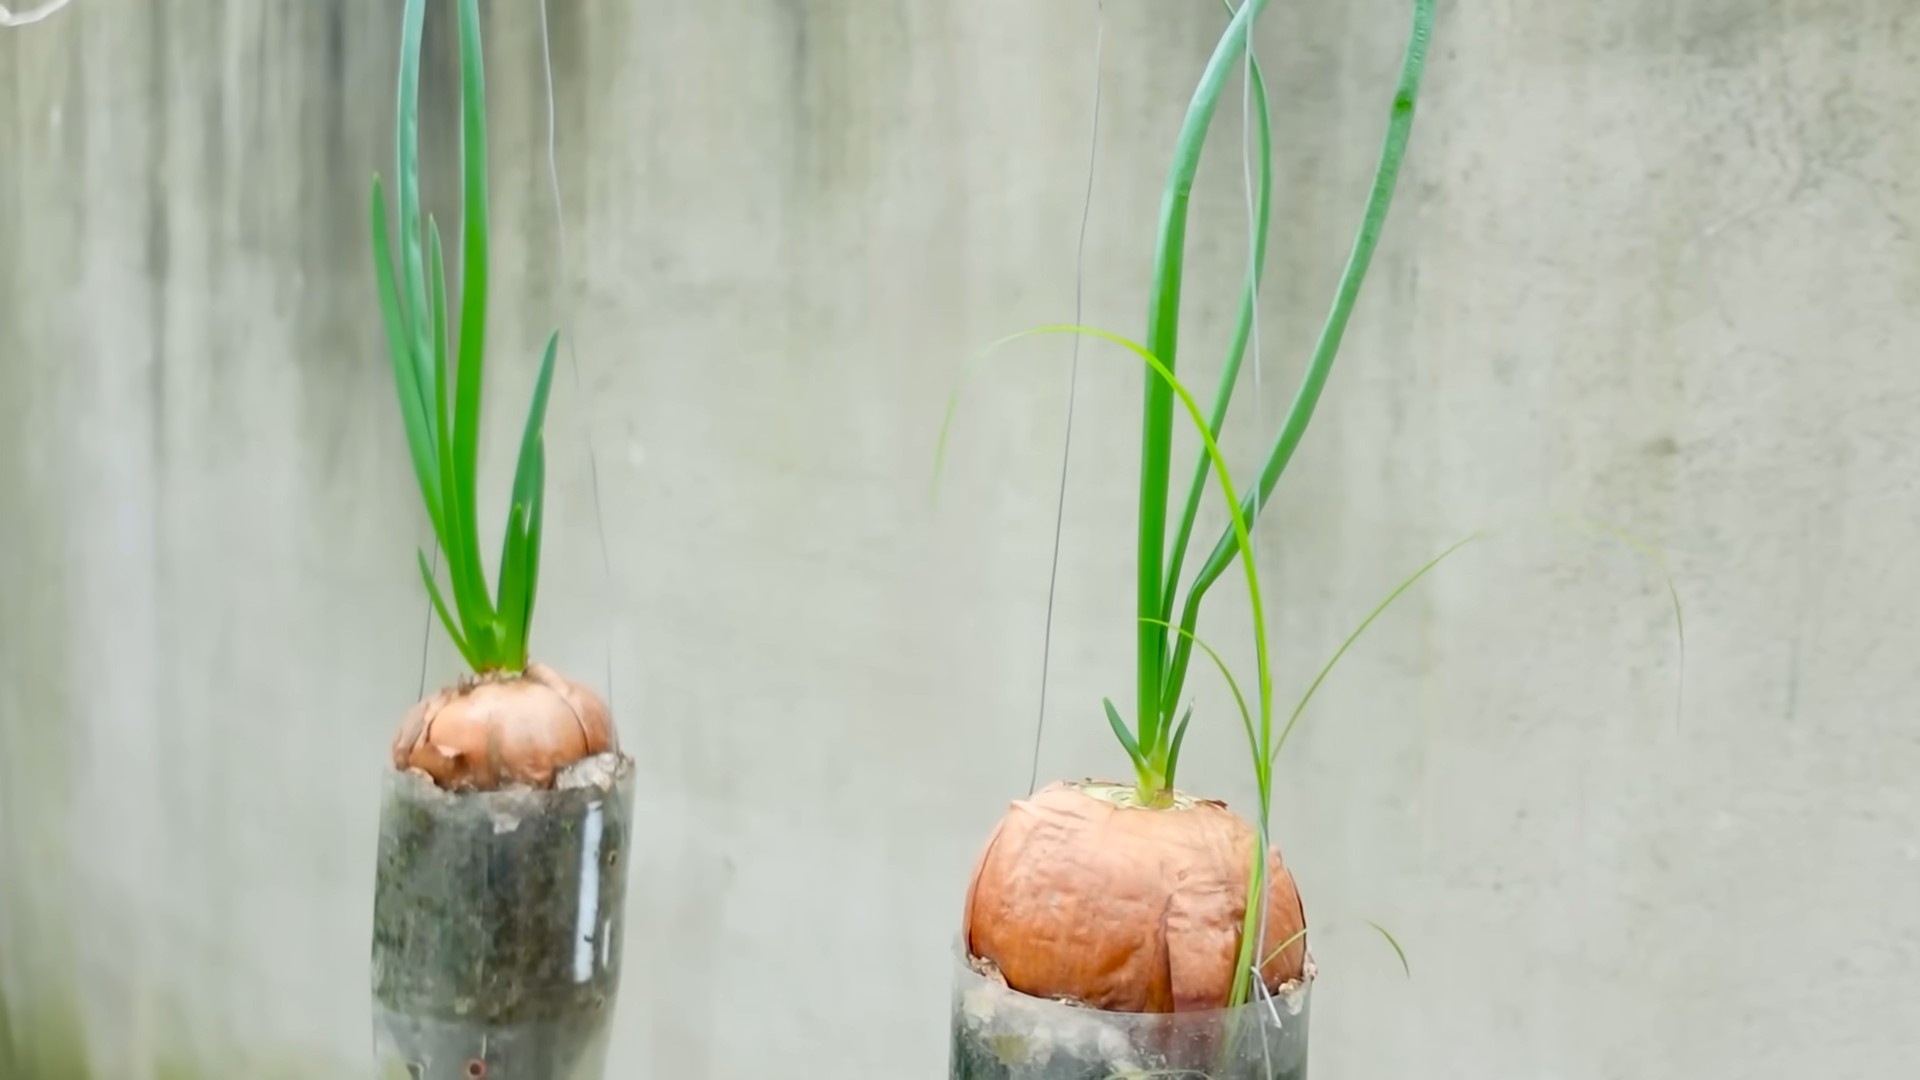
2. Plant the Onion Sets: Make a small hole in the center of the soil, about an inch deep. Place the onion set in the hole, with the pointy end facing up. Cover the set with soil, leaving the very tip exposed. Don’t bury the entire onion set, as this can lead to rot.
3. Water Thoroughly: After planting, water the soil thoroughly until water drains out of the drainage holes. This helps settle the soil and encourages root growth.
4. Repeat: If you’re planting multiple onions in separate bottles, repeat steps 1-3 for each bottle.
Caring for Your Onions
Once your onions are planted, it’s time to provide them with the care they need to thrive.
1. Sunlight: Onions need plenty of sunlight, at least 6-8 hours per day. Place your bottles in a sunny location, such as a balcony, patio, or windowsill. If you don’t have enough natural light, you can supplement with a grow light.
2. Watering: Water your onions regularly, keeping the soil consistently moist but not waterlogged. Check the soil moisture by sticking your finger into the soil. If the top inch feels dry, it’s time to water. Avoid overwatering, as this can lead to root rot. If you’re using the self-watering reservoir, check the water level regularly and refill as needed.
3. Fertilizing (Optional): To boost growth, you can fertilize your onions every 2-3 weeks with a balanced liquid fertilizer. Follow the instructions on the fertilizer label. I like to use a fertilizer that’s high in phosphorus, as this promotes bulb development.
4. Weeding: Keep an eye out for weeds and remove them promptly. Weeds can compete with your onions for nutrients and water.
5. Pest Control: Onions are generally pest-resistant, but they can sometimes be affected by onion maggots or thrips. Inspect your plants regularly for signs of pests. If you find any, you can treat them with an appropriate insecticide or organic pest control method.
6. Rotation: Rotate the bottles regularly to ensure even sunlight exposure on all sides of the plant. This will help prevent the onions from leaning towards the light.
Harvesting Your Onions
The moment you’ve been waiting for – harvesting your homegrown onions!
1. Harvest Time: Onions are typically ready to harvest when the tops start to turn yellow and fall over. This usually takes about 90-120 days from planting.
2. Harvesting: Gently pull the onions out of the bottles. If the soil is dry, you may need to loosen it first.
3. Curing: After harvesting, cure the onions by laying them out in a warm, dry, and well-ventilated place for about 1-2 weeks. This allows the outer layers to dry and helps prevent rot during storage.
4. Storing: Once the onions are cured, you can store them in a cool, dry, and dark place. Braiding the tops together and hanging them is a traditional storage method.
Troubleshooting
Even with the best care, you might encounter some challenges along the way. Here are a few common problems and how to address them:
* Yellowing Leaves: This could be a sign of overwatering, underwatering, or nutrient deficiency. Check the soil moisture and adjust your watering accordingly. If you suspect a nutrient deficiency, fertilize with a balanced fertilizer.
* Slow Growth: This could be due to insufficient sunlight, poor soil, or lack of nutrients. Make sure your onions are getting enough sunlight and fertilize regularly.
* Root Rot: This is caused by overwatering and poor drainage. Make sure your bottles have adequate drainage holes and avoid overwatering. If you suspect root rot, you can try transplanting the onion into fresh soil.
* Pests: Inspect your plants regularly for signs of pests and treat them accordingly.
Tips for Success
Here are a few extra tips to help you succeed with your bottle onion garden:
* Choose the Right Variety: Select onion varieties that are well-suited to your climate and growing conditions.
* Start with Healthy Sets: Choose firm, healthy onion sets that are free from blemishes or signs of disease.
* Don’t Overcrowd: Avoid planting too many onions in a single bottle. Overcrowding can lead to stunted growth and increased risk of disease.
* Be Patient: Growing onions takes time and patience. Don’t get discouraged if you don’t see results immediately.
* Experiment: Try different varieties of onions and different growing techniques to see what works best for you.
Why Grow Onions in Bottles?
You might be wondering, why go to all this trouble when you could just grow onions in the ground? Well, there are several advantages to growing onions in bottles:
* Space-Saving: Bottles are perfect for small spaces like balconies, patios, and windowsills.
* Recycling: It’s a great way to recycle plastic bottles and reduce waste.
* Easy to Move: Bottles are easy to move around, so you can adjust their position to maximize sunlight exposure.
* Control: You have more control over the growing environment, such as soil quality and watering.
* Fun and Educational: It’s a fun and educational project for kids and adults alike.
So, there you have it! Growing onions in bottles is a simple, rewarding, and eco-friendly way to enjoy fresh, homegrown onions, even if you’re short on space. Give it a try, and I’m sure you’ll be amazed at the results! Happy gardening!
Conclusion
So, there you have it! Growing onions in bottles isn’t just a quirky gardening experiment; it’s a genuinely effective way to maximize your space, minimize waste, and enjoy a continuous supply of fresh, flavorful onions. This DIY trick is a must-try for anyone with limited garden space, whether you live in an apartment with a balcony, a small urban home, or simply want to make the most of your existing garden beds. The beauty of this method lies in its simplicity and adaptability. You’re not confined to traditional rows and soil preparation. You’re essentially creating a miniature, self-contained onion farm within recycled plastic bottles.
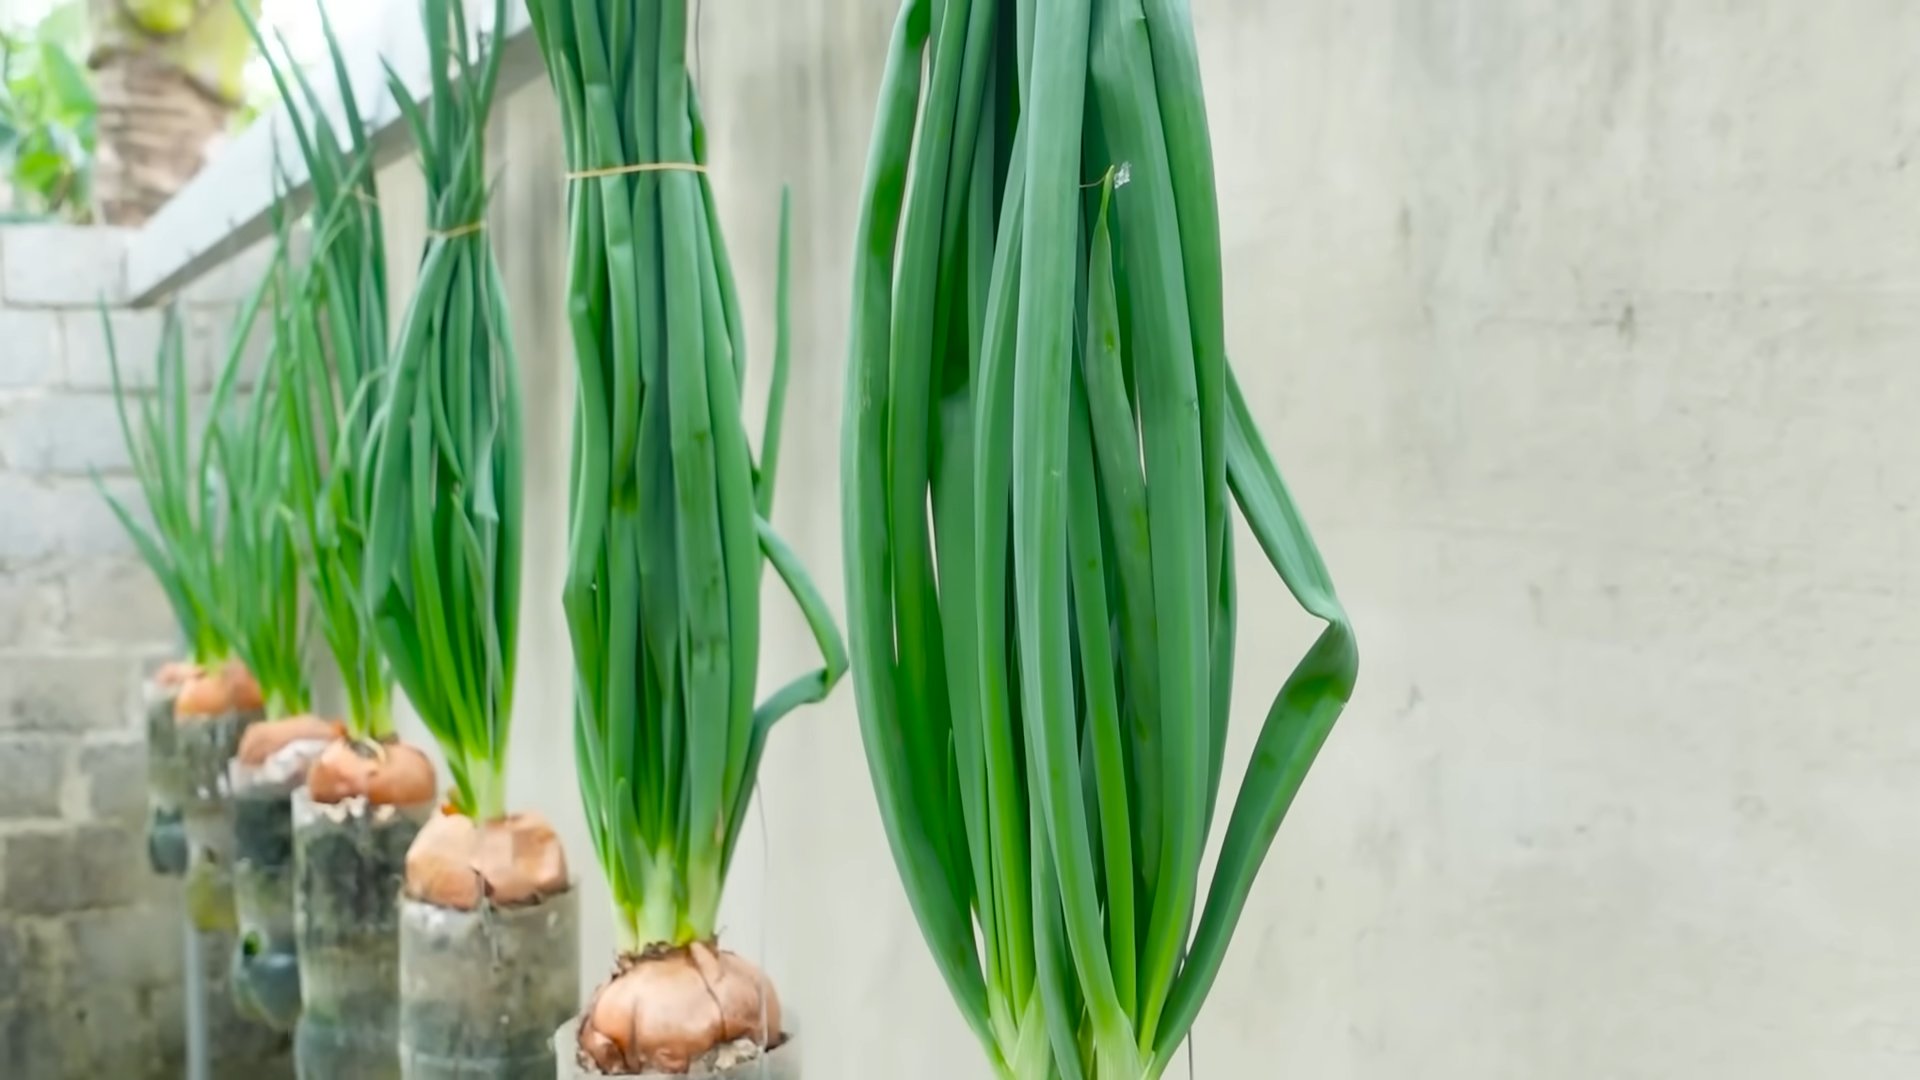
Think about the possibilities! Imagine having a vertical wall of green onion tops, ready to be snipped and added to your favorite dishes. Picture the satisfaction of knowing you’re reducing plastic waste while simultaneously growing your own food. And consider the educational aspect – this is a fantastic project to involve children in, teaching them about plant growth, recycling, and sustainable living.
But the benefits don’t stop there. Growing onions in bottles offers better control over soil conditions and watering, reducing the risk of pests and diseases that can plague traditional onion crops. You can easily move your bottle onions to a sheltered location during harsh weather, ensuring a consistent harvest throughout the year.
Ready to take your onion game to the next level? Don’t be afraid to experiment with different onion varieties. While green onions (scallions) are the easiest to start with, you can also try growing shallots or even smaller bulb onions in larger bottles. Consider adding a slow-release fertilizer to the soil mix to provide your onions with a steady supply of nutrients. And don’t forget to monitor the moisture levels in the bottles, adjusting your watering schedule as needed.
This method isn’t just about growing onions; it’s about embracing a more sustainable and creative approach to gardening. It’s about finding innovative solutions to common gardening challenges and making the most of the resources available to you. It’s about proving that you don’t need a sprawling farm to enjoy the taste of homegrown produce.
We wholeheartedly encourage you to try this DIY trick for growing onions in bottles. It’s a rewarding and surprisingly simple project that will transform the way you think about gardening. Once you’ve experienced the joy of harvesting your own bottle-grown onions, we’re confident you’ll be hooked!
Don’t keep your success a secret! We want to hear about your experiences. Share your photos, tips, and variations on social media using #BottleOnions and #DIYGardening. Let’s inspire others to embrace this innovative and sustainable gardening technique. Let us know what worked for you, what challenges you faced, and any creative solutions you came up with. Together, we can build a community of bottle-onion enthusiasts and revolutionize the way we grow our food. So, grab some bottles, some soil, and some onion sets, and get ready to embark on a fun and rewarding gardening adventure. Happy growing!
Frequently Asked Questions (FAQ)
What kind of bottles are best for growing onions?
The best bottles for growing onions are clear plastic bottles, such as those used for water, soda, or juice. The size of the bottle will depend on the type of onion you’re growing. For green onions (scallions), smaller bottles (1-2 liters) are sufficient. For shallots or smaller bulb onions, you’ll need larger bottles (2-3 liters). Make sure to thoroughly clean the bottles before using them to remove any residue. Also, ensure the plastic is food-grade and BPA-free if possible. Avoid using bottles that have contained harsh chemicals or pesticides. The clarity of the bottle is important because it allows sunlight to reach the soil and roots, promoting healthy growth.
What type of soil should I use?
A well-draining potting mix is ideal for growing onions in bottles. Avoid using garden soil, as it can be too heavy and compact, hindering root growth. A good potting mix will retain moisture while allowing excess water to drain away, preventing root rot. You can also amend the potting mix with compost or other organic matter to provide additional nutrients. A mix of equal parts potting soil, compost, and perlite or vermiculite is a great option. The perlite or vermiculite will improve drainage and aeration.
How often should I water my bottle onions?
Water your bottle onions regularly, keeping the soil consistently moist but not waterlogged. The frequency of watering will depend on the climate, the size of the bottle, and the type of soil you’re using. Check the soil moisture by sticking your finger into the top inch of soil. If it feels dry, it’s time to water. Water thoroughly until excess water drains out of the drainage holes. Avoid overwatering, as this can lead to root rot. During hot, dry weather, you may need to water more frequently. During cooler, wetter weather, you may need to water less frequently.
How much sunlight do bottle onions need?
Onions need at least 6-8 hours of sunlight per day to thrive. Place your bottle onions in a sunny location, such as a south-facing window or a balcony that receives plenty of sunlight. If you don’t have access to enough natural sunlight, you can supplement with grow lights. Position the grow lights a few inches above the onion tops and keep them on for 12-14 hours per day. Rotate the bottles regularly to ensure that all sides of the onions receive equal sunlight.
Can I grow onions from seed in bottles?
Yes, you can grow onions from seed in bottles, but it’s generally easier to start with onion sets (small, immature onion bulbs). Onion sets will mature faster and are less susceptible to pests and diseases. If you choose to grow from seed, start the seeds indoors 8-10 weeks before the last expected frost. Sow the seeds in a seed-starting tray filled with a seed-starting mix. Once the seedlings have developed a few true leaves, transplant them into the bottles. Be sure to harden off the seedlings before transplanting them outdoors.
How do I fertilize my bottle onions?
Onions are heavy feeders and require regular fertilization. You can use a liquid fertilizer or a slow-release fertilizer. If using a liquid fertilizer, dilute it according to the package instructions and apply it every 2-3 weeks. If using a slow-release fertilizer, mix it into the soil at the time of planting. Choose a fertilizer that is high in nitrogen, phosphorus, and potassium (NPK). You can also supplement with compost tea or other organic fertilizers. Avoid over-fertilizing, as this can burn the roots.
How do I prevent pests and diseases?
Growing onions in bottles can help reduce the risk of pests and diseases, but it’s still important to take precautions. Inspect your onions regularly for signs of pests or diseases. Common onion pests include aphids, thrips, and onion maggots. Common onion diseases include downy mildew, onion rot, and white rot. If you detect pests or diseases, treat them promptly with an appropriate insecticide or fungicide. You can also use organic pest control methods, such as neem oil or insecticidal soap. Ensure good air circulation around the bottles to prevent fungal diseases.
How long does it take to harvest bottle onions?
The time it takes to harvest bottle onions will depend on the type of onion you’re growing and the growing conditions. Green onions (scallions) can be harvested in as little as 3-4 weeks. Shallots and smaller bulb onions will take longer, typically 2-3 months. You can harvest green onions by snipping off the green tops as needed. To harvest shallots or bulb onions, wait until the tops have turned yellow and fallen over. Gently pull the onions from the bottles and allow them to cure in a warm, dry place for a few days before storing them.
Can I reuse the soil in the bottles?
It’s generally not recommended to reuse the soil in the bottles for growing onions, as it may be depleted of nutrients and harbor pests or diseases. However, you can amend the soil with compost or other organic matter to replenish the nutrients. If you suspect that the soil is contaminated with pests or diseases, it’s best to discard it and start with fresh soil. You can compost the old soil or use it to amend other garden beds.
What are some variations on this method?
There are many variations on this method of growing onions in bottles. You can use different types of bottles, such as glass bottles or milk jugs. You can also create a vertical garden by hanging the bottles from a fence or wall. Another variation is to use self-watering bottles, which have a reservoir of water at the bottom that slowly releases moisture into the soil. You can also experiment with different soil mixes and fertilizers to find what works best for your growing conditions. The possibilities are endless!
Leave a Comment