

Growing peanuts in pots might sound like a quirky experiment, but trust me, it’s a surprisingly rewarding and fun project! Have you ever wondered where those delicious peanuts in your favorite snack come from? While large-scale peanut farming is a modern marvel, the history of peanut cultivation stretches back thousands of years, with evidence suggesting they were first grown in South America. Imagine, ancient civilizations enjoying the same nutty goodness we do today!
But why should you consider growing peanuts in pots? Well, for starters, it’s a fantastic way to connect with nature, even if you only have a small balcony or patio. Plus, it’s a fantastic learning experience for kids (and adults!). More importantly, it allows you to enjoy fresh, homegrown peanuts, free from the chemicals and additives sometimes found in store-bought varieties. I’m going to share some simple DIY tricks and hacks that will make growing peanuts in pots a breeze, even if you don’t have a green thumb. Get ready to harvest your own nutty treasure!
Growing Peanuts in Pots: A Beginner’s Guide
Hey there, fellow gardening enthusiasts! Ever thought about growing your own peanuts? It might sound a little crazy, especially if you don’t live in a peanut-growing region, but trust me, it’s totally doable, and surprisingly rewarding, even in pots! I’m going to walk you through everything you need to know to successfully cultivate these little legumes right on your patio or balcony. Get ready for some homegrown goodness!
Choosing the Right Peanut Variety
First things first, not all peanut varieties are created equal when it comes to container gardening. Some are bushier and more compact, making them perfect for pots, while others are sprawling and need a lot more space. Here’s a breakdown of some good options:
* Valencia: These are known for their sweet flavor and multiple peanuts per shell. They tend to be more upright, which is great for containers.
* Spanish: These are smaller peanuts with reddish-brown skins. They’re also relatively compact and early-maturing, making them a good choice for shorter growing seasons.
* Runner: While typically grown in fields, some runner varieties can do well in larger containers. Just make sure you have enough space.
* Virginia: These are the largest peanuts, often sold as “ballpark peanuts.” They can be grown in pots, but you’ll need a very large container.
I personally recommend starting with Valencia or Spanish peanuts. They’re generally easier to manage in pots and give you a good chance of success.
Gathering Your Supplies
Okay, now that you’ve picked your peanut variety, let’s gather everything you’ll need. This is where the fun begins!
* Peanut Seeds: You can buy these online or at your local garden center. Make sure they’re raw, unsalted peanuts. Roasted peanuts won’t sprout. I usually buy organic seeds to avoid any unwanted chemicals.
* Large Pots: Peanuts need room to grow, especially underground. I recommend pots that are at least 12 inches in diameter and 12 inches deep. The bigger, the better, really.
* Well-Draining Potting Mix: This is crucial! Peanuts don’t like soggy soil. A mix of potting soil, compost, and perlite or vermiculite works well. I usually go for a mix that’s about 60% potting soil, 20% compost, and 20% perlite.
* Watering Can or Hose: You’ll need to water your peanuts regularly, especially during hot weather.
* Fertilizer (Optional): A balanced fertilizer can help your peanuts grow strong and healthy. I like to use a slow-release organic fertilizer.
* Trowel or Small Shovel: For planting your peanut seeds.
* Mulch (Optional): Mulch helps retain moisture and suppress weeds. I often use straw or shredded leaves.
Planting Your Peanut Seeds
Alright, let’s get those peanuts in the ground (or, in this case, in the pot!). This is a pretty straightforward process.
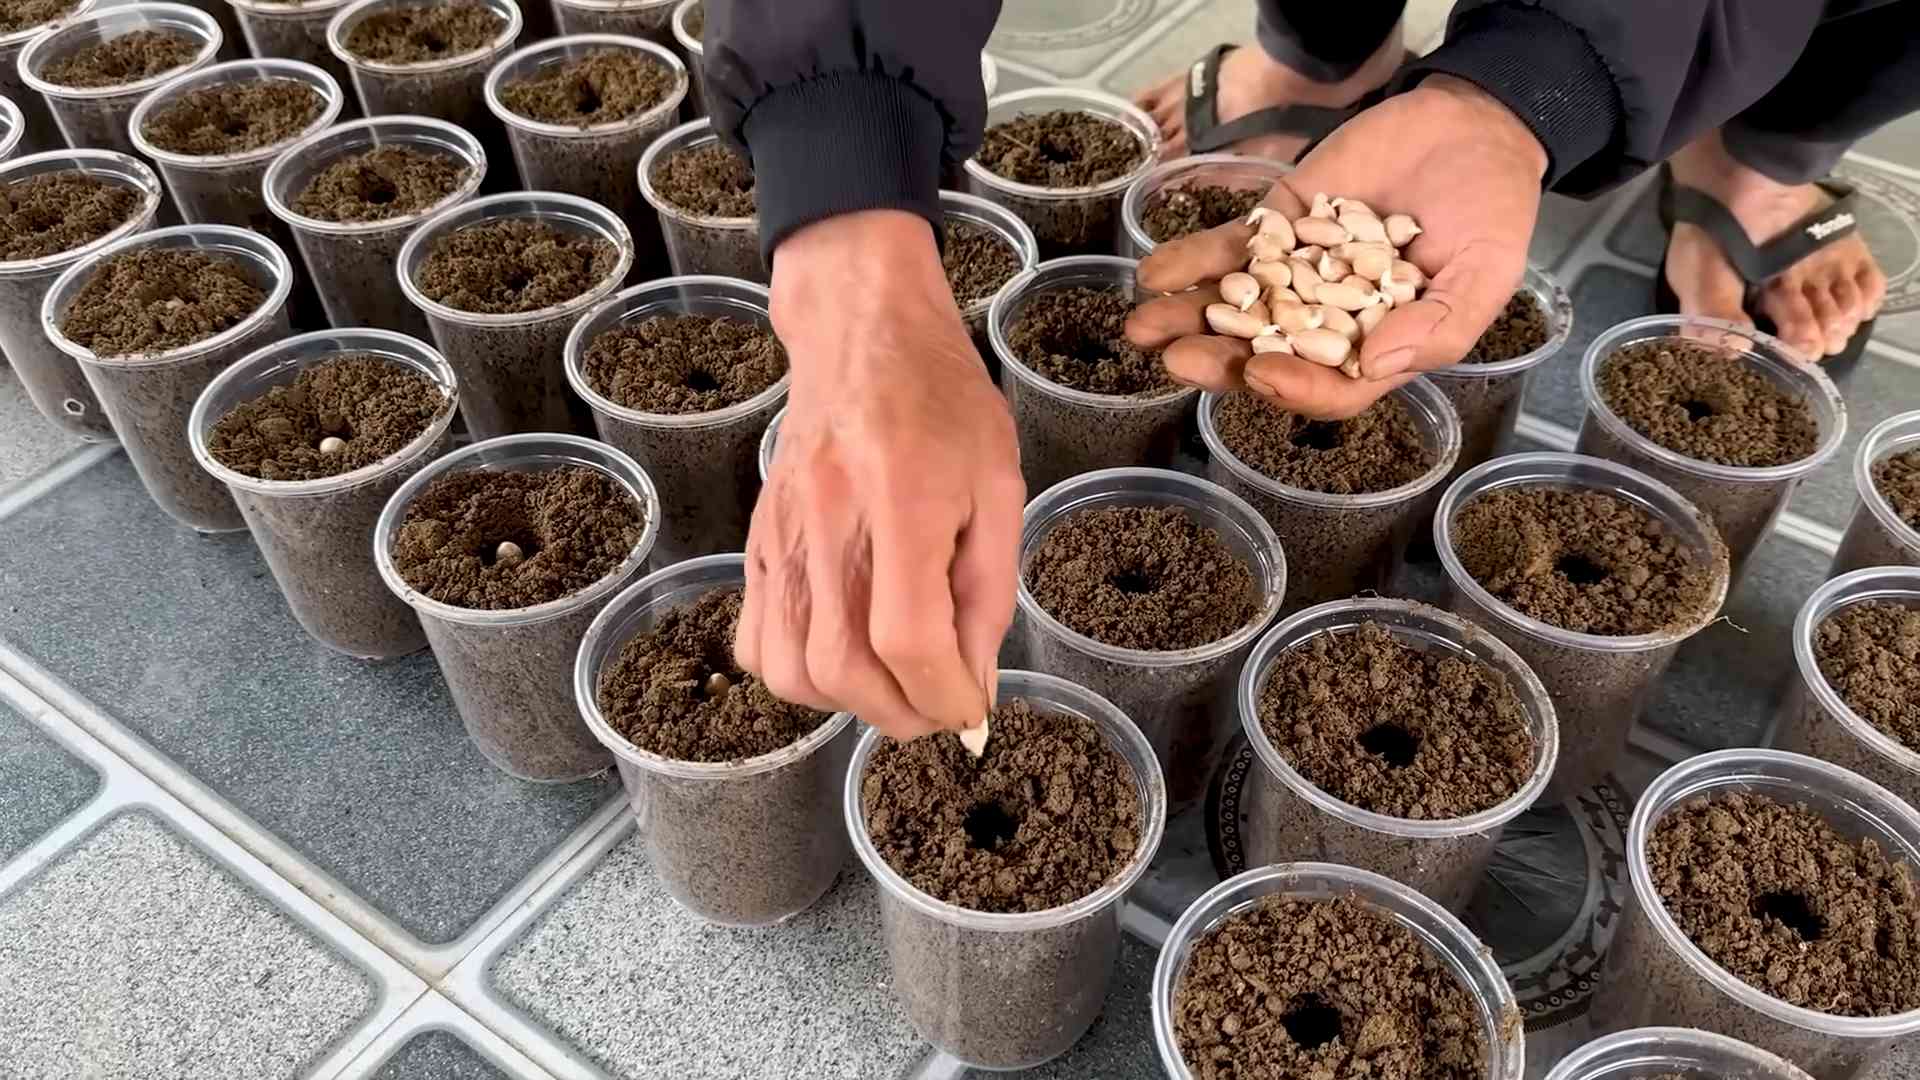
1. Prepare Your Pots: Fill your pots with the well-draining potting mix, leaving about an inch or two of space at the top.
2. Plant the Seeds: Make small holes about 1-2 inches deep and 6 inches apart. Place one peanut seed in each hole. If you’re using a very large pot, you can plant more seeds, but make sure they have enough space to grow.
3. Cover the Seeds: Gently cover the seeds with soil and pat it down lightly.
4. Water Thoroughly: Water the pots until the soil is evenly moist. Don’t overwater, though! You want the soil to be damp, not soggy.
5. Choose a Sunny Location: Peanuts need at least 6-8 hours of sunlight per day. Place your pots in a sunny spot on your patio or balcony.
Caring for Your Peanut Plants
Now that your peanuts are planted, it’s time to nurture them and watch them grow! Here’s what you need to do:
* Watering: Water your peanut plants regularly, especially during hot, dry weather. The soil should be consistently moist, but not waterlogged. I usually check the soil moisture every day and water when the top inch feels dry.
* Fertilizing: If you’re using fertilizer, follow the instructions on the package. I usually fertilize my peanut plants every few weeks with a balanced organic fertilizer.
* Weeding: Keep your pots free of weeds. Weeds can compete with your peanut plants for nutrients and water.
* Hilling: This is an important step! As your peanut plants grow, they’ll produce “pegs” that grow downwards from the plant and into the soil. These pegs are where the peanuts develop. To encourage peanut production, you’ll need to “hill” the soil around the base of the plants. This means adding more soil to cover the pegs. I usually do this every few weeks as the plants grow.
* Pest Control: Peanuts are generally pretty pest-resistant, but keep an eye out for aphids, spider mites, and other common garden pests. If you see any pests, you can try spraying them with insecticidal soap or neem oil.
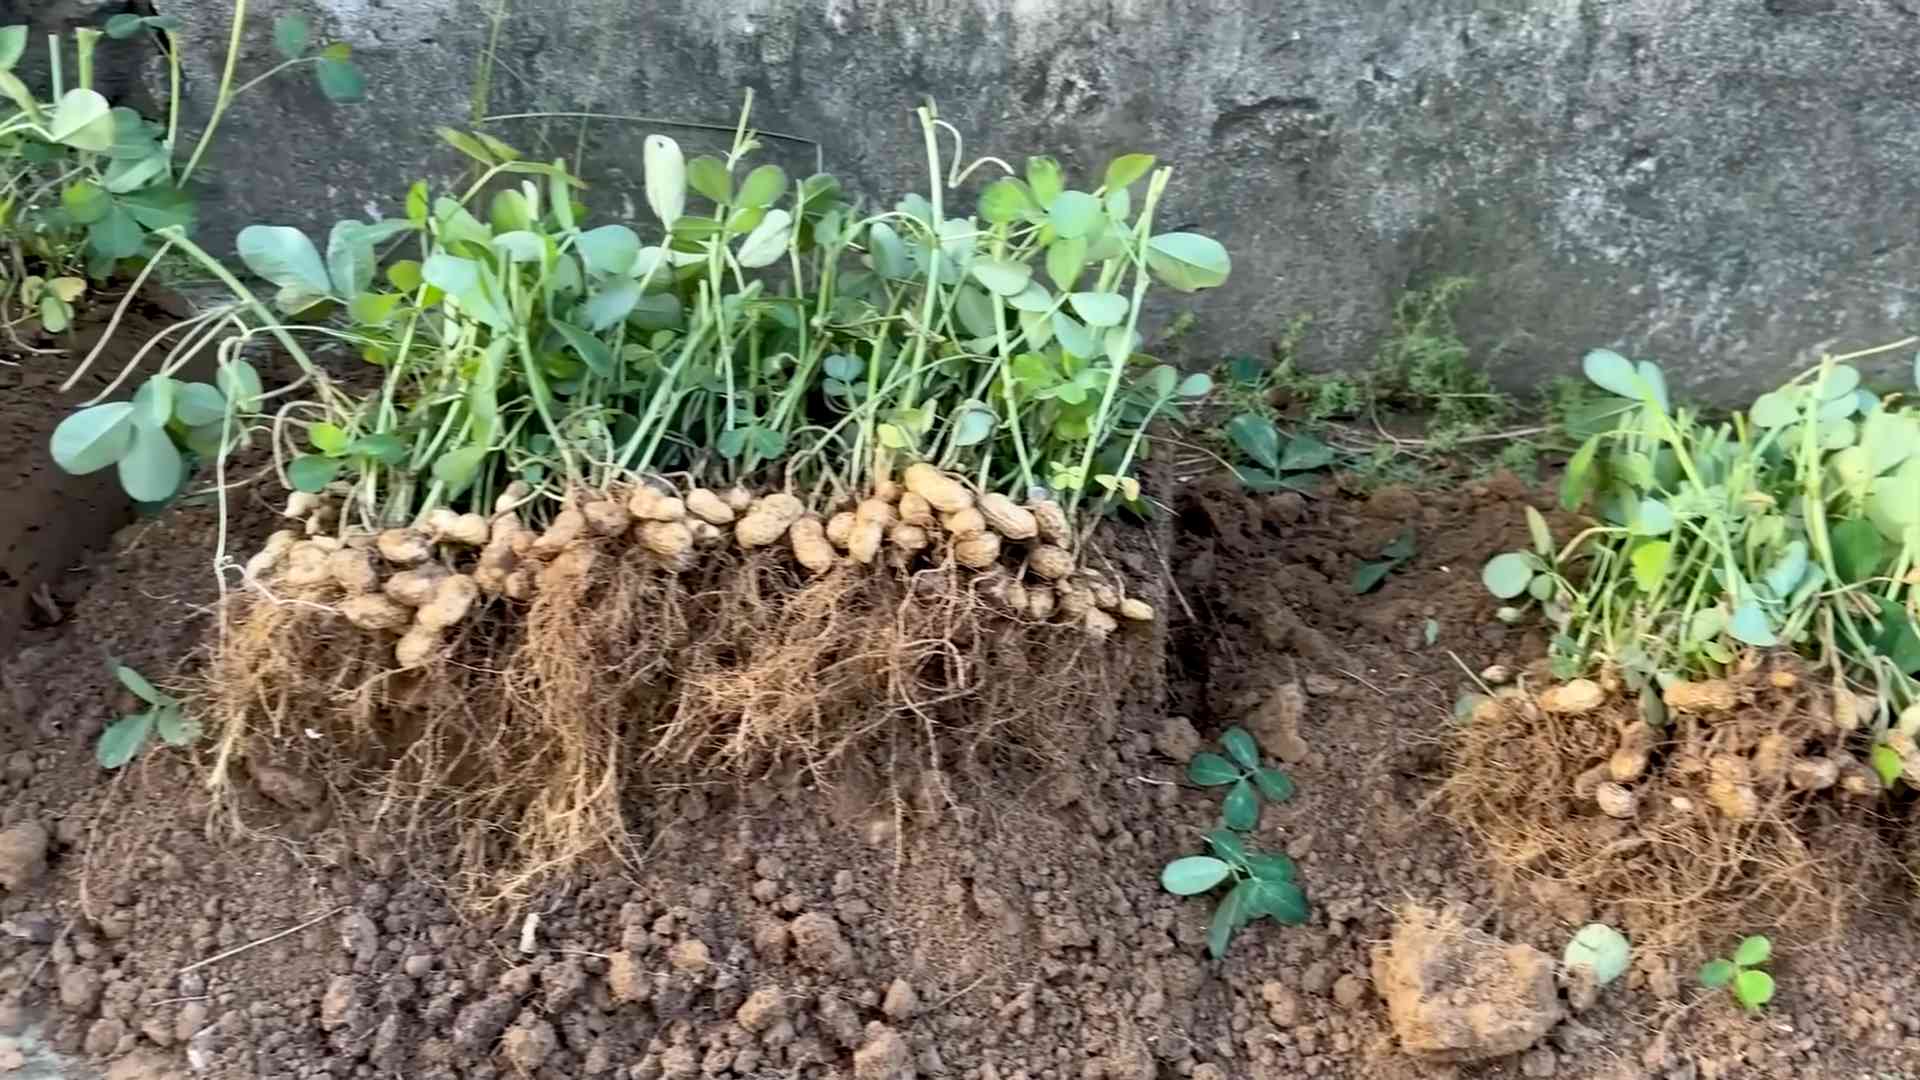
Harvesting Your Peanuts
This is the moment you’ve been waiting for! Harvesting your peanuts is the most rewarding part of the process. Here’s how to do it:
1. Timing is Key: Peanuts are usually ready to harvest about 120-150 days after planting, depending on the variety. A good indicator is when the leaves start to turn yellow and the plant begins to look a little tired.
2. Dig Them Up: Gently dig up the entire plant, being careful not to damage the peanuts. I usually use a garden fork to loosen the soil around the plant before pulling it up.
3. Shake Off the Soil: Shake off as much soil as possible from the roots and peanuts.
4. Curing the Peanuts: This is an important step to ensure your peanuts taste their best. Hang the entire plant upside down in a dry, well-ventilated place for about 2-4 weeks. This allows the peanuts to dry and cure. I usually hang them in my garage or shed.
5. Separate the Peanuts: Once the peanuts are cured, you can separate them from the plant.
6. Roasting (Optional): You can eat your peanuts raw, but they taste even better roasted! To roast them, spread them out on a baking sheet and bake them at 350 degrees Fahrenheit for about 20-25 minutes, or until they’re golden brown and fragrant.
Troubleshooting
Even with the best planning, things can sometimes go wrong. Here are a few common problems you might encounter and how to fix them:
* Poor Germination: If your peanut seeds don’t sprout, it could be due to several factors:
* Old Seeds: Make sure your seeds are fresh.
* Cold Soil: Peanuts need warm soil to germinate. Wait until the soil temperature is consistently above 65 degrees Fahrenheit before planting.
* Overwatering: Soggy soil can cause the seeds to rot.
* Yellowing Leaves: This could be a sign of nutrient deficiency. Try fertilizing your plants with a balanced fertilizer.
* Lack of Peanuts: If your plants are growing well but not producing peanuts, it could be due to:
* Insufficient Sunlight: Make sure your plants are getting enough sunlight.
* Poor Soil: Peanuts need well-draining soil.
* Lack of Hilling: Remember to hill the soil around the base of the plants to encourage peanut production.
* Pests: Keep an eye out for pests and treat them promptly.
Enjoying Your Homegrown Peanuts
Congratulations! You’ve successfully grown your own peanuts in pots. Now it’s time to enjoy the fruits (or, in this case, the legumes) of your labor. You can eat them raw, roasted, or use them in your favorite recipes. I love adding them to salads, stir-fries, and even desserts.
Growing peanuts in pots is a fun and rewarding experience. It’s a great way to connect with nature and enjoy fresh, homegrown food. So, what are you waiting for? Get out there and start planting! I promise, you won’t regret it. Happy gardening!
Conclusion
So, there you have it! Growing peanuts in pots is not only achievable, but it’s also a rewarding and surprisingly simple project that brings a touch of the farm to your home, regardless of your garden size. We’ve walked you through the entire process, from selecting the right variety to harvesting your very own homegrown peanuts.
Why is this DIY trick a must-try? Because it offers a unique connection to your food. There’s something incredibly satisfying about nurturing a plant from seed to harvest, especially when that harvest results in a delicious and nutritious snack. Plus, growing peanuts in pots is a fantastic educational opportunity for kids (and adults!), teaching them about plant life cycles and the origins of their food. It’s also a great way to control the growing environment, minimizing pests and diseases that might plague in-ground peanut crops.
But the best part? The taste! Freshly harvested, homegrown peanuts have a flavor that far surpasses anything you’ll find in a store. The subtle sweetness and nutty aroma are simply unmatched.
Now, let’s talk about variations. Feel free to experiment with different peanut varieties. Valencia peanuts, with their multiple small nuts per shell, are a great choice for pots. You can also try Spanish peanuts, known for their reddish skins and intense flavor. Consider adding companion plants to your peanut pots, such as marigolds to deter nematodes or basil to repel aphids. And if you’re feeling adventurous, try roasting your harvested peanuts with different spices like chili powder, garlic salt, or even a touch of cinnamon for a sweet and savory treat.
Don’t be afraid to get creative with your container choices, too. While we recommended a large pot, you can also use grow bags or even repurposed containers like old buckets or tubs, as long as they have adequate drainage. Just ensure the container is large enough to accommodate the peanut plant’s root system.
We truly believe that anyone can successfully grow peanuts in pots, even with limited space or gardening experience. It’s a fun, educational, and delicious project that will bring joy and satisfaction to your life.
So, what are you waiting for? Grab some peanut seeds, a pot, and some soil, and get started on your peanut-growing adventure today! We’re confident that you’ll be amazed by the results.
And most importantly, we want to hear about your experience! Share your photos, tips, and stories with us in the comments below. Let us know what peanut variety you chose, what challenges you faced, and what delicious creations you made with your homegrown peanuts. Your feedback will not only inspire others to try this DIY trick but also help us improve our guide and provide even better information in the future. Let’s build a community of peanut-growing enthusiasts! We are excited to see your peanut growing journey.
Frequently Asked Questions (FAQ)
What is the best time to start growing peanuts in pots?
The ideal time to start growing peanuts is in the spring, after the last frost. Peanuts need warm soil to germinate and thrive. If you live in a colder climate, you can start the seeds indoors 4-6 weeks before the last expected frost and then transplant them outdoors once the weather warms up. Make sure the soil temperature is consistently above 65°F (18°C) for optimal germination.
What kind of soil is best for growing peanuts in pots?
Peanuts prefer well-draining, sandy loam soil. Avoid heavy clay soils, as they can become waterlogged and hinder peanut development. You can create a suitable soil mix by combining equal parts of potting soil, sand, and compost. The compost will provide essential nutrients, while the sand will improve drainage. Ensure the pH of the soil is slightly acidic, around 6.0 to 6.5.
How often should I water my peanut plants in pots?
Water your peanut plants regularly, especially during hot and dry weather. The soil should be consistently moist but not waterlogged. Water deeply whenever the top inch of soil feels dry to the touch. Avoid overhead watering, as it can promote fungal diseases. Instead, water at the base of the plant. During the flowering and pegging stages, ensure adequate moisture to support peanut development.
How much sunlight do peanut plants need?
Peanut plants need at least 6-8 hours of direct sunlight per day to thrive. Choose a sunny location for your peanut pots where they will receive ample sunlight throughout the day. If you live in a particularly hot climate, provide some afternoon shade to prevent the plants from scorching. Insufficient sunlight can lead to poor growth and reduced peanut production.
How long does it take for peanuts to mature in pots?
Peanuts typically take 120-150 days to mature, depending on the variety and growing conditions. You’ll know they’re ready to harvest when the foliage starts to turn yellow and the pods feel plump and full. You can also dig up a few plants to check the peanut development. If the peanuts are mature and the shells are hard, it’s time to harvest.
Do I need to fertilize my peanut plants in pots?
Yes, peanut plants benefit from regular fertilization, especially during the early stages of growth. Use a balanced fertilizer with a ratio of 10-10-10 or 5-10-10. Avoid fertilizers that are high in nitrogen, as they can promote excessive foliage growth at the expense of peanut production. Fertilize every 4-6 weeks, following the instructions on the fertilizer package. You can also amend the soil with compost or other organic matter to provide slow-release nutrients.
What are some common pests and diseases that affect peanut plants in pots?
Common pests that can affect peanut plants include aphids, spider mites, and nematodes. Aphids and spider mites can be controlled with insecticidal soap or neem oil. Nematodes can be a more challenging problem, but you can use nematode-resistant peanut varieties or incorporate beneficial nematodes into the soil. Common diseases include leaf spot and root rot. Prevent these diseases by providing good air circulation, avoiding overhead watering, and using well-draining soil.
How do I harvest peanuts from pots?
To harvest peanuts, gently dig up the entire plant, being careful not to damage the pods. Shake off any excess soil and then hang the plants upside down in a warm, dry place for 2-3 weeks to cure. Curing allows the peanuts to dry out and develop their flavor. Once the peanuts are cured, you can remove them from the plants and store them in a cool, dry place.
Can I grow peanuts indoors?
While it’s possible to grow peanuts indoors, it can be challenging to provide the necessary conditions for optimal growth. Peanuts need a lot of sunlight, warm temperatures, and well-draining soil. If you want to try growing peanuts indoors, choose a sunny window or use grow lights to provide adequate illumination. Ensure the pot is large enough to accommodate the plant’s root system and provide good air circulation.
What are the benefits of growing peanuts in pots compared to in the ground?
Growing peanuts in pots offers several advantages over growing them in the ground. It allows you to control the growing environment, minimizing pests and diseases. It’s also a great option for people with limited space or poor soil conditions. Container gardening makes it easier to move the plants to a sunny location or protect them from frost. Additionally, harvesting peanuts from pots is much easier than digging them up from the ground.

Leave a Comment