

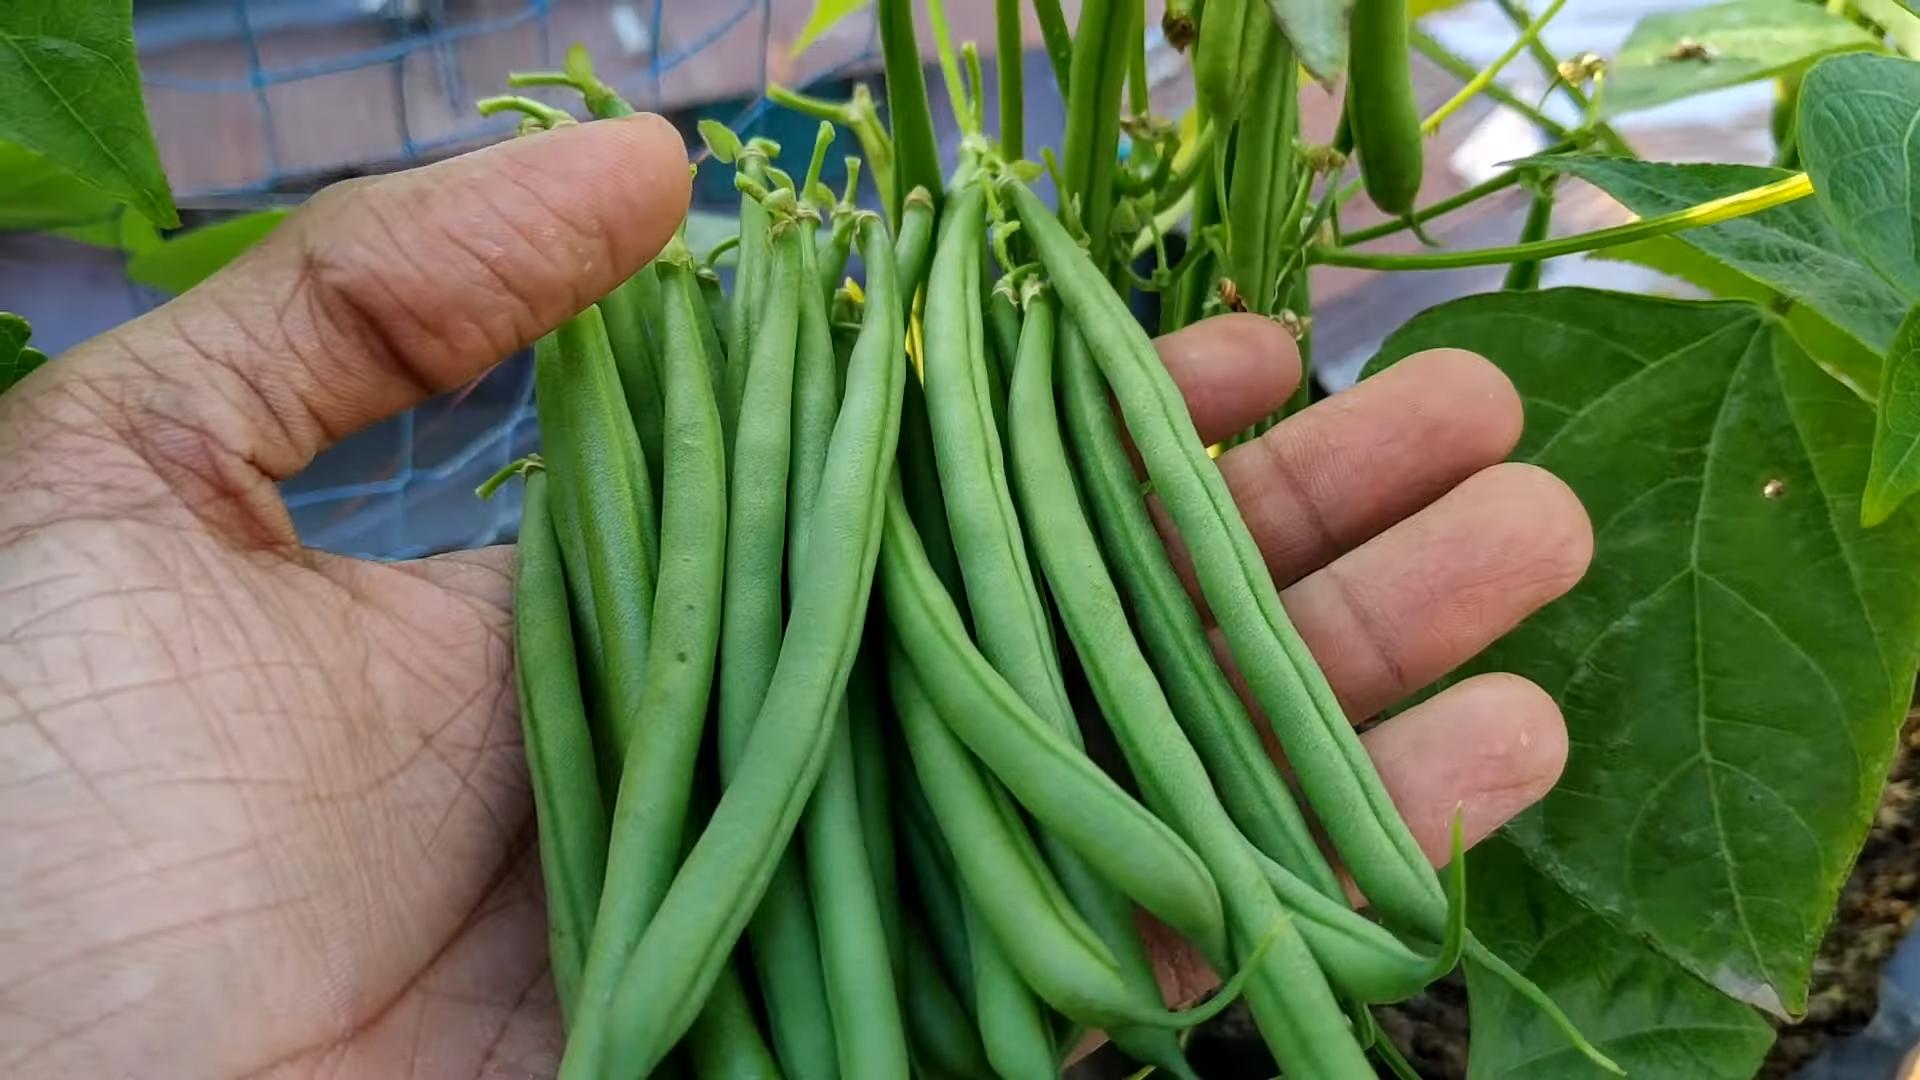
Grow French Beans at Home – imagine stepping into your garden and plucking fresh, crisp French beans, ready to be tossed into a vibrant salad or steamed as a delicious side dish. Sounds idyllic, right? Well, it’s more achievable than you might think! For centuries, cultivating your own food has been a source of sustenance and pride. From ancient Roman kitchen gardens to the victory gardens of wartime, the ability to nurture life from a tiny seed has always held a special significance.
But let’s be honest, modern life can feel a million miles away from the simple pleasure of gardening. That’s where these DIY tricks and hacks come in! I’m here to show you that you don’t need acres of land or a green thumb of legend to grow French beans at home successfully. Whether you have a sprawling garden, a sunny balcony, or just a windowsill, I’ll guide you through the process with easy-to-follow steps and clever tips that will have you harvesting your own bounty in no time.
Why is this DIY project so important? Because in a world of processed foods and long supply chains, knowing where your food comes from and having control over its quality is more valuable than ever. Plus, there’s nothing quite like the satisfaction of nurturing a plant from seed to table. So, let’s get our hands dirty and unlock the secrets to growing delicious French beans right in your own home!
Growing Potatoes in Buckets: A Beginner’s Guide
Hey there, fellow gardening enthusiasts! Ever dreamed of harvesting your own homegrown potatoes, fresh from the earth (or, in this case, a bucket)? Well, you’re in the right place! Growing potatoes in buckets is a fantastic way to enjoy a bountiful harvest, even if you’re short on space or dealing with less-than-ideal soil conditions. I’ve been doing this for a few years now, and trust me, it’s incredibly rewarding. Let’s dive into how you can grow your own spuds in buckets!
What You’ll Need
Before we get our hands dirty, let’s gather the essentials. Here’s a checklist of everything you’ll need to successfully grow potatoes in buckets:
* Buckets: 5-gallon buckets are ideal, but larger ones work too. Make sure they have drainage holes!
* Seed Potatoes: These are potatoes specifically grown for planting. You can find them at your local garden center.
* Potting Mix: A good quality potting mix is crucial. Avoid using garden soil, as it can compact and hinder drainage.
* Fertilizer: A balanced, slow-release fertilizer will provide your potatoes with the nutrients they need.
* Watering Can or Hose: For keeping your potatoes well-hydrated.
* Optional:
* Grow bags (as an alternative to buckets)
* Compost or well-rotted manure (to enrich the potting mix)
* Mulch (to help retain moisture)
Choosing the Right Seed Potatoes
Selecting the right seed potatoes is a key step. Here’s what to look for:
* Variety: Consider what kind of potatoes you enjoy eating. Some popular varieties for bucket growing include Yukon Gold, Red Pontiac, and Kennebec.
* Certified Seed Potatoes: These are disease-free and will give you the best chance of success.
* Size: Choose seed potatoes that are about the size of a chicken egg. Larger potatoes can be cut into pieces, ensuring each piece has at least one or two “eyes” (the little buds that will sprout).
Preparing Your Seed Potatoes
This step is optional, but I highly recommend it. It’s called “chitting” or “sprouting” your seed potatoes, and it gives them a head start.
1. Place the seed potatoes in a cool, bright location: An egg carton or a tray works well.
2. Wait for sprouts to appear: This usually takes a few weeks. The sprouts should be short, thick, and green.
3. Handle with care: Be gentle when handling the seed potatoes to avoid damaging the sprouts.
Planting Your Potatoes
Now for the fun part! Let’s get those potatoes in the buckets.
1. Prepare the bucket: Make sure your bucket has drainage holes. If not, drill a few in the bottom.
2. Add a layer of potting mix: Fill the bottom of the bucket with about 4-6 inches of potting mix.
3. Place the seed potatoes: Place the seed potatoes on top of the potting mix, with the sprouts facing upwards. If you cut your seed potatoes, make sure the cut side is facing down.
4. Cover with more potting mix: Cover the seed potatoes with another 4-6 inches of potting mix.
5. Water thoroughly: Water the soil until it’s evenly moist but not soggy.
The “Hilling” Process
This is where the magic happens! Hilling is the process of adding more soil to the bucket as the potato plants grow. This encourages the plants to produce more potatoes along the stem.
1. Wait for the plants to emerge: Once the potato plants have grown about 6-8 inches tall, it’s time to start hilling.
2. Add more potting mix: Add enough potting mix to cover the lower part of the stems, leaving only the top few leaves exposed.
3. Repeat the process: Continue hilling every few weeks as the plants grow taller. The goal is to fill the bucket almost to the top with potting mix.
4. Water after hilling: Water the soil thoroughly after each hilling.
Caring for Your Potato Plants
Consistent care is essential for a successful potato harvest.
1. Watering: Water your potato plants regularly, especially during dry periods. The soil should be consistently moist but not waterlogged. Check the soil moisture by sticking your finger into the soil. If the top inch feels dry, it’s time to water.
2. Fertilizing: Feed your potato plants with a balanced fertilizer every few weeks. Follow the instructions on the fertilizer package. You can also add compost tea to the soil for an extra boost of nutrients.
3. Sunlight: Potato plants need at least 6-8 hours of sunlight per day. Place your buckets in a sunny location.
4. Pest Control: Keep an eye out for pests like aphids, potato beetles, and flea beetles. If you spot any pests, take action immediately. You can use insecticidal soap or neem oil to control them.
5. Disease Prevention: Potato plants are susceptible to diseases like blight. To prevent diseases, make sure your plants have good air circulation and avoid overwatering. If you notice any signs of disease, remove the affected leaves immediately.
Harvesting Your Potatoes
The moment you’ve been waiting for! Here’s how to know when your potatoes are ready to harvest:
1. Check the foliage: The foliage will start to turn yellow and die back. This is a sign that the potatoes are mature.
2. Test harvest: Gently dig around in the soil to check the size of the potatoes. If they’re the size you want, it’s time to harvest.
3. Harvesting: Carefully dump the contents of the bucket onto a tarp or into a wheelbarrow. Gently sort through the soil and collect your potatoes.
4. Curing: Cure your potatoes by spreading them out in a cool, dark, and well-ventilated place for a week or two. This will help them to develop a thicker skin and store longer.
Troubleshooting
Even with the best care, you might encounter some challenges along the way. Here are a few common problems and how to address them:
* Lack of Potatoes:
* Insufficient Sunlight: Ensure your plants receive at least 6-8 hours of direct sunlight daily.
* Poor Soil: Use a high-quality potting mix and amend with compost.
* Inadequate Fertilization: Feed your plants regularly with a balanced fertilizer.
* Improper Hilling: Make sure you are hilling the plants as they grow to encourage more potato production.
* Small Potatoes:
* Overcrowding: Use a large enough bucket (at least 5 gallons) for each plant.
* Insufficient Watering: Keep the soil consistently moist, especially during tuber development.
* Nutrient Deficiency: Ensure your plants are getting enough nutrients through fertilization.
* Pests and Diseases:
* Aphids: Spray with insecticidal soap or neem oil.
* Potato Beetles: Handpick beetles and larvae or use an appropriate insecticide.
* Flea Beetles: Use row covers or apply an insecticide.
* Blight: Ensure good air circulation and avoid overwatering. Remove affected foliage immediately. Consider using a fungicide if the problem persists.
* Green Potatoes:
* Exposure to Light: Green potatoes contain solanine, which is toxic. Avoid eating green potatoes. To prevent greening, make sure the potatoes are completely covered with soil during hilling and store harvested potatoes in a dark place.
Choosing the Right Bucket
The type of bucket you use can impact your potato growing success.
* Size Matters: A 5-gallon bucket is a good starting point, but larger buckets (10 gallons or more) can accommodate more growth and potentially yield more potatoes.
* Material: Plastic buckets are common and readily available. Make sure they are food-grade if possible, especially if you are concerned about chemicals leaching into the soil. Fabric grow bags are another excellent option. They provide good drainage and aeration, which can promote healthier root growth.
* Color: Dark-colored buckets can absorb more heat, which can be beneficial in cooler climates. However, in hot climates, lighter-colored buckets may be preferable to prevent the soil from overheating.
* Drainage: Adequate drainage is crucial to prevent root rot. If your bucket doesn’t have drainage holes, drill several in the bottom.
Soil Considerations
The quality of your potting mix is paramount.
* Avoid Garden Soil: Garden soil tends to compact in containers, which can restrict root growth and drainage.
* Use a

Conclusion
So, there you have it! Growing French beans at home is not only achievable but also incredibly rewarding. From the satisfaction of nurturing a plant from seed to the joy of harvesting your own fresh, crisp beans, this DIY project offers a unique connection to your food. We’ve walked you through the simple steps, from selecting the right variety and preparing the soil to providing the necessary support and protection.
But why is this DIY trick a must-try? Beyond the obvious benefit of having access to fresh, organic produce, growing your own French beans allows you to control every aspect of the process. You can avoid harmful pesticides and herbicides, ensuring that your family is consuming healthy, wholesome food. Furthermore, it’s a fantastic way to reduce your carbon footprint by minimizing transportation and packaging. And let’s not forget the sheer enjoyment of gardening – a therapeutic activity that can reduce stress and improve your overall well-being.
Variations and Suggestions:
Don’t be afraid to experiment! Try different varieties of French beans, such as bush beans or pole beans, to see which ones thrive best in your garden. Consider companion planting – marigolds can deter pests, while nasturtiums can attract beneficial insects. You can also succession plant your beans, sowing new seeds every few weeks to ensure a continuous harvest throughout the growing season. If you’re short on space, try growing French beans in containers on your balcony or patio. Just make sure to choose a large enough pot and provide adequate support for the plants. For a unique twist, try pickling your French beans for a tangy and delicious treat. Or, blanch and freeze them for later use in soups, stews, and stir-fries.
A Call to Action:
We wholeheartedly encourage you to give this DIY trick a try. Whether you’re a seasoned gardener or a complete beginner, growing French beans at home is a fun and accessible project that anyone can enjoy. The taste of homegrown beans is simply unmatched, and the sense of accomplishment you’ll feel is truly priceless. So, grab your seeds, prepare your soil, and get ready to experience the joy of growing your own food.
And most importantly, we want to hear about your experience! Share your tips, tricks, and photos with us in the comments below. Let us know what varieties you’re growing, what challenges you’ve faced, and what successes you’ve achieved. Together, we can create a community of passionate gardeners who are dedicated to growing their own fresh, delicious French beans. Happy gardening!
Frequently Asked Questions (FAQ)
Q: What is the best time of year to plant French beans?
A: French beans are warm-season crops, so they should be planted after the last frost when the soil has warmed up to at least 60°F (15°C). In most regions, this is typically in late spring or early summer. You can also start seeds indoors a few weeks before the last frost to get a head start on the growing season. However, be careful when transplanting them, as they don’t like having their roots disturbed.
Q: How much sunlight do French beans need?
A: French beans need at least 6-8 hours of direct sunlight per day to thrive. Choose a sunny location in your garden where they will receive plenty of light throughout the day. If you’re growing them in containers, make sure to place them in a spot that gets ample sunlight. Insufficient sunlight can lead to leggy plants and reduced yields.
Q: What kind of soil is best for growing French beans?
A: French beans prefer well-drained, fertile soil with a pH between 6.0 and 7.0. Amend your soil with compost or other organic matter to improve drainage and fertility. Avoid heavy clay soils, as they can become waterlogged and inhibit root growth. A slightly sandy loam is ideal.
Q: How often should I water my French beans?
A: French beans need consistent moisture, especially during flowering and pod development. Water deeply and regularly, especially during dry spells. Avoid overhead watering, as this can promote fungal diseases. Instead, water at the base of the plants. Mulching around the plants can help retain moisture and suppress weeds.
Q: Do French beans need fertilizer?
A: French beans are relatively light feeders, but they will benefit from a balanced fertilizer applied at planting time. You can also side-dress them with a nitrogen-rich fertilizer a few weeks after they emerge. Avoid over-fertilizing, as this can lead to excessive foliage growth and reduced pod production. Using compost tea or other organic fertilizers can also provide essential nutrients.
Q: How do I support my French bean plants?
A: Pole beans require support, such as a trellis, fence, or teepee. Bush beans typically don’t need support, but they may benefit from staking if they become heavy with pods. Provide support early in the growing season to encourage the plants to climb and prevent them from falling over.
Q: What are some common pests and diseases that affect French beans?
A: Common pests of French beans include aphids, bean beetles, and spider mites. Diseases include powdery mildew, bean rust, and anthracnose. Inspect your plants regularly for signs of pests or diseases and take appropriate action. Organic pest control methods, such as insecticidal soap or neem oil, can be effective. Ensure good air circulation to prevent fungal diseases.
Q: When and how do I harvest French beans?
A: French beans are typically ready to harvest 50-60 days after planting. Harvest them when the pods are firm, crisp, and about the size of a pencil. Pick them regularly to encourage continued production. Snap the pods off the plant carefully to avoid damaging the stems. Overripe beans will become tough and stringy.
Q: Can I save seeds from my French bean plants?
A: Yes, you can save seeds from your French bean plants, but only if you are growing heirloom or open-pollinated varieties. Hybrid varieties will not produce true-to-type seeds. Allow some pods to mature fully on the plant until they are dry and brown. Shell the seeds and store them in a cool, dry place.
Q: Are there any companion plants that are beneficial for French beans?
A: Yes, several companion plants can benefit French beans. Marigolds can deter pests, while nasturtiums can attract beneficial insects. Other good companion plants include carrots, cucumbers, and rosemary. Avoid planting French beans near onions or garlic, as they can inhibit growth.
Leave a Comment