

Growing Sweet Potatoes Backyard might seem like a daunting task, conjuring images of sprawling farms and endless fields. But guess what? You don’t need acres of land to enjoy the sweet, earthy goodness of homegrown sweet potatoes! I’m here to tell you that even with a small backyard, or even just a sunny patio, you can cultivate your own delicious crop.
Sweet potatoes have a rich history, dating back thousands of years in Central and South America. They were a staple food for many indigenous cultures and eventually made their way across the globe, becoming a beloved ingredient in cuisines worldwide. Think about it – from sweet potato pie to savory fries, this versatile vegetable has truly earned its place in our hearts (and on our plates!).
But why bother with the effort of growing sweet potatoes backyard when you can just buy them at the store? Well, for starters, there’s nothing quite like the taste of a freshly harvested sweet potato. The flavor is simply unmatched! Plus, you’ll know exactly where your food is coming from and what went into growing it – no mystery chemicals or long-distance transportation involved. More importantly, in today’s world, where self-sufficiency and sustainable living are becoming increasingly important, learning to grow your own food is a valuable skill. It’s empowering, rewarding, and a fantastic way to connect with nature. So, let’s dive into some easy DIY tricks and hacks that will have you harvesting your own sweet potatoes in no time!
Growing Sweet Potatoes in Your Backyard: A Comprehensive DIY Guide
Hey there, fellow gardening enthusiasts! I’m so excited to share my tried-and-true method for growing sweet potatoes right in your own backyard. Forget those grocery store prices – with a little effort, you can harvest a bounty of these delicious and nutritious tubers. This guide will walk you through every step, from prepping your slips to harvesting your sweet potato treasure. Let’s get digging!
Getting Started: Preparing Your Sweet Potato Slips
Sweet potatoes aren’t grown from seeds, but from “slips,” which are sprouts that grow from a mature sweet potato. You can buy slips online or from a local nursery, but it’s much more rewarding (and cost-effective!) to grow your own. Here’s how:
* Choosing Your Sweet Potato: Select an organic sweet potato from the grocery store or, even better, one from a previous harvest. Look for one that’s firm and free of blemishes.
* Timing is Key: Start this process about 6-8 weeks before your last expected frost. Sweet potatoes need warm weather to thrive.
* The Water Method: This is my preferred method.
* Gather Your Supplies: You’ll need a sweet potato, a glass jar or container, toothpicks, and water.
* Suspending the Sweet Potato: Insert 3-4 toothpicks around the middle of the sweet potato.
* Partial Submersion: Fill the jar with water so that the bottom half of the sweet potato is submerged. The toothpicks will hold the sweet potato in place.
* Sunny Spot: Place the jar in a warm, sunny location.
* Water Changes: Change the water every few days to prevent mold growth.
* Patience is a Virtue: In a few weeks, you’ll start to see sprouts (slips) emerging from the sweet potato.
* The Soil Method: Another effective way to grow slips.
* Gather Your Supplies: You’ll need a sweet potato, a container with drainage holes, and potting soil.
* Planting the Sweet Potato: Bury the sweet potato horizontally in the potting soil, leaving the top third exposed.
* Watering: Water the soil thoroughly and keep it consistently moist, but not soggy.
* Warm Location: Place the container in a warm, sunny location.
* Wait for Sprouts: In a few weeks, slips will start to emerge from the sweet potato.
* Harvesting Your Slips: Once the slips are about 6-8 inches long, they’re ready to be harvested.
* Gently Twist and Pull: Carefully twist and pull the slips from the sweet potato. Try to get as much of the root as possible.
* Rooting the Slips: Place the slips in a glass of water for a few days until they develop roots. This will give them a better chance of survival when you transplant them into the garden.
Preparing Your Garden Bed
Sweet potatoes need well-drained soil and plenty of sunshine. Here’s how to get your garden bed ready:
* Sunlight is Essential: Choose a location that receives at least 6-8 hours of direct sunlight per day.
* Soil Preparation: Sweet potatoes prefer loose, sandy loam soil. If your soil is heavy clay, amend it with compost, aged manure, and sand to improve drainage.
* Tilling or Digging: Till or dig the soil to a depth of at least 12 inches. This will allow the sweet potatoes to grow easily.
* Mounding the Soil: Create raised rows or mounds about 12 inches high and 3-4 feet apart. This will improve drainage and provide more room for the sweet potatoes to develop.
* Fertilizing: Sweet potatoes don’t need a lot of fertilizer. In fact, too much nitrogen can lead to excessive vine growth and fewer sweet potatoes. A light application of a balanced fertilizer (like 10-10-10) before planting is sufficient. I prefer using compost tea for a more organic approach.
Planting Your Sweet Potato Slips
Now for the fun part – planting your slips!
1. Timing is Crucial: Wait until the soil has warmed up to at least 65°F (18°C) before planting. This is usually a few weeks after the last frost.
2. Watering the Slips: Before planting, water the slips thoroughly. This will help them establish roots quickly.
3. Planting Depth: Plant the slips about 4-6 inches deep, spacing them 12-18 inches apart along the raised rows or mounds.
Hey there, fellow gardening enthusiasts! I’m so excited to share my tried-and-true method for growing sweet potatoes right in your own backyard. Forget those grocery store prices – with a little effort, you can harvest a bounty of these delicious and nutritious tubers. This guide will walk you through every step, from prepping your slips to harvesting your sweet potato treasure. Let’s get digging!
Getting Started: Preparing Your Sweet Potato Slips
Sweet potatoes aren’t grown from seeds, but from “slips,” which are sprouts that grow from a mature sweet potato. You can buy slips online or from a local nursery, but it’s much more rewarding (and cost-effective!) to grow your own. Here’s how:
* Choosing Your Sweet Potato: Select an organic sweet potato from the grocery store or, even better, one from a previous harvest. Look for one that’s firm and free of blemishes.
* Timing is Key: Start this process about 6-8 weeks before your last expected frost. Sweet potatoes need warm weather to thrive.
* The Water Method: This is my preferred method.
* Gather Your Supplies: You’ll need a sweet potato, a glass jar or container, toothpicks, and water.
* Suspending the Sweet Potato: Insert 3-4 toothpicks around the middle of the sweet potato.
* Partial Submersion: Fill the jar with water so that the bottom half of the sweet potato is submerged. The toothpicks will hold the sweet potato in place.
* Sunny Spot: Place the jar in a warm, sunny location.
* Water Changes: Change the water every few days to prevent mold growth.
* Patience is a Virtue: In a few weeks, you’ll start to see sprouts (slips) emerging from the sweet potato.
* The Soil Method: Another effective way to grow slips.
* Gather Your Supplies: You’ll need a sweet potato, a container with drainage holes, and potting soil.
* Planting the Sweet Potato: Bury the sweet potato horizontally in the potting soil, leaving the top third exposed.
* Watering: Water the soil thoroughly and keep it consistently moist, but not soggy.
* Warm Location: Place the container in a warm, sunny location.
* Wait for Sprouts: In a few weeks, slips will start to emerge from the sweet potato.
* Harvesting Your Slips: Once the slips are about 6-8 inches long, they’re ready to be harvested.
* Gently Twist and Pull: Carefully twist and pull the slips from the sweet potato. Try to get as much of the root as possible.
* Rooting the Slips: Place the slips in a glass of water for a few days until they develop roots. This will give them a better chance of survival when you transplant them into the garden.
Preparing Your Garden Bed
Sweet potatoes need well-drained soil and plenty of sunshine. Here’s how to get your garden bed ready:
* Sunlight is Essential: Choose a location that receives at least 6-8 hours of direct sunlight per day.
* Soil Preparation: Sweet potatoes prefer loose, sandy loam soil. If your soil is heavy clay, amend it with compost, aged manure, and sand to improve drainage.
* Tilling or Digging: Till or dig the soil to a depth of at least 12 inches. This will allow the sweet potatoes to grow easily.
* Mounding the Soil: Create raised rows or mounds about 12 inches high and 3-4 feet apart. This will improve drainage and provide more room for the sweet potatoes to develop.
* Fertilizing: Sweet potatoes don’t need a lot of fertilizer. In fact, too much nitrogen can lead to excessive vine growth and fewer sweet potatoes. A light application of a balanced fertilizer (like 10-10-10) before planting is sufficient. I prefer using compost tea for a more organic approach.
Planting Your Sweet Potato Slips
Now for the fun part – planting your slips!
1. Timing is Crucial: Wait until the soil has warmed up to at least 65°F (18°C) before planting. This is usually a few weeks after the last frost.
2. Watering the Slips: Before planting, water the slips thoroughly. This will help them establish roots quickly.
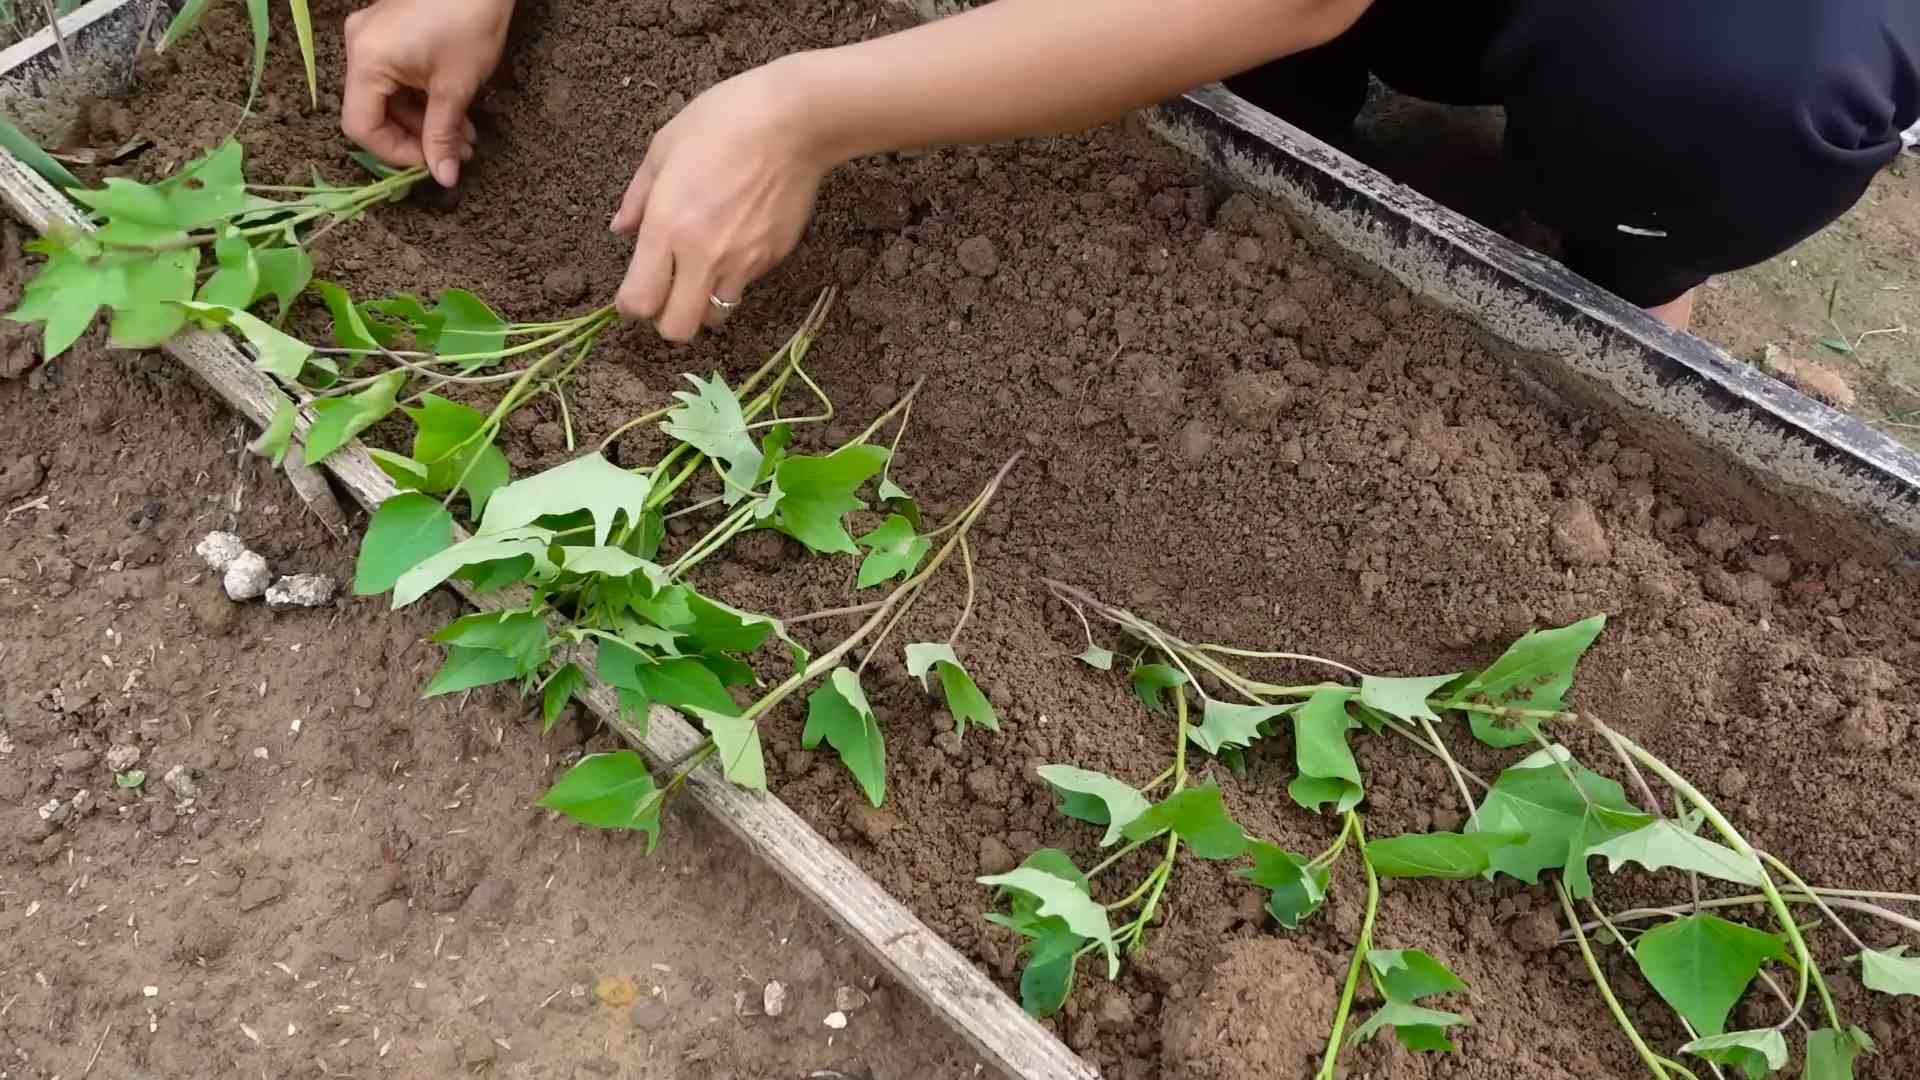
3. Planting Depth: Plant the slips about 4-6 inches deep, spacing them 12-18 inches apart along the raised rows or mounds.
4. Firming the Soil: Gently firm the soil around the slips to remove any air pockets.
5. Watering After Planting: Water the newly planted slips thoroughly.
6. Mulching (Optional): Mulch around the plants with straw or hay to help retain moisture and suppress weeds.
Caring for Your Sweet Potato Plants
Sweet potatoes are relatively low-maintenance, but here are a few things to keep in mind:
* Watering: Water regularly, especially during dry spells. Sweet potatoes need consistent moisture, but avoid overwatering, which can lead to root rot.
* Weeding: Keep the garden bed free of weeds, which can compete with the sweet potatoes for nutrients and water.
* Vine Training (Optional): Sweet potato vines can spread quite a bit. If you have limited space, you can train them to grow along a trellis or fence.
* Fertilizing (If Needed): If the plants are looking pale or stunted, you can apply a light application of a balanced fertilizer or compost tea.
* Pest Control: Sweet potatoes are generally pest-resistant, but watch out for pests like flea beetles and sweet potato weevils. Use organic pest control methods, such as insecticidal soap or neem oil, if necessary.
* Disease Prevention: Avoid overhead watering, which can promote fungal diseases. Ensure good air circulation around the plants.
Harvesting Your Sweet Potatoes
The moment you’ve been waiting for! Here’s how to harvest your sweet potatoes:
1. Timing is Everything: Sweet potatoes are typically ready to harvest about 90-120 days after planting. The leaves will start to turn yellow and the vines will begin to die back.
2. Choose a Dry Day: Harvest your sweet potatoes on a dry day to prevent rot.
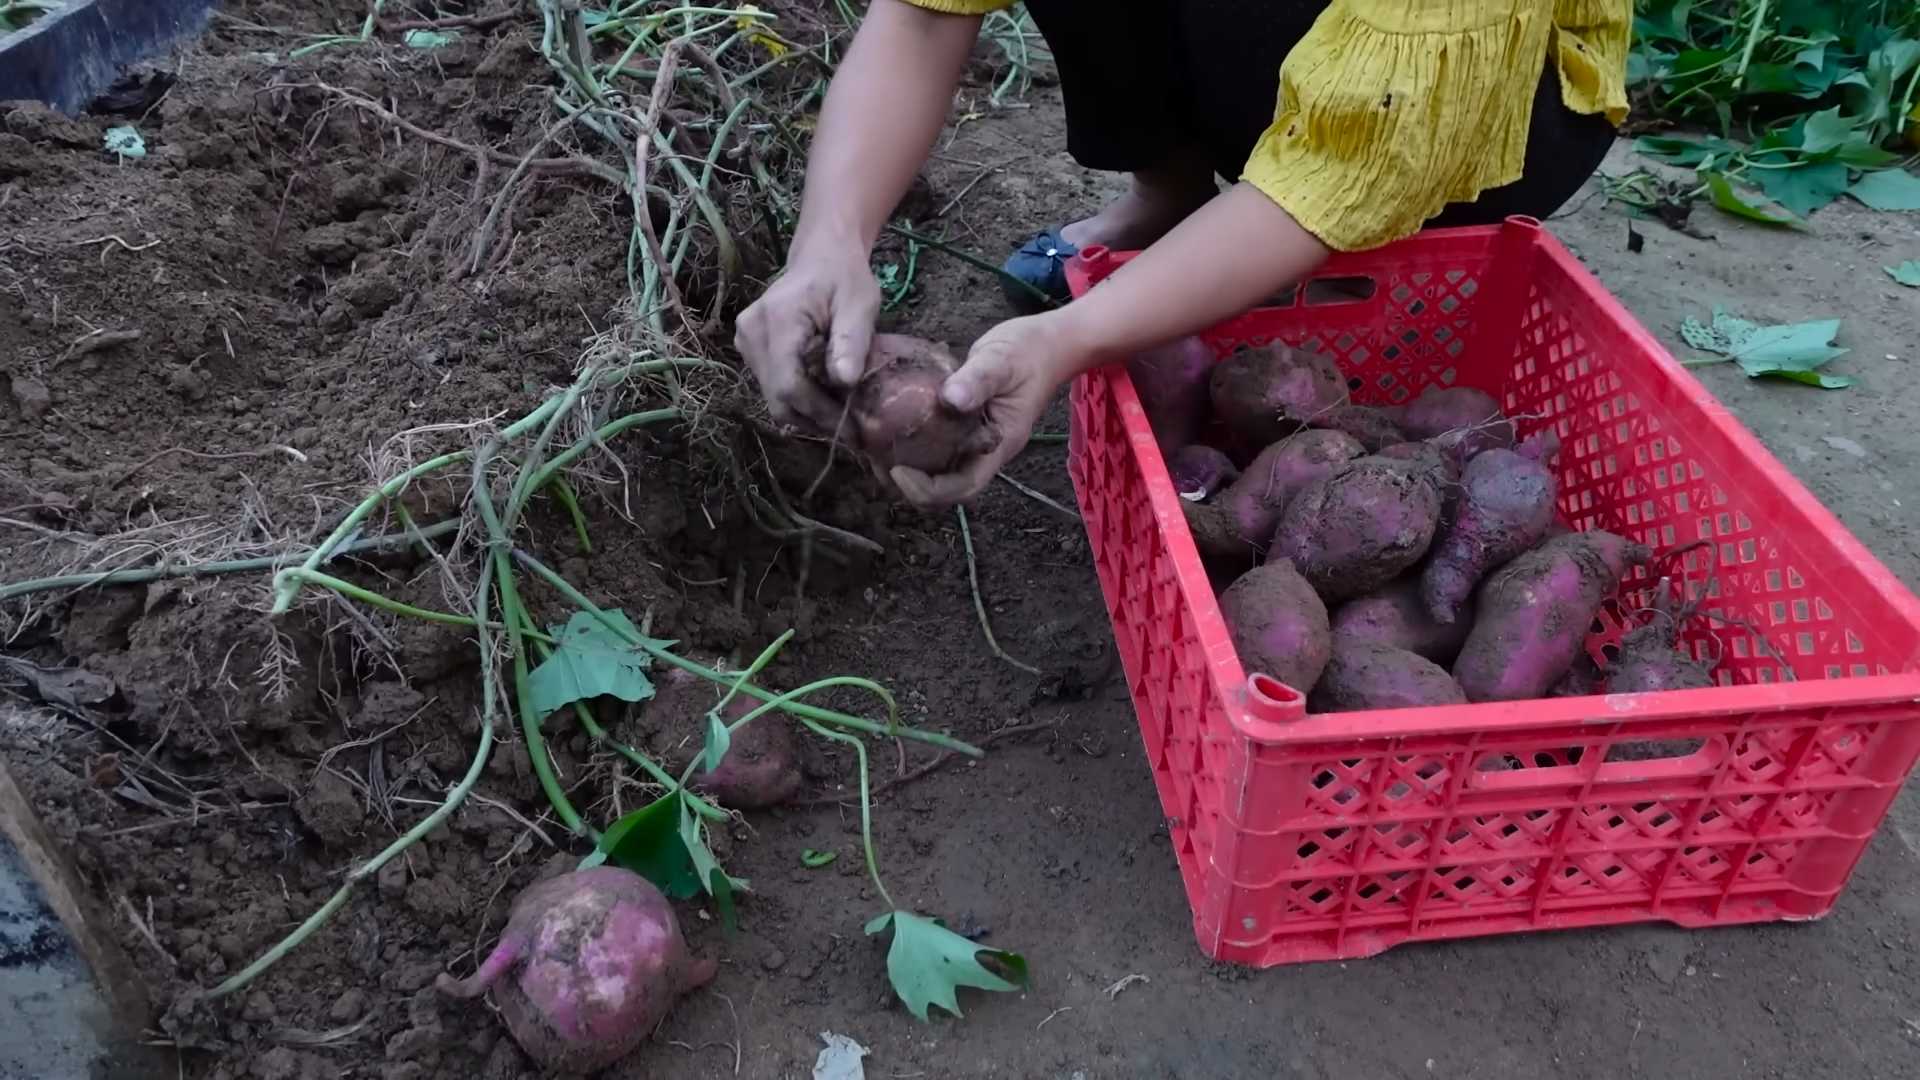
3. Dig Carefully: Use a garden fork or shovel to carefully dig around the plants, being careful not to damage the sweet potatoes. Start about a foot away from the plant and work your way inwards.
4. Lift the Plants: Gently lift the plants from the ground, being careful not to pull on the vines, which can break the sweet potatoes.
5. Brush Off the Soil: Brush off any excess soil from the sweet potatoes.
6. Curing Your Sweet Potatoes: This is a crucial step for improving the flavor and storage life of your sweet potatoes.
* Gentle Handling: Be very gentle when handling the sweet potatoes, as they bruise easily.
* Warm and Humid Environment: Place the sweet potatoes in a warm (80-85°F or 27-29°C) and humid (85-90% humidity) location for 7-10 days. A greenhouse or a warm, humid room in your house works well.
* Proper Air Circulation: Ensure good air circulation around the sweet potatoes to prevent mold growth.
* Turning the Sweet Potatoes: Turn the sweet potatoes every few days to ensure even curing.
7. Storing Your Sweet Potatoes: After curing, store your sweet potatoes in a cool (55-60°F or 13-16°C), dry, and dark location. A basement or root cellar is ideal.
* Avoid Refrigeration: Do not refrigerate sweet potatoes, as this will cause them to develop a hard core and lose their flavor.
* Proper Ventilation: Store the sweet potatoes in a well-ventilated container, such as a cardboard box or a mesh bag.
* Check Regularly: Check the sweet potatoes regularly for signs of rot and discard any that are damaged.
Troubleshooting Common Problems
Even with the best planning, you might encounter a few challenges. Here are some common problems and how to address them:
* Slips Not Sprouting: Make sure the sweet potato is in a warm, sunny location and that the water is changed regularly. Sometimes, it just takes time.
* Yellowing Leaves: This could be a sign of nutrient deficiency. Apply a light application of a balanced fertilizer or compost tea.
* Pest Infestation: Identify the pest and use appropriate organic pest control methods.
*
Conclusion
So, there you have it! Growing sweet potatoes in your backyard is not only achievable but also incredibly rewarding. From the vibrant green vines sprawling across your garden to the anticipation of unearthing those sweet, earthy treasures, the entire process is a joy. We’ve walked you through the steps, from preparing your slips to harvesting your bountiful crop, and hopefully, dispelled any myths about the difficulty of this endeavor.
Why is this DIY trick a must-try? Because it connects you to your food source in a way that simply buying produce from the store never can. You control the inputs, ensuring your sweet potatoes are grown organically and free from harmful chemicals. Plus, the flavor of a homegrown sweet potato, freshly dug from your own soil, is simply unparalleled. It’s sweeter, richer, and more intensely flavored than anything you’ll find on a supermarket shelf.
But the benefits extend beyond just taste. Growing your own sweet potatoes is a sustainable practice, reducing your carbon footprint and promoting biodiversity in your backyard. It’s also a fantastic way to get some exercise, relieve stress, and connect with nature. And let’s not forget the satisfaction of sharing your homegrown bounty with friends and family!
Looking for variations? Consider experimenting with different varieties of sweet potatoes. Beauregard is a classic choice, known for its orange flesh and sweet flavor. But there are also white-fleshed varieties like Japanese sweet potatoes, which are drier and starchier, or purple-fleshed varieties like Okinawan sweet potatoes, which are packed with antioxidants. You can also try growing your sweet potatoes in containers if you have limited space. Just make sure the containers are large enough to accommodate the growing tubers. Another fun variation is to train the vines to grow up a trellis, creating a beautiful and edible living wall.
Don’t be intimidated by the prospect of growing sweet potatoes. It’s easier than you think, and the rewards are well worth the effort. With a little planning and care, you can enjoy a delicious and nutritious harvest of homegrown sweet potatoes all season long.
We encourage you to give this DIY trick a try. Start small, perhaps with just a few slips, and see how it goes. You might be surprised at how successful you are! And most importantly, don’t forget to share your experience with us. We’d love to hear about your successes, your challenges, and any tips or tricks you discover along the way. Share your photos and stories on social media using #HomegrownSweetPotatoes. Let’s build a community of backyard sweet potato growers and inspire others to get their hands dirty!
So, grab your gardening gloves, prepare your soil, and get ready to experience the joy of growing your own sweet potatoes. You won’t regret it! This is a fantastic way to enjoy fresh, healthy produce and connect with nature. Happy gardening!
Frequently Asked Questions (FAQ)
What is the best time of year to plant sweet potato slips?
The ideal time to plant sweet potato slips is after the last frost, when the soil has warmed up to at least 65 degrees Fahrenheit. This typically occurs in late spring or early summer, depending on your climate. In warmer regions, you may be able to plant earlier, while in cooler regions, you may need to wait until later in the season. A good rule of thumb is to wait until the soil is warm enough to comfortably walk barefoot on. Planting too early in cold soil can stunt the growth of the slips and reduce your yield.
How much space do sweet potato plants need?
Sweet potato plants need plenty of space to spread out, as their vines can grow quite long. A good rule of thumb is to space the slips about 12-18 inches apart in rows that are 3-4 feet apart. This will give the plants enough room to grow without overcrowding each other. If you are growing sweet potatoes in containers, make sure the containers are large enough to accommodate the growing tubers. A 10-gallon container is a good size for a single sweet potato plant.
What kind of soil is best for growing sweet potatoes?
Sweet potatoes prefer well-drained, sandy loam soil that is rich in organic matter. They do not like heavy clay soil, which can become waterlogged and prevent the tubers from developing properly. Before planting, amend your soil with compost or other organic matter to improve drainage and fertility. Sweet potatoes also prefer slightly acidic soil, with a pH between 5.5 and 6.5. You can test your soil pH with a soil testing kit and amend it accordingly.
How often should I water sweet potato plants?
Sweet potato plants need consistent moisture, especially during the first few weeks after planting. Water deeply and regularly, especially during dry spells. Once the plants are established, you can reduce the frequency of watering, but make sure the soil remains consistently moist. Avoid overwatering, as this can lead to root rot. A good way to check if your plants need water is to stick your finger into the soil. If the top inch of soil is dry, it’s time to water.
Do sweet potato plants need fertilizer?
Sweet potato plants are not heavy feeders, but they do benefit from a balanced fertilizer. Apply a slow-release fertilizer at planting time, following the instructions on the package. Avoid using fertilizers that are high in nitrogen, as this can promote excessive vine growth at the expense of tuber development. You can also side-dress your plants with compost tea or other organic fertilizers during the growing season.
How do I know when my sweet potatoes are ready to harvest?
Sweet potatoes are typically ready to harvest about 90-120 days after planting. The leaves will start to turn yellow and the vines will begin to die back. You can also dig up a test potato to check its size and maturity. To harvest, carefully dig around the plants with a garden fork, being careful not to damage the tubers. Gently lift the plants from the soil and brush off any excess dirt.
How should I cure and store my sweet potatoes?
Curing sweet potatoes is essential for developing their sweetness and improving their storage life. After harvesting, gently brush off any excess dirt and allow the sweet potatoes to dry in a warm, well-ventilated place for about 1-2 weeks. The ideal curing temperature is around 85-90 degrees Fahrenheit with high humidity. After curing, store the sweet potatoes in a cool, dark, and dry place, such as a basement or root cellar. The ideal storage temperature is around 55-60 degrees Fahrenheit. Properly cured and stored sweet potatoes can last for several months.
Can I grow sweet potatoes from store-bought sweet potatoes?
Yes, you can grow sweet potatoes from store-bought sweet potatoes, but it’s not always guaranteed to be successful. Choose organic sweet potatoes, as conventionally grown sweet potatoes may be treated with chemicals that prevent sprouting. To sprout a sweet potato, suspend it in a jar of water, with the bottom half submerged. Place the jar in a warm, sunny location and wait for sprouts to emerge. Once the sprouts are several inches long, you can carefully remove them and plant them in soil.
Are sweet potato leaves edible?
Yes, sweet potato leaves are edible and nutritious. They can be eaten raw in salads or cooked like spinach. The leaves are a good source of vitamins A and C, as well as fiber and antioxidants. Choose young, tender leaves for the best flavor. Avoid eating leaves that have been treated with pesticides or herbicides.
What are some common pests and diseases that affect sweet potato plants?
Some common pests that affect sweet potato plants include sweet potato weevils, flea beetles, and aphids. Diseases that can affect sweet potato plants include fusarium wilt, stem rot, and black rot. To prevent pests and diseases, practice good garden hygiene, such as removing weeds and debris from around the plants. You can also use organic pest control methods, such as insecticidal soap or neem oil. Choose disease-resistant varieties of sweet potatoes whenever possible.

Leave a Comment