

Hanging melon growing DIY: Ever dreamt of a lush, vibrant garden overflowing with juicy melons, but thought you didn’t have the space? I’m here to tell you that dream can absolutely become a reality, even if you’re working with a tiny balcony or just a sunny corner! Forget sprawling vines taking over your precious garden real estate. This article is your ultimate guide to a clever, space-saving, and frankly, quite impressive method: growing melons in hanging baskets!
The concept of vertical gardening, including hanging plants, has been around for centuries, with roots in ancient civilizations like the Hanging Gardens of Babylon. While they might not have been growing melons in quite the same way we are, the idea of maximizing space and bringing greenery to new heights is a time-honored tradition.
But why should you try hanging melon growing DIY? Well, besides the obvious space-saving benefits, it also offers better air circulation, reducing the risk of fungal diseases. Plus, it keeps those delicious melons off the ground, away from pests and potential rot. Imagine the satisfaction of harvesting your own sweet, homegrown melons from a beautiful hanging display! I’m excited to share my best tips and tricks to help you achieve a bountiful harvest, no matter how small your garden may be. Let’s get started!
DIY Hanging Melon Trellis: Grow Deliciousness Vertically!
Hey there, fellow gardeners! Are you dreaming of juicy, homegrown melons but short on space? Or maybe you just want to add a touch of whimsy to your garden? Well, I’ve got the perfect solution: a DIY hanging melon trellis! This project is surprisingly easy, budget-friendly, and incredibly rewarding. Trust me, there’s nothing quite like harvesting a perfectly ripe melon that you grew hanging in the air!
This guide will walk you through every step, from gathering your materials to supporting those heavy fruits. Let’s get started!
Materials You’ll Need:
Before we dive in, let’s gather our supplies. I’ve tried to keep this list as accessible as possible, using materials you might already have around the house or can easily find at your local hardware store.
* Sturdy Trellis: This is the backbone of our project. You can use a pre-made metal trellis, a repurposed pallet (carefully sanded and treated, of course!), or even build your own from wood or bamboo. The size will depend on the type of melon you’re growing. For smaller melons like cantaloupe, a 4×4 foot trellis should be sufficient. For larger watermelons, you might need something bigger.
* Heavy-Duty Hanging Hardware: We need something strong to support the weight of the trellis and the melons. I recommend using heavy-duty eye bolts, S-hooks, and chain. Make sure the weight rating of your hardware exceeds the expected weight of your mature melons. Safety first!
* Strong Rope or Twine: This will be used to create slings for supporting the melons as they grow. Jute twine, nylon rope, or even repurposed pantyhose (yes, really!) work well.
* Potting Soil: Choose a high-quality potting mix that’s well-draining and rich in nutrients. Melons are heavy feeders!
* Melon Seedlings or Seeds: Select your favorite melon variety! Consider the size of the mature fruit when choosing. Bush varieties are generally better suited for hanging trellises than sprawling vine types.
* Large Container: You’ll need a large pot or container to house your melon plant. A 15-20 gallon container is a good starting point. Make sure it has drainage holes!
* Drill and Drill Bits: For attaching the hanging hardware to the trellis and container.
* Measuring Tape: To ensure accurate placement of hardware.
* Gloves: To protect your hands.
* Optional: Landscape fabric, compost, fertilizer, mulch.
Building Your Hanging Melon Trellis: Step-by-Step
Now for the fun part! Let’s assemble our hanging melon trellis.
1. Prepare the Trellis:
* If you’re using a pre-made trellis, inspect it for any damage and make sure it’s sturdy.
* If you’re building your own trellis, now’s the time to assemble it. Use strong joints and weather-resistant materials.
* If you’re repurposing a pallet, carefully sand it down to remove any splinters and apply a sealant or paint to protect it from the elements.
2. Attach the Hanging Hardware to the Trellis:
* Measure and mark the locations for your eye bolts on the top of the trellis. I recommend placing them at the corners for maximum stability.
* Drill pilot holes at the marked locations.
* Screw in the eye bolts securely.
3. Prepare the Container:
* If your container doesn’t have drainage holes, drill some in the bottom. Melons don’t like soggy roots!
* Line the bottom of the container with landscape fabric to prevent soil from washing out.
4. Attach Hanging Hardware to the Container (Optional):
* If you want to hang the entire container along with the trellis, repeat steps 2 and 3 to attach eye bolts to the container. This is optional, as you can also place the container on a sturdy stand or hang it separately.
5. Hang the Trellis:
* Find a strong support structure to hang your trellis from. This could be a sturdy tree branch, a pergola, or a specially built frame.
* Attach the chain to the eye bolts on the trellis using S-hooks.
* Hang the trellis from your support structure. Make sure it’s level and secure.
* If you’re hanging the container as well, attach it to the trellis or hang it separately.
6. Fill the Container with Potting Soil:
* Fill the container with your chosen potting mix, leaving a few inches of space at the top.
* Mix in some compost or slow-release fertilizer to give your melon plants a boost.
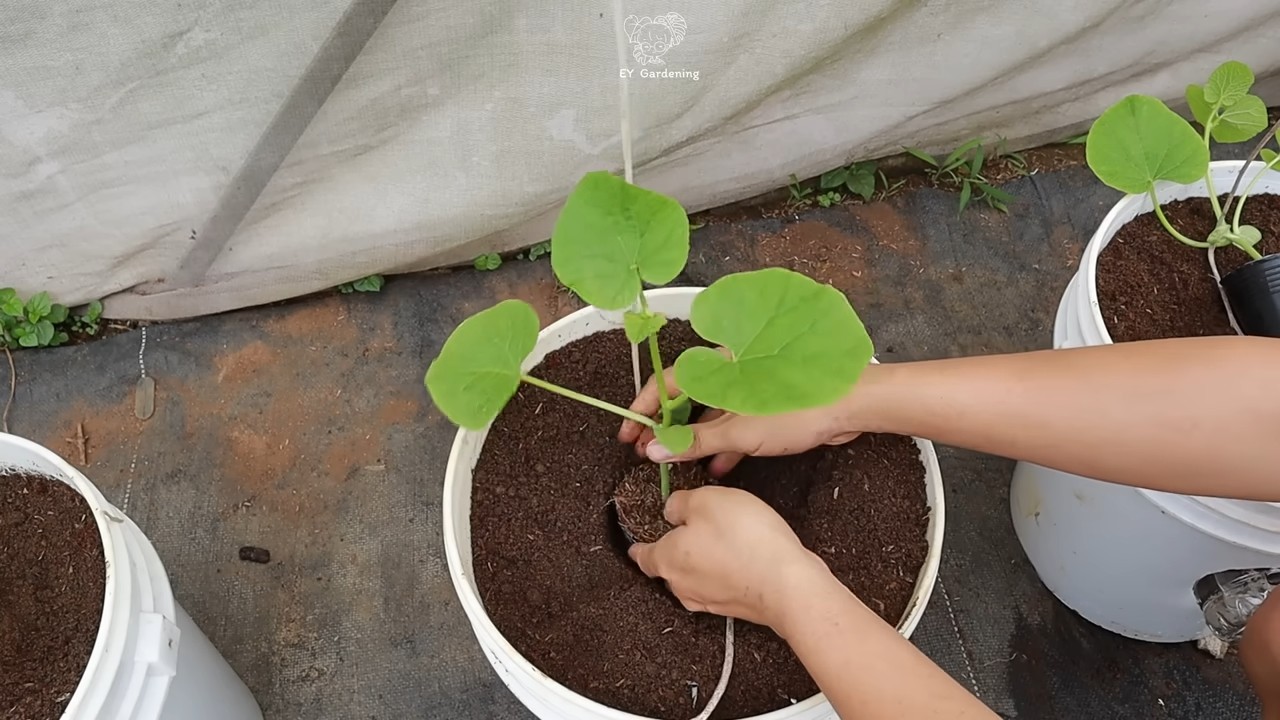
Planting Your Melon Seedlings:
Alright, trellis is up, container is ready, now let’s get those melon babies in the ground!
1. Plant the Seedlings:
* Gently remove the melon seedlings from their containers.
* Plant them in the prepared container, spacing them according to the variety’s recommendations. Usually, one or two plants per container is sufficient.
* Water thoroughly after planting.
2. Mulch Around the Plants:
* Apply a layer of mulch around the base of the plants to help retain moisture and suppress weeds.
3. Water Regularly:
* Melons need consistent moisture, especially during hot weather. Water deeply whenever the top inch of soil feels dry.
Supporting Your Growing Melons:
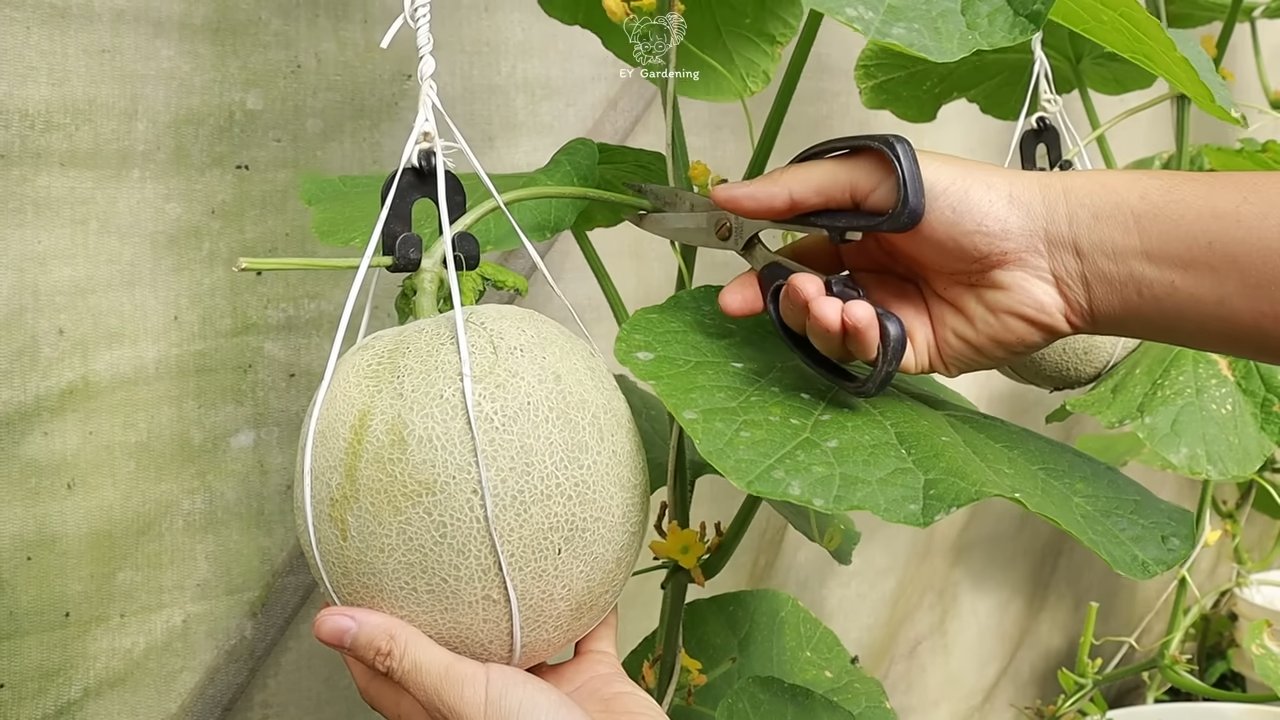
This is where the rope or twine comes in! As your melons grow, they’ll need support to prevent them from breaking off the vine.
1. Create Slings:
* Cut lengths of rope or twine long enough to create a sling that will cradle the melon.
* Tie the ends of the rope or twine together to form a loop.
2. Support the Melons:
* As the melons start to develop, gently place them in the slings.
* Attach the slings to the trellis, ensuring that the melon is well-supported.
* Adjust the slings as the melons grow to provide adequate support.
* For larger melons, you might need to use multiple slings.
* Pro Tip: Pantyhose are surprisingly effective for creating slings! They’re stretchy, breathable, and won’t damage the fruit.
Caring for Your Hanging Melon Plants:
Now that your melons are planted and supported, it’s time to provide them with the care they need to thrive.
1. Fertilize Regularly:
* Melons are heavy feeders and need regular fertilization to produce abundant fruit.
* Use a balanced fertilizer or a fertilizer specifically formulated for fruiting plants.
* Follow the instructions on the fertilizer label.
2. Prune the Vines:
* Pruning can help to improve air circulation and encourage fruit production.
* Remove any dead or yellowing leaves.
* Pinch off the tips of the vines to encourage branching.
3. Watch Out for Pests and Diseases:
* Keep an eye out for common melon pests like aphids, squash bugs, and vine borers.
* Treat any infestations promptly with organic pest control methods.
* Ensure good air circulation to prevent fungal diseases.
4. Provide Plenty of Sunlight:
* Melons need at least 6-8 hours of sunlight per day to thrive.
* Choose a location for your hanging trellis that receives plenty of sunlight.
Harvesting Your Hanging Melons:
The moment we’ve all been waiting for! Harvesting your homegrown melons is the ultimate reward for your hard work.
1. Check for Ripeness:
* The signs of ripeness vary depending on the melon variety.
* Generally, ripe melons will have a fragrant aroma, a dull rind, and a slight give when pressed.
* The stem where the melon attaches to the vine will also start to dry out.
2. Harvest Carefully:
* Use a sharp knife or pruning shears to cut the melon from the vine.
* Leave a short piece of the stem attached to the melon.
* Handle the melon gently to avoid bruising.
3. Enjoy Your Harvest!
* Refrigerate your melons for a few hours before enjoying them for the best flavor.
* Share your bounty with friends and family!
Troubleshooting Tips:
Even with the best planning, things don’t always go perfectly. Here are a few common issues you might encounter and how to address them:
* Melons are not setting fruit: This could be due to a lack of pollination. You can hand-pollinate the flowers by transferring pollen from the male flowers to the female flowers using a small brush.
*
Conclusion
So, there you have it! This simple yet ingenious DIY trick for hanging melon growing is more than just a gardening novelty; it’s a game-changer for maximizing space, preventing rot, and ultimately, harvesting healthier, more delicious melons. We’ve walked you through the process, highlighting the benefits and offering practical tips to ensure your success.
Why is this a must-try? Imagine a garden bursting with vibrant green foliage, punctuated by the delightful sight of melons suspended gracefully in mid-air. Beyond the aesthetic appeal, this method actively combats common melon-growing problems. Ground contact often leads to rot and pest infestations, especially in humid climates. By lifting your melons off the ground, you’re creating a healthier environment, promoting better air circulation, and reducing the risk of disease. Plus, for those with limited garden space, vertical gardening is a lifesaver, allowing you to grow more in less area.
But the beauty of this DIY project lies in its adaptability. Feel free to experiment with different materials for your slings or supports. Upcycled t-shirts, burlap sacks, or even repurposed netting can all work wonders. Consider the size and weight of your melon variety when choosing your materials. For smaller melons like cantaloupe or honeydew, lighter fabrics will suffice. For larger watermelons, you’ll need something sturdier, like heavy-duty netting or a reinforced sling.
Another variation to consider is the type of support structure you use. While we’ve suggested using existing structures like trellises or fences, you can also create your own custom supports using PVC pipes or wooden frames. This allows you to tailor the setup to your specific garden layout and melon-growing needs. Think about adding decorative elements to your supports to enhance the visual appeal of your garden.
Don’t be afraid to get creative with your melon placement, too. Experiment with different heights and spacing to optimize sunlight exposure and air circulation. Remember to monitor your melons regularly, adjusting the slings or supports as needed to accommodate their growth.
This DIY project isn’t just about growing melons; it’s about fostering a deeper connection with nature, embracing sustainable practices, and enjoying the satisfaction of harvesting your own homegrown produce. It’s about problem-solving, creativity, and the simple joy of watching something grow from seed to fruition.
We are confident that this hanging melon growing technique will transform your gardening experience. It’s a simple, effective, and rewarding way to cultivate delicious melons while maximizing space and minimizing problems.
So, what are you waiting for? Gather your materials, choose your melon variety, and embark on this exciting gardening adventure. We encourage you to try this DIY trick and witness the difference it makes in your melon harvest.
And most importantly, we want to hear about your experiences! Share your photos, tips, and stories with us in the comments below. Let’s create a community of passionate gardeners who are dedicated to growing the best melons possible. Your insights and feedback will help us refine this technique and inspire others to embrace the joys of hanging melon growing. Happy gardening!
Frequently Asked Questions (FAQ)
What types of melons are best suited for hanging?
While many melon varieties can be grown using this method, smaller to medium-sized melons tend to be the most manageable. Cantaloupe, honeydew, and smaller watermelon varieties like Sugar Baby are excellent choices. Larger watermelons can be grown using this method, but require significantly stronger support structures and slings. Consider the mature weight of the melon when selecting your variety and planning your support system.
How do I know when my melon is ripe if it’s hanging?
Determining ripeness for hanging melons is similar to ground-grown melons, but you’ll need to rely more on visual and olfactory cues. Look for changes in color, such as a deepening of the rind color or a slight yellowing of the underside. The stem should also start to dry and crack near the point where it connects to the melon. Give the melon a gentle tap; a ripe melon will sound hollow. Finally, sniff the melon near the stem end; a ripe melon will have a sweet, fruity aroma. Remember that experience is the best teacher, so pay close attention to your melons and learn to recognize the signs of ripeness.
What kind of material should I use for the sling?
The best material for your melon sling depends on the size and weight of the melon you’re growing. For smaller melons, breathable fabrics like old t-shirts, burlap, or netting are suitable. For larger watermelons, you’ll need something stronger, such as heavy-duty netting, reinforced burlap, or even a purpose-built melon hammock. Ensure the material is strong enough to support the weight of the melon as it grows, and that it won’t rot or degrade in the elements. Avoid using materials that could cut into the melon’s rind.
How high off the ground should I hang the melons?
The ideal height for hanging your melons is typically between 12 and 18 inches off the ground. This provides ample air circulation, reduces the risk of soil-borne diseases, and makes it easier to monitor the melons’ growth and ripeness. However, you may need to adjust the height depending on the size of your melon variety and the available space in your garden. Ensure the melons are high enough to avoid contact with the ground, but not so high that they are difficult to reach for harvesting.
Will hanging the melons affect their taste or texture?
No, hanging the melons should not negatively affect their taste or texture. In fact, by preventing ground contact and promoting better air circulation, this method can actually improve the quality of your melons. Reduced risk of rot and disease translates to healthier, more flavorful fruit. Some gardeners even believe that hanging melons allows them to ripen more evenly, resulting in a sweeter, more consistent taste.
How often should I water hanging melons?
Watering requirements for hanging melons are similar to those for ground-grown melons. Water deeply and regularly, especially during hot, dry weather. Monitor the soil moisture levels and adjust your watering schedule accordingly. Avoid overwatering, as this can lead to root rot and other problems. Consider using a soaker hose or drip irrigation system to deliver water directly to the roots, minimizing water waste and promoting healthy growth.
What about pests and diseases? Are hanging melons less susceptible?
Hanging melons can indeed be less susceptible to certain pests and diseases, particularly those that thrive in soil or are spread through ground contact. By lifting the melons off the ground, you’re creating a less favorable environment for these pests and diseases. However, hanging melons are still vulnerable to airborne pests and diseases, so it’s important to monitor them regularly and take appropriate measures to prevent and control any problems. Consider using organic pest control methods, such as insecticidal soap or neem oil, to protect your melons.
Can I use this method in a container garden?
Absolutely! This hanging melon growing technique is particularly well-suited for container gardens, especially for those with limited space. Simply choose a container that is large enough to accommodate the melon plant’s root system, and provide a sturdy support structure for the hanging melons. Ensure the container has adequate drainage to prevent waterlogging. This method allows you to maximize your yield in a small space and enjoy fresh, homegrown melons even if you don’t have a traditional garden.
What if the sling starts to sag as the melon grows?
As the melon grows and increases in weight, the sling may start to sag. To prevent this, regularly inspect the sling and adjust it as needed. You may need to tighten the sling, reinforce it with additional material, or even replace it with a stronger one. Ensure the support structure is also strong enough to handle the increasing weight. By proactively addressing any sagging issues, you can prevent the melon from falling and ensure a successful harvest.
Is there a specific type of knot I should use to secure the sling?
A secure and reliable knot is essential for ensuring the safety of your hanging melons. A bowline knot is a good choice, as it’s strong, easy to tie, and doesn’t slip easily. Another option is a square knot, which is also strong and reliable. Avoid using knots that are prone to slipping or unraveling. When tying the knot, make sure it’s snug but not too tight, as this could damage the sling material. Double-check the knot regularly to ensure it remains secure.


Leave a Comment