

Housekeeping cleaning tips are essential for maintaining a healthy and happy home, and let’s be honest, who doesn’t want a sparkling clean space without spending all day scrubbing? I know I do! For centuries, cultures around the world have developed unique and ingenious methods for keeping their homes tidy, from ancient Roman bathhouses to the minimalist cleaning rituals of Japanese Zen gardens. The desire for a clean and organized living environment is deeply ingrained in us.
But in today’s fast-paced world, finding the time and energy for thorough cleaning can feel like a monumental task. That’s where these DIY housekeeping cleaning tips come in! I’m going to share some of my favorite time-saving hacks and clever solutions that will transform your cleaning routine from a chore into a breeze.
Imagine having more free time to relax, pursue your hobbies, or simply enjoy the company of loved ones, all thanks to a few simple tweaks in your cleaning approach. These housekeeping cleaning tips aren’t just about surface-level tidiness; they’re about creating a healthier, more comfortable, and more inviting home for you and your family. So, grab your cleaning supplies, and let’s get started on making your home shine!

DIY Toilet Bowl Cleaning Bombs with Harpic: A Powerful and Refreshing Clean!
Hey everyone! I’m so excited to share this amazing DIY project with you. We’re going to make our own toilet bowl cleaning bombs using Harpic toilet cleaner! Yes, you read that right. We’re taking the cleaning power of Harpic and turning it into convenient, fizzing bombs that will leave your toilet sparkling and smelling fresh. I’ve been using these for months, and they’ve seriously cut down on my scrubbing time. Plus, it’s a fun and cost-effective way to keep your bathroom clean.
Why Make Toilet Bowl Cleaning Bombs?
Before we dive in, let’s talk about why these bombs are so great:
* Powerful Cleaning: Harpic is known for its strong cleaning action, effectively removing stains and grime.
* Easy to Use: Just drop a bomb in the toilet bowl, let it fizz, and flush! No more messy liquids or sprays.
* Cost-Effective: Making your own bombs is much cheaper than buying pre-made toilet bowl cleaners.
* Customizable: You can adjust the ingredients to suit your preferences, adding extra scents or cleaning agents.
* Fun and Engaging: It’s a satisfying DIY project that makes cleaning a little less of a chore.
Ingredients You’ll Need
Okay, let’s gather our supplies. Here’s what you’ll need to make these amazing toilet bowl cleaning bombs:
* 1 cup Baking Soda: This is the base of our bombs and helps to deodorize and scrub.
* 1/2 cup Citric Acid: This is what creates the fizzing action and helps to remove hard water stains. You can usually find this in the baking aisle or online.
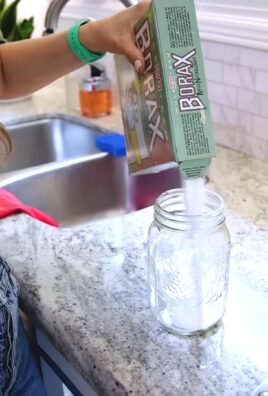
* 1/2 cup Borax: Borax is a natural mineral that helps to disinfect and clean.
* 1/4 cup Harpic Toilet Cleaner (Original or your preferred scent): This is the star of the show! It provides the powerful cleaning action and a fresh scent. I personally love the original scent, but feel free to experiment.
* 1-2 tablespoons Water: We’ll use this to bind the ingredients together. Be careful not to add too much, or the bombs will fizz prematurely.
* Optional: Essential Oils (Tea Tree, Eucalyptus, Lavender, etc.): Add a few drops of your favorite essential oils for an extra boost of fragrance and antibacterial properties. I usually add about 10-15 drops total.
* Optional: Food Coloring: If you want to add a pop of color to your bombs, you can add a few drops of food coloring.
* Spray Bottle filled with water: For spritzing to bind the mixture.
* Molds: Silicone molds work best because they’re flexible and easy to release the bombs from. You can use ice cube trays, muffin tins, or even decorative silicone molds.
* Gloves: To protect your hands from the ingredients.
* Mixing Bowl: A large bowl to mix all the ingredients together.
* Spoon or Whisk: For mixing.
Safety First!
Before we start, let’s talk about safety. Harpic is a powerful cleaner, so it’s important to take precautions:
* Wear Gloves: Always wear gloves when handling Harpic and the other ingredients to protect your skin.
* Work in a Well-Ventilated Area: Make sure you’re working in a room with good ventilation to avoid inhaling any fumes.
* Avoid Contact with Eyes: If Harpic gets in your eyes, rinse immediately with plenty of water and seek medical attention.
* Keep Out of Reach of Children and Pets: Store the finished bombs in a safe place where children and pets cannot access them.
Step-by-Step Instructions: Making Your Toilet Bowl Cleaning Bombs
Alright, let’s get started! Here’s how to make your own toilet bowl cleaning bombs:
Phase 1: Mixing the Dry Ingredients
1. Combine Dry Ingredients: In your large mixing bowl, combine the baking soda, citric acid, and borax. Use your spoon or whisk to mix them thoroughly. Make sure there are no clumps.
2. Add Optional Food Coloring: If you’re using food coloring, add a few drops to the dry mixture and mix well until the color is evenly distributed.
Phase 2: Adding the Wet Ingredients
3. Slowly Add Harpic: This is the most important step! Slowly pour the Harpic toilet cleaner into the dry mixture, mixing constantly. Be careful not to add it too quickly, or the mixture will start to fizz prematurely. I usually add it in small increments, mixing well after each addition.
4. Add Essential Oils (Optional): If you’re using essential oils, add them now and mix well.
5. Spritz with Water: Now, this is where the spray bottle comes in. Spritz the mixture with water, a little at a time, mixing constantly. You want the mixture to be damp enough to hold its shape when you squeeze it in your hand, but not so wet that it starts to fizz. I usually do 2-3 spritzes at a time.
6. Test the Consistency: To test the consistency, grab a handful of the mixture and squeeze it. If it holds its shape and doesn’t crumble, it’s ready. If it’s too dry, add a little more water. If it’s too wet, add a little more baking soda.
Phase 3: Molding and Drying
7. Pack the Molds: Now it’s time to pack the mixture into your molds. Use your fingers or a spoon to firmly pack the mixture into each mold. Make sure to fill them completely and press down to remove any air pockets.
8. Let Them Dry: Once all the molds are filled, let them dry for at least 24 hours, or until the bombs are completely hardened. I usually leave them in a cool, dry place.
9. Remove from Molds: After the bombs are completely dry, gently remove them from the molds. If they’re sticking, you can try tapping the molds on a hard surface or gently flexing them.
Phase 4: Storage
10. Store in an Airtight Container: Store your finished toilet bowl cleaning bombs in an airtight container in a cool, dry place. This will prevent them from absorbing moisture and fizzing prematurely. I use a glass jar with a tight-fitting lid.
Using Your Toilet Bowl Cleaning Bombs
Using these bombs is super easy!
1. Drop a Bomb: Simply drop one bomb into your toilet bowl.
2. Let it Fizz: Let the bomb fizz and dissolve for about 10-15 minutes. This will allow the Harpic and other ingredients to work their magic.
3. Scrub (Optional): If you have stubborn stains, you can use a toilet brush to scrub the bowl after the bomb has fizzed.
4. Flush: Flush the toilet and enjoy your sparkling clean bowl!
Tips and Tricks for Perfect Toilet Bowl Cleaning Bombs
Here are a few extra tips and tricks to help you make the perfect toilet bowl cleaning bombs:
* Don’t Over-Wet the Mixture: This is the most common mistake people make. Adding too much water will cause the bombs to fizz prematurely and they won’t harden properly. Add water slowly and in small increments.
* Pack the Molds Tightly: Packing the molds tightly will help the bombs hold their shape and prevent them from crumbling.
* Experiment with Scents: Feel free to experiment with different essential oils to create your own custom scents. Lavender, tea tree, and eucalyptus are all great options.
* Add Extra Cleaning Power: For extra cleaning power, you can add a tablespoon of white vinegar to the mixture.
* Make a Big Batch: These bombs keep for a long time, so you can make a big batch and have them on hand whenever you need them.
* Troubleshooting:
* Bombs are crumbling: Add a little more water to the mixture.
* Bombs are fizzing prematurely: You’ve added too much water. Add a little more baking soda to the mixture.
* Bombs are not hardening: Let them dry for a longer period of time.
Variations and Customizations
The beauty of DIY is that you can customize things to your liking! Here are a few variations you can try:
* Lemon Scent: Add lemon essential oil and a tablespoon of lemon juice to the mixture.
* Eucalyptus and Tea Tree: Add eucalyptus and tea tree essential oils for a refreshing and antibacterial boost.
* Lavender and Chamomile: Add lavender and chamomile essential oils for a calming and relaxing scent.
* Color Variations: Use different food colorings to create colorful bombs. You can
Conclusion
So, there you have it! This simple, yet incredibly effective DIY housekeeping cleaning trick is a game-changer for anyone looking to maintain a sparkling clean home without breaking the bank or relying on harsh chemicals. We’ve shown you how to harness the power of readily available ingredients to create a cleaning solution that tackles grime, eliminates odors, and leaves your home feeling fresh and inviting.
Why is this a must-try? Because it’s economical, eco-friendly, and genuinely works! Store-bought cleaners often contain a cocktail of chemicals that can be harmful to your health and the environment. This DIY alternative allows you to control exactly what goes into your cleaning products, ensuring a safer and healthier living space for you and your family. Plus, think of all the money you’ll save by ditching those expensive commercial cleaners!
But the beauty of this DIY housekeeping cleaning trick lies not only in its simplicity but also in its versatility. Feel free to experiment with different essential oils to create your own signature scent. Lavender, lemon, tea tree, and eucalyptus are all excellent choices, each offering unique aromatherapy benefits in addition to their cleaning properties. For tougher stains, consider adding a bit of baking soda to your solution for extra scrubbing power. You can also adjust the ratios of ingredients to suit your specific cleaning needs and preferences. For example, if you’re cleaning a particularly greasy surface, you might want to increase the amount of vinegar in your solution.
Don’t be afraid to get creative and personalize this DIY housekeeping cleaning trick to make it your own. The possibilities are endless!
We are confident that once you try this DIY cleaning solution, you’ll be amazed by the results. It’s a simple, effective, and sustainable way to keep your home clean and healthy. We encourage you to give it a try and see for yourself the difference it can make.
And most importantly, we want to hear about your experience! Share your tips, variations, and success stories in the comments below. Let’s build a community of DIY cleaning enthusiasts and help each other create cleaner, healthier homes. What essential oil combinations did you find most effective? Did you discover any other clever uses for this cleaning solution? Your insights could be invaluable to other readers.
So, go ahead, embrace the power of DIY housekeeping cleaning and transform your home into a sparkling sanctuary. You won’t regret it!
Frequently Asked Questions (FAQ)
What exactly are the benefits of using a DIY cleaning solution compared to store-bought cleaners?
DIY cleaning solutions offer a multitude of benefits. Firstly, they are significantly more economical. The ingredients used are typically inexpensive and readily available, saving you money in the long run. Secondly, they are environmentally friendly. By using natural ingredients, you reduce your exposure to harmful chemicals and minimize your contribution to environmental pollution. Thirdly, DIY cleaners are often safer for your health. You have complete control over the ingredients, avoiding potentially irritating or toxic substances found in many commercial cleaners. Finally, they are customizable. You can tailor the ingredients and scents to your specific needs and preferences.
Is this DIY cleaning solution safe to use on all surfaces?
While this DIY cleaning solution is generally safe for most surfaces, it’s always a good idea to test it in an inconspicuous area first, especially on delicate materials like wood or natural stone. Avoid using vinegar-based solutions on marble or granite, as the acidity can damage these surfaces. For wood surfaces, dilute the solution further and use a soft cloth to avoid scratching. Always read the manufacturer’s instructions for your specific surfaces before using any cleaning product, DIY or otherwise.
How long does this DIY cleaning solution last?
The shelf life of your DIY cleaning solution will depend on the ingredients you use. Solutions containing water are more prone to bacterial growth and should be used within a week or two. Adding a preservative like grapefruit seed extract can help extend the shelf life. Solutions made with vinegar or alcohol tend to last longer, up to a month or two. Store your cleaning solution in a clean, airtight container in a cool, dark place to maximize its shelf life. Always label the container with the date it was made. If you notice any changes in color, odor, or consistency, discard the solution.
Can I use different essential oils in this DIY cleaning solution?
Absolutely! Experimenting with different essential oils is one of the best parts of DIY cleaning. Lavender, lemon, tea tree, eucalyptus, orange, and peppermint are all popular choices for their cleaning and aromatherapy benefits. Consider the properties of each oil when making your selection. For example, tea tree oil is known for its antibacterial and antifungal properties, while lemon oil is a great degreaser. You can also blend different oils to create your own unique scent. Just be sure to use pure, high-quality essential oils for the best results.
What if I don’t have vinegar? Can I substitute it with something else?
If you don’t have vinegar on hand, you can try substituting it with lemon juice. Lemon juice has similar acidic properties and can be effective for cleaning and disinfecting. However, it may not be as strong as vinegar, so you might need to use a slightly higher concentration. Another option is to use rubbing alcohol (isopropyl alcohol), which is a good disinfectant and degreaser. However, be careful when using rubbing alcohol, as it is flammable and should be used in a well-ventilated area.
How do I store the DIY cleaning solution?
Store your DIY cleaning solution in a clean, airtight container. A glass spray bottle is a great option, as it’s reusable and won’t react with the ingredients. Avoid using metal containers, as they can corrode over time. Label the container clearly with the name of the solution and the date it was made. Store the solution in a cool, dark place away from direct sunlight and heat. This will help to preserve its effectiveness and prevent spoilage.
My DIY cleaning solution smells too strongly of vinegar. How can I fix this?
The strong smell of vinegar can be off-putting to some people. To reduce the vinegar smell, you can add a few drops of your favorite essential oil. Lemon, lavender, or orange essential oils are particularly effective at masking the vinegar scent. You can also try diluting the solution further with water. Another option is to let the solution sit for a few days before using it. The vinegar smell will dissipate over time.
Can I use this DIY cleaning solution to clean my bathroom?
Yes, this DIY cleaning solution is excellent for cleaning bathrooms. It can be used to clean sinks, toilets, showers, and floors. The vinegar in the solution helps to remove soap scum and hard water stains, while the essential oils provide a fresh, clean scent. However, avoid using vinegar-based solutions on marble or granite countertops, as the acidity can damage these surfaces.
Is this DIY cleaning solution safe for pets and children?
While this DIY cleaning solution is generally safer than commercial cleaners, it’s still important to take precautions when using it around pets and children. Keep the solution out of reach of children and pets. Avoid spraying it directly on pets or in areas where they frequently spend time. If your pet accidentally ingests the solution, contact your veterinarian immediately. When cleaning, ensure that the area is well-ventilated and allow it to dry completely before allowing pets or children to access it.
What are some other DIY housekeeping cleaning tips I can try?
Besides this cleaning solution, there are many other DIY housekeeping cleaning tips you can try. Baking soda is a versatile cleaning agent that can be used to deodorize carpets, clean ovens, and scrub sinks. Lemon juice is a natural disinfectant and degreaser that can be used to clean cutting boards, remove stains from clothing, and polish furniture. White vinegar is a powerful cleaner that can be used to remove hard water stains, clean coffee makers, and unclog drains. With a little creativity and resourcefulness, you can create a clean and healthy home using only natural ingredients.
Leave a Comment