

Harvest Napa Cabbage Backyard: Imagine stepping into your backyard, the crisp autumn air swirling around you, and harvesting your very own Napa cabbage, plump and ready for a delicious meal. Sounds idyllic, right? Well, it’s more achievable than you might think! For centuries, cultivating your own food has been a cornerstone of self-sufficiency and a connection to the earth. From ancient Chinese gardens where Napa cabbage originated to modern-day urban farms, the desire to grow our own has remained a constant.
But let’s be honest, sometimes gardening feels more like a chore than a joy. That’s where these DIY tricks and hacks come in! I’m here to share some simple, effective methods to help you successfully harvest Napa cabbage backyard, even if you’re a complete beginner. We’ll cover everything from knowing when it’s perfectly ripe to the best ways to store your bounty.
Why do you need these tricks? Because store-bought Napa cabbage simply can’t compare to the flavor and satisfaction of harvesting your own. Plus, you’ll know exactly where your food is coming from and what’s gone into growing it. So, grab your gardening gloves, and let’s get started on this rewarding journey of growing and harvesting your own Napa cabbage!
Harvesting Napa Cabbage from Your Backyard: A Step-by-Step Guide
Okay, so you’ve nurtured your Napa cabbage from tiny seedlings to beautiful, leafy heads, and now it’s time for the grand finale: harvesting! Don’t worry, it’s easier than you think. I’m going to walk you through the whole process, ensuring you get the most delicious and usable cabbage possible.
Knowing When to Harvest
The most crucial part of harvesting Napa cabbage is knowing when it’s ripe and ready. Picking it too early will result in a small, underdeveloped head, while waiting too long can lead to splitting or bolting (going to seed), which makes the cabbage bitter.
Here’s what to look for:
* Size and Shape: Napa cabbage is typically ready for harvest when the head is firm and feels solid when gently squeezed. The size will vary depending on the variety you planted, but generally, a mature head will be about 12-18 inches long and 6-8 inches wide.
* Firmness: This is key! A ripe Napa cabbage should feel dense and compact. If it feels loose or spongy, it’s not quite ready.
* Color: The outer leaves should be a pale green to yellowish-green color. Avoid harvesting if the leaves are significantly yellowed or have brown spots, as this could indicate disease or over-maturity.
* Time Since Planting: Napa cabbage typically takes 70-85 days to mature from transplanting. Keep track of when you planted your seedlings, and start checking for ripeness around that time.
* Weather Conditions: Hot weather can cause Napa cabbage to bolt, so it’s best to harvest before a heatwave if possible. Also, if you’re expecting a hard frost, it’s a good idea to harvest even if the cabbage isn’t quite fully mature, as frost can damage the leaves.
Tools You’ll Need
Before you head out to the garden, gather these essential tools:
* Sharp Knife or Pruning Shears: A sharp blade is crucial for a clean cut, which will help prevent disease from entering the remaining stem.
* Gloves (Optional): While not strictly necessary, gloves can protect your hands from dirt and any potential irritants on the cabbage leaves.
* Basket or Bag: You’ll need something to carry your harvested cabbage back to the kitchen.
* Water Hose (Optional): If your cabbage is particularly dirty, you might want to give it a quick rinse before bringing it inside.
The Harvesting Process: Step-by-Step
Alright, let’s get down to business! Here’s how to harvest your Napa cabbage:
1. Inspect the Cabbage: Before you start cutting, give your cabbage one last check to ensure it’s truly ready for harvest. Look for the signs of ripeness mentioned earlier: size, firmness, and color.
2. Prepare Your Cutting Tool: Make sure your knife or pruning shears are clean and sharp. A dull blade can crush the stem and make it more susceptible to disease. I usually wipe mine down with rubbing alcohol to sterilize it.
3. Locate the Cutting Point: Find the base of the cabbage head, where it meets the stem. You’ll want to cut the head off as close to the ground as possible, leaving a small stump.
4. Make the Cut: Using a firm, steady motion, cut through the stem just above the ground. Be careful not to damage any surrounding plants.
5. Remove the Outer Leaves (Optional): If the outer leaves are damaged, discolored, or particularly dirty, you can remove them before bringing the cabbage inside. This isn’t always necessary, but it can help improve the appearance and storage life of your cabbage.
6. Gently Clean the Cabbage (Optional): If your cabbage is covered in dirt, you can gently rinse it with a hose or in a sink. Be careful not to scrub too hard, as this can damage the leaves.
7. Transport Your Harvest: Carefully place your harvested cabbage in your basket or bag and carry it back to the kitchen.
What to Do After Harvesting
Once you’ve harvested your Napa cabbage, there are a few things you can do to ensure it stays fresh and delicious:
* Storage: Napa cabbage can be stored in the refrigerator for several weeks. Wrap it loosely in plastic wrap or place it in a perforated plastic bag to prevent it from drying out.
* Preparation: Before using your Napa cabbage, rinse it thoroughly under cold water. You can then chop, shred, or slice it as needed for your recipe.
* Enjoy! Napa cabbage is incredibly versatile and can be used in a variety of dishes, from salads and slaws to stir-fries and soups.
Encouraging Regrowth (Optional)
Did you know you can sometimes get a second, smaller harvest from the remaining stem? It’s not guaranteed, but it’s worth a try!
1. Leave the Stump: After harvesting the main head, leave the stump of the cabbage plant in the ground.
2. Water Regularly: Continue to water the stump regularly, just as you would have watered the entire plant.
3. Fertilize Lightly: You can also give the stump a light feeding of fertilizer to encourage new growth.
4. Watch for New Shoots: Keep an eye out for new shoots emerging from the stump. These shoots will eventually develop into small, leafy heads.
5. Harvest the Smaller Heads: Once the smaller heads are large enough, you can harvest them just as you harvested the main head.
Troubleshooting Common Problems
Sometimes, things don’t go exactly as planned. Here are a few common problems you might encounter when harvesting Napa cabbage, and how to deal with them:
* Cabbage is Bolting: If your cabbage starts to bolt (develop a flower stalk), it’s best to harvest it immediately, even if it’s not quite fully mature. Bolted cabbage can become bitter.
* Cabbage is Splitting: Splitting can occur when the cabbage grows too quickly due to excessive watering or fertilization. Harvest the cabbage as soon as you notice splitting to prevent further damage.
* Cabbage is Damaged by Pests or Diseases: If your cabbage is heavily infested with pests or diseases, it’s best to discard it to prevent the problem from spreading to other plants. However, if the damage is minor, you can remove the affected leaves and still use the rest of the cabbage.
Extra Tips for a Bountiful Harvest
Here are a few extra tips to help you get the most out of your Napa cabbage harvest:
* Succession Planting: Plant Napa cabbage seedlings every few weeks to ensure a continuous harvest throughout the growing season.
* Choose the Right Variety: Select a Napa cabbage variety that is well-suited to your climate and growing conditions.
* Provide Adequate Water and Nutrients: Napa cabbage needs plenty of water and nutrients to thrive. Make sure to water regularly and fertilize as needed.
* Protect from Pests and Diseases: Take steps to protect your cabbage from common pests and diseases, such as cabbage worms and clubroot.
* Harvest in the Morning: Harvesting in the morning, after the dew has dried, can help improve the storage life of your cabbage.
Using Your Harvested Napa Cabbage
Now that you’ve successfully harvested your Napa cabbage, it’s time to put it to good use! Here are just a few ideas:
* Salads and Slaws: Napa cabbage is a great addition to salads and slaws. Its mild flavor and crisp texture make it a refreshing alternative to traditional cabbage.
* Stir-Fries: Napa cabbage is a popular ingredient in stir-fries. It cooks quickly and adds a nice crunch.
* Soups and Stews: Napa cabbage can also be added to soups and stews. It adds a subtle sweetness and helps to thicken the broth.
* Kimchi: Napa cabbage is the main ingredient in kimchi, a traditional Korean fermented dish.
* Wraps: Use large Napa cabbage leaves as wraps for fillings like ground meat, vegetables, or rice.
I hope this guide has been helpful! With a little knowledge and effort, you can enjoy a bountiful harvest of delicious Napa cabbage from your own backyard. Happy gardening!
Conclusion
So, there you have it! Harvesting your own Napa cabbage right from your backyard isn’t just a gardening activity; it’s a gateway to fresher, more flavorful meals and a deeper connection with the food you eat. This DIY trick, while seemingly simple, unlocks a world of culinary possibilities and offers a level of control over your produce that you simply can’t achieve with store-bought options.
Think about it: no more wilted, bruised heads of cabbage that have traveled miles to reach your table. Instead, you’ll have crisp, vibrant Napa cabbage, bursting with natural sweetness, ready to be transformed into delicious dishes. From kimchi and stir-fries to slaws and salads, the possibilities are endless.
But the benefits extend beyond just taste and freshness. Growing and harvesting your own Napa cabbage is also a sustainable choice. You’re reducing your carbon footprint by eliminating transportation and packaging, and you’re supporting a more localized food system. Plus, it’s incredibly rewarding to nurture a plant from seed to harvest and then enjoy the fruits (or rather, vegetables) of your labor.
Don’t be afraid to experiment! Try different varieties of Napa cabbage to find your favorite flavor profile. Some are sweeter, while others have a slightly peppery bite. You can also adjust the timing of your harvest to influence the texture and tenderness of the leaves. For a more delicate flavor, harvest your Napa cabbage when the head is still relatively loose. For a firmer, more robust flavor, wait until the head is tightly packed.
Consider companion planting to enhance your Napa cabbage’s growth and deter pests. Marigolds, dill, and chamomile are all excellent choices. And don’t forget to amend your soil with plenty of compost and organic matter to provide your plants with the nutrients they need to thrive.
This DIY trick for harvesting Napa cabbage is more than just a gardening tip; it’s an invitation to embrace a more sustainable, flavorful, and rewarding way of eating. It’s about taking control of your food supply and connecting with the natural world. It’s about experiencing the joy of growing your own food and sharing that joy with others.
So, what are you waiting for? Grab your gardening gloves, head out to your backyard, and start harvesting your own Napa cabbage today! We’re confident that you’ll be amazed by the difference it makes. And once you’ve tasted the difference, we encourage you to share your experiences with us. Tell us about your favorite Napa cabbage recipes, your gardening tips, and any challenges you encountered along the way. Let’s build a community of backyard gardeners who are passionate about growing and eating fresh, healthy food. Share your photos and stories on social media using #HarvestNapaCabbageBackyard. We can’t wait to see what you create!
Frequently Asked Questions (FAQ)
Q: When is the best time to harvest my Napa cabbage?
A: The ideal time to harvest Napa cabbage is when the head is firm and tightly packed. Gently squeeze the head; if it feels solid and doesn’t give much, it’s ready to harvest. The exact timing will depend on the variety of Napa cabbage you’re growing and your local climate, but generally, it takes about 75-85 days from planting to harvest. Keep an eye on the weather forecast, as prolonged periods of freezing temperatures can damage the cabbage.
Q: How do I harvest Napa cabbage without damaging the plant?
A: The easiest and most effective way to harvest Napa cabbage is to use a sharp knife or garden shears. Simply cut the head of the cabbage at the base, leaving a small stump in the ground. This will allow the plant to potentially produce smaller side shoots that you can harvest later. Be careful not to damage any surrounding plants when cutting.
Q: Can I harvest Napa cabbage leaves individually instead of the whole head?
A: Yes, you can harvest Napa cabbage leaves individually, especially if you only need a small amount for a recipe. Start by harvesting the outer leaves, working your way towards the center of the head. This method allows the plant to continue growing and producing new leaves. However, keep in mind that harvesting individual leaves may shorten the overall lifespan of the plant.
Q: How do I store Napa cabbage after harvesting?
A: To store Napa cabbage after harvesting, wrap the head loosely in plastic wrap or place it in a perforated plastic bag. Store it in the crisper drawer of your refrigerator. Properly stored Napa cabbage can last for several weeks. Avoid washing the cabbage before storing it, as moisture can promote spoilage. Wash it only when you’re ready to use it.
Q: What if my Napa cabbage head is starting to split?
A: Splitting heads of Napa cabbage are often caused by inconsistent watering or excessive rainfall after a period of drought. While a split head may not look as appealing, it’s still perfectly safe to eat. Harvest the cabbage immediately to prevent further splitting and potential spoilage.
Q: My Napa cabbage has attracted pests. What should I do?
A: Napa cabbage can be susceptible to pests such as cabbage worms, aphids, and flea beetles. To prevent pest infestations, consider using row covers to protect your plants. You can also handpick pests off the plants or use organic pest control methods such as insecticidal soap or neem oil. Companion planting with herbs like dill and rosemary can also help deter pests.
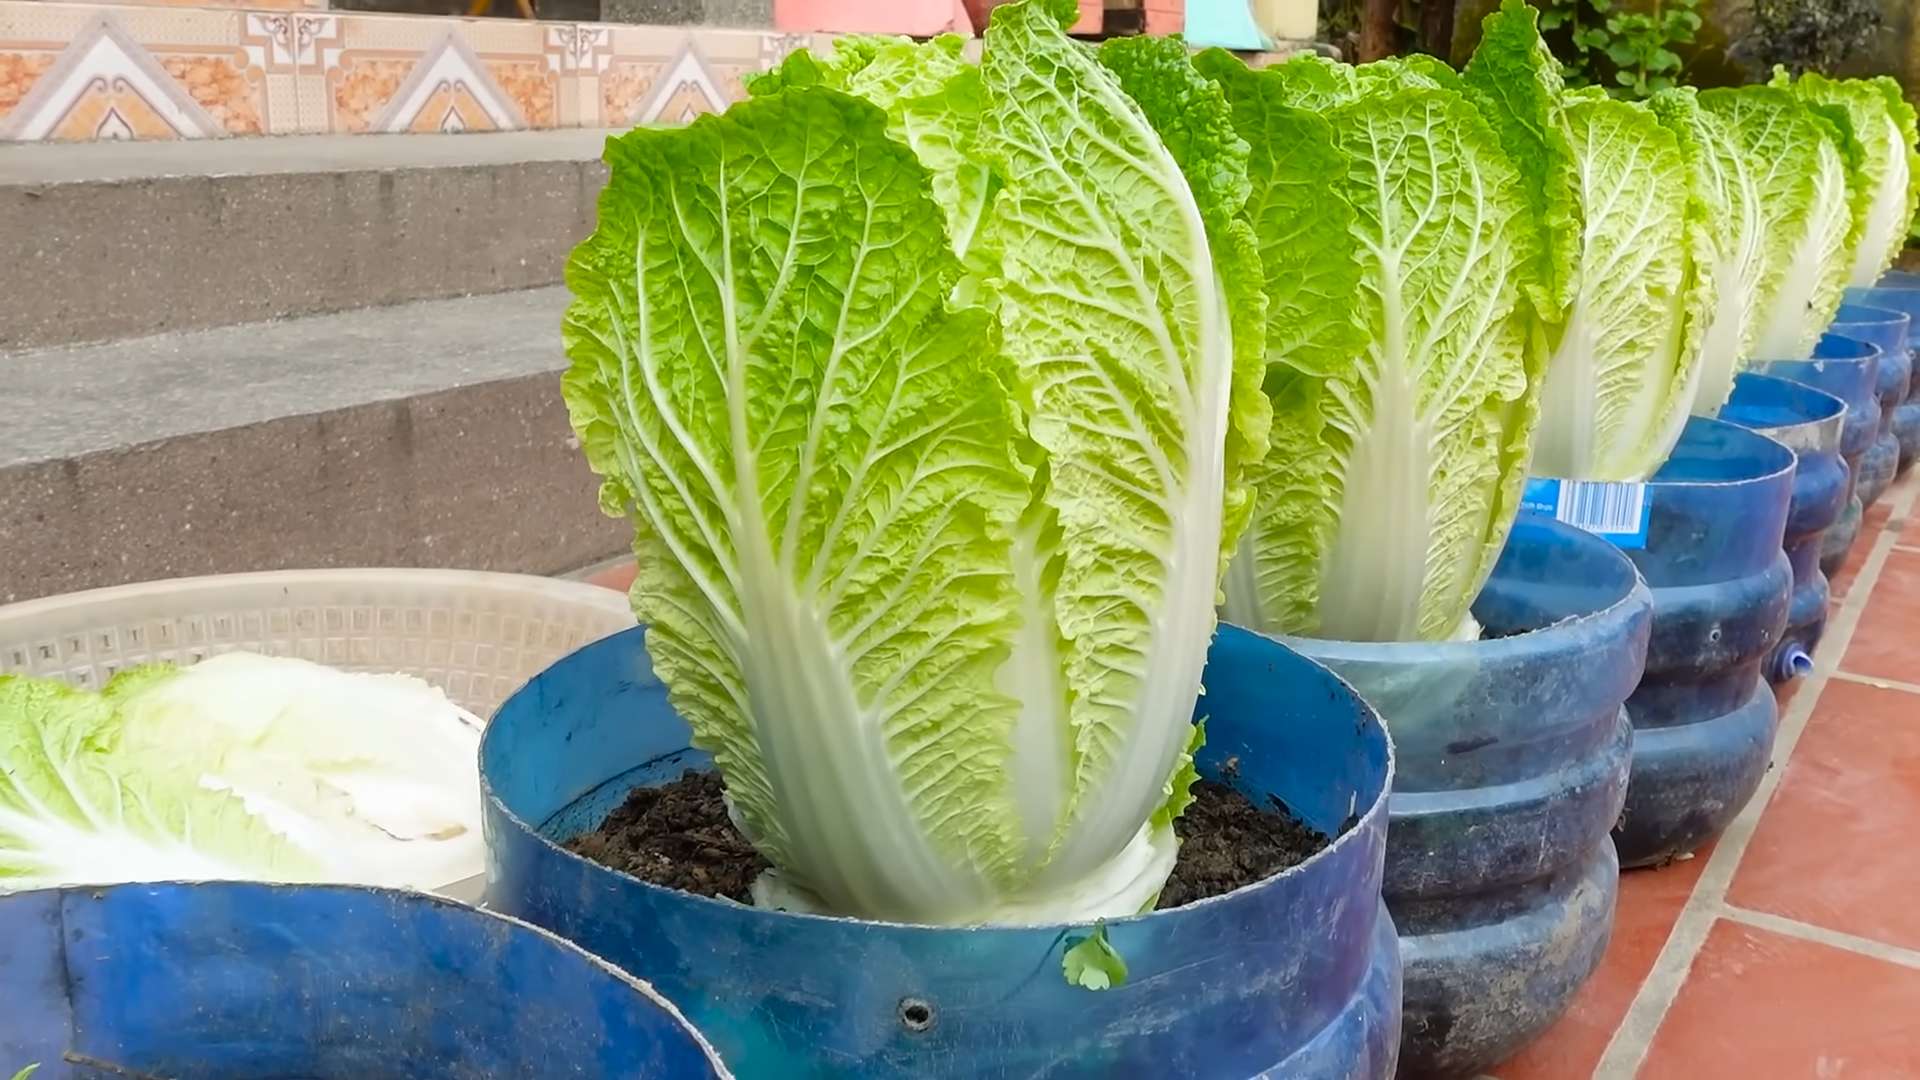
Q: Can I grow Napa cabbage in containers?
A: Yes, you can grow Napa cabbage in containers, but you’ll need to choose a large container (at least 12 inches in diameter) to accommodate the plant’s root system. Use a well-draining potting mix and provide regular watering and fertilization. Container-grown Napa cabbage may not grow as large as those grown in the ground, but you can still harvest a decent-sized head.
Q: What are some good companion plants for Napa cabbage?
A: Good companion plants for Napa cabbage include marigolds, dill, chamomile, rosemary, and thyme. These plants can help deter pests, attract beneficial insects, and improve the overall health of your Napa cabbage plants. Avoid planting Napa cabbage near members of the nightshade family, such as tomatoes, peppers, and eggplants, as they can compete for nutrients and attract similar pests.
Q: Can I save seeds from my Napa cabbage for future planting?
A: Saving seeds from Napa cabbage can be challenging because it’s a biennial plant, meaning it typically takes two years to produce seeds. If you want to save seeds, you’ll need to overwinter the plant and allow it to flower and produce seeds in the second year. However, keep in mind that Napa cabbage can cross-pollinate with other members of the Brassica family, so the seeds may not produce true-to-type plants.
Q: What are some delicious ways to use my homegrown Napa cabbage?
A: The possibilities are endless! Napa cabbage is incredibly versatile and can be used in a wide variety of dishes. Try it in kimchi, stir-fries, slaws, salads, soups, and even grilled. Its mild flavor and crisp texture make it a perfect addition to any meal. Don’t be afraid to experiment and get creative in the kitchen!
Leave a Comment