

Home Mushroom Growing Tutorial: Unlock the Secrets to Cultivating Delicious Fungi in Your Own Space!
Have you ever dreamed of harvesting fresh, flavorful mushrooms right from your kitchen? Imagine the satisfaction of adding homegrown shiitakes to your stir-fry or topping your pizza with oyster mushrooms you nurtured yourself. Well, dream no more! This comprehensive home mushroom growing tutorial will guide you through the fascinating world of mycology, making it easier than you ever thought possible to cultivate these culinary delights.
The practice of mushroom cultivation dates back centuries, with evidence suggesting that the Chinese were among the first to intentionally grow mushrooms as early as 600 AD. From ancient medicinal practices to modern gourmet cuisine, mushrooms have held a significant place in human history and culture. But you don’t need to be an expert mycologist to enjoy the benefits of homegrown mushrooms.
In today’s world, where access to fresh, organic produce can be challenging and expensive, learning how to grow your own food is more important than ever. This DIY guide provides a cost-effective and sustainable way to add nutritious and delicious mushrooms to your diet. Plus, it’s a rewarding and educational hobby that connects you with the natural world. So, let’s dive in and discover the magic of home mushroom growing!
Grow Your Own Gourmet Mushrooms at Home: A Beginner’s Guide
Hey there, fellow fungi fanatics! Ever dreamt of harvesting your own delicious, fresh mushrooms right in your kitchen? Well, dream no more! I’m going to walk you through a simple and rewarding DIY project: growing mushrooms at home. It’s easier than you think, and the taste of homegrown mushrooms is simply unbeatable.
What You’ll Need: The Essential Supplies
Before we dive in, let’s gather our supplies. This is crucial for a successful mushroom-growing adventure.
* Mushroom Spawn: This is the “seed” of your mushrooms. You can find it online or at specialized gardening stores. Oyster mushrooms are a great choice for beginners because they’re relatively easy to grow and quite forgiving. Look for spawn in grain, sawdust, or plug form.
* Growing Substrate: This is what your mushrooms will feed on. Straw, coffee grounds, hardwood sawdust, and cardboard are all excellent options. For this guide, we’ll focus on using straw, as it’s readily available and easy to work with.
* Large Container: A plastic tub, bucket, or even a laundry basket will work. Just make sure it’s clean and has drainage holes.
* Spray Bottle: For misting your mushrooms and maintaining humidity.
* Bleach or Disinfectant: To sterilize your container and prevent contamination.
* Gloves: To keep your hands clean and prevent introducing unwanted bacteria.
* Optional: A humidity tent (a clear plastic bag or a makeshift greenhouse) to help maintain optimal humidity levels.
Phase 1: Preparing the Substrate (Straw)
The key to successful mushroom growing is a properly prepared substrate. We need to pasteurize the straw to kill off any competing organisms that might hinder our mushroom growth.
1. Chop the Straw: Using scissors or a knife, chop the straw into smaller pieces, about 2-4 inches long. This will make it easier to pack into the container and for the mushroom mycelium to colonize.
2. Pasteurize the Straw: There are a couple of ways to pasteurize straw. I prefer the hot water method because it’s simple and effective.
* Hot Water Method: Fill a large pot or tub with water and heat it to around 160-180°F (71-82°C). You don’t want it boiling, just hot enough to kill off unwanted organisms.
* Submerge the chopped straw completely in the hot water. You might need to weigh it down with a brick or a heavy object to keep it submerged.
* Let the straw soak in the hot water for about 1-2 hours. This will effectively pasteurize it.
3. Drain and Cool the Straw: After pasteurization, carefully drain the hot water from the straw. Let the straw cool down to room temperature. It should be moist but not dripping wet. Squeeze out any excess water. The straw should feel like a wrung-out sponge.
Phase 2: Inoculating the Substrate with Mushroom Spawn
Now comes the exciting part: introducing the mushroom spawn to the prepared straw! This is where the magic happens.
1. Clean Your Container: Thoroughly clean your chosen container with a bleach solution (1 part bleach to 9 parts water) to sterilize it. Rinse it well with clean water and let it dry. This will help prevent contamination.
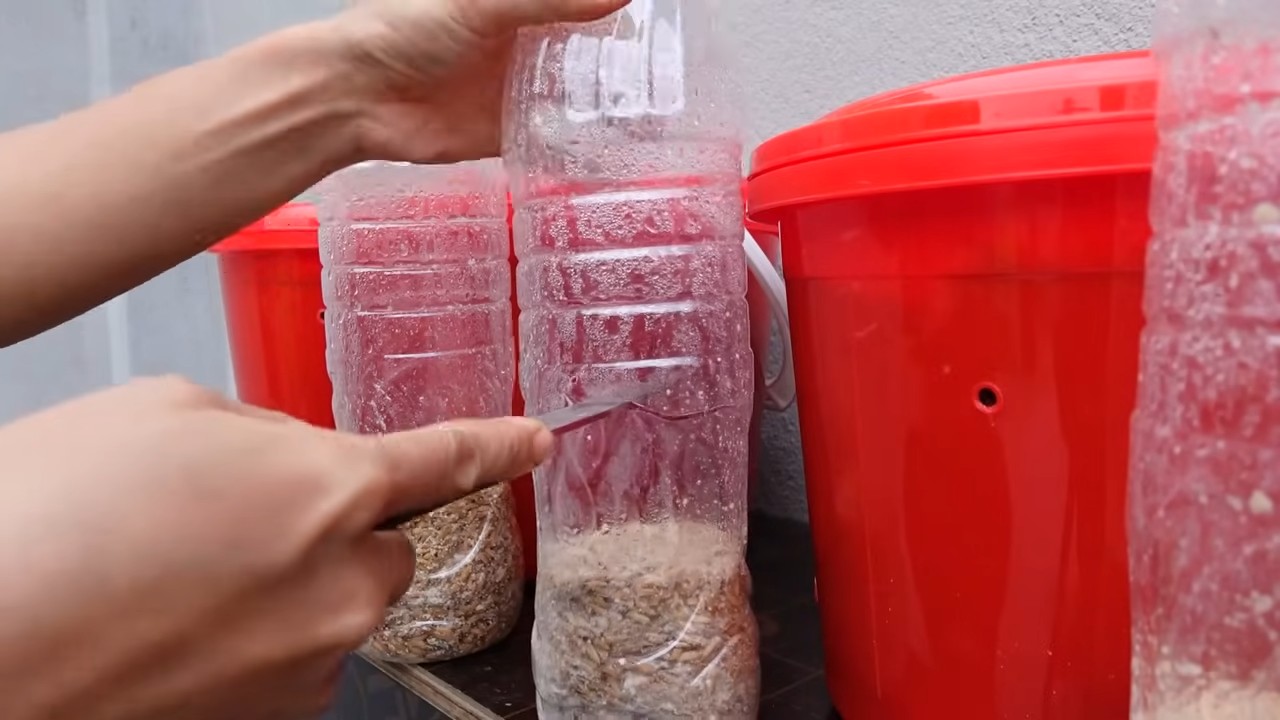
2. Layer the Substrate and Spawn: Start by placing a layer of the pasteurized straw at the bottom of the container.
3. Sprinkle Spawn: Sprinkle a generous layer of mushroom spawn over the straw. Aim for about 1 part spawn to 10 parts substrate by weight.
4. Repeat Layers: Continue layering straw and spawn, alternating between the two, until the container is almost full. Leave a little space at the top.
5. Final Layer: Finish with a final layer of straw on top.
6. Gently Press Down: Gently press down on the substrate to compact it slightly. This will help the mycelium colonize the straw more effectively.
Phase 3: Incubation: Letting the Mycelium Grow
This is the waiting game. The mycelium, the vegetative part of the mushroom, needs time to colonize the straw.
1. Find a Suitable Location: Place the container in a dark, humid, and well-ventilated location. A basement, closet, or spare room works well. The ideal temperature for oyster mushroom colonization is around 65-75°F (18-24°C).
2. Maintain Humidity: Keep the substrate moist by misting it with a spray bottle every day or two. You want the straw to stay damp but not waterlogged. A humidity tent can help maintain consistent humidity levels. If you’re using a plastic bag, make sure to poke some holes in it for ventilation.
3. Monitor Colonization: Over the next few weeks, you’ll notice white, fuzzy growth spreading throughout the straw. This is the mycelium colonizing the substrate. It should take about 2-4 weeks for the straw to be fully colonized.
4. Check for Contamination: Keep an eye out for any signs of contamination, such as green, black, or other colored molds. If you see any contamination, remove the affected area immediately to prevent it from spreading.
Phase 4: Fruiting: Harvesting Your Mushrooms
Once the straw is fully colonized, it’s time to initiate fruiting, which means encouraging the mushrooms to grow.
1. Increase Light Exposure: Move the container to a location with indirect light. Mushrooms need some light to fruit properly.
2. Increase Humidity: Increase the humidity even further. You can do this by misting the substrate more frequently or by using a humidity tent.
3. Lower Temperature (Optional): Some mushroom varieties fruit better with a slight temperature drop. If possible, try lowering the temperature a few degrees.
4. Provide Fresh Air: Ensure good air circulation. Open a window or use a fan to provide fresh air. Mushrooms need oxygen to fruit.
5. Watch for Pinheads: After a few days, you’ll start to see small mushroom “pinheads” forming on the surface of the substrate. These are the baby mushrooms!
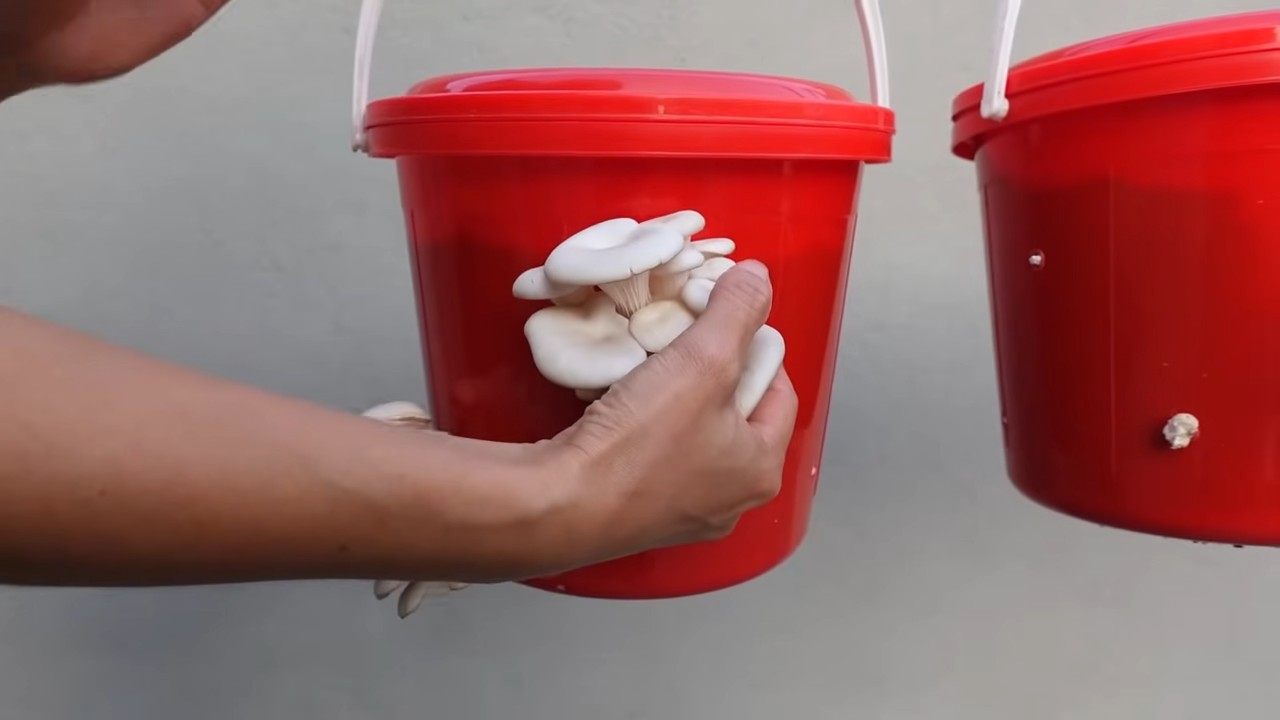
6. Harvest Your Mushrooms: The mushrooms will grow rapidly. Harvest them when the caps are fully developed but before they start to drop spores. This is usually when the edges of the caps start to flatten out or curl upwards.
7. Harvesting Technique: To harvest, gently twist and pull the mushrooms from the substrate. Avoid cutting them, as this can leave behind a stump that can rot.
Phase 5: Subsequent Flushes
After your first harvest, don’t throw away the substrate! You can often get several more “flushes” of mushrooms from the same substrate.
1. Soak the Substrate: After harvesting, soak the substrate in cold water for 12-24 hours. This will rehydrate the mycelium and encourage it to produce more mushrooms.
2. Drain and Repeat: Drain the water and return the container to its fruiting location. Repeat the fruiting process as described above.
3. Declining Yields: Each subsequent flush will likely produce fewer mushrooms than the previous one. Eventually, the substrate will be exhausted, and you’ll need to start a new batch.
Troubleshooting Tips
Even with the best preparation, you might encounter some challenges along the way. Here are a few common problems and how to address them:
* Contamination: If you see mold or other unwanted growth, remove the affected area immediately. Ensure proper sterilization and ventilation to prevent future contamination.
* Slow Colonization: If the mycelium is colonizing slowly, check the temperature and humidity. Make sure the temperature is within the ideal range and the substrate is moist but not waterlogged.
* No Fruiting: If the substrate is fully colonized but no mushrooms are forming, try increasing the light exposure, humidity, and fresh air. A slight temperature drop can also help.
* Small Mushrooms: If the mushrooms are small and stunted, it could be due to lack of nutrients or poor environmental conditions. Make sure the substrate is properly prepared and the growing environment is optimal.
Choosing the Right Mushroom Variety
While oyster mushrooms are a great starting point, there are many other varieties you can try growing at home. Here are a few popular options:
* Shiitake Mushrooms: These have a rich, earthy flavor and are often grown on hardwood logs or sawdust.
* Lion’s Mane Mushrooms: These unique-looking mushrooms have a delicate, seafood-like flavor and are known for their potential cognitive benefits.
* Wine Cap Mushrooms: These are relatively easy to grow in outdoor gardens and have a meaty texture and flavor.
Important Considerations for Success
* Cleanliness is Key: Maintaining a clean and sterile environment is crucial for preventing
Conclusion
Embarking on the journey of home mushroom growing is more than just a culinary adventure; it’s a rewarding experience that connects you with nature and provides a sustainable source of fresh, delicious food. This tutorial has armed you with the knowledge and confidence to cultivate your own gourmet mushrooms right in the comfort of your home. Forget relying solely on grocery store options – imagine the satisfaction of harvesting plump, flavorful mushrooms that you nurtured from start to finish.
This DIY trick isn’t just about saving money (though that’s certainly a perk!). It’s about understanding the fascinating life cycle of fungi, reducing your carbon footprint by sourcing food locally (even hyper-locally!), and enjoying the unparalleled taste of freshly grown mushrooms. Store-bought mushrooms often lack the robust flavor and delicate texture of homegrown varieties, which can elevate your culinary creations to a whole new level.
But the benefits extend beyond the kitchen. Home mushroom growing can be a therapeutic hobby, offering a calming and engaging activity that promotes mindfulness and reduces stress. It’s also a fantastic educational opportunity for children, teaching them about biology, sustainability, and the importance of respecting the natural world.
Ready to take your mushroom cultivation to the next level? Consider experimenting with different substrates. While we focused on straw and coffee grounds, you can also try using hardwood sawdust, cardboard, or even old cotton clothing. Each substrate will yield slightly different results, influencing the flavor and texture of your mushrooms. Another exciting variation is to explore different mushroom species. Oyster mushrooms are a great starting point, but once you’ve mastered the basics, you can venture into the world of shiitake, lion’s mane, or even more exotic varieties. Remember to research the specific needs of each species to ensure optimal growth.
Don’t be afraid to experiment with your growing environment as well. While a dark, humid space is generally ideal, you can fine-tune the temperature and humidity levels to optimize mushroom production. A simple humidity tent made from a plastic bag can work wonders in drier climates.
We encourage you to embrace the learning process and view any challenges as opportunities for growth (pun intended!). Mushroom cultivation is a science and an art, and there’s always something new to discover.
So, what are you waiting for? Gather your supplies, follow the steps outlined in this tutorial, and prepare to be amazed by the magic of home mushroom growing. We’re confident that you’ll find it to be a fulfilling and rewarding experience.
We’d love to hear about your mushroom growing adventures! Share your successes, challenges, and tips in the comments below. Let’s build a community of home mushroom growers and inspire others to join the fun. Don’t forget to tag us in your photos on social media using #HomeMushroomGrowing. Happy growing!
Frequently Asked Questions (FAQ)
What are the best mushrooms to start with for home growing?
Oyster mushrooms (Pleurotus species) are widely considered the easiest and most forgiving mushrooms for beginners. They are fast-growing, relatively tolerant of environmental fluctuations, and can thrive on a variety of substrates, including straw, coffee grounds, and even cardboard. Their versatility in the kitchen also makes them a popular choice. Other good options for beginners include shiitake mushrooms (Lentinula edodes), which are known for their rich, savory flavor, and button mushrooms (Agaricus bisporus), the most common type of mushroom found in grocery stores. However, button mushrooms can be slightly more challenging to cultivate at home than oyster or shiitake mushrooms.
How long does it take to grow mushrooms at home?
The time it takes to grow mushrooms at home varies depending on the species, the substrate used, and the environmental conditions. Oyster mushrooms typically fruit within 2-3 weeks after the substrate has been fully colonized by mycelium. Shiitake mushrooms can take longer, often requiring several months to fruit. Button mushrooms also have a longer fruiting time compared to oyster mushrooms. Generally, you can expect to see your first harvest within 4-8 weeks of starting the cultivation process. Patience is key!
What are the ideal environmental conditions for growing mushrooms?
Most mushrooms prefer a dark, humid environment with temperatures between 60-75°F (15-24°C). Humidity is crucial for mushroom development, so aim for a humidity level of 80-90%. You can maintain humidity by misting the growing area regularly or using a humidity tent. While mushrooms don’t need direct sunlight, they do require some indirect light to trigger fruiting. Good ventilation is also important to prevent the buildup of carbon dioxide, which can inhibit mushroom growth.
What if my mushrooms aren’t growing?
Several factors can contribute to a lack of mushroom growth. First, ensure that the substrate is fully colonized by mycelium. If the mycelium growth is slow or patchy, it could indicate contamination or insufficient moisture. Check the humidity and temperature levels to ensure they are within the optimal range. Also, make sure the growing area has adequate ventilation. If you suspect contamination, remove the affected area to prevent it from spreading. Sometimes, simply waiting longer can be the solution, as some mushroom species take longer to fruit than others.
How do I know when my mushrooms are ready to harvest?
The ideal time to harvest mushrooms depends on the species. Oyster mushrooms are typically ready to harvest when the caps are fully formed and the edges are still slightly curled downwards. Shiitake mushrooms are ready when the caps have flattened out and the gills are visible. Button mushrooms are harvested when the caps are closed and the veil is still intact. It’s always better to harvest slightly early than to let the mushrooms overmature, as overripe mushrooms can release spores and become less flavorful.
Can I reuse the substrate after harvesting mushrooms?
Yes, you can often get multiple flushes (harvests) from a single substrate. After harvesting the first flush, soak the substrate in water for 12-24 hours to rehydrate it. Then, return it to the growing area and maintain the optimal environmental conditions. You may get a second or even a third flush of mushrooms, although the yield may decrease with each subsequent flush. Once the substrate is exhausted, you can compost it and use it to enrich your garden soil.
What are some common problems with home mushroom growing and how can I fix them?
Common problems include contamination, slow mycelium growth, and lack of fruiting. Contamination can be prevented by using sterile techniques when preparing the substrate and maintaining a clean growing environment. Slow mycelium growth can be caused by insufficient moisture, low temperatures, or poor ventilation. Lack of fruiting can be due to inadequate light, low humidity, or improper temperature. Addressing these issues by adjusting the environmental conditions and ensuring proper hygiene can often resolve the problems.
Is home mushroom growing safe?
Yes, home mushroom growing is generally safe as long as you only cultivate edible mushroom species and follow proper hygiene practices. It’s crucial to accurately identify the mushroom species you are growing to avoid accidentally cultivating poisonous varieties. Always wash your hands thoroughly before and after handling the substrate and mushrooms. If you have any allergies to molds or fungi, take precautions to avoid inhaling spores.
Leave a Comment