

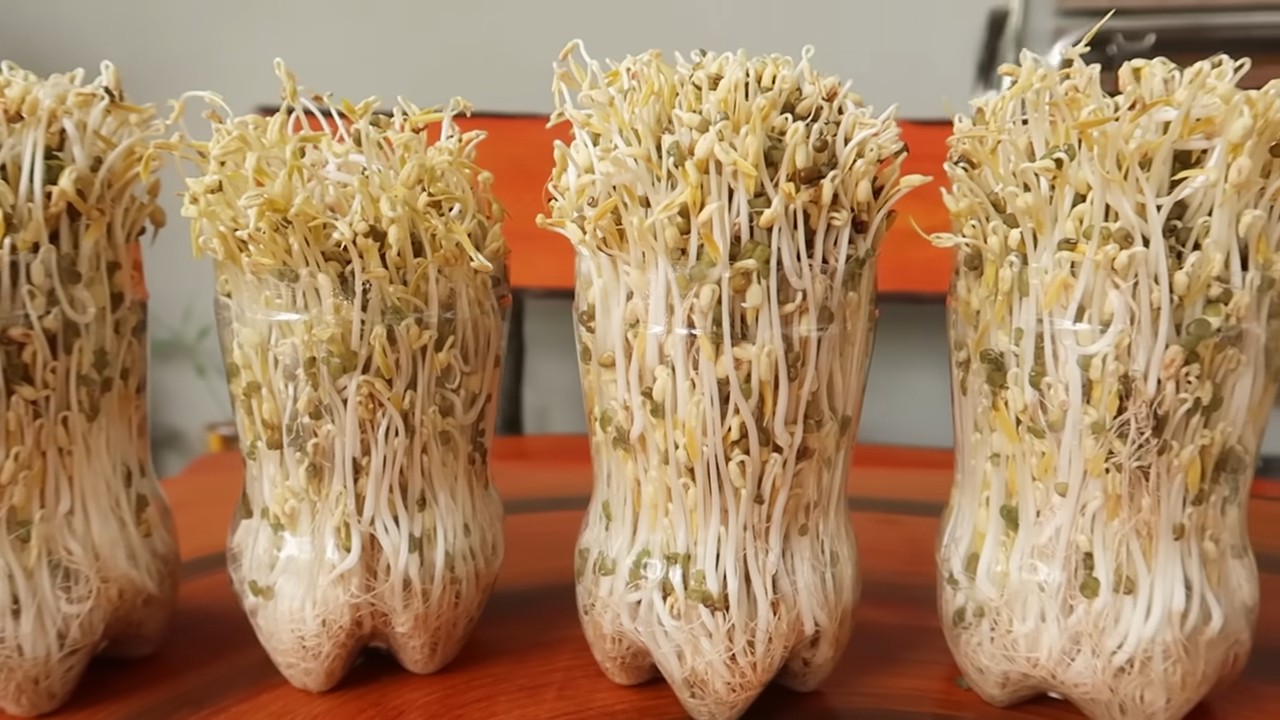
Mung Bean Sprouts DIY: Unlock the secrets to growing your own fresh, crunchy sprouts right in your kitchen! Forget those limp, flavorless sprouts from the grocery store. I’m going to show you how incredibly easy and rewarding it is to cultivate your own batch of these nutritional powerhouses at home.
Sprouting, in general, has a rich history, dating back thousands of years in various cultures, particularly in Asian cuisine. Mung bean sprouts, specifically, have been a staple in dishes across Asia, prized for their delicate flavor and impressive health benefits. They’re packed with vitamins, minerals, and enzymes, making them a fantastic addition to salads, stir-fries, and even sandwiches.
But why bother with a Mung Bean Sprouts DIY project? Well, for starters, it’s incredibly cost-effective. A small bag of mung beans can yield a surprisingly large amount of sprouts. Plus, you have complete control over the growing process, ensuring they’re free from pesticides and other unwanted chemicals. More importantly, growing your own sprouts is incredibly satisfying! There’s something truly special about nurturing a tiny seed into a vibrant, edible plant. I’ve found that it’s a great way to connect with nature, even when you’re stuck indoors. So, are you ready to ditch the store-bought sprouts and embark on this fun and easy Mung Bean Sprouts DIY adventure with me? Let’s get started!
DIY Mung Bean Sprouts: A Beginner’s Guide to Growing Your Own Crunchy Goodness
Hey there, fellow food enthusiasts! Ever wanted to grow your own fresh, crunchy mung bean sprouts right in your kitchen? It’s surprisingly easy, super rewarding, and way cheaper than buying them at the store. Plus, you know exactly what’s going into them – no weird preservatives or questionable growing practices. I’m going to walk you through everything you need to know to become a mung bean sprouting pro!
What You’ll Need
Before we dive in, let’s gather our supplies. The beauty of this project is that you probably already have most of these things lying around.
* Mung Beans: Obviously! Look for organic, whole mung beans specifically sold for sprouting. You can usually find them at health food stores, Asian markets, or online. Avoid beans that look damaged or discolored.
* A Wide-Mouth Jar: A quart-sized mason jar works perfectly. Make sure it’s clean!
* Sprouting Lid or Cheesecloth: You’ll need something to cover the jar and allow for drainage. A sprouting lid is ideal (they’re inexpensive and reusable), but a few layers of cheesecloth secured with a rubber band will also do the trick.
* Water: Filtered water is best, but tap water that’s been sitting out for a while to let the chlorine dissipate is fine too.
* A Bowl: For soaking the beans.
* A Dark Place: A cupboard, pantry, or even a covered box will work. Darkness is key for optimal sprout growth.
* A Colander or Strainer: For rinsing the sprouts.
Step-by-Step Sprouting Instructions
Okay, let’s get sprouting! This process takes about 3-5 days, so patience is key. But trust me, the fresh, crunchy sprouts are worth the wait.
1. Soak the Beans:
* Rinse your mung beans thoroughly under cool water to remove any debris.
* Place about 1/4 to 1/2 cup of mung beans in your bowl. Remember, they’ll expand significantly, so don’t overcrowd them.
* Cover the beans with plenty of cool water – about 2-3 times the volume of the beans. They’ll absorb a lot of water.
* Let them soak for 8-12 hours, or even overnight. This rehydrates the beans and starts the germination process. I usually soak them before I go to bed so they are ready in the morning.
* You’ll notice the beans will swell up considerably. That’s exactly what we want!
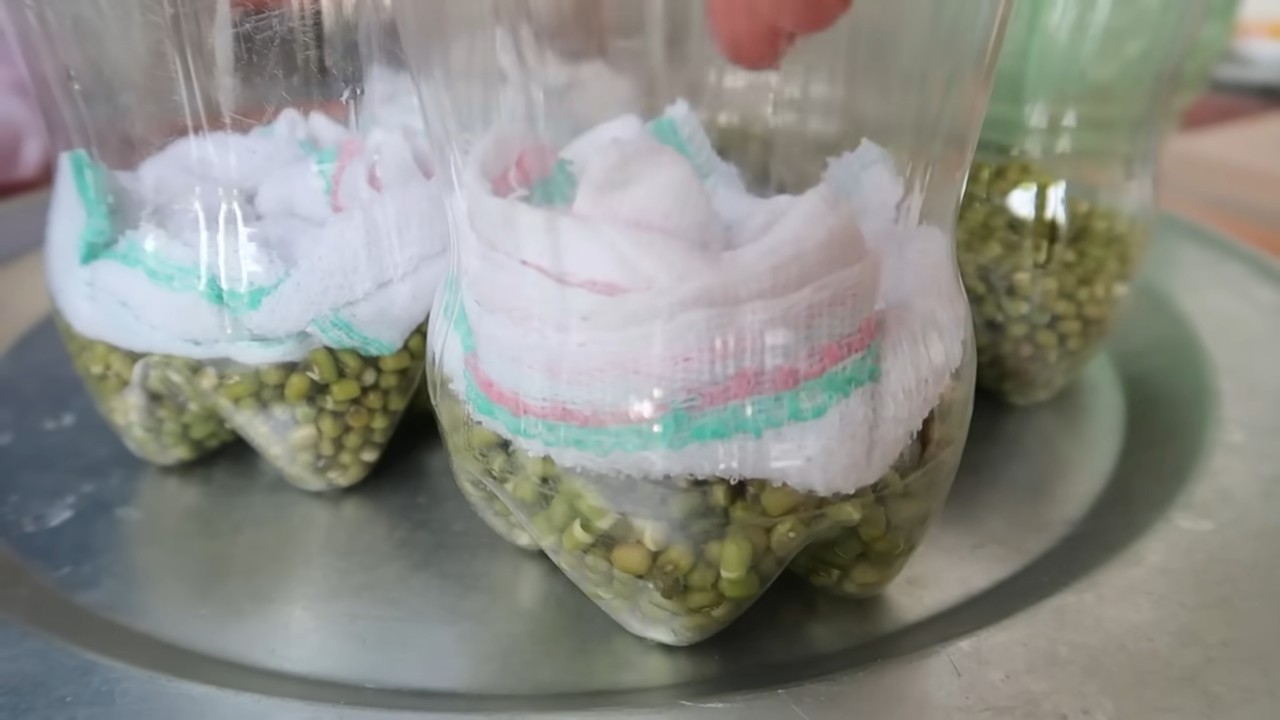
2. Transfer to the Jar:
* Drain the soaked beans in your colander or strainer. Rinse them well under cool water.
* Transfer the rinsed beans to your clean wide-mouth jar.
3. Cover and Drain:
* Secure your sprouting lid or cheesecloth to the jar.
* Turn the jar upside down over the sink or a bowl to drain any excess water. You want the beans to be moist, but not sitting in water. This is crucial to prevent mold growth.
4. Darkness is Your Friend:
* Place the jar in your dark cupboard, pantry, or covered box. The darkness encourages the sprouts to grow long and white.
5. Rinse and Drain (Twice a Day!):
* This is the most important step! Rinse and drain your sprouts twice a day – once in the morning and once in the evening.
* To rinse, simply fill the jar with cool water, swirl the beans around gently, and then drain thoroughly.
* Make sure to drain as much water as possible after each rinse. Again, excess moisture leads to mold.
* After draining, return the jar to its dark location.
6. Observe and Be Patient:
* Over the next few days, you’ll start to see tiny sprouts emerging from the beans. It’s so exciting!
* Continue rinsing and draining twice a day.
* The sprouts will grow longer and thicker each day.
7. Harvest Time!
* Your sprouts are ready to harvest when they’re about 1-2 inches long. This usually takes 3-5 days.
* Give them one final rinse and drain.
8. Greening (Optional):
* If you prefer greener sprouts, you can expose them to indirect sunlight for a few hours before harvesting. This will encourage chlorophyll production and give them a slightly greener hue. But don’t leave them in direct sunlight, or they’ll dry out.
9. Storage:
* Store your harvested sprouts in an airtight container in the refrigerator. They should last for about a week.
* Rinse them again before using.
Troubleshooting: Common Sprouting Problems and Solutions
Even with the best instructions, sometimes things can go wrong. Here are a few common problems and how to fix them:
* Mold: This is the biggest enemy of sprouting. Mold usually appears as fuzzy white or gray patches.
* Cause: Insufficient rinsing and draining, poor ventilation, or contaminated beans.
* Solution: If you see mold, unfortunately, you’ll have to discard the entire batch. To prevent mold in the future, make sure you’re rinsing and draining thoroughly twice a day. Use clean jars and sprouting equipment. Consider adding a tablespoon of apple cider vinegar to the rinse water – it has antifungal properties.
* Slow Growth:
* Cause: Temperature too cold, poor quality beans, or insufficient soaking.
* Solution: Mung beans sprout best at room temperature (around 70-75°F). If your house is cold, try placing the jar in a slightly warmer location. Make sure you’re using high-quality sprouting beans and soaking them for the recommended time.
* Rotting Smell:
* Cause: Overwatering, poor drainage, or bacterial contamination.
* Solution: A rotting smell is a sign of bacterial growth. Discard the batch immediately. Ensure proper drainage and use clean water for rinsing.
* Sprouts are Too Short:
* Cause: Not enough time, or not enough darkness.
* Solution: Be patient! Give the sprouts more time to grow. Make sure they’re kept in a dark place.
Tips and Tricks for Sprouting Success
Here are a few extra tips to help you become a sprouting master:
* Start Small: Begin with a small amount of beans (1/4 cup) until you get the hang of it. It’s better to have a small, successful batch than a large, moldy one.
* Use Good Quality Beans: Invest in organic, sprouting-specific mung beans. They’ll have a higher germination rate and be less likely to be contaminated.
* Keep Everything Clean: Cleanliness is key to preventing mold and bacteria. Wash your jars, lids, and utensils thoroughly with soap and water.
* Don’t Overcrowd: Give the sprouts plenty of room to grow. Overcrowding can lead to poor ventilation and increased risk of mold.
* Experiment with Flavors: Once you’re comfortable with the basic process, try adding a few drops of lemon juice or apple cider vinegar to the rinse water for a slightly tangy flavor.
* Enjoy Your Harvest! Mung bean sprouts are delicious in salads, stir-fries, sandwiches, and soups. Get creative and enjoy the fruits (or rather, sprouts) of your labor!
Why Sprout Your Own Mung Beans?
Besides being incredibly easy and cost-effective, sprouting your own mung beans has a ton of benefits:
* Nutrient Powerhouse: Sprouting increases the nutritional value of mung beans. They become richer in vitamins, minerals, and enzymes.
* Improved Digestion: Sprouting breaks down complex carbohydrates, making the beans easier to digest.
* Freshness and Flavor: Homegrown sprouts are incredibly fresh and have a crisp, clean flavor that you just can’t get from store-bought ones.
* Control Over Ingredients: You know exactly what’s going into your sprouts – no pesticides, herbicides, or preservatives.
* Sustainable and Eco-Friendly: Growing your own sprouts reduces your carbon footprint and supports sustainable food practices.
* It’s Fun! Seriously, it’s so satisfying to watch those little sprouts grow. It’s a great project for kids too!
So, what are you waiting for? Grab some mung beans and get sprouting! I promise you’ll be hooked. Happy sprouting!
Conclusion
So, there you have it! Cultivating your own mung bean sprouts at home is not only incredibly simple and cost-effective, but it also guarantees you’re enjoying the freshest, most nutritious sprouts possible. Forget those limp, often questionable sprouts from the grocery store. With just a few readily available supplies and a little patience, you can have a continuous supply of crisp, flavorful mung bean sprouts ready to add a delightful crunch to your salads, stir-fries, sandwiches, and more.
This DIY trick is a must-try for several compelling reasons. First and foremost, you have complete control over the growing environment, ensuring optimal hygiene and minimizing the risk of contamination. Secondly, the taste difference is remarkable. Homegrown sprouts boast a vibrant, clean flavor that store-bought varieties simply can’t match. And finally, it’s an incredibly rewarding experience to watch these tiny seeds transform into a nutritious and delicious food source right before your eyes. It’s a mini-garden on your countertop!
Don’t be afraid to experiment with variations! While this guide focuses on the traditional jar method, you can also explore using sprouting trays or even specialized sprouting machines for larger-scale production. Consider adjusting the sprouting time based on your personal preference for sprout length and flavor intensity. Some people prefer shorter, sweeter sprouts, while others enjoy a longer, more robust flavor. You can also try different types of beans, although mung beans are particularly well-suited for sprouting due to their ease of germination and delicious taste.
Beyond the basic recipe, consider adding a touch of creativity to your sprouting process. Some people like to add a small amount of lemon juice to the rinsing water to help prevent mold growth and enhance the flavor. Others experiment with different light exposure levels to influence the sprout’s color and nutrient content. Remember, the key is to find what works best for you and your environment.
We wholeheartedly encourage you to give this DIY mung bean sprouts project a try. It’s a fun, educational, and ultimately delicious way to incorporate more fresh, healthy food into your diet. Once you’ve mastered the basics, you’ll be amazed at how easy it is to maintain a constant supply of these versatile sprouts.
Don’t hesitate to share your experiences with us! We’d love to hear about your successes, challenges, and any unique variations you’ve discovered. Post photos of your homegrown sprouts on social media and tag us. Let’s build a community of home sprouters and spread the word about this fantastic DIY trick! Happy sprouting!
Frequently Asked Questions (FAQ)
What are the nutritional benefits of mung bean sprouts?
Mung bean sprouts are a nutritional powerhouse, packed with vitamins, minerals, and antioxidants. They are an excellent source of Vitamin C, Vitamin K, folate, and various B vitamins. They also contain significant amounts of fiber, which aids in digestion and promotes gut health. Furthermore, mung bean sprouts are a good source of protein, making them a valuable addition to vegetarian and vegan diets. The sprouting process itself increases the bioavailability of certain nutrients, making them even more readily absorbed by the body. Eating mung bean sprouts regularly can contribute to improved immune function, bone health, and overall well-being.
How long do homemade mung bean sprouts last in the refrigerator?
Properly stored, homemade mung bean sprouts can last for up to 5-7 days in the refrigerator. To maximize their shelf life, ensure they are thoroughly drained after the final rinse and stored in an airtight container lined with a paper towel. The paper towel will help absorb any excess moisture, preventing the sprouts from becoming soggy and extending their freshness. Check the sprouts daily for any signs of spoilage, such as a slimy texture or an unpleasant odor. Discard any sprouts that show these signs.
What if my mung bean sprouts start to smell bad?
A foul odor is a clear indication that your mung bean sprouts have gone bad and should be discarded immediately. The smell is usually caused by bacterial growth, which can occur if the sprouts are not properly rinsed or if the growing environment is not clean. To prevent this, ensure you are rinsing the sprouts thoroughly at least twice a day with fresh, clean water. Also, sterilize your sprouting jar or container before each batch to eliminate any potential contaminants. If you notice a slight earthy smell, that’s normal, but any strong or unpleasant odor is a warning sign.
Can I eat the root of the mung bean sprout?
Yes, the root of the mung bean sprout is perfectly edible and safe to consume. In fact, many people enjoy the slightly crunchy texture and mild flavor of the root. There’s no need to remove it before eating the sprouts. However, if you prefer, you can trim the roots off before adding the sprouts to your dishes. It’s purely a matter of personal preference.
Why are my mung bean sprouts not sprouting?
There are several reasons why your mung bean sprouts might not be sprouting. The most common cause is using old or non-viable seeds. Mung beans have a limited shelf life, and their germination rate decreases over time. Ensure you are using fresh mung beans specifically intended for sprouting. Another reason could be improper soaking. The beans need to be soaked for an adequate amount of time (usually 8-12 hours) to initiate the germination process. Insufficient moisture during the sprouting process can also hinder growth. Make sure to rinse the sprouts thoroughly at least twice a day and keep them consistently moist. Finally, temperature can play a role. Mung beans sprout best in a warm environment (around 70-75°F or 21-24°C).
Is it safe to eat raw mung bean sprouts?
While homemade mung bean sprouts are generally safe to eat raw, it’s important to take precautions to minimize the risk of bacterial contamination. Thoroughly rinsing the sprouts with clean water is crucial to remove any potential pathogens. If you are concerned about food safety, you can lightly cook the sprouts before eating them. Steaming or stir-frying them for a few minutes will kill any harmful bacteria without significantly affecting their nutritional value. Individuals with weakened immune systems, pregnant women, and young children should exercise extra caution and consider cooking the sprouts before consumption.
Can I use any type of jar for sprouting?
While a wide-mouth mason jar is a popular choice for sprouting, you can use other types of jars as well, as long as they are clean and food-grade. The key is to ensure that the jar has adequate ventilation and drainage. A wide mouth is preferable because it makes it easier to rinse and drain the sprouts. You’ll also need a way to cover the jar while allowing air to circulate. A sprouting lid with a mesh screen is ideal, but you can also use cheesecloth or a piece of nylon netting secured with a rubber band. Avoid using jars with narrow necks, as they can make it difficult to rinse the sprouts properly and increase the risk of mold growth.
How much light do mung bean sprouts need?
Mung bean sprouts don’t require direct sunlight to grow. In fact, exposing them to direct sunlight can cause them to turn bitter. They thrive best in a dimly lit environment. You can place the sprouting jar in a cupboard or on a countertop away from direct sunlight. Some people prefer to sprout them in complete darkness to encourage longer, whiter sprouts. Experiment with different light levels to see what works best for you and your desired sprout characteristics.
Can I sprout other types of beans using the same method?
Yes, you can use the same basic method to sprout other types of beans, such as lentils, adzuki beans, and chickpeas. However, the soaking and sprouting times may vary depending on the type of bean. It’s best to research the specific requirements for each type of bean before starting the sprouting process. Some beans, like kidney beans, contain toxins that are destroyed by cooking, so they are not suitable for sprouting and eating raw. Always choose beans specifically intended for sprouting to ensure they are safe and will germinate properly.
Leave a Comment