

Mushroom growing plastic bottle: Who knew turning trash into treasure could be so delicious? I’m so excited to share this incredibly simple and rewarding DIY project with you – growing your own mushrooms in a recycled plastic bottle! Forget those expensive grocery store prices; imagine harvesting fresh, flavorful mushrooms right from your kitchen counter.
The practice of cultivating mushrooms has ancient roots, dating back centuries in various cultures. From the medicinal uses in traditional Chinese medicine to the culinary delights enjoyed in Europe, mushrooms have always held a special place. Now, we’re bringing this age-old practice into the modern home with a sustainable twist.
In today’s world, where sustainability and self-sufficiency are becoming increasingly important, this mushroom growing plastic bottle hack is a game-changer. Not only does it reduce waste by repurposing plastic bottles, but it also empowers you to grow your own food, reducing your carbon footprint and saving money. Plus, let’s be honest, there’s something incredibly satisfying about nurturing life from something that would otherwise end up in a landfill. This DIY project is perfect for beginners, apartment dwellers, or anyone looking for a fun and eco-friendly way to add fresh, organic mushrooms to their diet. So, grab that empty plastic bottle, and let’s get growing!
DIY Mushroom Growing in a Plastic Bottle: A Beginner’s Guide
Hey there, fellow fungi enthusiasts! Ever dreamt of harvesting your own delicious mushrooms right from your kitchen counter? Well, dream no more! This guide will walk you through the surprisingly simple process of growing mushrooms in a recycled plastic bottle. It’s a fun, eco-friendly project, and the reward of fresh, homegrown mushrooms is totally worth it. Let’s get started!
What You’ll Need:
Before we dive in, let’s gather our supplies. Don’t worry, most of these are easy to find:
* A clean, clear plastic bottle (2-liter soda bottle works great): Make sure it’s thoroughly cleaned with soap and water to remove any residue.
* Mushroom spawn (Oyster mushrooms are recommended for beginners): You can find these online or at your local gardening supply store. Oyster mushrooms are relatively easy to grow and tolerate a wider range of conditions.
* Substrate (Straw, coffee grounds, or hardwood sawdust): This is the food source for your mushrooms. Straw is a good option for beginners as it’s readily available and easy to prepare. Coffee grounds are also a great sustainable option.
* Boiling water: For pasteurizing the substrate.
* Spray bottle with water: To maintain humidity.
* Rubbing alcohol: For sanitizing your hands and tools.
* Gloves (optional): To maintain cleanliness.
* Drill or knife: To create ventilation holes.
* Micropore tape (optional): To cover the ventilation holes.
* A dark, humid place: A basement, closet, or even under the sink will work.
Preparing the Substrate: Pasteurization is Key!
This is arguably the most important step. Pasteurization kills off competing organisms that could prevent your mushrooms from growing. We don’t want any unwanted guests crashing our mushroom party!
1. Chop the straw (if using): If you’re using straw, chop it into smaller pieces, about 1-3 inches long. This makes it easier for the mushroom mycelium to colonize.
2. Place the substrate in a heat-resistant container: A large bucket or pot will do.
3. Pour boiling water over the substrate: Completely submerge the straw or coffee grounds in boiling water. This is where the pasteurization magic happens.
4. Let it soak for at least 1 hour: This allows the heat to penetrate the substrate and kill off any unwanted organisms.
5. Drain the excess water: After soaking, drain the substrate thoroughly. You want it to be damp, not soaking wet. A good test is to squeeze a handful of the substrate; only a few drops of water should come out.
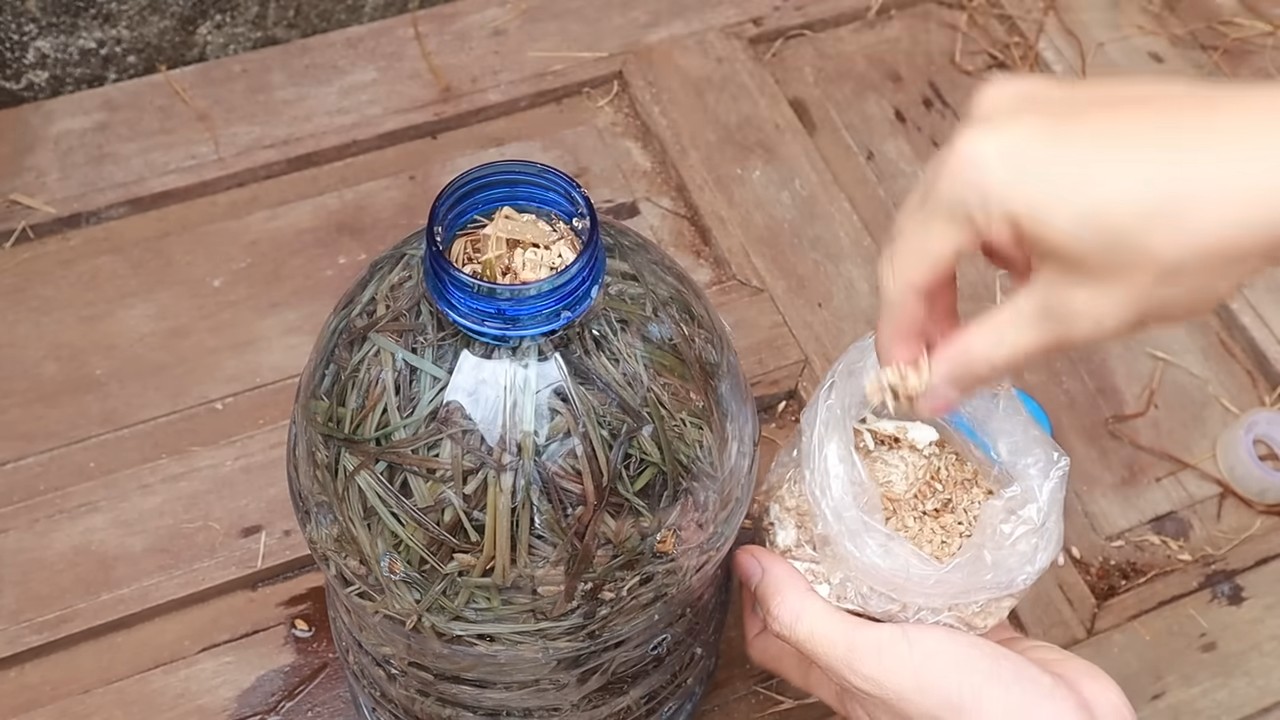
Creating the Mushroom Bottle: Layering is the Name of the Game
Now that our substrate is pasteurized, we can start building our mushroom bottle.
1. Sanitize your hands and work area: Cleanliness is crucial to prevent contamination. Use rubbing alcohol to sanitize your hands, the inside of the plastic bottle, and any tools you’ll be using.
2. Drill ventilation holes: Drill or carefully cut several small holes (about ¼ inch in diameter) around the bottle. These holes will allow for air exchange, which is essential for mushroom growth. Space them a few inches apart. You can use micropore tape to cover these holes later, which will help maintain humidity while still allowing for airflow.
3. Layer the substrate and spawn: This is where the magic begins! Start with a layer of substrate at the bottom of the bottle (about 2-3 inches). Then, sprinkle a layer of mushroom spawn over the substrate. Repeat this process, alternating layers of substrate and spawn, until you reach the top of the bottle. The final layer should be substrate.
4. Pack the layers gently: Don’t pack the substrate too tightly, as this can restrict airflow. Just gently press down on each layer to ensure good contact between the substrate and the spawn.
5. Cover the ventilation holes (optional): If you’re using micropore tape, cover the ventilation holes now. This will help maintain humidity inside the bottle.
Incubation: The Waiting Game
This is where patience comes in. The mycelium (the vegetative part of the mushroom) needs time to colonize the substrate.
1. Place the bottle in a dark, humid place: A basement, closet, or under the sink are all good options. The ideal temperature for oyster mushroom incubation is around 65-75°F (18-24°C).
2. Monitor the bottle: Check the bottle every few days. You should start to see white, fuzzy growth (the mycelium) spreading throughout the substrate.
3. Maintain humidity: If the substrate looks dry, lightly mist the inside of the bottle with water using a spray bottle. Be careful not to overwater, as this can lead to mold growth.
4. Wait for full colonization: This can take anywhere from 2-4 weeks, depending on the temperature and humidity. You’ll know the substrate is fully colonized when it’s completely covered in white mycelium.
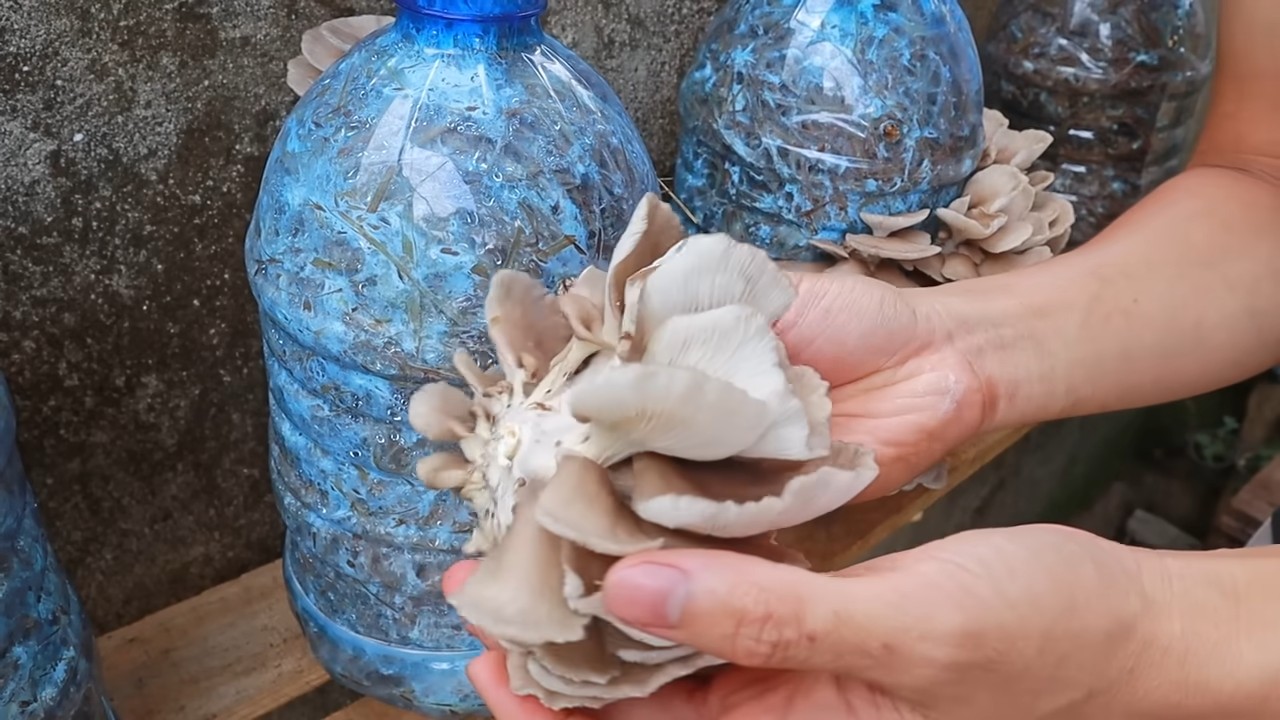
Fruiting: Time to Harvest!
Once the substrate is fully colonized, it’s time to trigger fruiting, which is when the mushrooms start to grow.
1. Increase light exposure: Move the bottle to a location with indirect light. Direct sunlight can dry out the substrate.
2. Increase humidity: Mist the bottle more frequently, several times a day. You can also place a plastic bag over the bottle to create a humidity tent, but make sure to leave some openings for air circulation.
3. Maintain ventilation: Ensure there’s adequate airflow around the bottle.
4. Watch for pins: After a few days, you should start to see small mushroom “pins” forming on the surface of the substrate, usually near the ventilation holes.
5. Harvest the mushrooms: Once the mushrooms have reached a desirable size (usually within a week of pinning), harvest them by gently twisting them off the substrate.
Second Flush and Beyond: Keeping the Fun Going
Congratulations, you’ve harvested your first batch of homegrown mushrooms! But the fun doesn’t have to stop there.
1. Soak the substrate: After harvesting, soak the substrate in water for a few hours to rehydrate it.
2. Return to fruiting conditions: Place the bottle back in its fruiting location and continue to mist it regularly.
3. Wait for the second flush: You should get another flush of mushrooms within a few weeks. You can usually get 2-3 flushes from a single bottle.
4. Compost the spent substrate: Once the substrate stops producing mushrooms, you can compost it and use it to enrich your garden soil.
Troubleshooting: Common Issues and Solutions
Even with the best intentions, things can sometimes go wrong. Here are some common issues you might encounter and how to fix them:
* Mold growth: If you see green, black, or other colored mold growing in the bottle, it means the substrate wasn’t properly pasteurized or the environment is too humid. Unfortunately, there’s not much you can do at this point except discard the bottle and start over with a fresh batch of substrate. Make sure to thoroughly pasteurize the substrate and maintain good ventilation.
* Slow colonization: If the mycelium is growing slowly, it could be due to low temperature or lack of humidity. Try moving the bottle to a warmer location and misting it more frequently.
* No pinning: If the substrate is fully colonized but no mushrooms are forming, it could be due to lack of light or humidity. Try increasing light exposure and misting the bottle more frequently.
* Small mushrooms: If the mushrooms are small and stunted, it could be due to lack of nutrients or poor ventilation. Try adding a small amount of nutrient-rich material to the substrate, such as coffee grounds or bran. Also, make sure there’s adequate airflow around the bottle.
Choosing Your Substrate: A Deeper Dive
While I mentioned straw and coffee grounds earlier, let’s explore substrate options a bit more. The right substrate can significantly impact your mushroom yield and the overall success of your project.
* Straw: As I said, a great beginner-friendly option. It’s readily available, relatively inexpensive, and easy to pasteurize. However, it doesn’t provide as many nutrients as some other substrates.
* Coffee Grounds: A fantastic sustainable choice! Coffee grounds are rich in nitrogen, which mushrooms love. Make sure to use fresh coffee grounds, as they can quickly become contaminated with mold. You can often get them for free from local coffee shops.
* Hardwood Sawdust: A more nutrient-rich option than straw, but it requires more careful pasteurization. Make sure to use hardwood sawdust, not softwood, as softwood contains resins that can inhibit mushroom growth.
* Cardboard: Surprisingly effective! Cardboard is readily available
Conclusion
So, there you have it! Transforming a simple plastic bottle into a thriving mushroom farm is not just a fun project; it’s a sustainable and incredibly rewarding way to enjoy fresh, delicious mushrooms right from your own home. We’ve walked you through the process, highlighting the ease and accessibility of this DIY trick. Forget expensive mushroom growing kits or relying solely on store-bought varieties. With minimal effort and readily available materials, you can cultivate a continuous supply of these culinary delights.
The beauty of this method lies in its adaptability. Feel free to experiment with different mushroom species. Oyster mushrooms are a fantastic starting point due to their resilience and rapid growth, but don’t be afraid to branch out and try shiitake or even lion’s mane once you’ve mastered the basics. Consider varying the substrate mixture as well. While our recipe provides a solid foundation, tweaking the ratio of coffee grounds, straw, and other organic materials can influence the flavor and yield of your mushrooms.
This DIY mushroom growing method is a game-changer for anyone interested in sustainable living, urban gardening, or simply enjoying the freshest possible ingredients. It’s a fantastic educational project for kids, teaching them about the life cycle of fungi and the importance of recycling. Plus, it’s a conversation starter! Imagine the look on your friends’ faces when you tell them you grew those delicious mushrooms yourself, using nothing more than a repurposed plastic bottle.
Don’t be intimidated by the process. The steps are straightforward, and the rewards are immense. The satisfaction of harvesting your own homegrown mushrooms is unparalleled. And remember, even if your first attempt isn’t perfect, don’t give up! Mushroom cultivation is a learning process, and each attempt will bring you closer to mastering the art.
We strongly encourage you to give this DIY mushroom growing trick a try. It’s an affordable, eco-friendly, and incredibly satisfying way to bring the taste of the forest to your table. Once you’ve harvested your first batch, we’d love to hear about your experience! Share your photos, tips, and any variations you’ve tried in the comments below. Let’s build a community of mushroom enthusiasts and inspire others to embrace the magic of homegrown fungi. Happy growing!
Frequently Asked Questions (FAQ)
What type of plastic bottle is best for growing mushrooms?
Ideally, you should use a sturdy, food-grade plastic bottle. Look for bottles that have a recycling symbol indicating they are safe for food contact. Avoid using bottles that have contained harsh chemicals or cleaning products, as these could contaminate your mushrooms. A 2-liter soda bottle or a similar-sized water bottle works well. Make sure to thoroughly clean and sanitize the bottle before use.
What kind of mushrooms can I grow in a plastic bottle?
Oyster mushrooms are the easiest and most recommended variety for beginners. They are relatively forgiving and can thrive in a wide range of conditions. Other options include shiitake, lion’s mane, and wine cap mushrooms, but these may require more specific substrate mixtures and environmental controls. Start with oyster mushrooms to gain experience and then experiment with other varieties as you become more confident.
What is the best substrate for growing mushrooms in a bottle?
A mixture of coffee grounds, straw, and sawdust is a good starting point. Coffee grounds provide nitrogen, while straw and sawdust provide carbon and structure. You can also add other organic materials such as shredded cardboard, wood chips, or even spent grain from brewing beer. The key is to ensure the substrate is properly pasteurized to kill any competing organisms.
How do I pasteurize the substrate?
Pasteurization is crucial to prevent mold and other contaminants from outcompeting your mushrooms. There are several ways to pasteurize your substrate. One common method is to submerge the substrate in hot water (around 160-180°F or 71-82°C) for 60-90 minutes. You can also steam the substrate in a large pot or pressure cooker. Ensure the substrate is thoroughly saturated with water during the pasteurization process. After pasteurization, allow the substrate to cool completely before inoculating it with mushroom spawn.
Where should I place the mushroom bottle while it’s growing?
The ideal location is a cool, dark, and humid environment. A basement, closet, or even under the sink can work well. Avoid direct sunlight, as it can overheat the bottle and dry out the substrate. Maintain a temperature between 60-75°F (15-24°C) and a humidity level of 80-90%. You can increase humidity by misting the bottle regularly or placing it inside a plastic bag with a few air holes.
How long does it take for mushrooms to grow?
The time it takes for mushrooms to grow depends on the species, the substrate, and the environmental conditions. Oyster mushrooms typically start to fruit within 2-3 weeks of inoculation. Shiitake mushrooms may take several months to fruit. Be patient and monitor the bottle regularly for signs of growth.
How do I know when the mushrooms are ready to harvest?
Oyster mushrooms are ready to harvest when the caps are fully formed and the edges are still slightly curled downwards. Shiitake mushrooms are ready when the caps have flattened out and the gills are visible. Harvest the mushrooms by gently twisting them off the substrate.
Can I get multiple flushes of mushrooms from the same bottle?
Yes, you can typically get several flushes of mushrooms from the same bottle. After harvesting the first flush, soak the substrate in water for 12-24 hours to rehydrate it. Then, drain the excess water and return the bottle to its growing location. You should see another flush of mushrooms within a few weeks.
What if my mushroom bottle gets moldy?
Mold is a common problem in mushroom cultivation. If you see mold growing on the substrate, it’s important to remove it immediately to prevent it from spreading. You can try scraping off the moldy area and spraying the area with a diluted hydrogen peroxide solution. If the mold is widespread, it’s best to discard the entire bottle and start over. Proper pasteurization of the substrate is the best way to prevent mold growth.
Is growing mushrooms in a plastic bottle safe?
Yes, growing mushrooms in a plastic bottle is generally safe, as long as you use a food-grade plastic bottle and follow proper hygiene practices. Make sure to thoroughly clean and sanitize the bottle before use, and always wash your hands before handling the substrate or mushrooms. If you are concerned about the safety of the plastic, you can line the bottle with a food-grade plastic bag or use a glass jar instead.
Can I use this method to grow mushrooms indoors year-round?
Absolutely! One of the biggest advantages of this DIY mushroom growing trick is that it allows you to cultivate mushrooms indoors regardless of the season. By controlling the temperature, humidity, and lighting, you can create an optimal environment for mushroom growth year-round. This makes it a fantastic option for urban dwellers and anyone who wants to enjoy fresh, homegrown mushrooms throughout the year. Remember to monitor the conditions regularly and adjust as needed to ensure your mushrooms thrive.
Leave a Comment