

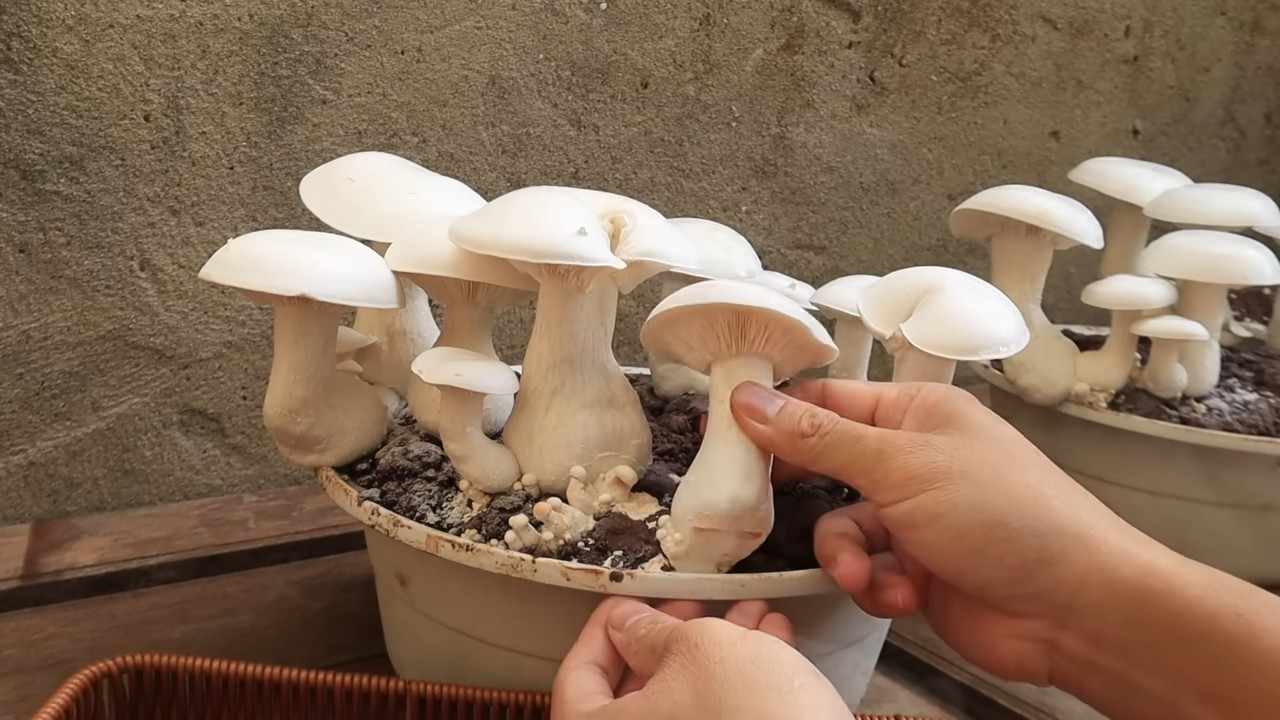
Mushroom Growing in a Bowl: Imagine harvesting fresh, delicious mushrooms right from your kitchen counter! Sounds like something out of a fairytale, doesn’t it? Well, it’s not! This DIY guide will unlock the secrets to cultivating your own edible fungi in the most unexpected of places – a simple bowl.
For centuries, mushrooms have held a revered place in various cultures, from ancient medicinal practices in the East to culinary delicacies in Europe. Their earthy flavors and unique textures have captivated palates worldwide. But beyond their culinary appeal, growing mushrooms yourself connects you to a long and fascinating history of human interaction with the natural world.
Why should you try mushroom growing in a bowl? Because it’s easier than you think! Forget sprawling gardens and complicated setups. This method is perfect for apartment dwellers, busy individuals, or anyone who wants to experience the joy of growing their own food without a huge commitment. Plus, store-bought mushrooms can be expensive, and you never quite know how fresh they are. With this DIY trick, you’ll have a constant supply of organic, flavorful mushrooms right at your fingertips. I’m excited to show you how!
Grow Your Own Gourmet Mushrooms in a Bowl: A Beginner’s Guide
Hey there, fellow fungi enthusiasts! Ever dreamt of harvesting your own delicious mushrooms right from your kitchen counter? Well, dream no more! I’m going to walk you through a super simple and rewarding DIY project: growing mushrooms in a bowl. It’s easier than you think, and the satisfaction of eating something you nurtured from spores is truly amazing. We’ll be focusing on oyster mushrooms for this guide, as they are relatively easy to grow and quite forgiving for beginners. Let’s get started!
What You’ll Need
Before we dive in, let’s gather our supplies. This is crucial for a smooth and successful mushroom-growing experience.
* Oyster Mushroom Spawn: This is the heart of our operation! You can find oyster mushroom spawn online or at specialty gardening stores. Make sure it’s fresh and from a reputable source. Grain spawn is generally the easiest to work with for this method.
* Substrate: This is the food source for your mushrooms. We’ll be using pasteurized straw. Straw is readily available, inexpensive, and provides a great environment for oyster mushrooms. You can also use coffee grounds, but straw is more beginner-friendly.
* A Bowl: Choose a bowl that’s large enough to hold your substrate and spawn. A plastic or ceramic bowl works perfectly. I recommend something at least 8 inches in diameter and 4 inches deep.
* A Large Pot or Container: We’ll need this for pasteurizing the straw. Make sure it’s big enough to fully submerge the straw.
* A Thermometer: This is essential for monitoring the temperature during pasteurization. A candy thermometer works great.
* A Strainer or Colander: For draining the pasteurized straw.
* Spray Bottle: Filled with clean water for maintaining humidity.
* Gloves: To keep things sanitary and prevent contamination.
* Optional: Micropore tape or plastic wrap to cover the bowl initially.
Preparing the Substrate: Pasteurizing the Straw
This is a crucial step to eliminate competing organisms and give your mushroom spawn a head start. We’re not sterilizing, just pasteurizing, which means we’re killing off the bad guys without completely eliminating all the beneficial microbes.
1. Chop the Straw: Cut the straw into smaller pieces, about 2-4 inches long. This will make it easier to pack into the bowl and allow the mushroom mycelium to colonize it more effectively. I usually use scissors or garden shears for this.
2. Soak the Straw: Place the chopped straw in your large pot or container and cover it with water. Make sure all the straw is fully submerged. Let it soak for at least an hour. This will help it absorb moisture and prepare it for pasteurization.
3. Pasteurize the Straw: Place the pot on the stove and heat the water to 160-180°F (71-82°C). Maintain this temperature for 60-90 minutes. Use your thermometer to monitor the temperature closely. It’s important not to let the water boil, as this can damage the straw and make it too soggy.
4. Drain the Straw: After pasteurization, carefully drain the hot water from the pot. Transfer the straw to a strainer or colander and let it cool completely. You want the straw to be damp but not dripping wet. Squeeze out any excess water. The straw should feel like a wrung-out sponge.
Inoculating the Substrate: Layering Spawn and Straw
Now comes the fun part: introducing the mushroom spawn to the prepared straw! This is where the magic happens.
1. Clean Your Bowl: Before we start, make sure your bowl is clean and free of any contaminants. Wash it with soap and water and dry it thoroughly.
2. Layering Time: We’ll be creating layers of straw and spawn in the bowl. Start with a layer of pasteurized straw at the bottom of the bowl, about an inch thick.
3. Add Spawn: Sprinkle a generous layer of oyster mushroom spawn over the straw. Aim for about 1/4 of your total spawn for this first layer.
4. Repeat Layers: Continue layering straw and spawn, pressing down gently each time. Make sure the spawn is evenly distributed throughout the straw.
5. Top Layer: Finish with a final layer of straw on top. This will help retain moisture and protect the spawn.
6. Optional Covering: Cover the bowl loosely with micropore tape or plastic wrap. This will help maintain humidity and prevent contamination. If using plastic wrap, poke a few small holes for air circulation.
Incubation: Waiting for the Magic to Happen
This is the waiting game. The mushroom mycelium needs time to colonize the straw.
1. Find a Suitable Location: Place the bowl in a dark, warm, and humid location. A temperature of 65-75°F (18-24°C) is ideal. A closet, basement, or spare room works well.
2. Maintain Humidity: Check the moisture level of the straw regularly. If it feels dry, mist it lightly with water from your spray bottle. You want the straw to stay damp but not soggy.
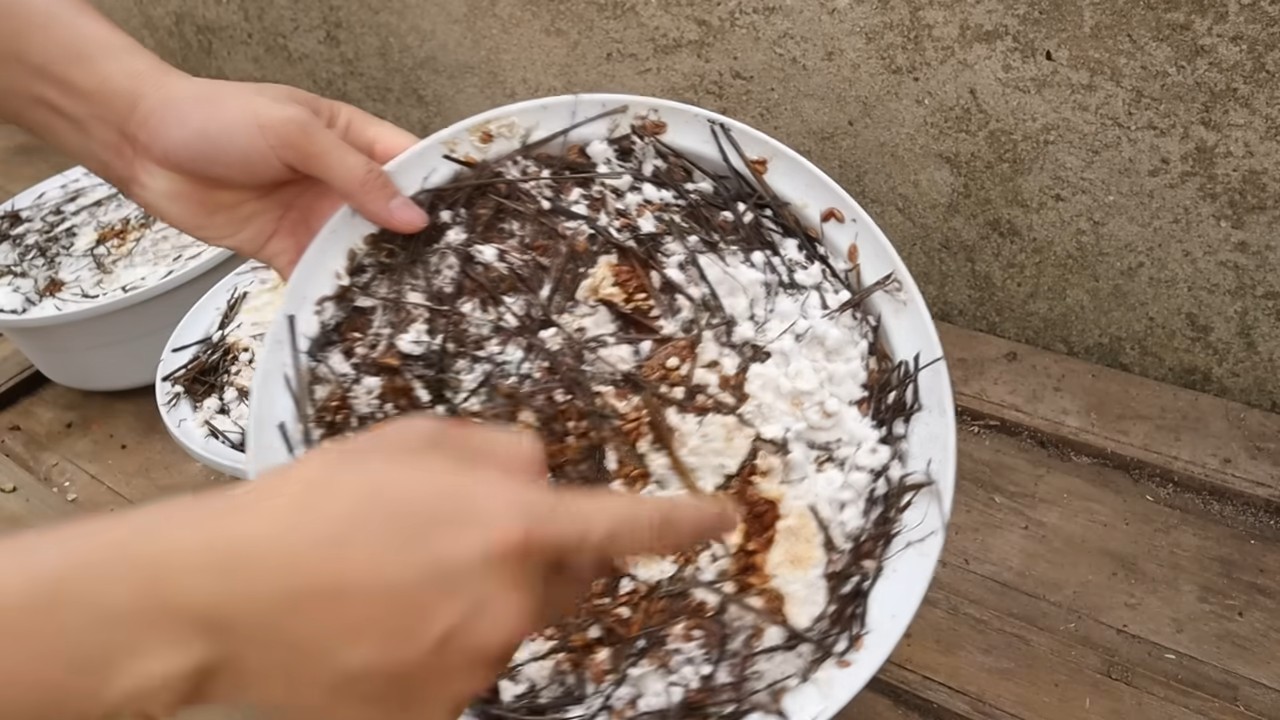
3. Patience is Key: It will take several weeks for the mycelium to fully colonize the straw. You’ll know it’s happening when you see white, fuzzy growth spreading throughout the straw. This is the mushroom mycelium, and it’s a beautiful sight!
Fruiting: Time to Harvest!
Once the straw is fully colonized, it’s time to trigger fruiting, which means encouraging the mushrooms to grow.
1. Increase Airflow: Remove the micropore tape or plastic wrap to allow for more airflow.
2. Increase Light: Move the bowl to a location with indirect light. Direct sunlight can dry out the mushrooms.
3. Maintain Humidity: Continue to mist the straw regularly to maintain high humidity. You can also place a humidity dome over the bowl, such as a clear plastic container or bag.
4. Watch for Pinheads: After a few days, you should start to see small mushroom “pinheads” forming. These are the baby mushrooms!
5. Harvest Time: The mushrooms will grow rapidly. Harvest them when the caps are fully developed but before they start to drop spores. This is usually when the edges of the caps start to flatten out or curl upwards.
6. Harvesting Technique: To harvest, gently twist and pull the mushrooms from the straw. Try to remove the entire cluster at once.
Post-Harvest Care: Encouraging More Flushes
Congratulations, you’ve harvested your first flush of mushrooms! But the fun doesn’t have to end there. You can often get several more flushes from the same bowl.
1. Clean Up: After harvesting, remove any remaining mushroom stems or debris from the straw.
2. Soak the Substrate: Submerge the colonized straw in water for 12-24 hours. This will rehydrate the substrate and encourage another flush of mushrooms.
3. Repeat the Process: Drain the water and return the bowl to its fruiting location. Continue to maintain humidity and airflow.
4. Enjoy Multiple Flushes: You can usually get 2-3 flushes of mushrooms from the same bowl. After that, the substrate will be depleted of nutrients, and it’s time to start a new batch.
Troubleshooting: Common Issues and Solutions
Even with the best intentions, things can sometimes go wrong. Here are some common issues you might encounter and how to fix them.
* Contamination: If you see green, black, or other colored mold growing in your bowl, it’s likely contaminated. Unfortunately, there’s not much you can do at this point except discard the contaminated substrate. To prevent contamination, make sure to pasteurize the straw properly and maintain a clean environment.
* Slow Colonization: If the mycelium is growing slowly, it could be due to low temperature or insufficient humidity. Make sure the bowl is in a warm and humid location.
* No Fruiting: If the straw is fully colonized but no mushrooms are forming, it could be due to lack of airflow or insufficient light. Try increasing airflow and moving the bowl to a location with indirect light.
* Dry Mushrooms: If the mushrooms are drying out, increase humidity by misting them more frequently or using a humidity dome.
Enjoy Your Homegrown Mushrooms!
Now that you’ve successfully grown your own oyster mushrooms, it’s time to enjoy the fruits (or rather, fungi) of your labor! Oyster mushrooms are incredibly versatile and can be used in a wide variety of dishes. Sauté them with garlic and butter, add them to soups and stews, or use them as a topping for pizza or pasta. The possibilities are endless!
Growing mushrooms in a bowl is a fun, rewarding, and educational experience. I hope this guide
Conclusion
So, there you have it! Growing mushrooms in a bowl isn’t just a quirky science experiment; it’s a surprisingly accessible and rewarding way to bring fresh, flavorful fungi right to your kitchen counter. We’ve walked through the simple steps, highlighting how even a complete beginner can successfully cultivate their own delicious harvest. Forget those overpriced, often bruised mushrooms at the grocery store – with a little patience and this straightforward method, you can enjoy the unparalleled taste of homegrown goodness.
This DIY mushroom growing technique is a must-try for several reasons. First and foremost, it’s incredibly cost-effective. The initial investment in supplies is minimal, especially when compared to purchasing mushrooms regularly. Second, it’s a sustainable practice. You’re reducing your carbon footprint by eliminating the transportation and packaging associated with commercially grown mushrooms. Third, and perhaps most importantly, it’s incredibly satisfying. There’s something truly magical about watching these fascinating organisms sprout and flourish under your care.
But the beauty of this method lies in its adaptability. While we’ve focused on a general approach, feel free to experiment with different types of mushrooms. Oyster mushrooms are particularly well-suited for bowl cultivation due to their aggressive growth and tolerance for varied conditions. You could also try shiitake mushrooms, although they may require a bit more attention to humidity and temperature. Consider adding different substrates to your growing medium. Coffee grounds, straw, and even shredded cardboard can provide valuable nutrients and support the mushroom’s growth. Just be sure to pasteurize any new substrate to eliminate competing molds and bacteria.
Don’t be afraid to get creative with your bowl setup too. While a simple glass or ceramic bowl works perfectly fine, you could also repurpose old containers or even create a more elaborate terrarium-like environment. The key is to maintain adequate humidity and airflow.
We are confident that you’ll find this DIY mushroom growing experience to be both educational and delicious. It’s a fantastic way to connect with nature, learn about the fascinating world of fungi, and enjoy the fruits (or rather, the mushrooms) of your labor.
So, what are you waiting for? Gather your supplies, follow the steps outlined in this guide, and embark on your own mushroom-growing adventure. We encourage you to share your experiences with us! Post photos of your mushroom bowls, tell us about any challenges you encountered, and let us know which variations you tried. Your feedback will not only help us improve this guide but also inspire others to discover the joys of growing their own mushrooms. Let’s cultivate a community of mushroom enthusiasts, one bowl at a time! This method of mushroom growing is a game changer.
Frequently Asked Questions (FAQ)
What kind of mushrooms can I grow in a bowl?
While many types of mushrooms can be grown indoors, some are better suited for bowl cultivation than others. Oyster mushrooms (Pleurotus spp.) are generally considered the easiest and most reliable choice for beginners. They are fast-growing, relatively tolerant of varying conditions, and produce abundant harvests. Shiitake mushrooms (Lentinula edodes) can also be grown in a bowl, but they require more attention to humidity and temperature. Other possibilities include lion’s mane (Hericium erinaceus) and pioppino (Agrocybe aegerita), but these may be more challenging to cultivate successfully. Avoid attempting to grow wild mushrooms in a bowl, as many are poisonous and require very specific conditions to thrive.
How do I prepare the substrate for mushroom growing?
The substrate is the material that the mushroom mycelium will feed on. Common substrates for bowl cultivation include straw, coffee grounds, sawdust, and even shredded cardboard. Regardless of the substrate you choose, it’s crucial to pasteurize it before introducing the mushroom spawn. Pasteurization kills off competing molds and bacteria that could hinder the growth of your mushrooms. To pasteurize straw or sawdust, soak it in hot water (around 160-180°F) for at least an hour. For coffee grounds, simply microwave them for a few minutes or pour boiling water over them. Allow the substrate to cool completely before mixing it with the mushroom spawn.
Where can I get mushroom spawn?
Mushroom spawn is essentially mushroom “seeds.” It consists of mycelium (the vegetative part of the mushroom) grown on a carrier material such as grain or sawdust. You can purchase mushroom spawn from online retailers specializing in mushroom cultivation supplies. Local nurseries or garden centers may also carry mushroom spawn, particularly oyster mushroom spawn. When purchasing spawn, make sure it is fresh and from a reputable source. Look for spawn that is actively growing and free from any signs of contamination.
How long does it take for mushrooms to grow in a bowl?
The time it takes for mushrooms to grow in a bowl depends on several factors, including the type of mushroom, the temperature, and the humidity. Generally, oyster mushrooms will begin to fruit within 2-3 weeks of inoculation. Shiitake mushrooms may take longer, typically 4-6 weeks. Keep the bowl in a location with consistent temperature and high humidity to encourage faster growth. Mist the substrate regularly to maintain moisture levels.
How do I know when the mushrooms are ready to harvest?
Mushrooms are typically ready to harvest when the caps have fully expanded but before they begin to release spores. For oyster mushrooms, this is when the edges of the caps start to flatten out or curl upwards. For shiitake mushrooms, the caps should be firm and slightly curved downwards. To harvest, simply twist or cut the mushrooms off at the base of the stem.
How do I maintain humidity in the mushroom bowl?
Maintaining adequate humidity is crucial for successful mushroom cultivation. You can increase humidity by misting the substrate regularly with water. You can also cover the bowl with a clear plastic bag or dome to trap moisture. Be sure to leave some ventilation to prevent the buildup of excess moisture, which can lead to mold growth. A humidity sensor can help you monitor the humidity levels inside the bowl.
What if my mushroom bowl gets moldy?
Mold contamination is a common problem in mushroom cultivation. If you notice mold growing in your mushroom bowl, it’s important to take action immediately. Remove any affected areas of the substrate and spray the remaining substrate with a diluted hydrogen peroxide solution. Increase ventilation to reduce humidity levels. If the mold infestation is severe, it may be necessary to discard the entire bowl and start over. To prevent mold contamination, always use pasteurized substrate and maintain good hygiene practices.
Can I reuse the substrate after harvesting mushrooms?
After harvesting a flush of mushrooms, the substrate will be depleted of nutrients. However, you can often get multiple flushes of mushrooms from the same substrate. To encourage a second flush, soak the substrate in water for a few hours and then drain it thoroughly. Place the bowl back in its growing location and continue to maintain humidity and temperature. If you don’t get a second flush, or if the substrate becomes contaminated with mold, it’s best to discard it and start with fresh substrate.
Is it safe to eat mushrooms grown in a bowl?
Yes, it is generally safe to eat mushrooms grown in a bowl, provided that you have used a reputable source of spawn and followed proper hygiene practices. However, it’s important to be able to identify the mushrooms you are growing and to ensure that they are not contaminated with mold or bacteria. If you are unsure about the safety of your mushrooms, it’s best to err on the side of caution and discard them. Always cook mushrooms thoroughly before eating them.
Leave a Comment